文章目录
问题描述
- 了解如何使用系统服务
- 了解系统服务使用的基本原理
- 了解服务的注册过程
概述
如果一个客户端想使用一个系统服务,就要考虑如何让客户端调用方便,如何开放出去,并且如何跨进程的交互(也就是要拿到服务的 binder)。那么怎么拿到 binder 就是服务需要注册到一个固定的地方,就是 ServiceManager ,这样 Client 需要使用的时候可以根据名称去 ServiceManager 查询就可以了。
如何使用系统服务
- 我们以前使用一些系统服务的时候一般会调用 Context 的 getSystemService 方法,传入服务名。
    @Override
    public Object getSystemService(String name) {


        // 		...
        return SystemServiceRegistry.getSystemService(this, name);
    }
 public static Object getSystemService(ContextImpl ctx, String name) {


        if (name == null) {


            return null;
        }
        final ServiceFetcher<?> fetcher = SYSTEM_SERVICE_FETCHERS.get(name);
        if (fetcher == null) {


            // 。。。
            return null;
        }
        final Object ret = fetcher.getService(ctx);
        // 。。。
        return ret;
    }
其中 SYSTEM_SERVICE_FETCHERS 是一个 HashMap,也就是根据服务名称去fetcher里查找对应的服务
private static final Map<String, ServiceFetcher<?>> SYSTEM_SERVICE_FETCHERS =
            new ArrayMap<String, ServiceFetcher<?>>();
那么ServiceFetcher 是如何获取的 service 的
public final T getService(ContextImpl ctx) {


			// 首先在Context里先有一个缓存 它是一个数组。所以 Context 有几个缓存就有几个
			final Object[] cache = ctx.mServiceCache;
			T ret = null;
			synchronized (cache) {


                    // Return it if we already have a cached instance.
                    T service = (T) cache[mCacheIndex];
                    if (service != null || gates[mCacheIndex] == ContextImpl.STATE_NOT_FOUND) {


                        ret = service;
                        break; // exit the for (;;)
                    }

					// ... 略
					// 如果 service == null 会 createService()
					T service = null;
                    @ServiceInitializationState int newState = ContextImpl.STATE_NOT_FOUND;
                    try {


                        // 创建
                        service = createService(ctx);
                        newState = ContextImpl.STATE_READY;

                    } catch (ServiceNotFoundException e) {


                        onServiceNotFound(e);

                    } finally {


                        synchronized (cache) {


                        // 然后在加入缓存
                            cache[mCacheIndex] = service;
                            gates[mCacheIndex] = newState;
                            cache.notifyAll();
                        }
                    }
                    ret = service;

            }
            return ret;
}
- createService() 随便找几个 createService 的实现如下:
    registerService(Context.NSD_SERVICE, NsdManager.class,
                new CachedServiceFetcher<NsdManager>() {


            @Override
            public NsdManager createService(ContextImpl ctx) throws ServiceNotFoundException {


                IBinder b = ServiceManager.getServiceOrThrow(Context.NSD_SERVICE);
                INsdManager service = INsdManager.Stub.asInterface(b);
                return new NsdManager(ctx.getOuterContext(), service);
            }});

        registerService(Context.POWER_SERVICE, PowerManager.class,
                new CachedServiceFetcher<PowerManager>() {


            @Override
            public PowerManager createService(ContextImpl ctx) throws ServiceNotFoundException {


            	// 通过  Context.POWER_SERVIC 拿到 IBinder 对象,其实就是 Binder代理对象,
                IBinder powerBinder = ServiceManager.getServiceOrThrow(Context.POWER_SERVICE);
                // 获取封装好的 IPowerManager 对象
                IPowerManager powerService = IPowerManager.Stub.asInterface(powerBinder);
                IBinder thermalBinder = ServiceManager.getServiceOrThrow(Context.THERMAL_SERVICE);
                IThermalService thermalService = IThermalService.Stub.asInterface(thermalBinder);
                // 最后又封装了一层 PowerManager 对象返回
                return new PowerManager(ctx.getOuterContext(), powerService, thermalService,
                        ctx.mMainThread.getHandler());
            }});
接下来是 ServiceManager.getServiceOrThrow(Context.POWER_SERVICE); 代码如下,其中调用了 getService()
    public static IBinder getServiceOrThrow(String name) throws ServiceNotFoundException {


        final IBinder binder = getService(name);
        if (binder != null) {


            return binder;
        } else {


            throw new ServiceNotFoundException(name);
        }
    }
    public static IBinder getService(String name) {


        try {


        // 典型的缓存机制 sCache 就是 HashMap() 但是后面创建了之后没有添加 Cache 的调用,说明只是初始化的时候预加载了一些 cache进去
            IBinder service = sCache.get(name);
            if (service != null) {


                return service;
            } else {


            // 没有查到就通过下面创建
                return Binder.allowBlocking(rawGetService(name));
            }
        } catch (RemoteException e) {


            Log.e(TAG, "error in getService", e);
        }
        return null;
    }
如何注册系统服务
ServiceManager 中的下面代码注册
    public static void addService(String name, IBinder service, boolean allowIsolated,
            int dumpPriority) {


        try {


            getIServiceManager().addService(name, service, allowIsolated, dumpPriority);
        } catch (RemoteException e) {


            Log.e(TAG, "error in addService", e);
        }
    }
再往下就是以前会调用到跨进程的服务了
frameworks/native/cmds/servicemanager/
什么时候注册的系统服务
SystemServer启动大概分为几步:启动 Binder 机制,启动各类服务,进入 Loop 循环。也有一部分服务是开启的服务。
无论是在 SystemServer 启动的服务,还是单独开启的服务,都需要向 ServiceManager 注册服务,这样才能被其他客户端使用
- surfaceflinger 为例:在surfaceflinger入口函数 main 中
int main(int, char**) {


	// ProcessState 构造函数会启动 binder 机制
	// 映射内存分配缓冲区等等
    sp<ProcessState> ps(ProcessState::self());
    //  启动 binder 线程池
    ps->startThreadPool();
	// 创建核心对象
    sp<SurfaceFlinger> flinger = new SurfaceFlinger();
    // initialize before clients can connect 进行初始化
    flinger->init();
	 // 拿到 ServiceManager 句柄
    sp<IServiceManager> sm(defaultServiceManager());
    // 然后注册到 sm 中
    sm->addService(String16(SurfaceFlinger::getServiceName()), flinger, false,
                   IServiceManager::DUMP_FLAG_PRIORITY_CRITICAL | IServiceManager::DUMP_FLAG_PROTO);
	// run surface flinger in this thread
	// 进入循环了
    flinger->run();
    return 0;
}
- 下面是 defaultServiceManager() 函数
sp<IServiceManager> defaultServiceManager()
{


	// 不等于 null 直接返回
    if (gDefaultServiceManager != NULL) return gDefaultServiceManager;

    {


        AutoMutex _l(gDefaultServiceManagerLock);
        while (gDefaultServiceManager == NULL) {


            gDefaultServiceManager = interface_cast<IServiceManager>(
            // 通过 getContextObject() 获取的 bpBinder 返回封装成 IServiceManager 返回给上层
                ProcessState::self()->getContextObject(NULL));
                // 如果为 null Sleep 1 再 While 循环直到等到创建为止 (为什么可能为null,因为如果是单独的进程 可能和 ServiceManager 一样由 init 调用,有可能 ServiceManager还未注册到binder驱动就可能失败。)
            if (gDefaultServiceManager == NULL)
                sleep(1);
        }
    }

    return gDefaultServiceManager;
}
- getContextObject() 就是 通过 getStrongProxyForHandle 参数为0
sp<IBinder> ProcessState::getContextObject(const sp<IBinder>& /*caller*/)
{


    return getStrongProxyForHandle(0);
}
- 上面方法参数为 0 走下面的代码,实际上最后创建的是 BpBinder
BpBinder 就是 Binder的引用对象:Binder 引用对象是 Binder 实体对象在客户进程的代表
sp<IBinder> ProcessState::getStrongProxyForHandle(int32_t handle)
{


    sp<IBinder> result;

    AutoMutex _l(mLock);

    handle_entry* e = lookupHandleLocked(handle);

    if (e != NULL) {


        IBinder* b = e->binder;
        if (b == NULL || !e->refs->attemptIncWeak(this)) {


            if (handle == 0) {


                Parcel data;
                status_t status = IPCThreadState::self()->transact(
                        0, IBinder::PING_TRANSACTION, data, NULL, 0);
                if (status == DEAD_OBJECT)
                   return NULL;
            }

            b = BpBinder::create(handle);
            e->binder = b;
            if (b) e->refs = b->getWeakRefs();
            result = b;
        } else {


            // This little bit of nastyness is to allow us to add a primary
            // reference to the remote proxy when this team doesn't have one
            // but another team is sending the handle to us.
            result.force_set(b);
            e->refs->decWeak(this);
        }
    }

    return result;
}
如何启动 binder 机制
- 打开 binder 驱动
open_driver(“/dev/binder”)
- 映射内存,分配缓存区
mmap(0, BINDER_VM_SIZE, PROT_READ, MAP_PRIVATE | MAP_NORESERVE, mDriverFD, 0);
- 启动 binder 线程,进入 binder loop
总结:如何添加系统服务
首先系统服务和应用服务是有区别的
- 添加系统服务的时机
如果是跑在 SystemServer 中,那么就在SystemServer初始化的时候添加到启动系统服务中
如果是跑在单独进程中,则需要在 init.rc 中添加一下配置,然后要有自己的 main 函数
- 服务端要做哪些准备
启动 binder 机制以配合跨进程的通信
做自己的工作
注册到 ServiceManager 中,以方便其他进程获取服务。
- 应用端要做哪些事
为了通过 context.getSystemService(“”)获取服务,则需要注册一个 ServiceFetcher ,
- 其他还应该考虑一些安全配置等问题。
系统服务和binder应用服务有什么区别?
它们在启动方式上有什么区别?
- 系统服务的启动大多都是启动在SystemServer 中,在其 run() 方法中有如下代码用来启动各种服务,里面包括了 AMS、WMS、PMS等,上面也有介绍
// Start services. 启动所有的 Java service
        try {


            traceBeginAndSlog("StartServices");
            startBootstrapServices();
            startCoreServices();
            startOtherServices();
            SystemServerInitThreadPool.shutdown();
        } catch (Throwable ex) {


            Slog.e("System", "******************************************");
            Slog.e("System", "************ Failure starting system services", ex);
            throw ex;
        } finally {


            traceEnd();
        }
基本上服务的启动,就是做一些准备工作,切换线程池,准备binder,初始化工作,等。上面也介绍了还有一种是单独进程的启动要复杂一点。
- 应用服务的启动
无论是 startService 还是 bindService 都是有应用端发起的,正常启动都会走到下面的代码
    private ComponentName startServiceCommon(Intent service, boolean requireForeground,
            UserHandle user) {


        try {


            validateServiceIntent(service);
            service.prepareToLeaveProcess(this);
            ComponentName cn = ActivityManager.getService().startService(
                    mMainThread.getApplicationThread(), service,
                    service.resolveTypeIfNeeded(getContentResolver()), requireForeground,
                    getOpPackageName(), getAttributionTag(), user.getIdentifier());

            return cn;
        } catch (RemoteException e) {


            throw e.rethrowFromSystemServer();
        }
    }
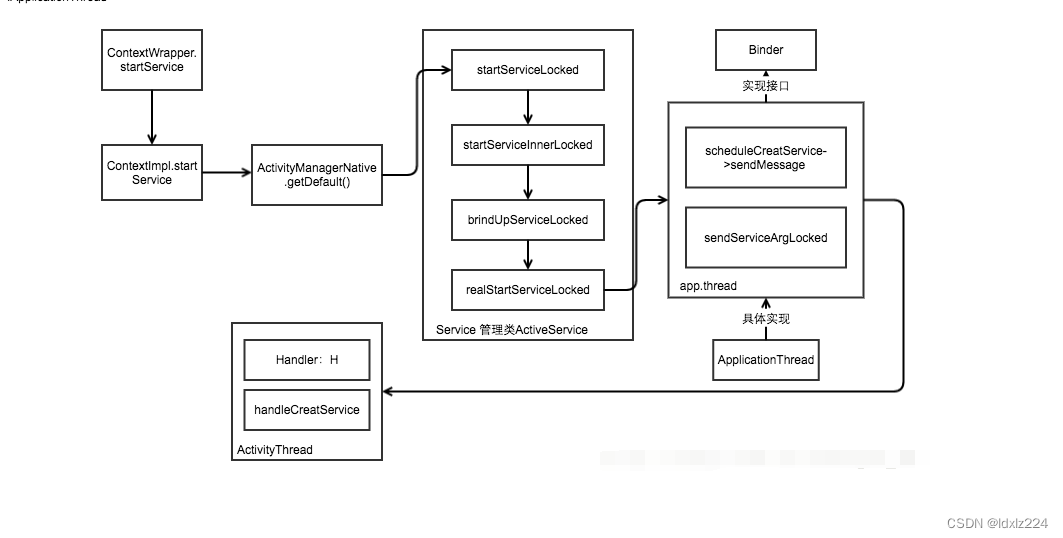
启动服务都会调用到 AMS 的 startService 方法,最终通过一系列调用,回调到 ActivityThread 的 handleCreateService() 函数中。
private void handleCreateService(CreateServiceData data) {


       // 。。。
        Service service = null;
        try {


            ContextImpl context = ContextImpl.createAppContext(this, packageInfo);
            Application app = packageInfo.makeApplication(false, mInstrumentation);
            // 通过 ClassLoader 加载 Service 类,构造 Service对象
            java.lang.ClassLoader cl = packageInfo.getClassLoader();
            service = packageInfo.getAppFactory()
                    .instantiateService(cl, data.info.name, data.intent);
            // Service resources must be initialized with the same loaders as the application
            // context.
            context.getResources().addLoaders(
                    app.getResources().getLoaders().toArray(new ResourcesLoader[0]));
			// 给 Service 赋予上下文
            context.setOuterContext(service);
            // 执行生命周期
            service.attach(context, this, data.info.name, data.token, app,
                    ActivityManager.getService());
            service.onCreate();
            mServices.put(data.token, service);
            try {


                ActivityManager.getService().serviceDoneExecuting(
                        data.token, SERVICE_DONE_EXECUTING_ANON, 0, 0);
            } catch (RemoteException e) {


                throw e.rethrowFromSystemServer();
            }
        } catch (Exception e) {


        }
    }
网上找了一张图借用一下
它们在注册方式上有什么区别?
- 系统服务的注册上面已经介绍了很清楚的流程了,注意的就是只有 系统服务才能注册到 ServiceManager
- 应用服务的注册流程大概如下(网络盗图)
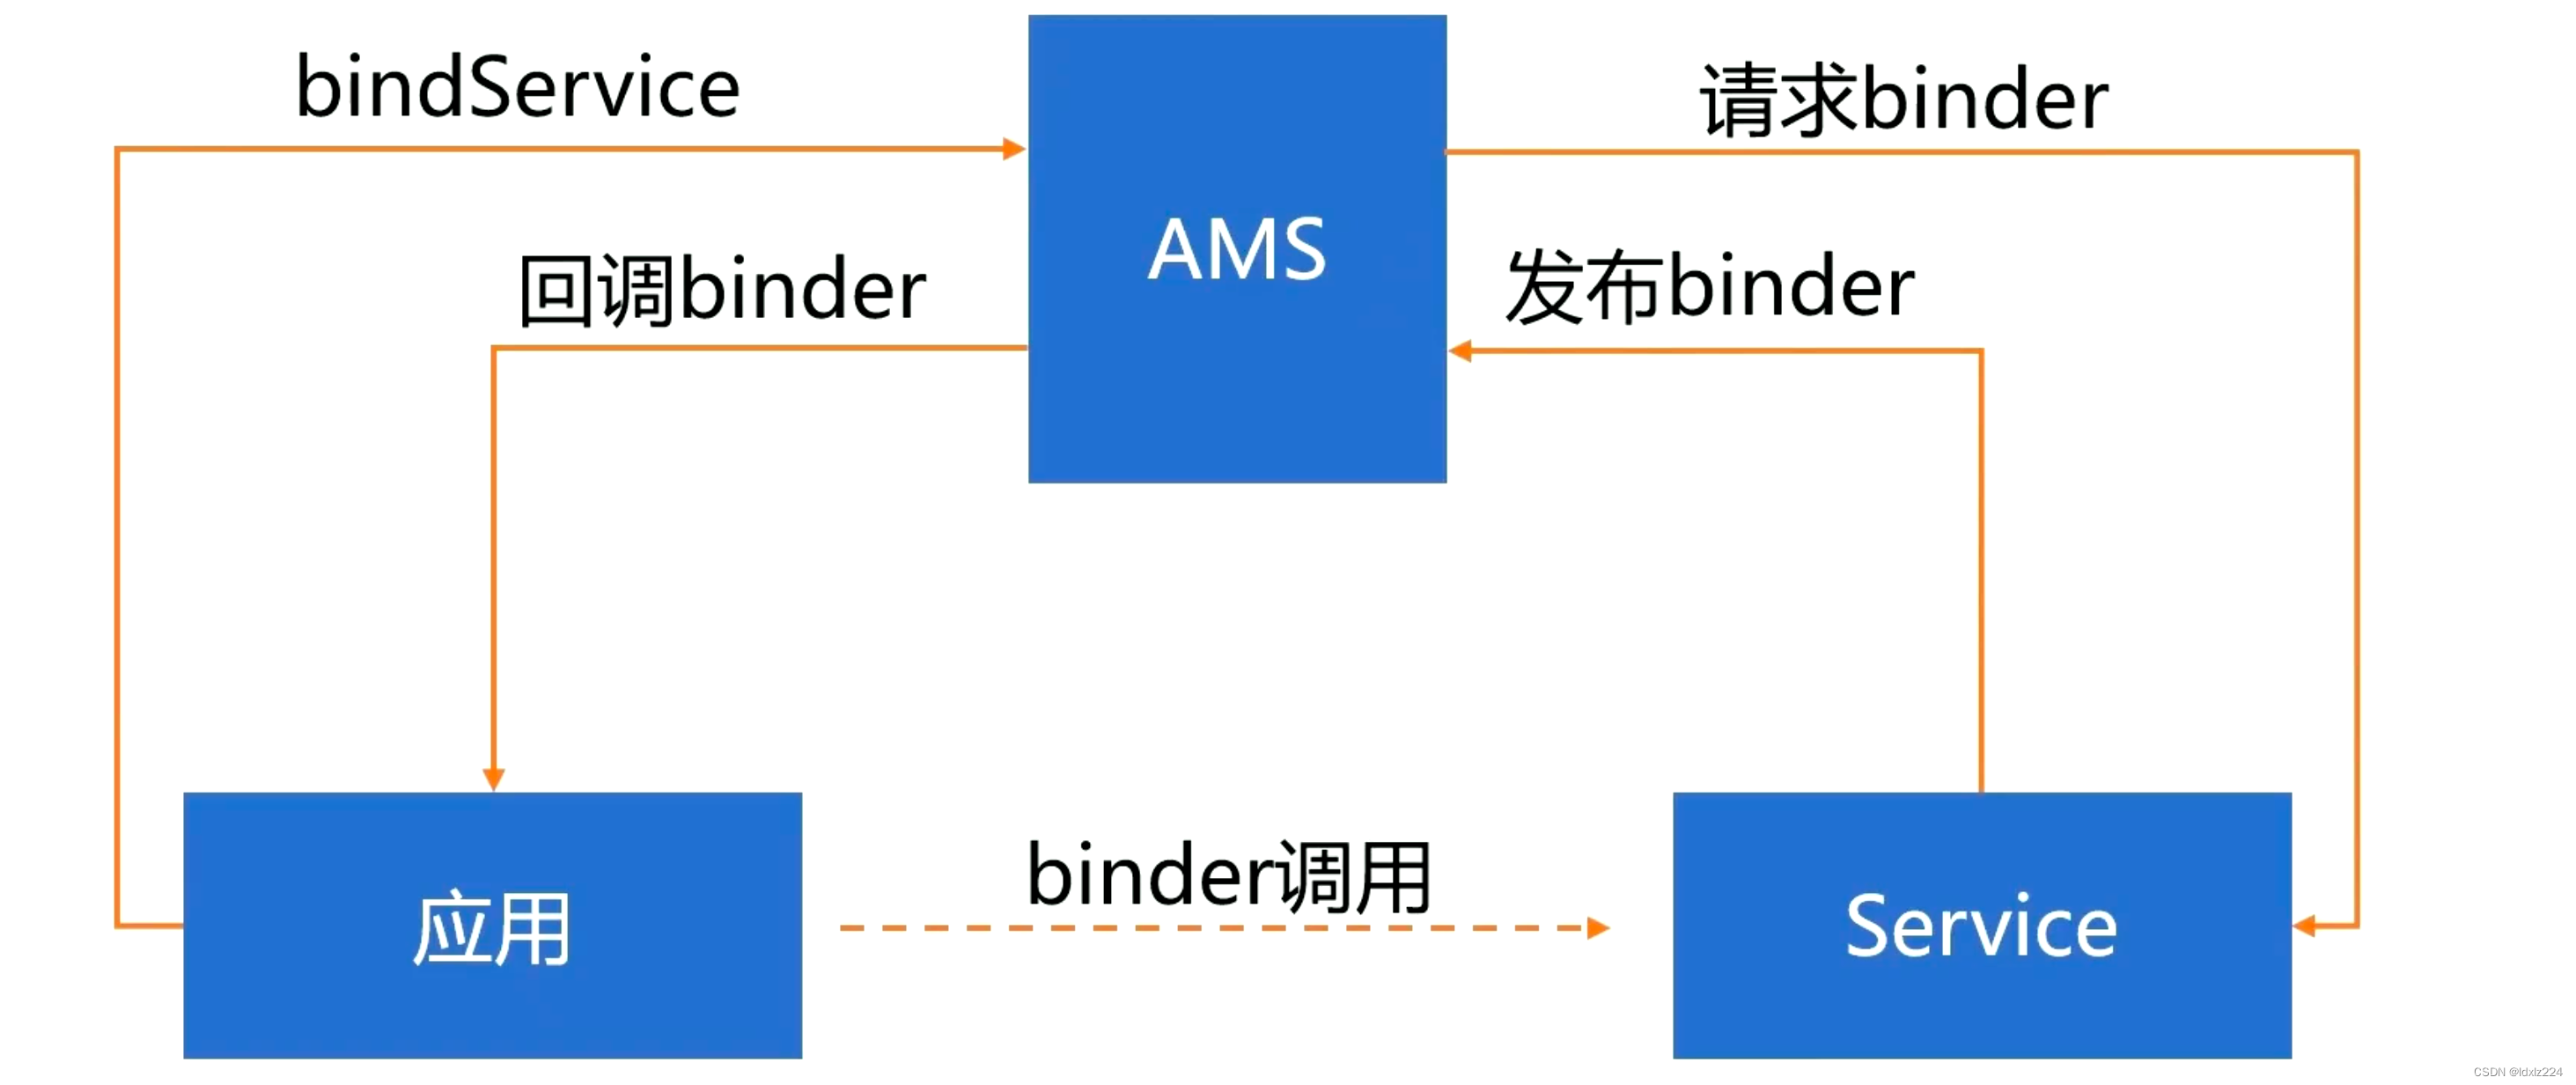
首先由应用端发起的 bindService 调用,发送到 AMS,如果注册过 AMS会直接回调 binder 给应用,如果未注册过则请求binder对象,service 就会响应请求,然后发布binder给AMS ,再回调到应用。
应用注册不想系统服务注册那样是启动时主动注册一个服务,而是需要应用主动去调用,Service被动发布binder的情形。
它们在使用方式上有什么区别?
- 系统服务的使用,还是借用上面用过的代码
// 通过 Context.getSystemService(“服务名称”)  然后走下面代码
        registerService(Context.POWER_SERVICE, PowerManager.class,
                new CachedServiceFetcher<PowerManager>() {


            @Override
            public PowerManager createService(ContextImpl ctx) throws ServiceNotFoundException {


            	// 通过  Context.POWER_SERVIC 拿到 IBinder 对象,其实就是 Binder代理对象,
                IBinder powerBinder = ServiceManager.getServiceOrThrow(Context.POWER_SERVICE);
                // 获取封装好的 IPowerManager 对象
                IPowerManager powerService = IPowerManager.Stub.asInterface(powerBinder);
                IBinder thermalBinder = ServiceManager.getServiceOrThrow(Context.THERMAL_SERVICE);
                IThermalService thermalService = IThermalService.Stub.asInterface(thermalBinder);
                // 最后又封装了一层 PowerManager 对象返回
                return new PowerManager(ctx.getOuterContext(), powerService, thermalService,
                        ctx.mMainThread.getHandler());
            }});
- 应用服务的使用
private ServiceConnection conn = new ServiceConnection() {


        @Override
        public void onServiceConnected(ComponentName name, IBinder service) {


            iPersonAidlInterface = IPersonAidlInterface.Stub.asInterface(service);

        }

        @Override
        public void onServiceDisconnected(ComponentName name) {


        }
    };
bindService(intent,conn,BIND_AUTO_CREATE)
通过 bindService 像AMS发送绑定服务的请求,AMS通过 onServiceConnected 的回调把服务的 binder 对象返回给应用端,然后通过 asInterface 封装成业务接口对象,之后就可以通过业务对象发起调用了。