WebSocket–入门
公司领导提出了一个新的需求,那就是部门主管在有审批消息的情况下,需要看到提示消息。其实这种需求最简单的方法使接入短信、邮件、公众号平台。直接推送消息。但是,由于使自研项目,公司领导不想花钱,只能另辟蹊径。
WebSocket简介
WebSocket协议是基于TCP的一种新的网络协议。它实现了浏览器与服务器全双工(full-duplex)通信,即允许服务器主动发送信息给客户端。因此,在WebSocket中,浏览器和服务器只需要完成一次握手,两者之间就直接可以创建持久性的连接,并进行双向数据传输,客户端和服务器之间的数据交换变得更加简单。
WebSocket-实现后端推送消息给前端
依赖导入
<!-- 该依赖包含 SpringBoot starer 无需重复导入 -->
<dependency>
    <groupId>org.springframework.boot</groupId>
    <artifactId>spring-boot-starter-websocket</artifactId>
    <version>2.7.0</version>
</dependency>
<!-- 除此之外我们还需要lombok 和 fastjson -->
<!-- 这里就不导入了 -->
代码实现
WebSocketConfig
import org.springframework.context.annotation.Bean;
import org.springframework.context.annotation.Configuration;
import org.springframework.web.socket.server.standard.ServerEndpointExporter;

@Configuration
public class WebSocketConfig {


    @Bean
    public ServerEndpointExporter serverEndpointExporter() {


        return new ServerEndpointExporter();
    }
}
WebSocketMessage–封装的消息结果类(非必须)
import lombok.Data;

@Data
public class NoticeWebsocketResp<T> {


    private String noticeType;

    private T noticeInfo;

}
WebSocketServer
import com.alibaba.fastjson.JSONObject;
import com.mydemo.websocketdemo.domain.NoticeWebsocketResp;
import lombok.extern.slf4j.Slf4j;
import org.springframework.stereotype.Component;
import org.springframework.util.StringUtils;
import javax.websocket.*;
import javax.websocket.server.PathParam;
import javax.websocket.server.ServerEndpoint;
import java.io.IOException;
import java.util.*;
import java.util.concurrent.ConcurrentHashMap;


@ServerEndpoint("/notice/{userId}")
@Component
@Slf4j
public class NoticeWebsocket {


    //记录连接的客户端
    public static Map<String, Session> clients = new ConcurrentHashMap<>();

    /**
     * userId关联sid(解决同一用户id,在多个web端连接的问题)
     */
    public static Map<String, Set<String>> conns = new ConcurrentHashMap<>();

    private String sid = null;

    private String userId;


    /**
     * 连接成功后调用的方法
     * @param session
     * @param userId
     */
    @OnOpen
    public void onOpen(Session session, @PathParam("userId") String userId) {


        this.sid = UUID.randomUUID().toString();
        this.userId = userId;
        clients.put(this.sid, session);

        Set<String> clientSet = conns.get(userId);
        if (clientSet==null){


            clientSet = new HashSet<>();
            conns.put(userId,clientSet);
        }
        clientSet.add(this.sid);
        log.info(this.sid + "连接开启!");
    }

    /**
     * 连接关闭调用的方法
     */
    @OnClose
    public void onClose() {


        log.info(this.sid + "连接断开!");
        clients.remove(this.sid);
    }

    /**
     * 判断是否连接的方法
     * @return
     */
    public static boolean isServerClose() {


        if (NoticeWebsocket.clients.values().size() == 0) {


            log.info("已断开");
            return true;
        }else {


            log.info("已连接");
            return false;
        }
    }

    /**
     * 发送给所有用户
     * @param noticeType
     */
    public static void sendMessage(String noticeType){


        NoticeWebsocketResp noticeWebsocketResp = new NoticeWebsocketResp();
        noticeWebsocketResp.setNoticeType(noticeType);
        sendMessage(noticeWebsocketResp);
    }


    /**
     * 发送给所有用户
     * @param noticeWebsocketResp
     */
    public static void sendMessage(NoticeWebsocketResp noticeWebsocketResp){


        String message = JSONObject.toJSONString(noticeWebsocketResp);
        for (Session session1 : NoticeWebsocket.clients.values()) {


            try {


                session1.getBasicRemote().sendText(message);
            } catch (IOException e) {


                e.printStackTrace();
            }
        }
    }

    /**
     * 根据用户id发送给某一个用户
     * **/
    public static void sendMessageByUserId(String userId, NoticeWebsocketResp noticeWebsocketResp) {


        if (!StringUtils.isEmpty(userId)) {


            String message = JSONObject.toJSONString(noticeWebsocketResp);
            Set<String> clientSet = conns.get(userId);
            if (clientSet != null) {


                Iterator<String> iterator = clientSet.iterator();
                while (iterator.hasNext()) {


                    String sid = iterator.next();
                    Session session = clients.get(sid);
                    if (session != null) {


                        try {


                            session.getBasicRemote().sendText(message);
                        } catch (IOException e) {


                            e.printStackTrace();
                        }
                    }
                }
            }
        }
    }

    /**
     * 收到客户端消息后调用的方法
     * @param message
     * @param session
     */
    @OnMessage
    public void onMessage(String message, Session session) {


        log.info("收到来自窗口"+this.userId+"的信息:"+message);
    }

    /**
     * 发生错误时的回调函数
     * @param error
     */
    @OnError
    public void onError(Throwable error) {


        error.printStackTrace();
    }

}
这样我们就配置好了websocket
测试准备
访问接口–当请求该接口时,主动推送消息
import com.mydemo.websocketdemo.domain.NoticeWebsocketResp;
import com.mydemo.websocketdemo.websocketserver.NoticeWebsocket;
import org.springframework.web.bind.annotation.GetMapping;
import org.springframework.web.bind.annotation.RequestMapping;
import org.springframework.web.bind.annotation.RestController;

@RestController
@RequestMapping("/order")
public class OrderController {


    @GetMapping("/test")
    public String test() {


        NoticeWebsocket.sendMessage("你好,WebSocket");
        return "ok";
    }

    @GetMapping("/test1")
    public String test1() {


        NoticeWebsocketResp noticeWebsocketResp = new NoticeWebsocketResp();
        noticeWebsocketResp.setNoticeInfo("米奇妙妙屋");
        NoticeWebsocket.sendMessageByUserId("1", noticeWebsocketResp);
        return "ok";
    }
}
springboot启动类
import org.springframework.boot.SpringApplication;
import org.springframework.boot.autoconfigure.SpringBootApplication;

@SpringBootApplication
public class WebSocketApplication {


    public static void main(String[] args) {


        SpringApplication.run(WebSocketApplication.class,args);
    }
}
前端测试页面
<!DOCTYPE html>
<html lang="en">
<head>
    <meta charset="UTF-8">
    <title>SseEmitter</title>
</head>
<body>
<div id="message"></div>
</body>
<script>
var limitConnect = 0;
init();
function init() {


// 8080未默认端口,可自行替换
var ws = new WebSocket('ws://localhost:8080/notice/2');
// 获取连接状态
console.log('ws连接状态:' + ws.readyState);
//监听是否连接成功
ws.onopen = function () {


    console.log('ws连接状态:' + ws.readyState);
    limitConnect = 0;
    //连接成功则发送一个数据
    ws.send('我们建立连接啦');
}
// 接听服务器发回的信息并处理展示
ws.onmessage = function (data) {


    console.log('接收到来自服务器的消息:');
    console.log(data);
    //完成通信后关闭WebSocket连接
    // ws.close();
}
// 监听连接关闭事件
ws.onclose = function () {


    // 监听整个过程中websocket的状态
    console.log('ws连接状态:' + ws.readyState);
reconnect();

}
// 监听并处理error事件
ws.onerror = function (error) {


    console.log(error);
}
}
function reconnect() {


    limitConnect ++;
    console.log("重连第" + limitConnect + "次");
    setTimeout(function(){


        init();
    },2000);

}
</script>
</html>
之后用浏览器打开html页面,显示如下:
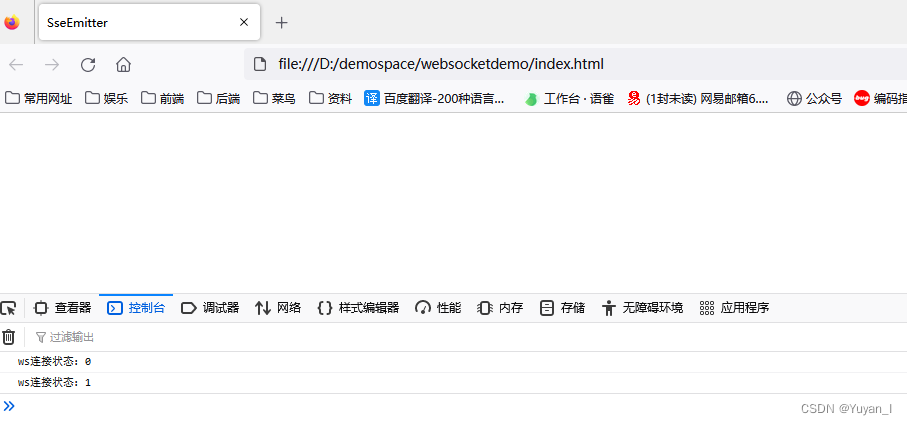
连接成功
调用接口
localhost:8080/order/test
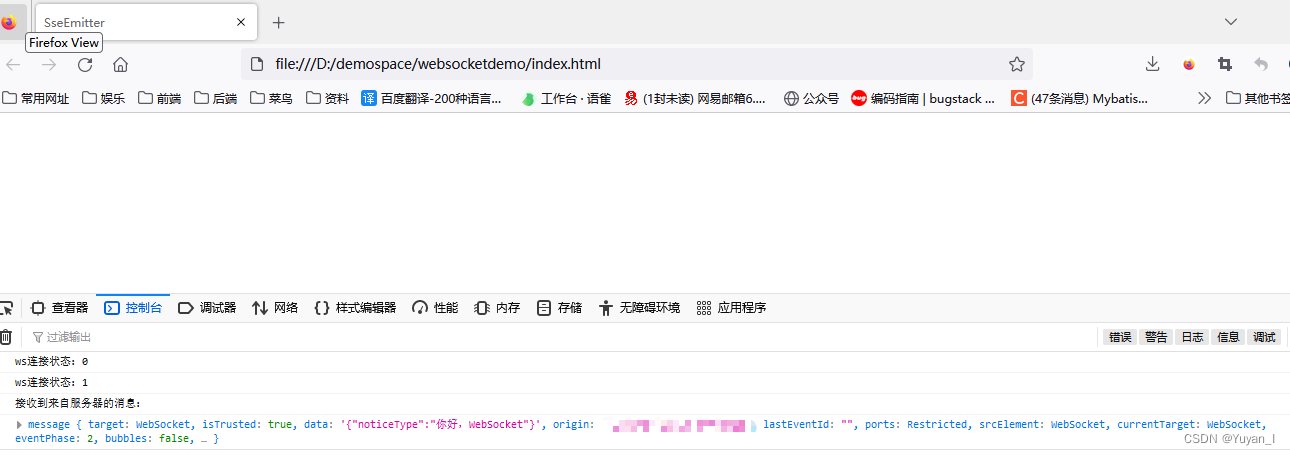
证明后端推送消息给前端成功