安装 Django
在应用程序开发中,分别创建env文件夹和wordspace文件夹。
env文件夹用于存放创建的虚拟环境,wordspace用于存放项目代码,至此实现虚拟环境和应用程序代码的分隔。
步骤1:创建文件夹,创建命令为mkdir env和 mkdir wordspace。

步骤2:安装 virtualenv库。创建命令为pip install virtualenv。
步骤3:切换到env文件夹并挪创建虚拟环境的命令。创建命令为virtualenv --no-site-pack-ages -p C:\Users\a-xiaobodou\AppData\Local\Programs\Python\Python310\python.exe study_env。

文件:

检查virtualenv的帮助,创建命令为:virtualenv --help
PS C:\Users\a-xiaobodou\OneDrive - Microsoft\Projects\Python\env> virtualenv --help
usage: virtualenv [--version] [--with-traceback] [-v | -q] [--read-only-app-data] [--app-data APP_DATA] [--reset-app-data] [--upgrade-embed-wheels] [--discovery {builtin}] [-p py] [--try-first-with py_exe]
                  [--creator {builtin,cpython3-win,venv}] [--seeder {app-data,pip}] [--no-seed] [--activators comma_sep_list] [--clear] [--no-vcs-ignore] [--system-site-packages] [--copies] [--no-download | --download]
                  [--extra-search-dir d [d ...]] [--pip version] [--setuptools version] [--wheel version] [--no-pip] [--no-setuptools] [--no-wheel] [--no-periodic-update] [--symlink-app-data] [--prompt prompt] [-h]
                  dest

options:
  --version                     display the version of the virtualenv package and its location, then exit
  --with-traceback              on failure also display the stacktrace internals of virtualenv (default: False)
  --read-only-app-data          use app data folder in read-only mode (write operations will fail with error) (default: False)
  --app-data APP_DATA           a data folder used as cache by the virtualenv (default: C:\Users\a-xiaobodou\AppData\Local\pypa\virtualenv)
  --reset-app-data              start with empty app data folder (default: False)
  --upgrade-embed-wheels        trigger a manual update of the embedded wheels (default: False)
  -h, --help                    show this help message and exit

verbosity:
  verbosity = verbose - quiet, default INFO, mapping => CRITICAL=0, ERROR=1, WARNING=2, INFO=3, DEBUG=4, NOTSET=5

  -v, --verbose                 increase verbosity (default: 2)
  -q, --quiet                   decrease verbosity (default: 0)

discovery:
  discover and provide a target interpreter

  --discovery {builtin}         interpreter discovery method (default: builtin)
  -p py, --python py            interpreter based on what to create environment (path/identifier) - by default use the interpreter where the tool is installed - first found wins (default: [])
  --try-first-with py_exe       try first these interpreters before starting the discovery (default: [])

creator:
  options for creator builtin

  --creator {builtin,cpython3-win,venv}
                                create environment via (builtin = cpython3-win) (default: builtin)
  dest                          directory to create virtualenv at
  --clear                       remove the destination directory if exist before starting (will overwrite files otherwise) (default: False)
  --no-vcs-ignore               don't create VCS ignore directive in the destination directory (default: False)
  --system-site-packages        give the virtual environment access to the system site-packages dir (default: False)
  --copies, --always-copy       try to use copies rather than symlinks, even when symlinks are the default for the platform (default: True)

seeder:
  options for seeder app-data

  --seeder {app-data,pip}       seed packages install method (default: app-data)
  --no-seed, --without-pip      do not install seed packages (default: False)
  --no-download, --never-download
                                pass to disable download of the latest pip/setuptools/wheel from PyPI (default: True)
  --download                    pass to enable download of the latest pip/setuptools/wheel from PyPI (default: False)
  --extra-search-dir d [d ...]  a path containing wheels to extend the internal wheel list (can be set 1+ times) (default: [])
  --pip version                 version of pip to install as seed: embed, bundle or exact version (default: bundle)
  --setuptools version          version of setuptools to install as seed: embed, bundle or exact version (default: bundle)
  --wheel version               version of wheel to install as seed: embed, bundle or exact version (default: bundle)
  --no-pip                      do not install pip (default: False)
  --no-setuptools               do not install setuptools (default: False)
  --no-wheel                    do not install wheel (default: False)
  --no-periodic-update          disable the periodic (once every 14 days) update of the embedded wheels (default: False)
  --symlink-app-data            not supported - symlink the python packages from the app-data folder (requires seed pip>=19.3) (default: False)

activators:
  options for activation scripts

  --activators comma_sep_list   activators to generate - default is all supported (default: bash,batch,fish,nushell,powershell,python)
  --prompt prompt               provides an alternative prompt prefix for this environment (value of . means name of the current working directory) (default: None)

config file C:\Users\a-xiaobodou\AppData\Local\pypa\virtualenv\virtualenv.ini missing (change via env var VIRTUALENV_CONFIG_FILE)
PS C:\Users\a-xiaobodou\OneDrive - Microsoft\Projects\Python\env>
创建命令为:virtualenv -p C:\Users\a-xiaobodou\AppData\Local\Programs\Python\Python310\python.exe study_env
PS C:\Users\a-xiaobodou\OneDrive - Microsoft\Projects\Python\env> virtualenv -p C:\Users\a-xiaobodou\AppData\Local\Programs\Python\Python310\python.exe study_env
created virtual environment CPython3.10.7.final.0-64 in 7284ms
  creator CPython3Windows(dest=C:\Users\a-xiaobodou\OneDrive - Microsoft\Projects\Python\env\study_env, clear=False, no_vcs_ignore=False, global=False)
  seeder FromAppData(download=False, pip=bundle, setuptools=bundle, wheel=bundle, via=copy, app_data_dir=C:\Users\a-xiaobodou\AppData\Local\pypa\virtualenv)
    added seed packages: pip==22.3.1, setuptools==65.6.3, wheel==0.38.4
  activators BashActivator,BatchActivator,FishActivator,NushellActivator,PowerShellActivator,PythonActivator
PS C:\Users\a-xiaobodou\OneDrive - Microsoft\Projects\Python\env>
文件:

步骤3:激活虚拟环境。进入虚拟环境“study_env/Scripts”文件夹并执行activate命令,即可激活当前虚拟环境study_env。

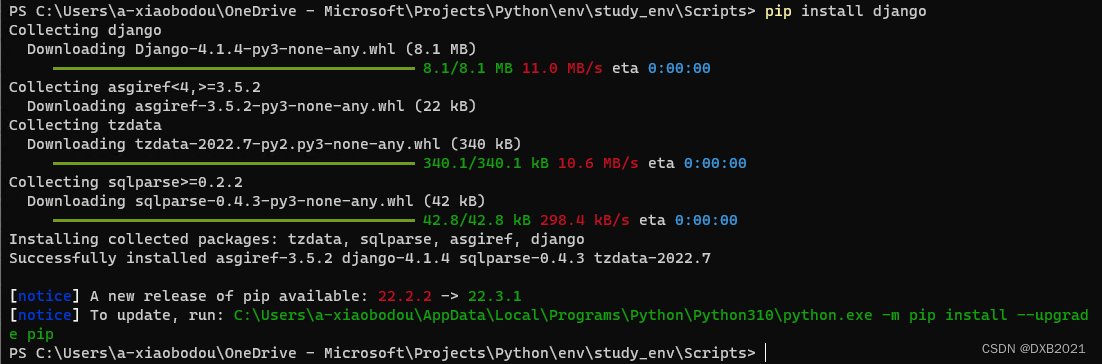
步骤4:安装Djiango。安装命令为pip install django。
步骤5:检查 Djiango是否能正常使用。
PS C:\Users\a-xiaobodou\OneDrive - Microsoft\Projects\Python\env\study_env\Scripts> python
Python 3.10.7 (tags/v3.10.7:6cc6b13, Sep  5 2022, 14:08:36) [MSC v.1933 64 bit (AMD64)] on win32
Type "help", "copyright", "credits" or "license" for more information.
>>> import django
>>> django.VERSION
(4, 1, 4, 'final', 0)
>>>
步骤三,解决了。需要作为管理员。

步骤四:

文件:
命令行:
Microsoft Windows [Version 10.0.22000.1219]
(c) Microsoft Corporation. All rights reserved.

C:\Windows\system32>cd C:\Users\a-xiaobodou\OneDrive - Microsoft\Projects\Python\env\study_env\Scripts

C:\Users\a-xiaobodou\OneDrive - Microsoft\Projects\Python\env\study_env\Scripts>activate study_env

(study_env) C:\Users\a-xiaobodou\OneDrive - Microsoft\Projects\Python\env\study_env\Scripts>pip install django
Collecting django
  Using cached Django-4.1.4-py3-none-any.whl (8.1 MB)
Collecting sqlparse>=0.2.2
  Using cached sqlparse-0.4.3-py3-none-any.whl (42 kB)
Collecting asgiref<4,>=3.5.2
  Using cached asgiref-3.5.2-py3-none-any.whl (22 kB)
Collecting tzdata
  Using cached tzdata-2022.7-py2.py3-none-any.whl (340 kB)
Installing collected packages: tzdata, sqlparse, asgiref, django
Successfully installed asgiref-3.5.2 django-4.1.4 sqlparse-0.4.3 tzdata-2022.7

(study_env) C:\Users\a-xiaobodou\OneDrive - Microsoft\Projects\Python\env\study_env\Scripts>
步骤五:

第一个Django项目
1、创建项目及各文件作用的解读
Djiangorjwa 的django-admin命令可以帮助我们快速构建项目。
步骤1:激活虚拟环境study_env
步骤2:进入代码存放文件夹wordspace,并创建名“hello”的Djiango项目,命令为django-admin startproject hello。

命令行:
(study_env) C:\Users\a-xiaobodou\OneDrive - Microsoft\Projects\Python>cd wordspace

(study_env) C:\Users\a-xiaobodou\OneDrive - Microsoft\Projects\Python\wordspace>django-admin startproject hello

(study_env) C:\Users\a-xiaobodou\OneDrive - Microsoft\Projects\Python\wordspace>
步骤3:查看目录结构。
文件1
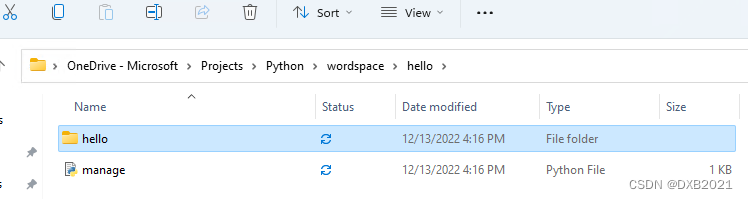
文件2
visual studio code:
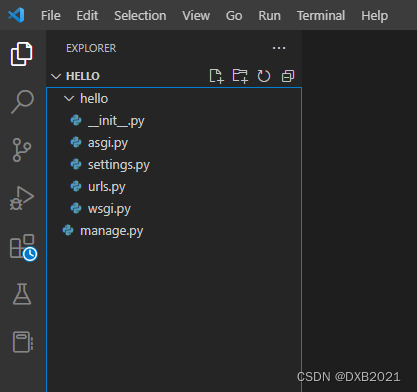
(1)__init__.py:表示该目录结构 是一个Python包,可进行数据库的初始化操作。
(2)settings.py:表示Django项目的配置文件,可配置项目所使用的数据库存、静态资源、调试模式、域名限制等配置信息。
(3)urls.py:表示项目的URL路由映射文件。
(4)wsgi.py:表示定义的WSGI接口信息。
(5)manage.py:表示管理集工具文件,用于启动整个Django项目的文件。
2、创建应用及各文件作用的解读
应用app主要用于处理业务逻辑,如模型、视图、路由等功能的实现。
步骤1:进入hello项目文件夹,并执行应用创建命令,命令为python manage.py startapp app_name

命令行:
(study_env) C:\Users\a-xiaobodou\OneDrive - Microsoft\Projects\Python\wordspace\hello>python manage.py startapp app_name

(study_env) C:\Users\a-xiaobodou\OneDrive - Microsoft\Projects\Python\wordspace\hello>
步骤2:目录结构
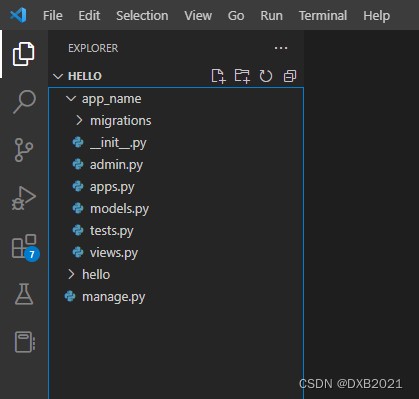
(1)migrations:表示 用于存储执行迁移命令时数据库变化的中间文件。
(2)admin.py:表示用于配置管理后台中管理模型的文件。
(3)apps.py:用于在工程目录settings.py中加入INSTALLED_APPS。
(4)models.py:表示用于定义数据库表模型的文件,该文件是MVT中M体现的模块。
(5)tests.py:表示用于写单元测试的文件。
(6) views.py:表示用于定义视图函数的代码文件,该文件是MVT中V体现的模块。
3、启动项目
步骤1:编辑“”文件,并在INSTALLED_APPS中加入应用app_name的名称。
INSTALLEND_APPS=[
    ......
    'app',    #新增此行
]
步骤2:控制台输入启动命令,命令为python manage.py runserver 0.0.0.0:8080,启动服务器。
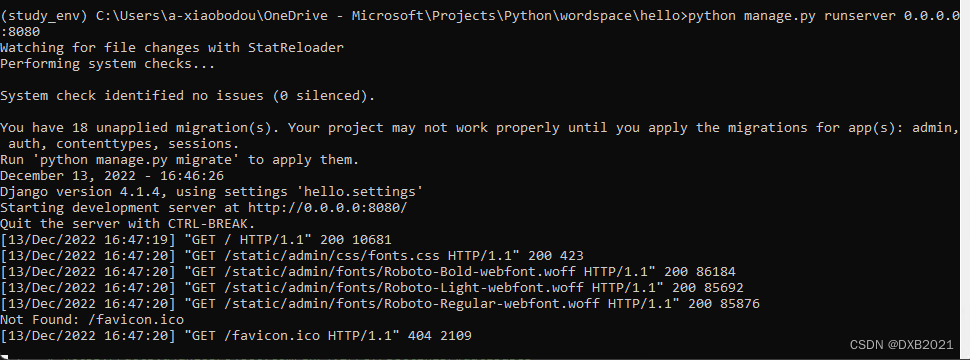
代码行:
(study_env) C:\Users\a-xiaobodou\OneDrive - Microsoft\Projects\Python\wordspace\hello>python manage.py runserver 0.0.0.0:8080
Watching for file changes with StatReloader
Performing system checks...

System check identified no issues (0 silenced).

You have 18 unapplied migration(s). Your project may not work properly until you apply the migrations for app(s): admin, auth, contenttypes, sessions.
Run 'python manage.py migrate' to apply them.
December 13, 2022 - 16:46:26
Django version 4.1.4, using settings 'hello.settings'
Starting development server at http://0.0.0.0:8080/
Quit the server with CTRL-BREAK.
[13/Dec/2022 16:47:19] "GET / HTTP/1.1" 200 10681
[13/Dec/2022 16:47:20] "GET /static/admin/css/fonts.css HTTP/1.1" 200 423
[13/Dec/2022 16:47:20] "GET /static/admin/fonts/Roboto-Bold-webfont.woff HTTP/1.1" 200 86184
[13/Dec/2022 16:47:20] "GET /static/admin/fonts/Roboto-Light-webfont.woff HTTP/1.1" 200 85692
[13/Dec/2022 16:47:20] "GET /static/admin/fonts/Roboto-Regular-webfont.woff HTTP/1.1" 200 85876
Not Found: /favicon.ico
[13/Dec/2022 16:47:20] "GET /favicon.ico HTTP/1.1" 404 2109
启动命令中0.0.0.0代表该项目可以被同一局域网内的电脑访问,而8080代表端口号。
如果不说明端口,启动命令为python manage.py runserver时,则表示默认开启8000端口。
需要注意:启动命令中IP和端口两个参数都可以写,如命令:python manage.py runserver IP:端口;也可以只写端口,如命令:python manage.py runserver 端口,表示默认启动本地IP地址即127.0.0.1。
步骤3:在浏览器中输入IP地址及端口号,如http://127.0.0.1:8080。若页面如下图片,则表示Django项目启动成功。

路由配置和视图的使用
Django中视图层主要用于处理HTTP请求并进行业务逻辑处理,最后响应相关的HTML模板。视图层接收HTTP请求,并映射到视图层中对应的业务逻辑函数中,这就需要用到URL映射机制。URL映射机制需要注意路由配置和视图定义。
路由配置
Django中URL映射机制主要体现在urls.py文件中,因此需要编辑urls.py文件。在urlpatterns变量中配置路由地址hello/',当读者在浏览器中访问该地址时,程序将调用app_name/views.py中定义的hello()视图函数进行视图处理。
hello/urls.py的代码如下 :
"""hello URL Configuration

The `urlpatterns` list routes URLs to views. For more information please see:
    https://docs.djangoproject.com/en/4.1/topics/http/urls/
Examples:
Function views
    1. Add an import:  from my_app import views
    2. Add a URL to urlpatterns:  path('', views.home, name='home')
Class-based views
    1. Add an import:  from other_app.views import Home
    2. Add a URL to urlpatterns:  path('', Home.as_view(), name='home')
Including another URLconf
    1. Import the include() function: from django.urls import include, path
    2. Add a URL to urlpatterns:  path('blog/', include('blog.urls'))
"""
from django.contrib import admin
from django.urls import path

from app_name import views

urlpatterns = [
    path('admin/', admin.site.urls),
    path('hello/', views.hello),
]
视图定义:
在app_name/views.py文件中定义函数hello(),需要注意以下两点。
(1)将请求request作为第一个参数。请求request中有很多方法,例如判断当前HTTP请求方式,可以使用request.method获取。
(2)视图函数必须有返回值,返回HTTP内容使用HttpResponse,渲染页面使用render,重定向使用redirect或HttpResponseRedirect。
在应用app_name的views.py中定义hello()函数,代码如下:
from django.shortcuts import render

# Create your views here.

from django.http import HttpResponse

def hello(request):
    if request.method=='GET':
        return HttpResponse('Hello Python!')
URL映射和对应的视图函数已经配置成功,在浏览器中访问地址http://127.0.0.1:8000/hello/。
运动结果失败。