Spring IOC 应用
第1节 Spring IoC基础
Spring框架下IOC实现,解析bean的几种方式

1.1 BeanFactory与ApplicationContext区别
BeanFactory是Spring框架中IoC容器的顶层接⼝,它只是⽤来定义⼀些基础功能,定义⼀些基础规范,⽽ ApplicationContext是它的⼀个⼦接⼝,所以 ApplicationContext是具备BeanFactory提供的全部功能的 。通常,我们称BeanFactory为SpringIOC的基础容器,ApplicationContext是容器的高级接⼝,⽐ BeanFactory要拥有更多的功能,⽐如说国际化⽀持和资源访问(xml,java配置类)等等
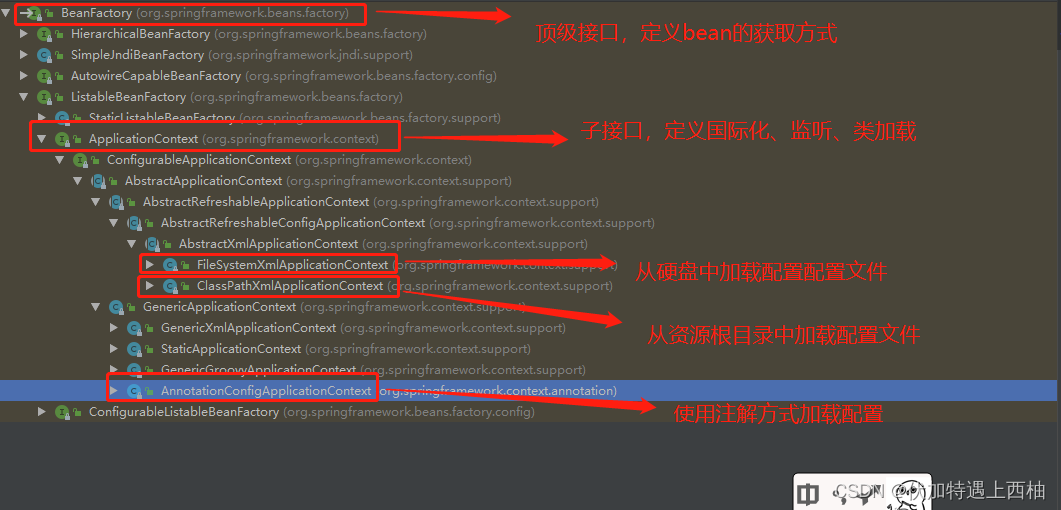
启动 IoC 容器的⽅式
- Java环境下启动IoC容器
ClassPathXmlApplicationContext:从类的根路径下加载配置⽂件(推荐使⽤)
FileSystemXmlApplicationContext:从磁盘路径上加载配置⽂件
AnnotationConfigApplicationContext:纯注解模式下启动Spring容器
ClassPathXmlApplicationContext和FileSystemXmlApplicationContext演示
定义applicationContext.xml
<?xml version="1.0" encoding="UTF-8"?>
<!--跟标签beans,里面配置一个又一个的bean子标签,每一个bean子标签都代表一个类的配置-->
<beans xmlns="http://www.springframework.org/schema/beans"
       xmlns:xsi="http://www.w3.org/2001/XMLSchema-instance"
       xsi:schemaLocation="
        http://www.springframework.org/schema/beans
        https://www.springframework.org/schema/beans/spring-beans.xsd
">
    <!--bean
        作用:
            声明类交给spring容器
        属性:
            id: 唯一标识
            class:全路径限定名称
        细节:
            默认使用无参构造函数实例化-->
    <bean id="accountDao" class="com.lagou.edu.dao.impl.JdbcAccountDaoImpl">
        <property name="ConnectionUtils" ref="connectionUtils"/>
    </bean>
    <bean id="transferService" class="com.lagou.edu.service.impl.TransferServiceImpl">
        <!--set+ name 之后锁定到传值的set方法了,通过反射技术可以调用该方法传入对应的值-->
        <property name="AccountDao" ref="accountDao"></property>
    </bean>

    <!--配置新增的三个Bean-->
    <bean id="connectionUtils" class="com.lagou.edu.utils.ConnectionUtils"></bean>

    <!--事务管理器-->
    <bean id="transactionManager" class="com.lagou.edu.utils.TransactionManager">
        <property name="ConnectionUtils" ref="connectionUtils"/>
    </bean>

    <!--代理对象工厂-->
    <bean id="proxyFactory" class="com.lagou.edu.factory.ProxyFactory">
        <property name="TransactionManager" ref="transactionManager"/>
    </bean>
</beans>
    @Test
    public void testIoC() throws Exception {


        // 通过读取classpath下的xml文件来启动容器(xml模式SE应用下推荐)
        ClassPathXmlApplicationContext applicationContext = new ClassPathXmlApplicationContext("classpath:applicationContext.xml");
        // 不推荐使用
        //ApplicationContext applicationContext1 = new FileSystemXmlApplicationContext("文件系统的绝对路径");
//        ApplicationContext applicationContext = new FileSystemXmlApplicationContext("F:\\outWork\\00-kaiyuan\\06-spring\\spring\\lagou-transfer-ioc-xml\\src\\main\\resources\\applicationContext.xml");
        AccountDao accountDao = (AccountDao) applicationContext.getBean("accountDao");
        System.out.println("accountDao:" + accountDao);
        applicationContext.close();
    }

小结
    1、工厂类:ApplicationContext
    2、工厂配置:
        文件类型:xml
        方式:
       <!--bean
        作用:
            声明类交给spring容器
        属性:
            id: 唯一标识
            class:全路径限定名称
        细节:
            默认使用无参构造函数实例化-->
    <bean id="accountDao" class="com.lagou.edu.dao.impl.JdbcAccountDaoImpl">
        <property name="ConnectionUtils" ref="connectionUtils"/>
    </bean>
    3、工厂加载配置:
        ApplicationContext通过ClassPathXmlApplicationContext加载applicationContext.xml配置;
        或者通过FileSystemXmlApplicationContext加载applicationContext.xml配置;
    4、工厂获得bean:
        ApplicationContext使用getBean()方法,用于根据bean的名称获取实例化对象
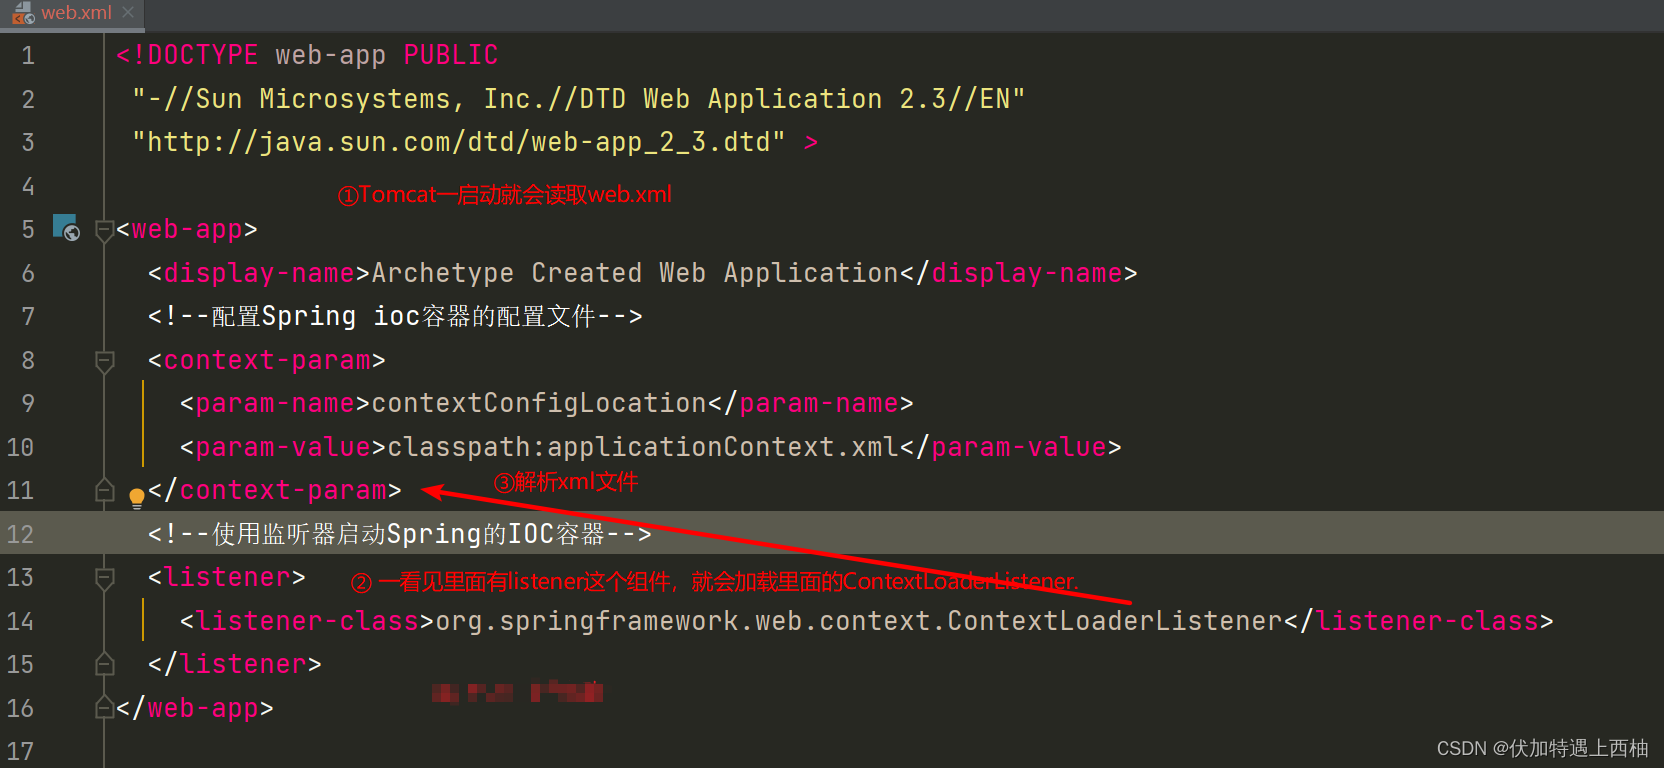
Web环境下启动IoC容器(通过监听器去加载xml)
1、 从xml启动容器
- 添加依赖
ContextLoaderListener在spring-web下所以需要添加依赖
<!--引入spring web功能-->
    <dependency>
      <groupId>org.springframework</groupId>
      <artifactId>spring-web</artifactId>
      <version>5.1.12.RELEASE</version>
    </dependency>
- 配置web.xml
<!DOCTYPE web-app PUBLIC
 "-//Sun Microsystems, Inc.//DTD Web Application 2.3//EN"
 "http://java.sun.com/dtd/web-app_2_3.dtd" >

<web-app>
  <display-name>Archetype Created Web Application</display-name>
  <!--配置Spring ioc容器的配置⽂件-->
  <context-param>
    <param-name>contextConfigLocation</param-name>
    <param-value>classpath:applicationContext.xml</param-value>
  </context-param>
  <!--使⽤监听器启动Spring的IOC容器-->
  <listener>
    <listener-class>org.springframework.web.context.ContextLoaderListener</listener-class>
  </listener>
</web-app>
- 获取对象
    private TransferService transferService = null;
    //通过webApplicationContext来获取对象实例
    @Override
    public void init() throws ServletException {


        WebApplicationContext webApplicationContext = WebApplicationContextUtils.getWebApplicationContext(this.getServletContext());
         transferService = (TransferService) .getBean("transferService");

    }
- 分析
2、从配置类启动容器
第2节 bean标签详解【重点】
1、bean标签作用
bean作用:
	用于配置对象让spring 来创建的。
    【细节】
	默认情况下调用类的无参构造函数。
2、bean标签基本属性
| 属性 | 说明 |
|---|---|
| id | bean的唯一标识名称 |
| class | 实现类的全限定名称 |
| name | bean的名称 * 多个别名使用 ”,” 分割 * bean与bean的别名不可以重复 |
<?xml version="1.0" encoding="UTF-8"?>
<beans xmlns="http://www.springframework.org/schema/beans"
       xmlns:xsi="http://www.w3.org/2001/XMLSchema-instance"
       xsi:schemaLocation="http://www.springframework.org/schema/beans
       http://www.springframework.org/schema/beans/spring-beans.xsd">

    <bean id="accountDao" name="accountDao2,accountDao3" class="com.spring.dao.impl.AccountDaoImpl"></bean>

    <bean id="accountService"  class="com.spring.service.impl.AccountServiceImpl"></bean>

</beans>
3、bean标签作用范围
| 属性 | 说明 |
|---|---|
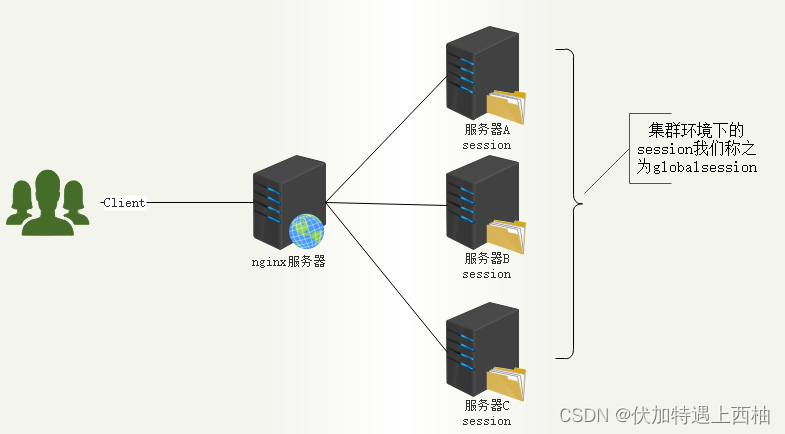
| scope | 指定对象的作用范围。 * singleton 【默认】: 单例,所有的请求都用一个对象来处理 * prototype : 多例,每个请求用一个新的对象来处理 * request : WEB 项目中,将对象存入到 request 域中. * session : WEB 项目中,将对象存入到 session 域中. * global session : WEB 项目中,应用在集群环境.如果没有集群环境那么相当于session |
global session图解
【1】思考
单例、多例他们分别在什么场景中使用?他们有什么区别?
spring默认单例,不需要修改,不要随意定义成员变量。
多例:资源共用
【2】目标
1、掌握scope的单例、多例的配置
2、掌握单例和多例的区别
【3】bean作用域实例(6)
步骤:
	1、改造ClientController多次获得对象
	2、装配bean到spring的IOC容器中,修改bean标签中scope的作用域
	3、观察不同作用域下获得的对象内存地址是否一致
【3.1】创建项目
ClientController
/**
 * @Description:测试
 */
public class ClientController {


    @Test
    public void saveAccount() {


        /**
         * Spring-IOC容器:ApplicationContext
         * 构建方式:通过ClassPathXmlApplicationContext加载配置文件
         * 使用bean:getBean
         */
        ApplicationContext applicationContext = new ClassPathXmlApplicationContext("bean.xml");
        AccountDao accountDaoA = (AccountDao) applicationContext.getBean("accountDao");
        AccountDao accountDaoB = (AccountDao) applicationContext.getBean("accountDao");

        System.out.println("accountDaoA的内存地址:"+accountDaoA.hashCode());
        System.out.println("accountDaoB的内存地址:"+accountDaoB.hashCode());

    }

}
【3.2】Bean【默认:singleton】
使用bean标签在bean.xml中装配accountDao的scope=“singleton”
<?xml version="1.0" encoding="UTF-8"?>
<beans xmlns="http://www.springframework.org/schema/beans"
       xmlns:xsi="http://www.w3.org/2001/XMLSchema-instance"
       xsi:schemaLocation="http://www.springframework.org/schema/beans
       http://www.springframework.org/schema/beans/spring-beans.xsd">
    <bean id="accountDao" class="com.spring.dao.impl.AccountDaoImpl" scope="singleton"></bean>

    <!--创建accountServic-->
    <bean id="accountServic" class="com.spring.service.impl.AccountServicImpl"></bean>
</beans>
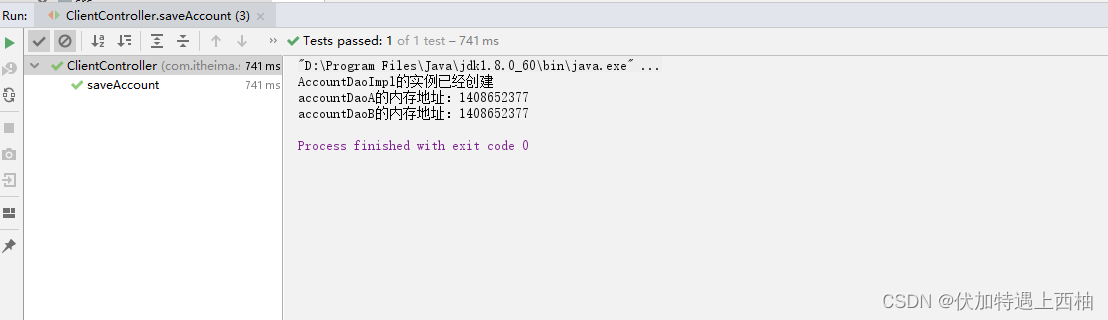
【3.3】singleton运行结果
【3.4】bean【多例:prototype】
使用bean标签在bean.xml中装配accountDao的scope=“prototype”
<?xml version="1.0" encoding="UTF-8"?>
<beans xmlns="http://www.springframework.org/schema/beans"
       xmlns:xsi="http://www.w3.org/2001/XMLSchema-instance"
       xsi:schemaLocation="http://www.springframework.org/schema/beans
       http://www.springframework.org/schema/beans/spring-beans.xsd">
    <bean id="accountDao" class="com.spring.dao.impl.AccountDaoImpl" scope="prototype"></bean>

    <!--创建accountServic-->
    <bean id="accountServic" class="com.spring.service.impl.AccountServicImpl"></bean>
</beans>
【3.5】prototype运行结果
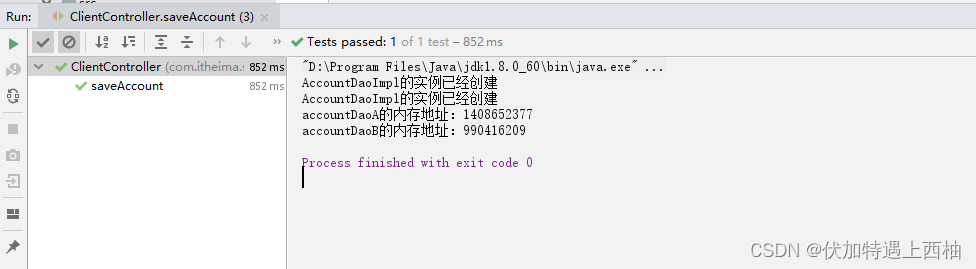
【4】bean作用域小结
1、单例和多里创建方式、内存地址
	【singleton单例】:所有请求只创建一个对象,内存地址相同
	【prototype多例】:每次请求都创建新的对象,内存地址不同
2、为什么使用单例?
	节省内存、CPU的开销,加快对象访问速度
3、为什么使用多例?
	如果你给controller中定义很多的属性,那么单例肯定会出现竞争访问,不要在controller层中定义成员变量(dao、service注入的bean)
	当web层的对象是有状态的时候 使用多例,防止并发情况下的互相干扰
4、单例、多例的场景
	单例===》spring中的Dao,Service,controller都是单例的
	多例====》struts2的Action是多实例
4、bean标签生命周期
sevlet的生命周期回顾
1.被创建:执行init方法,只执行一次

  --默认情况下,第一次被访问时,Servlet被创建,然后执行init方法;

  --可以配置执行Servlet的创建时机;

2.提供服务:执行service的doGet、doPost方法,执行多次

3.被销毁:当Servlet服务器正常关闭时,执行destroy方法,只执行一次
spring-IOC中不同作用域中bean的生命周期
| 作用范围 | 生命周期 | |
|---|---|---|
| 单例scope=“singleton” | 所有请求只创建一次对象 | 出生:应用加载,创建容器,对象就被创建 活着:只要容器在,对象一直活着。 死亡:应用卸载,销毁容器,对象就被销毁 |
| 多例scope=“prototype” | 每次请求都创建对象 | 出生:应用加载,创建容器,对象使用创建 活着:只要容器在,对象一直活着。 死亡:对象长时间不用,被垃圾回收器回收 |
生命周期方法相关
| 名称 | 说明 |
|---|---|
| init-method | 指定类中的初始化方法名称 |
| destroy-method | 指定类中销毁方法名称 |
【1】目标
1、掌握bean的生命周期配置方式
2、单例和多例下bean的生命周期的区别。
【2】bean生命周期实例
步骤:
	1、创建LifecycBeanServic类
	2、装配LifecycBeanServic
	3、创建测试类
	4、观察默认单例下生命周期
	5、观察多例下生命周期
【2.1】创建项目
/**
 * @Description:生命周期测试服务
 */
public class LifecycleService {


    public LifecycleService() {


        System.out.println("LifecycleService构造");
    }

    public void init(){


        System.out.println("LifecycleService初始化");
    }

    public void doJob(){


        System.out.println("LifecycleService工作中");
    }

    public void destroy(){


        System.out.println("LifecycleService销毁");
    }
}
【2.3】装配LifecycleBean
装配bean并且设置问单例:
<?xml version="1.0" encoding="UTF-8"?>
<beans xmlns="http://www.springframework.org/schema/beans"
       xmlns:xsi="http://www.w3.org/2001/XMLSchema-instance"
       xsi:schemaLocation="http://www.springframework.org/schema/beans
       http://www.springframework.org/schema/beans/spring-beans.xsd">

    <bean id="lifecycBeanServic" class="com.spring.service.LifecycBeanServic"
          scope="singleton" init-method="init" destroy-method="destory"></bean>
</beans>
【2.4】创建ClientController
/**
 * @Description:客户端
 */
public class ClientContrller {


    /**
     * ApplicationContext:spring-IOC容器
     * ClassPathXmlApplicationContext:容器实现类,加载配置文件
     * applicationContext.getBean:获得容器中的bean对象
     */
    @Test
    public void createAccount(){


        ApplicationContext applicationContext = new ClassPathXmlApplicationContext("bean.xml");
        System.out.println("applicationContext初始化完成");
        LifecycleService lifecycleService = applicationContext.getBean("lifecycleService", LifecycleService.class);
        lifecycleService.doJob();
        System.out.println("applicationContext容器关闭");
        ((ClassPathXmlApplicationContext) applicationContext).close();

    }
}
【2.5】单例模式下生命周期:
【2.6】多例模式下生命周期
将配置文件中的单例修改为多例
<?xml version="1.0" encoding="UTF-8"?>
<beans xmlns="http://www.springframework.org/schema/beans"
       xmlns:xsi="http://www.w3.org/2001/XMLSchema-instance"
       xsi:schemaLocation="http://www.springframework.org/schema/beans
       http://www.springframework.org/schema/beans/spring-beans.xsd">

    <bean id="lifecycBeanServic" class="com.spring.service.LifecycBeanServic"
          scope="prototype"  init-method="init" destroy-method="destory"></bean>
</beans>
再次执行方法发现,LifecycleBean被延迟加载了,并且只执行了初始化方法-init,没有执行销毁方法destory.
【3】bean生命周期小结
单例对象:scope="singleton"
	一个应用只有一个对象的实例。它的作用范围就是整个应用。
	生命周期:
		对象出生:当应用加载,创建容器时,对象就被创建了。
		对象活着:只要容器在,对象一直活着。
		对象死亡:当应用卸载,销毁容器时,对象就被销毁了。

多例对象:scope="prototype"
	每次访问对象时,都会重新创建对象实例。
	生命周期:
		对象出生:当使用对象时,创建新的对象实例(getBean)。
		对象活着:只要对象在使用中,就一直活着。
		对象死亡:当对象长时间不用时,被垃圾回收器回收。
生命周期方法:
init-method:指定类中的初始化方法名称
destroy-method:指定类中销毁方法名称
5.bean的实例化方式
bean的实例化方式有以下3种:
- bean缺省构造函数创建
- 静态factory方法创建
- 实例化factory方法创建
缺省构造函数方式【重点】
配置方式
    <!--bean
        作用:
            声明类交给spring容器
        属性:
            id: 唯一标识
            class:全路径限定名称
        细节:
            默认使用无参构造函数实例化-->
    <bean id="connectionUtils" class="com.lagou.edu.utils.ConnectionUtils"></bean>
注意事项
缺省构造函数实例化Bean的方式是Spring中默认的实例化方式;
被实例化的Bean中必须有无参构造;
静态工厂方法方式
配置方式
  <!--另外两种方式是为了我们自己new的对象加入到SpringIOC容器管理-->
    <!--方式二:静态方法-->
    <bean id="connectionUtils" class="com.lagou.edu.factory.CreateBeanFactory" factory-method="getInstanceStatic"/>
创建静态工厂
public class CreateBeanFactory {


    public static ConnectionUtils getInstanceStatic() {


        return new ConnectionUtils();
    }
}
实例工厂方法方式
配置方式
<!--实例化工厂实例化-->
<bean id="instanceFactory" class="com.spring.factory.InstanceFactory"></bean>
<bean id="accountInstance" factory-bean="instanceFactory" factory-method="createAccount"></bean>
创建实例工厂
/**
 * @Description:实例化工厂
 */
public class InstanceFactory {


    public Account createAccount(){


        System.out.println("实例工厂构建!");
        return  new Account();
    }

    public User createUser(){


        System.out.println("实例工厂构建!");
        return  new User();
    }
}
bean实例化小结
【缺省构造函数方式】
	说明:
		在默认情况下会根据默认缺省构造函数来创建类对象。如果bean中没有默认无参构造函数,将会创建失败。
	场景:
		当各个bean的业务逻辑相互比较独立时,或者与外界关联较少时可以使用

【静态工厂方法方式】
	说明:
        使用工厂中的静态方法创建对象,并装配到 spring的IOC 容器中。
        id 属性:指定 bean 的 id,用于从容器中获取
        class 属性:指定静态工厂的全限定类名
        factory-method 属性:指定生产对象的静态方法
	场景:
		统一管理各个bean的创建
		各个bean在创建之前需要相同的初始化处理,则可用静态factory方法进行统一的处理

【实例工厂方法方式】
	说明
        使用工厂中的实例方法创建对象,并装配到容器中。
            1、先把实例工厂做为一个bean装配到 spring容器中。
            2、然后再引用工厂bean 来调用里面的非静态方法来获取bean并装配到spring的IOC容器中。
            factory-bean 属性:用于指定实例工厂 bean 的 id。
            factory-method 属性:用于指定实例工厂中创建对象的方法
	场景:
		1.实例factory方法也作为业务bean控制,可以用于集成其他框架的bean创建管理方法,
		2.能够使bean和factory的角色互换