源码位置:http://square.github.io/picasso/
源码解析网站: http://www.jcodecraeer.com/a/anzhuokaifa/androidkaifa/2014/0731/1639.html
以下转自: http://www.bkjia.com/Androidjc/1004886.html
在Android开发中,常需要从远程获取图片并显示在客户端,当然我们可以使用原生HttpUrlConnection和AsyncTask等操作来完成,但并不推荐,因为这样不仅需要我们编写大量的代码,还需要处理缓存和下载管理等,最好自己封装成库或者采用第三方库;
Picasso:A Powerful Image Downloading and Caching Library for Android
根据名字就知道它是跟什么相关了(Picasso:毕加索)它的基本操作非常简单喔
文章主要介绍如何通过基本的HttpUrlConnection和AcyncTask实现获取远程图片;以及如何使用Picasso框架来实现,最后作为练习实现一个小Demo,希望对正在学习Android网络操作的同学有所帮助;
1,使用HttpUrlConnection和AsyncTask实现远程图片下载
使用HttpUrlConnection和AsyncTask获取远程图片,需要以下几步:
HttpUrlConnection connection=url.openConnection();//url代表图片地址InputStream in=connection.getInputStream();Bitmap bitmap=BitmapFactory.decodeStream(in);imageView.setBitmap(bitmap)我们知道在主线程中是无法执行以上网络操作的,所以需要AsyncTask,将耗时操作运行在后台线程中,对于HttpUrlConnection和AsyncTask具体操作不熟悉的可以看看我写的上一篇文章:Android网络编程 HttpUrlConnection HttpClient AsyncTask;
以下是使用上述代码完成图片下载的示例:
    public class MainActivity extends Activity {
    private ImageView imageView;

    @Override
    protected void onCreate(Bundle savedInstanceState) {
        super.onCreate(savedInstanceState);
        setContentView(R.layout.activity_main);
        imageView = (ImageView) findViewById(R.id.image);
        String url = "http://www.jycoder.com/json/Image/1.jpg";

        // 执行Task
        new ImageDownloadTask(ivBasicImage).execute(url);
    }

    //自定义获取图片Task
    private class ImageDownloadTask extends AsyncTask<String, Void, Bitmap> {
        ImageView imageView;

        public ImageDownloadTask(ImageView imageView) {
            this.imageView = imageView;
        }

        protected Bitmap doInBackground(String... addresses) {
            Bitmap bitmap = null;
            InputStream in;
            try {
                // 建立URL连接
                URL url = new URL(addresses[0]);
                HttpURLConnection conn = (HttpURLConnection) url.openConnection();
                // 打开输入流
                conn.connect();
                in = conn.getInputStream();
                // 编码输入流
                bitmap = BitmapFactory.decodeStream(in);
            } catch (IOException e) {
                e.printStackTrace();
            } finally {
              if(in != null)
                 in.close();
            }
            return bitmap;
        }

        // Task执行完毕,返回bitmap
        @Override
        protected void onPostExecute(Bitmap result) {
            // Set bitmap image for the result
            imageView.setImageBitmap(result);
        }
    }
    }
2,Picasso框架
什么是Picasso:
强大的图片下载和缓存的第三方库;我觉得这就是对它最准确的描述了,至于其他特性,可以参见官网介绍:Picasso
如何使用Picasso
android update project -p
ant jar
2.Picasso的基本用法:
将Picasso添加进项目后,要使用它非常简单,只需要一行代码就能搞定:
Picasso.with(context).load(imageUrl).into(imageView);短短的一行代码为我们解决了很多问题:
- 自动将图像缓存在本地
- 通过图片压缩转换以减少内存消耗
- 自动处理了ImageView的回收,即自动取消不在视野范围内的ImageView视图资源的加载;
3.适配器:适配器自动发现和重用以前取消的下载:
    @Override
    public void getView(int position, View convertView, ViewGroup parent) {
      SquaredImageView view = (SquaredImageView) convertView;
      if (view == null) {
        view = new SquaredImageView(context);
      }
      String url = getItem(position);

      Picasso.with(context).load(url).into(view);
}4.图像格式转换:很多时候需要将图片进行格式转换或者剪裁以节省内存或者达到我们的布局效果:
剪裁大小:
Picasso.with(context).load(imageUrl).resize(50,50).centerCrop().into(imageView);自定义格式转换:为了实现更多你想要图片转换的效果,你可以自己实现一个实现了Transformation接口的类,然后将其对象传递给transform()方法:
 public calss myTransformation implements Transformation{
        @Overrride
        public Bitmap transform(Bitmap source){
            //对source实现自定义裁剪
        }
        @Override
        public String key(){
            return "square()";
        }

}5.占位符图片:所谓的占位符图像即当图片未正常显示时默认的图片,通过placeholder()设置,Picasso也支持设置图片显示错误时显示的默认图片,通过error()设置:
Picasso.wint(context).load(imageUrl).placeholder(R.drawable.image_placeholder).error(R.drawable.image_error_placeholder).into(imageView);6.载入本地资源:除了通过网络下载图片,Picasso也可以载入本地图片资源:
Picasso.with(context).load(R.drawable.icon).into(imageView);
    Picasso.with(context).load("file:///android_asset/Adnroid.png").into(imageView);

Picasso.wiht(context).load(new File(...)).into(imageView);7.调试:为了方便调试,你可以通过调用Picasso的setIndicatiorEnabled(true);可以让不同来源的图片显示一个不同的色彩标记;
以下转自: http://blog.csdn.net/smallcheric/article/details/51055013
分析一下一些特殊情况下,Picasso的用法.
调用.noFade()
Picasso的默认图片加载方式有一个淡入的效果,如果调用了noFade(),加载的图片将直接显示在ImageView上
Picasso
    .with(context)
    .load(UsageExampleListViewAdapter.eatFoodyImages[0])
    .placeholder(R.mipmap.ic_launcher)
    .error(R.mipmap.future_studio_launcher)
    .noFade()
.into(imageViewFade);- 1
- 2
- 3
- 4
- 5
- 6
- 7
- 1
- 2
- 3
- 4
- 5
- 6
- 7
调用.noPlaceholder()
有一个场景,当你从网上加载了一张图片到Imageview上,过了一段时间,想在同一个ImageView上展示另一张图片,这个时候你就会去调用Picasso,进行二次请求,这时Picasso就会把之前的图片进行清除,可能展示的是.placeholder()的图片,给用户并不是很好的体验,如果调用了noPlaceholder(),就不会出现这种情况.
Picasso
    .with(context)
    .load(UsageExampleListViewAdapter.eatFoodyImages[0])
    .placeholder(R.mipmap.ic_launcher)
    .into(imageViewNoPlaceholder, new Callback() {
        @Override
        public void onSuccess() {
            // 当上次加载完成后,进行二次加载
            Picasso
                .with(context)
               .load(UsageExampleListViewAdapter.eatFoodyImages[1])
               .noPlaceholder()
               .into(imageViewNoPlaceholder);
        }

        @Override
        public void onError() {

        }
});- 1
- 2
- 3
- 4
- 5
- 6
- 7
- 8
- 9
- 10
- 11
- 12
- 13
- 14
- 15
- 16
- 17
- 18
- 19
- 20
- 1
- 2
- 3
- 4
- 5
- 6
- 7
- 8
- 9
- 10
- 11
- 12
- 13
- 14
- 15
- 16
- 17
- 18
- 19
- 20
调用resize(x, y)来自定义图片的加载大小
如果图片很大或者想自定义图片的显示样式,可以调用该API来解决这个问题;
Picasso
    .with(context)
    .load(UsageExampleListViewAdapter.eatFoodyImages[0])
    .resize(600, 200)
.into(imageViewResize);- 1
- 2
- 3
- 4
- 5
- 1
- 2
- 3
- 4
- 5
调用`onlyScaleDown()来缩短图片的加载计算时间
如果我们调用了resize(x,y)方法的话,Picasso一般会重新计算以改变图片的加载质量,比如一张小图变成一张大图进行展示的时候,但是如果我们的原图是比我们从新resize的新图规格大的时候,我们就可以调用onlyScaleDown()来直接进行展示而不再重新计算.
Picasso
    .with(context)
    .load(UsageExampleListViewAdapter.eatFoodyImages[0])
    .resize(6000, 2000)
    .onlyScaleDown() // 如果图片规格大于6000*2000,将只会被resize
.into(imageViewResizeScaleDown);- 1
- 2
- 3
- 4
- 5
- 6
- 1
- 2
- 3
- 4
- 5
- 6
对拉伸图片的处理
如果图片被操作了,可能在展示的时候就会比较丑,我们是想改变这种情景的,Picasso给我们提供了两种选择进行图片展示,centerCrop() 或者centerInside().
-
centerCrop()- 图片会被剪切,但是图片质量看着没有什么区别 -
Inside()
- 图片会被完整的展示,可能图片不会填充满ImageView`,也有可能会被拉伸或者挤压
Picasso
    .with(context)
    .load(UsageExampleListViewAdapter.eatFoodyImages[0])
    .resize(600, 200)
    .centerInside() 或者调用 .centerCrop()
.into(imageViewResizeCenterInside);- 1
- 2
- 3
- 4
- 5
- 6
- 1
- 2
- 3
- 4
- 5
- 6
调用.fit()来智能展示图片
如果调用了该API, Picasso会对图片的大小及ImageView进行测量,计算出最佳的大小及最佳的图片质量来进行图片展示,减少内存,并对视图没有影响;
Picasso
    .with(context)
    .load(UsageExampleListViewAdapter.eatFoodyImages[0])
    .fit()
.into(imageViewHero);- 1
- 2
- 3
- 4
- 5
- 1
- 2
- 3
- 4
- 5
调用.priority()设置图片加载的优先级
如果一个屏幕上顶部图片较大,而底部图片较小,因为Picasso是异步加载,所以小图会先加载出来,但是对于用户来说,更希望看到的是上面的图片先加载,底部的图片后加载,Picasso支持设置优先级,分为HIGH, MEDIUM, 和 LOW,所有的加载默认优先级为MEDIUM;
Picasso
    .with(context)
    .load(UsageExampleListViewAdapter.eatFoodyImages[0])
    .fit()
    .priority(Picasso.Priority.HIGH)
.into(imageViewHero);- 1
- 2
- 3
- 4
- 5
- 6
- 1
- 2
- 3
- 4
- 5
- 6
注意:设置优先级并不能保证图片就一定会被优先加载,只是会偏向倾斜于先加载;
调用tag()为请求添加标记提升用户体验
我们都知道,在一个ListView的子item中加载一张图片是很常见的,这些图片都来源于网络请求,如果这个listview有上千条数据,当用户快速滑动的时候,每个item会不断的被复用,当然Picasso的请求也不断地进行请求,取消请求,再次请求,再次取消的操作(对屏幕外的自动取消请求),但是如果有一个方案,可以在用户在快速滑动的时候全部停止请求,只有在滑动停止时再去请求,就非常完美了;
Picasso提供了三种设置Tag的方式
- 暂停标记
pauseTag() - 可见标记
resumeTag() - 取消标记
cancleTag()
pauseTag() 和 resumeTag()的用法
在图片请求时添加标记
Picasso
    .with(context)
    .load(UsageExampleListViewAdapter.eatFoodyImages[0])
    .tag("Profile ListView") //参数为 Object
.into(imageViewWithTag);- 1
- 2
- 3
- 4
- 5
- 1
- 2
- 3
- 4
- 5
然后让listview实现滑动监听
@Override
  public void onScrollStateChanged(AbsListView view, int scrollState) {
    final Picasso picasso = Picasso.with(context);

    if (scrollState == SCROLL_STATE_IDLE || scrollState == SCROLL_STATE_TOUCH_SCROLL) {
          picasso.resumeTag("Profile ListView");
    } else {
          picasso.pauseTag("Profile ListView");
    }
}- 1
- 2
- 3
- 4
- 5
- 6
- 7
- 8
- 9
- 10
- 1
- 2
- 3
- 4
- 5
- 6
- 7
- 8
- 9
- 10
cancleTag()的使用场景
试想一下,当你在浏览购物车的时候,这个时候就会去展示所有被选中item的图片资源,如果这个时候用户点击了购买按钮,就会弹出一个progressdialog去请求数据以进行页面跳转,这个时候原来的请求就需要取消掉了;
public void buyButtonClick(View v) {
     showDiaolg();

    // 取消网络请求
    Picasso
        .with(context)
        .cancelTag("ShoppingCart");
}- 1
- 2
- 3
- 4
- 5
- 6
- 7
- 8
- 1
- 2
- 3
- 4
- 5
- 6
- 7
- 8
注意:如果tag状态为pause或者resume的话,Picasso会对tag持有一个引用,如果此时用户退出了当前Activity,垃圾回收机制进行回收的时候,就会出现内存泄露,所以需要在onDestory()方法中进行相应处理;
.fetch() , .get() 及 Target之间的区别
.fetch()- 该方法会在后台异步加载一张图片,但是不会展示在ImageView上,也不会返回Bitmap,这个方法只是为了将获取到的资源加载到本地和内存中,为了后期加载缩短时间;.get()- 该方法也是一个异步线程,不过加载完成后会返回一个Bitmap,但是需要注意,该方法不能在主线程中调用,因为会造成线程阻塞;Target- 我们之前调用.into()方法,只是将获取到的资源加载到ImageView中,但我们还可以将资源作为回调放到Target中,上代码:
private Target target = new Target() {
    @Override
    public void onBitmapLoaded(Bitmap bitmap, Picasso.LoadedFrom from) {
        //加载成功后会得到一个bitmap,可以自定义操作
    }

    @Override
    public void onBitmapFailed(Drawable errorDrawable) {
        // 加载失败进行相应处理
    }

    @Override
    public void onPrepareLoad(Drawable placeHolderDrawable) {

    }
};

Picasso
    .with(context)
    .load(UsageExampleListViewAdapter.eatFoodyImages[0])
.into(target);- 1
- 2
- 3
- 4
- 5
- 6
- 7
- 8
- 9
- 10
- 11
- 12
- 13
- 14
- 15
- 16
- 17
- 18
- 19
- 20
- 21
- 1
- 2
- 3
- 4
- 5
- 6
- 7
- 8
- 9
- 10
- 11
- 12
- 13
- 14
- 15
- 16
- 17
- 18
- 19
- 20
- 21
注意:你可以使用.get()或者Target获取图片的Bitmap,但是当你使用Target时,不能使用匿名内部类的方式,因为垃圾回收机制在你获取不到Bitmap的时候会把对象回收;
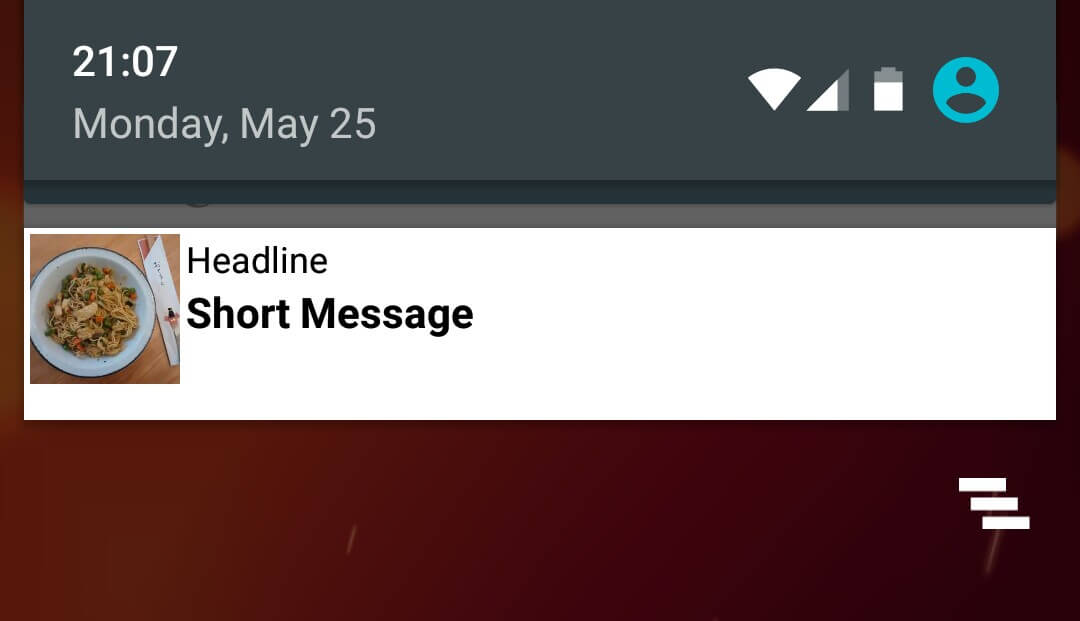
Picasso在自定义Notifications上的使用
Picasso有一个功能是可以加载图片到RemoteViews上,而RemoteViews是用在Widgets及自定义notification布局上的,下面通过一个小的示例来看Picasso是如何起作用的;
 private void testRemoteView() {
        RemoteViews remoteViews = new RemoteViews(getPackageName(),R.layout.item_picasso);
        remoteViews.setImageViewResource(R.id.iv_remoteview,R.mipmap.abc);

        remoteViews.setTextViewText(R.id.tv_title,"This Title");
        remoteViews.setTextViewText(R.id.tv_desc,"This desc");

        remoteViews.setTextColor(R.id.tv_title,getResources().getColor(android.R.color.black));
        remoteViews.setTextColor(R.id.tv_desc,getResources().getColor(android.R.color.holo_blue_bright));

        NotificationCompat.Builder builder = new NotificationCompat.Builder(MainActivity.this)
                                                .setSmallIcon(R.mipmap.notifation)
                                                .setContentTitle("Context Title")
                                                .setContentText("Content Text")
                                                .setContent(remoteViews)
                                                .setPriority(NotificationCompat.PRIORITY_MIN);

        Notification notification = builder.build();

        if (Build.VERSION.SDK_INT > 16){
            notification.bigContentView = remoteViews;
        }
        NotificationManager mNotificationManager = (NotificationManager) this.getSystemService(Context.NOTIFICATION_SERVICE);
        mNotificationManager.notify(NOTIFICATION_ID,notification);

        Picasso.with(MainActivity.this)
                .load("http://www.jycoder.com/json/Image/3.jpg")
                .into(remoteViews,R.id.iv_remoteview,NOTIFICATION_ID,notification);
}- 1
- 2
- 3
- 4
- 5
- 6
- 7
- 8
- 9
- 10
- 11
- 12
- 13
- 14
- 15
- 16
- 17
- 18
- 19
- 20
- 21
- 22
- 23
- 24
- 25
- 26
- 27
- 28
- 29
- 1
- 2
- 3
- 4
- 5
- 6
- 7
- 8
- 9
- 10
- 11
- 12
- 13
- 14
- 15
- 16
- 17
- 18
- 19
- 20
- 21
- 22
- 23
- 24
- 25
- 26
- 27
- 28
- 29
上面可以看到,Picasso的使用也是非常简单,只需要调用.into()的另一个重载方法即可: .into(Android.widget.RemoteViews remoteViews, int viewId, int notificationId, android.app.Notification notification)
效果如下
demo需要提供提供开源库picasso.jar
在Android.mk 文件增加:
LOCAL_STATIC_JAVA_LIBRARIES += picasso
LOCAL_PREBUILT_STATIC_JAVA_LIBRARIES := \
picasso:libs/picasso-2.5.2.jar