Pyinstaller是啥
https://pyinstaller.org/en/stable/
Pyinstaller可以打包Win、Linux、MacOS下的python程序,在什么环境下打包的就是什么平台的程序。相对来看,Pyinstaller打包的程序体积大、安全性稍差(容易反编译),但是上手相对简单一些。
入门案例:Hello World 封装
1.hello world封装
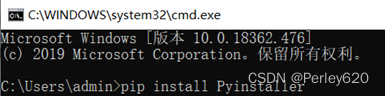
安装:cmd下输入pip install Pyinstaller(P大写)
清华大学镜像
pip install -i https://pypi.tuna.tsinghua.edu.cn/simple Pyinstaller
编程:加入input()解决闪退问题
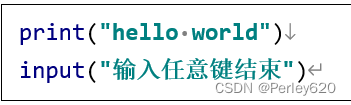
print("hello world")
input("输入任意键结束")
2.封装步骤
1.新建文件夹放入hello.py文件
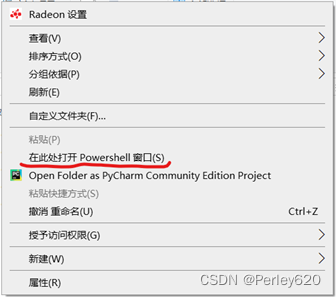
2.按住shift点鼠标右键选择
3.输入

pyinstaller -F hello.py
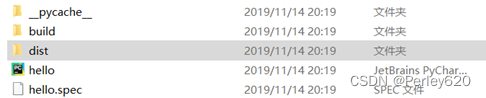
4.完成后打开dist文件
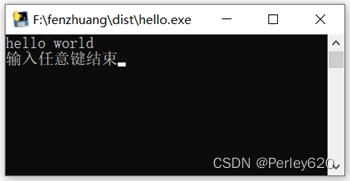
运行的效果如下
pyinstaller的参数详解
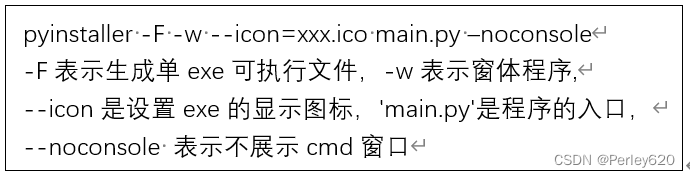
pyinstaller -F -w --icon=xxx.ico main.py –noconsole
- -F表示生成单exe可执行文件,-w表示窗体程序,
- –icon是设置exe的显示图标,'main.py’是程序的入口,
- –noconsole 表示不展示cmd窗口

| PyInstaller 支持的常用选项 | |
|---|---|
| -h,–help | 产生单个的可执行文件 |
| -D,–onedir | 产生一个目录(包含多个文件)作为可执行程序 |
| -a,–ascii | 不包含 Unicode 字符集支持 |
| -d,–debug | 产生 debug 版本的可执行文件 |
| -w,–windowed, --noconsolc | 指定程序运行时不显示命令行窗口(仅对 Windows 有效) |
| -c,–nowindowed, --console | 指定使用命令行窗口运行程序(仅对 Windows 有效) |
| -o DIR,–out=DIR | 指定 spec 文件的生成目录。如果没有指定,则默认使用当前目录来生成 spec 文件 |
| -p DIR,–path=DIR | 设置 Python 导入模块的路径(和设置 PYTHONPATH 环境变量的作用相似)。 也可使用路径分隔符(Windows 使用分号,Linux 使用冒号)来分隔多个路径 |
| -n NAME, --name=NAME | 指定项目(产生的 spec)名字。如果省略该选项,那么第一个脚本的主文件名将作为 spec 的名字 |
比如:加个icon图标
改进后:pyinstaller -F --icon=subway.ico hello.py

进阶案例:读取.dat文件,计算绘图并保存结果
1.dat文件读取和处理
import numpy as np
import pandas as pd
import os
# 列出当前目录下所有的文件
files = os.listdir(".")
for filename in files:
    portion = os.path.splitext(filename)
    # 如果后缀是.txt
    if portion[1] == ".txt":
        # 重新组合文件名和后缀名
        newname = portion[0] + ".csv"
        os.rename(filename,newname)
a=pd.read_csv('F:\python\loadc.csv',sep = ',',encoding = 'gbk')
import pandas as pd
import numpy as np
file_path = "./loadc.dat"
df = pd.read_csv(file_path,encoding = 'gbk')
2.整体的流程和代码

import pandas as pd
import numpy as np
from matplotlib import pyplot as plt
#########################################################
pd.set_option('display.width', 1000)#加了这一行那表格的一行就不会分段出现了
pd.set_option('display.max_columns', None)
pd.set_option('display.max_rows', None)
plt.rcParams['font.sans-serif'] = 'SimHei'
plt.rcParams['axes.unicode_minus'] = False ## 设置正常显示符号
###########################################################
file_path = "./loadc.dat"
df = pd.read_csv(file_path,encoding = 'gbk')
file_path1 = "./thrustweight.dat"
df1 = pd.read_csv(file_path1,encoding = 'gbk')
##########################################################
# 推力和载荷数据记录的处理
#转换成只有数据的列表
a=df.iloc[1,:].str.split("\t").tolist()
# print(df.loc["预估载荷上下界"])
load_list1=[i for j in a for i in j ]
load_data1=list(map(float,load_list1[1:]))
load_list=[]
for k in range(1,df.shape[0]):
a = df.iloc[k, :].str.split("\t").tolist()
load_list1 = [i for j in a for i in j]
load_data1 = list(map(float, load_list1[1:]))#输出不带米数的数据
load_list.insert(k-1, load_data1)
#装换成DataFrame数据
load_data_dataframe=pd.DataFrame(load_list,columns=["thrust_min","thrust_max","torque_min","torque_max"])
##########################################################
# 占比数据的处理
b=df1.iloc[1,:].str.split("\t").tolist()
load_rate1=[i for j in b for i in j ]
load_rate=list(map(float,load_rate1[:]))
cutter_thrust_rate1=load_rate[0]/100
shield_friction_rate1=load_rate[1]/100
equipment_traction_rate1=load_rate[2]/100
###########################################################
#输出刀盘推力的预估上界和下界
cutter_thrust_rate=pd.Series([cutter_thrust_rate1]*800)
cutter_thrust_load=load_data_dataframe.mul(cutter_thrust_rate,axis=0)
shield_friction_rate=pd.Series([shield_friction_rate1]*800)
shield_friction_load=load_data_dataframe.mul(shield_friction_rate,axis=0)
equipment_traction_rate=pd.Series([equipment_traction_rate1]*800)
equipment_traction_load=load_data_dataframe.mul(equipment_traction_rate,axis=0)
# print(load_data_dataframe)
# print(cutter_thrust_load)
###############################################################
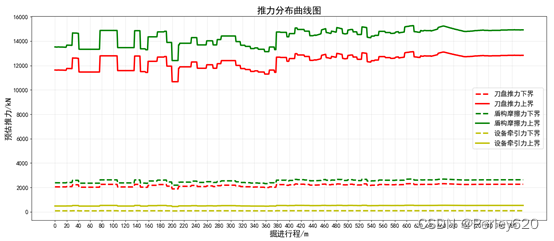
#画图
plt.figure(figsize=(20,8),dpi=80)#设置窗口大小
x=range(800)
y1=cutter_thrust_load["thrust_min"]
y2=cutter_thrust_load["thrust_max"]
# y3=cutter_thrust_load["torque_min"]
# y4=cutter_thrust_load["torque_max"]
y3=shield_friction_load["thrust_min"]
y4=shield_friction_load["thrust_max"]
y5=equipment_traction_load["thrust_min"]
y6=equipment_traction_load["thrust_max"]
plt.plot(x,y1,color="r",linestyle="--",linewidth=3,label="刀盘推力下界")
plt.plot(x,y2,color="r",linewidth=3,label="刀盘推力上界")
# plt.plot(x,y3,color="y",linewidth=3,label="刀盘扭矩下界")
# plt.plot(x,y4,color="k",linewidth=3,label="刀盘扭矩上界")
plt.plot(x,y3,color="g",linestyle="--",linewidth=3,label="盾构摩擦力下界")
plt.plot(x,y4,color="g",linewidth=3,label="盾构摩擦力上界")
plt.plot(x,y5,color="y",linestyle="--",linewidth=3,label="设备牵引力下界")
plt.plot(x,y6,color="y",linewidth=3,label="设备牵引力上界")
plt.legend(loc="best",fontsize='x-large')
plt.tick_params(labelsize=13)
plt.xticks(range(800)[::20],x[::20])
plt.savefig('./推力分布曲线图.png')
plt.title('推力分布曲线图',fontdict={
'weight':'normal','size': 20})
plt.ylabel('预估推力/kN',fontdict={
'weight':'normal','size': 17})
plt.xlabel('掘进行程/m',fontdict={
'weight':'normal','size': 17})
plt.grid(alpha=0.3)
plt.savefig("./推力分布曲线图.png")
# plt.show()
##############################################################
#文件存储
thrust_torque=pd.DataFrame()
thrust_torque["thrust_min"]=load_data_dataframe["thrust_min"]
thrust_torque["thrust_max"]=load_data_dataframe["thrust_max"]
thrust_torque["cutter_thrust_min"]=cutter_thrust_load["thrust_min"]
thrust_torque["cutter_thrust_max"]=cutter_thrust_load["thrust_max"]
thrust_torque["shield_friction_thrust_min"]=shield_friction_load["thrust_min"]
thrust_torque["shield_friction_thrust_max"]=shield_friction_load["thrust_max"]
thrust_torque["equipment_traction_thrust_min"]=equipment_traction_load["thrust_min"]
thrust_torque["equipment_traction_thrust_max"]=equipment_traction_load["thrust_max"]
thrust_torque["torque_min"]=load_data_dataframe["torque_min"]
thrust_torque["torque_max"]=load_data_dataframe["torque_max"]
thrust_torque.to_csv('./thrust_load.csv',sep = ';',index = True)
3.封装遇到问题及解决
问题1:RecursionError:maximum recursion depth exceeded
pyinstaller -F --icon=subway.ico PET.py
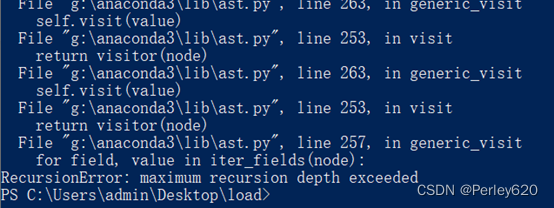
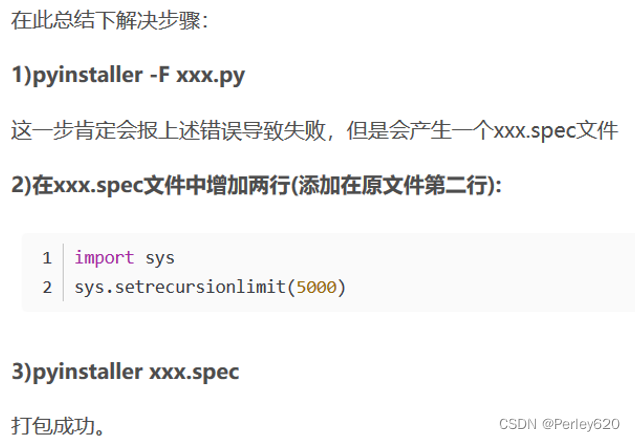
核心代码:
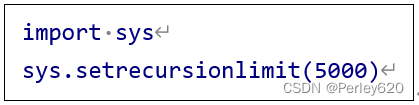
import sys
sys.setrecursionlimit(5000)
pyinstaller PET.spec

问题2:FileNotFoundError:File b’./loadc.dat’does not exist
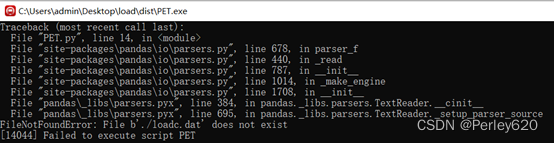
解决方法:把文件loadc.dat和thrustweight.dat放在PET.exe所在文件中
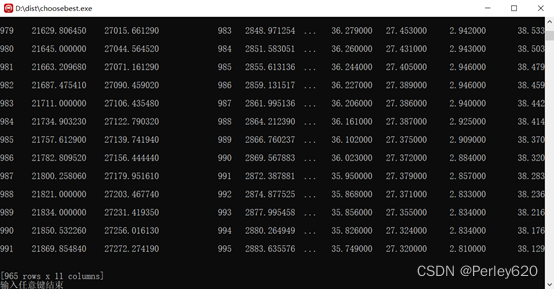
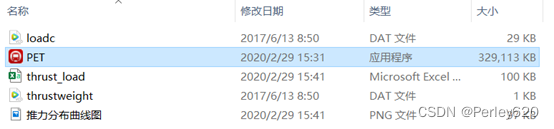
运行成功后的截图:
问题3:ModuleNotFoundError:No module named’sklearn.utils._cython_blas
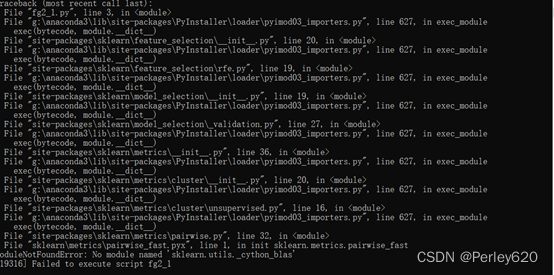
解决方法:Spec文件内加入
hiddenimports=[‘cython’, ‘sklearn’, ‘sklearn.utils._cython_blas’ ],(手敲)
然后pyinstaller fg2.spec
问题4:ModuleNotFoundError:No module named’sklearn.neighbors.typedefs
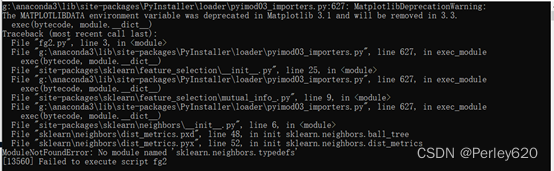
解决方法:编译时加sklearn.neighbors.typedefs
pyinstaller -F fg2.py --hidden-import sklearn.neighbors.typedefs
4.封装成功后运行
pyinstaller -F --icon=subway.ico choosebest.py
pyinstaller choosebest.spec
【用途】:推力预测
【流程设计】:
封装结果如下:

使用说明:
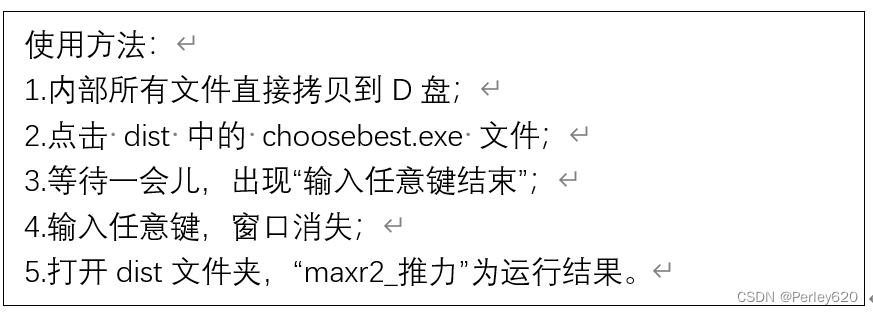
使用方法:
1.内部所有文件直接拷贝到D盘;
2.点击 dist 中的 choosebest.exe 文件;
3.等待一会儿,出现“输入任意键结束”;
4.输入任意键,窗口消失;
5.打开dist文件夹,“maxr2_推力”为运行结果。
程序运行结果: