源码基于:Android R
0. 前言
在之前的几篇博文中,对Android binder 的通信原理进行的深入的剖析,这些博文包括:binder 简介、servicemanager启动、service注册、service获取、Java 端的service 注册和获取、native下的C-S、java 下的C-S。
本文进一步分析 IPC 下的权限控制。
路径:
frameworks/base/core/java/android/os/Binder.java
frameworks/base/core/jin/android_util_Binder.cpp
frameworks/native/libs/binder/IPCThreadState.cpp
1. java 代码
frameworks/base/core/java/android/os/Binder.java

public static final native long clearCallingIdentity();

public static final native void restoreCallingIdentity(long token);
2. JNI 代码
frameworks/base/core/jin/android_util_Binder.cpp

static jlong android_os_Binder_clearCallingIdentity()
{
    return IPCThreadState::self()->clearCallingIdentity();
}

static void android_os_Binder_restoreCallingIdentity(JNIEnv* env, jobject clazz, jlong token)
{
    // XXX temporary sanity check to debug crashes.
    int uid = (int)(token>>32);
    if (uid > 0 && uid < 999) {
        // In Android currently there are no uids in this range.
        char buf[128];
        sprintf(buf, "Restoring bad calling ident: 0x%" PRIx64, token);
        jniThrowException(env, "java/lang/IllegalStateException", buf);
        return;
    }
    IPCThreadState::self()->restoreCallingIdentity(token);
}
restore 参数 token 是clear接口的返回值。
3. IPCThreadState 中代码
frameworks/native/libs/binder/IPCThreadState.cpp

int64_t IPCThreadState::clearCallingIdentity()
{
    // ignore mCallingSid for legacy reasons
    int64_t token = ((int64_t)mCallingUid<<32) | mCallingPid;
    clearCaller();
    return token;
}

void IPCThreadState::restoreCallingIdentity(int64_t token)
{
    mCallingUid = (int)(token>>32);
    mCallingSid = nullptr;  // not enough data to restore
    mCallingPid = (int)token;
}
clearCallingIdentity 主要两件事情:
- 高32位为 mCallingUid,低32位为 mCallingPid,将其存放到 token,后面会通过restoreCallingIdentity() 恢复。
- 调用 clearCaller(),临时获取 IPCThreadState 所在进程的确切PID 和 UID;
void IPCThreadState::clearCaller()
{
    mCallingPid = getpid();
    mCallingSid = nullptr;  // expensive to lookup
    mCallingUid = getuid();
}
4. 使用场景
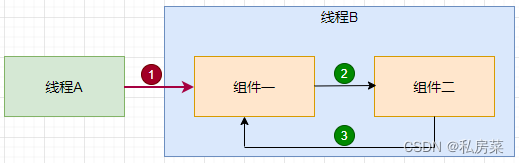
- 线程 A 通过 binder 调用到线程B,也有可能线程A 和线程B 在不同的进程;
- 而线程B 中有这样的逻辑:
- 组件一收到线程A 的调用后,这个时候线程B 所在的IPCThreadState 中的mCallingPid 和mCallingUid 可能会被修改,见4.2;
- 当组件一调用组件二的功能时,想要显示组件一本身的PID 和UID,见4.1;
- 当组件二完成后需要返回到组件一,需要恢复IPCThreadState 中的mCallingPid 和mCallingUid;
4.1 获取当前Bidner 线程的PID 和UID
JAVA:
public static final native int getCallingPid();
public static final native int getCallingUid();

JNI:
static jint android_os_Binder_getCallingPid()
{
    return IPCThreadState::self()->getCallingPid();
}
static jint android_os_Binder_getCallingUid()
{
    return IPCThreadState::self()->getCallingUid();
}
线程中可以通过Binder 接口获取calling pid 和calling uid,当然native 也可以通过IPCThreadState 获取:
pid_t IPCThreadState::getCallingPid() const
{
    return mCallingPid;
}
uid_t IPCThreadState::getCallingUid() const
{
    return mCallingUid;
}
那么最开始的mCallingPid 和mCallingUid 怎么来的呢?
IPCThreadState::IPCThreadState()
    : mProcess(ProcessState::self()),
      ...
{
    ...
    clearCaller();
    ...
}
clearCaller() 在第 3 节解析过,这里在每一个Binder 线程创建的时候会获取当前线程所在的pid、uid。
4.2 IPCThreadState 作为接收端,会修改calling pid和uid
status_t IPCThreadState::executeCommand(int32_t cmd)
{
    ...
    case BR_TRANSACTION:
        const pid_t origPid = mCallingPid;   //备份mCallingPid 和mCallingUid
        const char* origSid = mCallingSid;
        const uid_t origUid = mCallingUid;
        ...
        mCallingPid = tr.sender_pid;    //这里会修改成sender 的pid 和uid
        mCallingSid = reinterpret_cast<const char*>(tr_secctx.secctx);
        mCallingUid = tr.sender_euid;
        ...
        if (tr.target.ptr) {
            // We only have a weak reference on the target object, so we must first try to
            // safely acquire a strong reference before doing anything else with it.
            if (reinterpret_cast<RefBase::weakref_type*>(
                    tr.target.ptr)->attemptIncStrong(this)) {
                error = reinterpret_cast<BBinder*>(tr.cookie)->transact(tr.code, buffer, //进入接收端,此时的pid和uid都为sender的
                        &reply, tr.flags);
                reinterpret_cast<BBinder*>(tr.cookie)->decStrong(this);
            } else {
                error = UNKNOWN_TRANSACTION;
            }
        } else {
            error = the_context_object->transact(tr.code, buffer, &reply, tr.flags);
        }
        ...
        mCallingPid = origPid; //从接收端返回后,pid和uid 需要改为原始的
        mCallingSid = origSid;
        mCallingUid = origUid;
        ...
}
见代码中的注释,在 transact() 中都处于接收端,此时的 pid 和uid 都是sender 端的,如果此过程中需要获取Binder 原始的 mCallingPid 和mCallingUid,则需要调用clear和restore。
例如,AMS 中:
    public ComponentName startService(IApplicationThread caller, Intent service,
            ...
            String callingFeatureId, int userId)
            throws TransactionTooLargeException {
        ...
        synchronized(this) {
            final int callingPid = Binder.getCallingPid();
            final int callingUid = Binder.getCallingUid();
            final long origId = Binder.clearCallingIdentity();
            ComponentName res;
            try {
                res = mServices.startServiceLocked(caller, service,
                        resolvedType, callingPid, callingUid,
                        requireForeground, callingPackage, callingFeatureId, userId);
            } finally {
                Binder.restoreCallingIdentity(origId);
            }
            return res;
        }
    }
在调用ActiveServices.startServiceLocked(),需要获悉当前线程PID 和UID,则需要在调用之前clear ,在调用返回后restore。
至此,IPC 权限控制分析完成。