参考
http://www.taichi-maker.com/homepage/iot-development/iot-dev-reference/esp8266-c-plus-plus-reference/http-client-secure/certificate-fingerprint/
http://www.taichi-maker.com/homepage/iot-development/iot-platform/esp8266-bilibil-api-tutorial/esp8266-bilibili-api-application/
https://www.bilibili.com/read/cv17367361/
遇到的问题
1,太极创客中的例子不知道为什么不能得到返回数据,显示307重定向,个人觉得是因为http访问方式的问题
在实际操作中,如果使用http+数据的连接字符,在浏览器中自动跳转为https开头的
2,使用太极创客里的例子只是修改http为https也是不能得到正确的数据,
3,考虑到https的保密性和与http访问方式的不同,决定自己使用一下https的库
下面就是个人在使用这个库中的经历,最终得到了想要的效果,后面结合oled显示出来
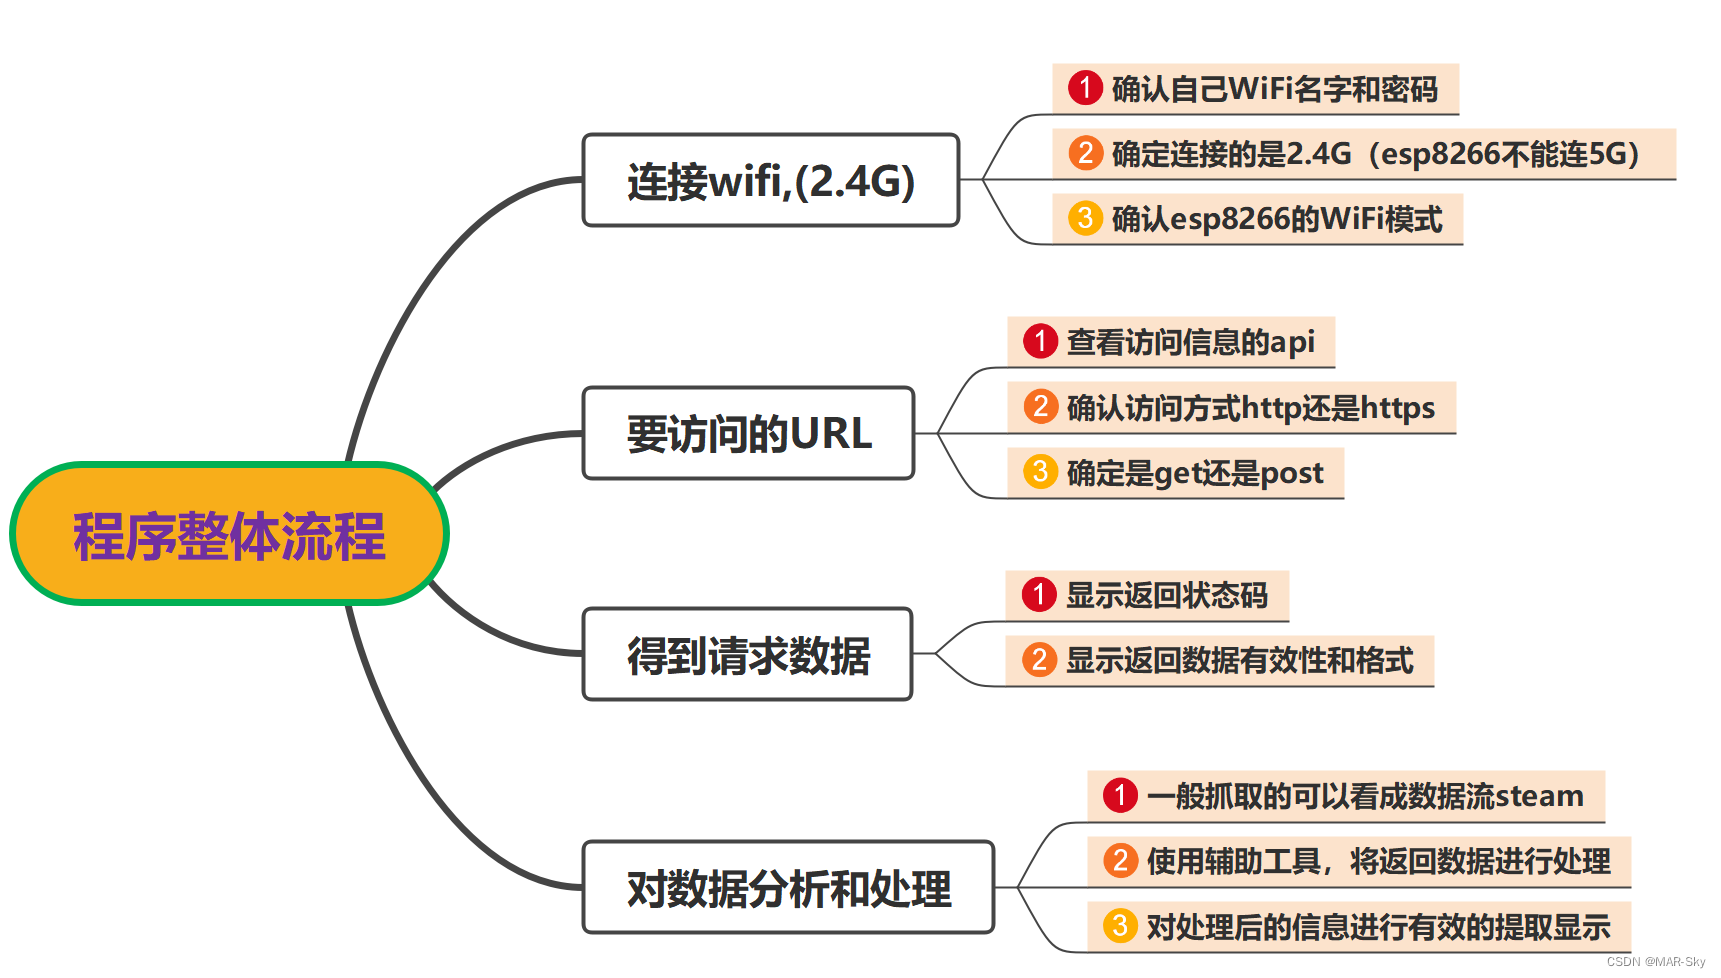
整体程序流程
程序
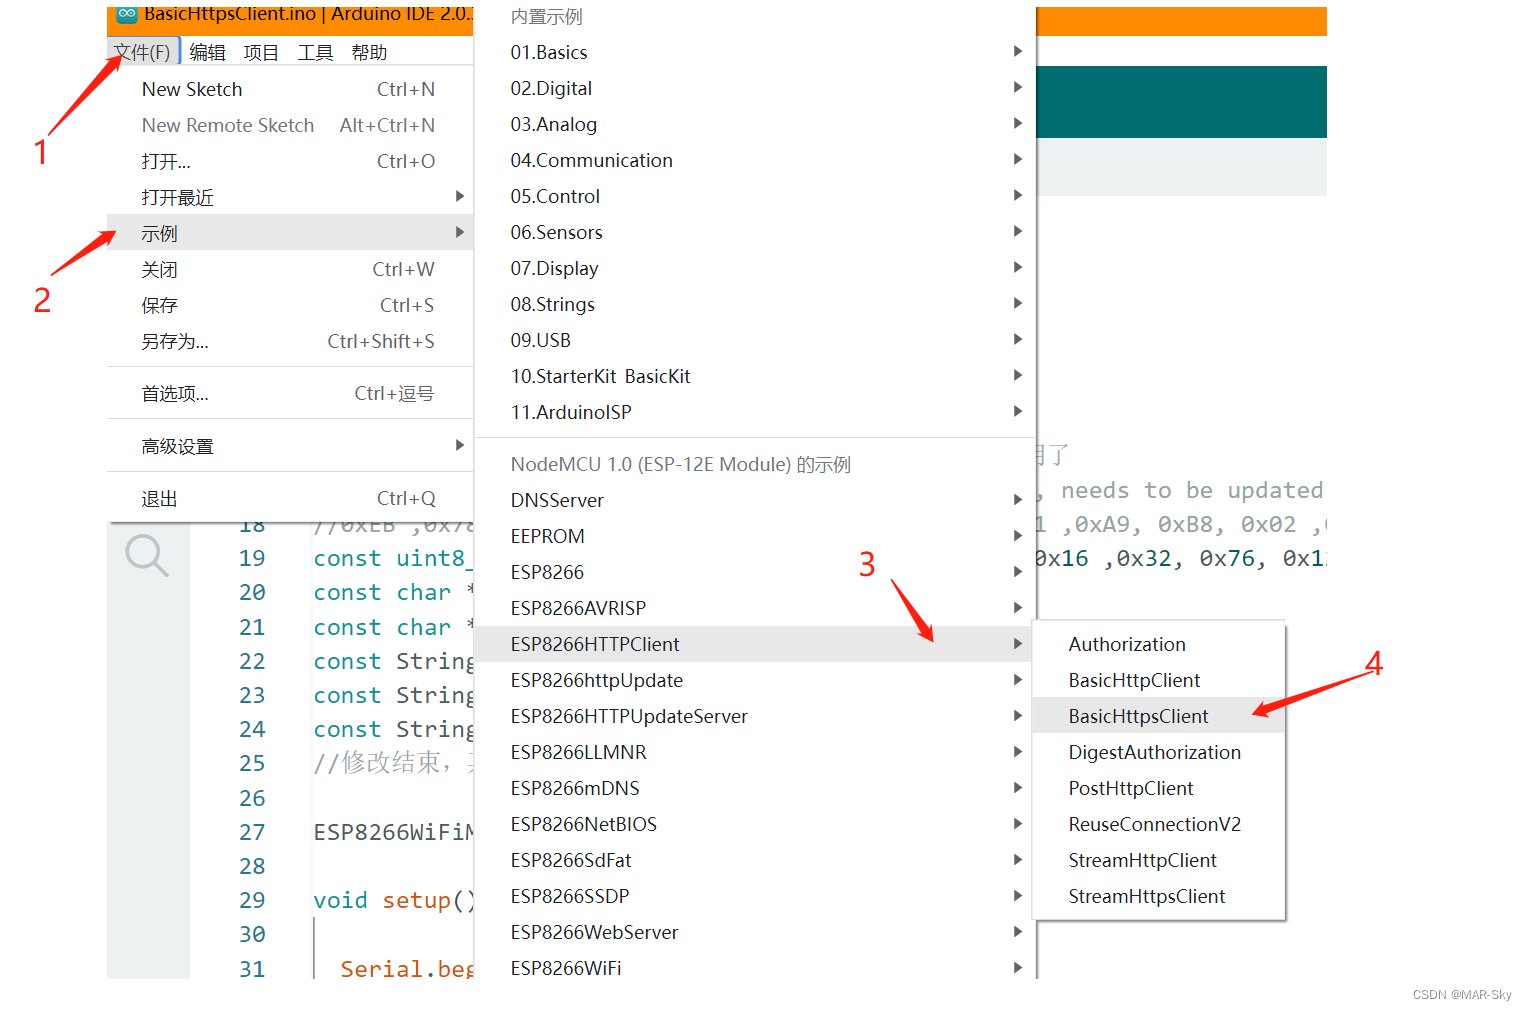
首先程序是根据示例程序中的程序修改而来(确保安装过esp8266的库才会显示),
/**
   BasicHTTPSClient.ino

    Created on: 20.08.2018

*/

#include <Arduino.h>
#include <ArduinoJson.h>
#include <ESP8266WiFi.h>
#include <ESP8266WiFiMulti.h>
#include <ESP8266HTTPClient.h>
#include <WiFiClientSecureBearSSL.h>

//需要自己修改的内容
//修改自己的密钥,也可在下面直接忽略安全访问,就不需要密钥了
// Fingerprint for demo URL, expires on June 2, 2021, needs to be updated well before this date
//0xEB ,0x78, 0xA8 ,0x16 ,0x32, 0x76, 0x12,0xD8, 0x51 ,0xFF
const uint8_t fingerprint[20] = {

     0xA9, 0xB8, 0x02 ,0xDF, 0xD6, 0xE7 ,0x32, 0x1D, 0xB9, 0xE8, 0xFF };
const char *ssid = "Tenda_7881A0";    //你的网络名称
const char *password = "88888888"; //你的网络密码
const String UID = "231216575";      //host+path+UID组成了访问网页的url
const String host = "https://api.bilibili.com";
const String path = "/x/relation/stat?vmid=";
//修改结束,其他基本不需要修改

ESP8266WiFiMulti WiFiMulti;

void setup() {


  Serial.begin(115200);  //设置显示串口波特率
  // Serial.setDebugOutput(true);

  Serial.println();
  Serial.println();
  Serial.println();

  for (uint8_t t = 4; t > 0; t--) {


    Serial.printf("[SETUP] WAIT %d...\n", t);
    Serial.flush();
    delay(1000);
  }

  WiFi.mode(WIFI_STA);    //客户模式
  WiFiMulti.addAP(ssid, password);  //设置连接的wifi密码和名称
}

void loop() {


  // wait for WiFi connection
  if ((WiFiMulti.run() == WL_CONNECTED)) {


    std::unique_ptr<BearSSL::WiFiClientSecure> client(new BearSSL::WiFiClientSecure);

    client->setFingerprint(fingerprint);
    // Or, if you happy to ignore the SSL certificate, then use the following line instead:
    // client->setInsecure();  //也可以不使用指纹证书登录

    HTTPClient https;

    Serial.print("[HTTPS] begin...\n");
    if (https.begin(*client, host+path+UID)) {

      // HTTPS

      Serial.print("[HTTPS] GET...\n");
      // start connection and send HTTP header
      int httpCode = https.GET();  //访问url返回的状态码

      // httpCode will be negative on error
      if (httpCode > 0) {


        // HTTP header has been send and Server response header has been handled
        Serial.printf("[HTTPS] GET... code: %d\n", httpCode);

        // file found at server
        if (httpCode == HTTP_CODE_OK || httpCode == HTTP_CODE_MOVED_PERMANENTLY) {


          String payload = https.getString();
          Serial.println(payload);
          de_json(payload);  //将请求到的json数据进行解析显示
        }
      } else {


        Serial.printf("[HTTPS] GET... failed, error: %s\n", https.errorToString(httpCode).c_str());
      }

      https.end();
    } else {


      Serial.printf("[HTTPS] Unable to connect\n");
    }
  }

  Serial.println("Wait 10s before next round...");
  delay(3000);
}
void de_json(String input){


  //从这里开始是使用辅助工具生成的
  StaticJsonDocument<256> doc;

  DeserializationError error = deserializeJson(doc, input);

  if (error) {


    Serial.print(F("deserializeJson() failed: "));
    Serial.println(error.f_str());
    return;
  }

  int code = doc["code"]; // 0
  const char* message = doc["message"]; // "0"
  int ttl = doc["ttl"]; // 1

  JsonObject data = doc["data"];
  long data_mid = data["mid"]; // 231216575
  int data_following = data["following"]; // 154
  int data_whisper = data["whisper"]; // 0
  int data_black = data["black"]; // 0
  int data_follower = data["follower"]; // 1
  //辅助工具得到的代码到这里结束,下面是自己想要显示的内容

  Serial.println("=======================");
  Serial.println(ttl);
  Serial.print("Fen Si: ");              // 串口监视器输出粉丝数量
  Serial.println(data_follower);
  Serial.print("Guan Zhu: ");            // 串口监视器输出关注数量
  Serial.println(data_following);
  Serial.print("Hei Ming Dan = ");       // 串口监视器输黑名单里的数量
  Serial.println(data_black);
  Serial.print("=======================");
}
程序中需要的准备工作
下面要根据自己浏览器的实际情况,查看方式可能不太一样(个人使用的是edge)
查看自己需要的哔哩哔哩数据的URL
得到需要的host,path和UID数据
一、找到显示需要数据的网页
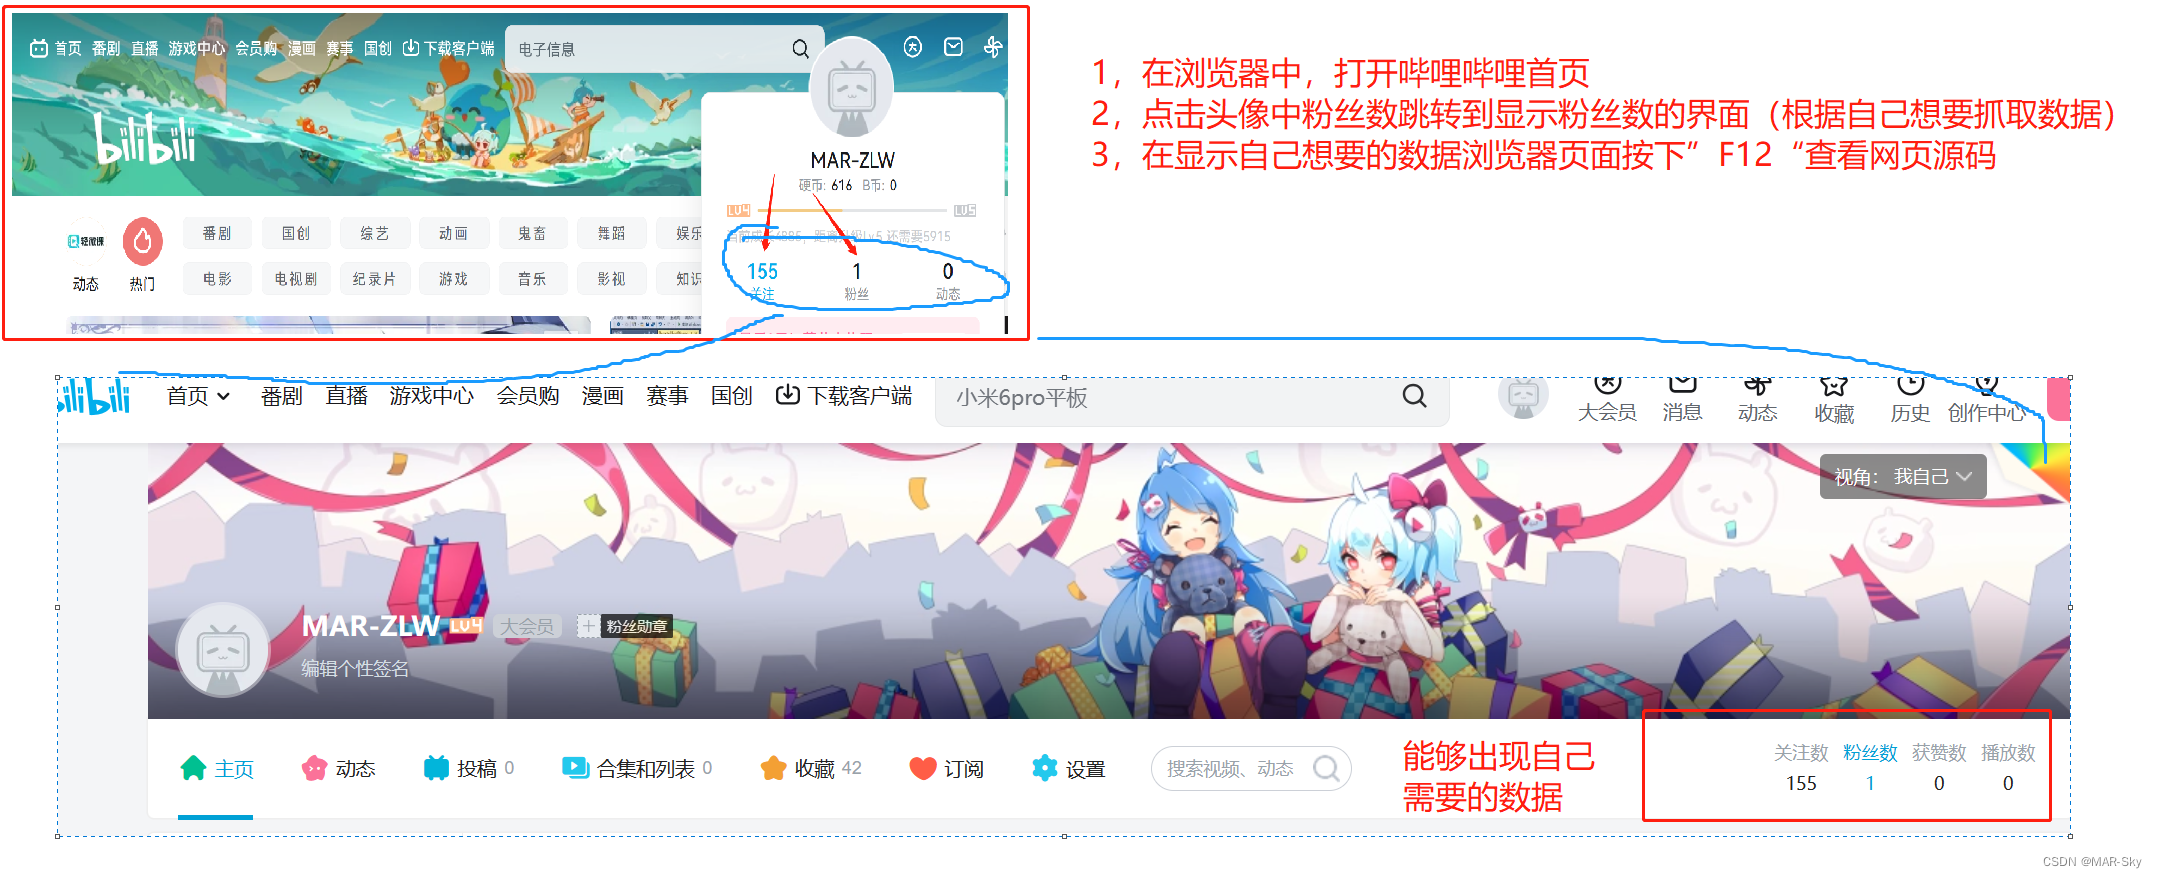
二、查找需要数据的请求信息
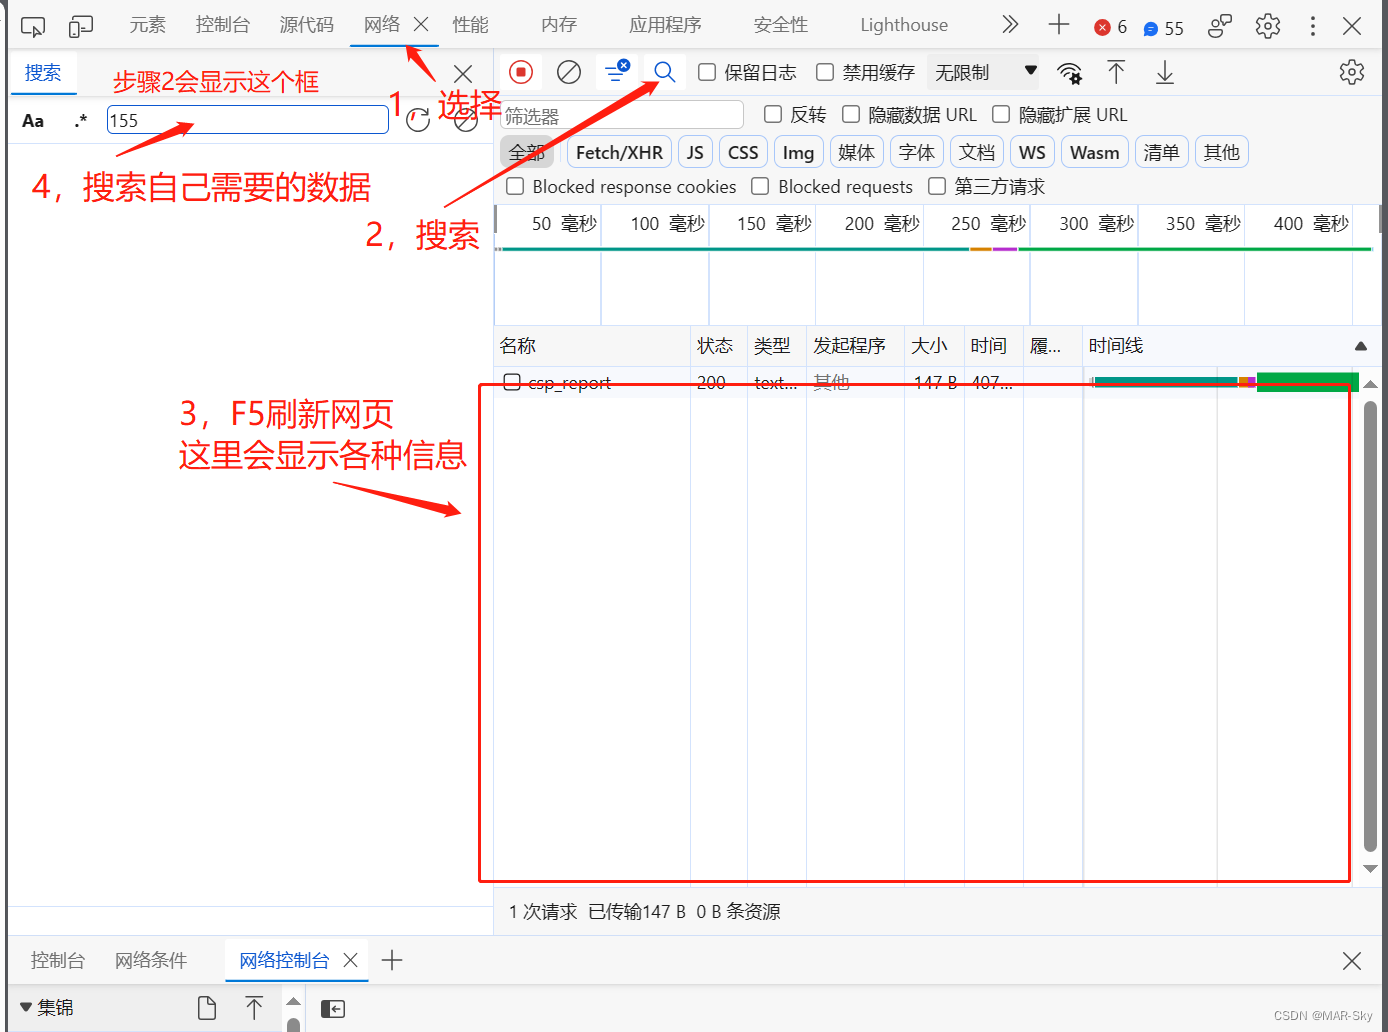
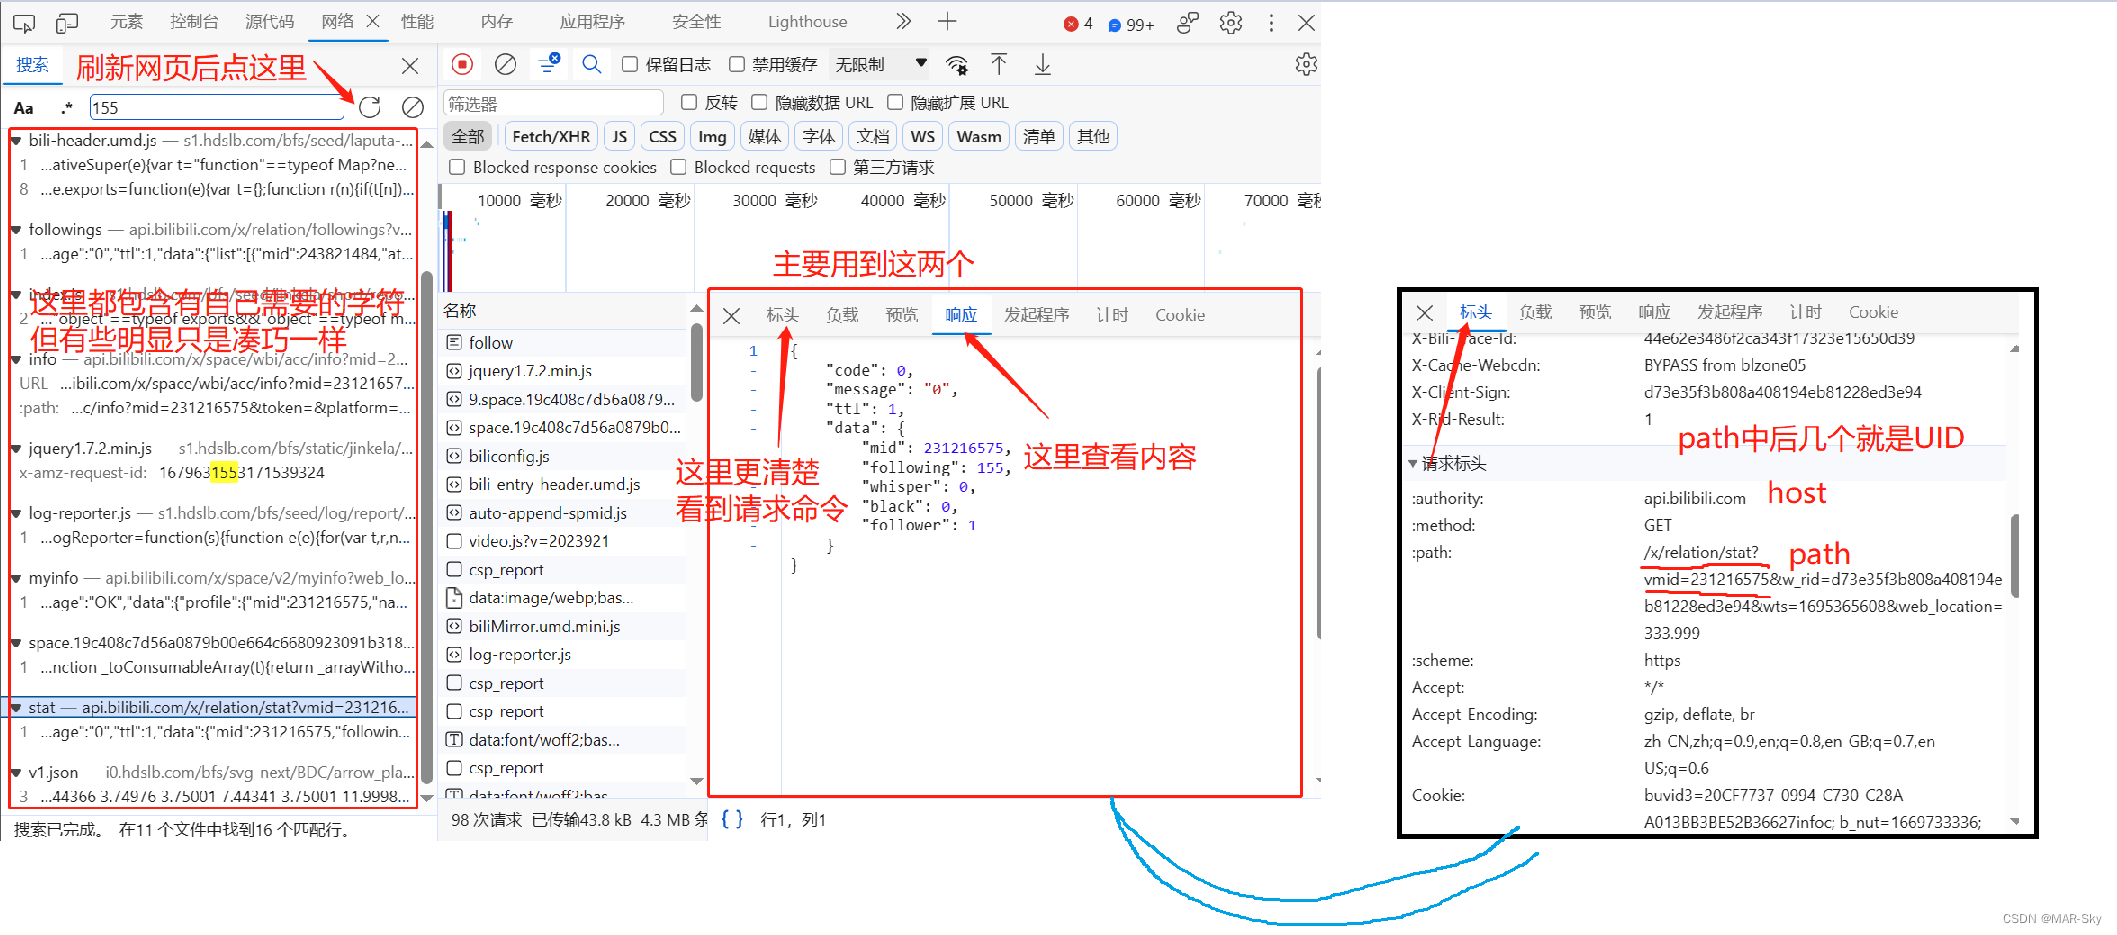
从这里可以找到需要的三个数据
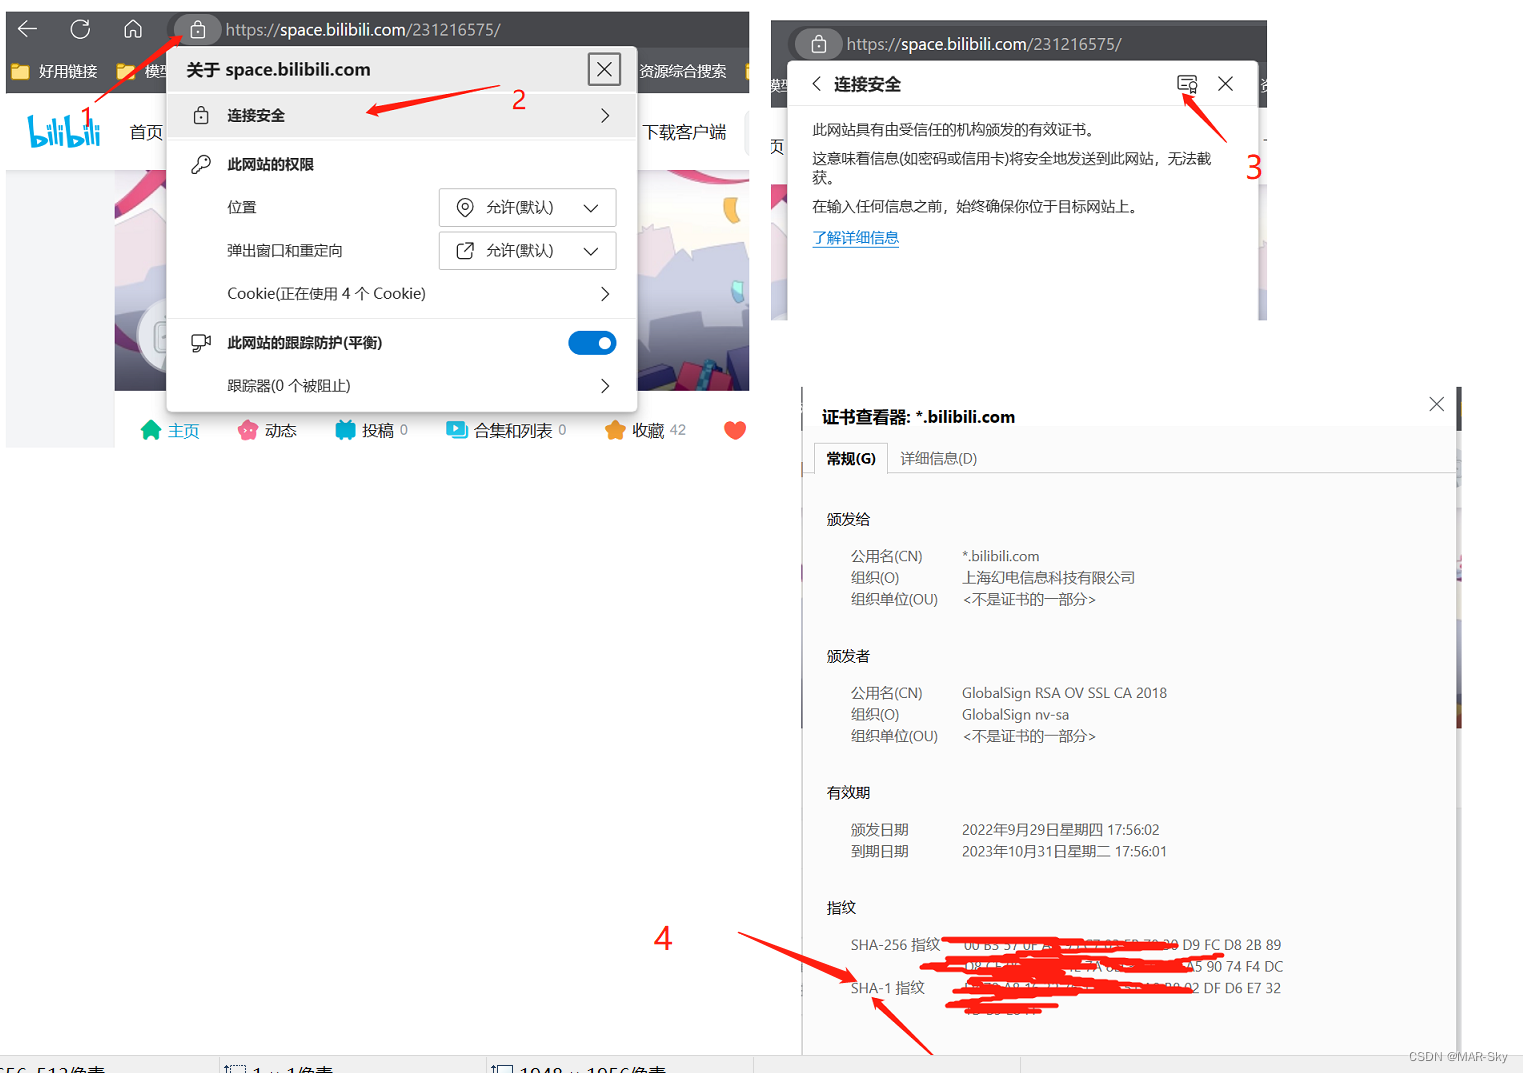
找到认证指纹
最后得SHA-1的指纹,注意这个是有期限的,
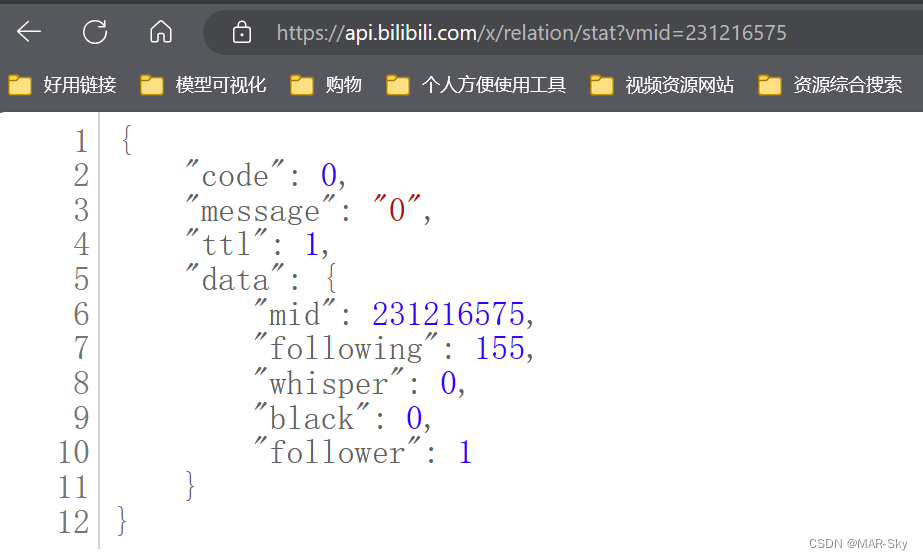
先手动从浏览器中得到数据的基本形式
获取方式:把前面得到的host+path+uid最为浏览器的URL,在浏览器中输入,得到类似下面的json文件的格式
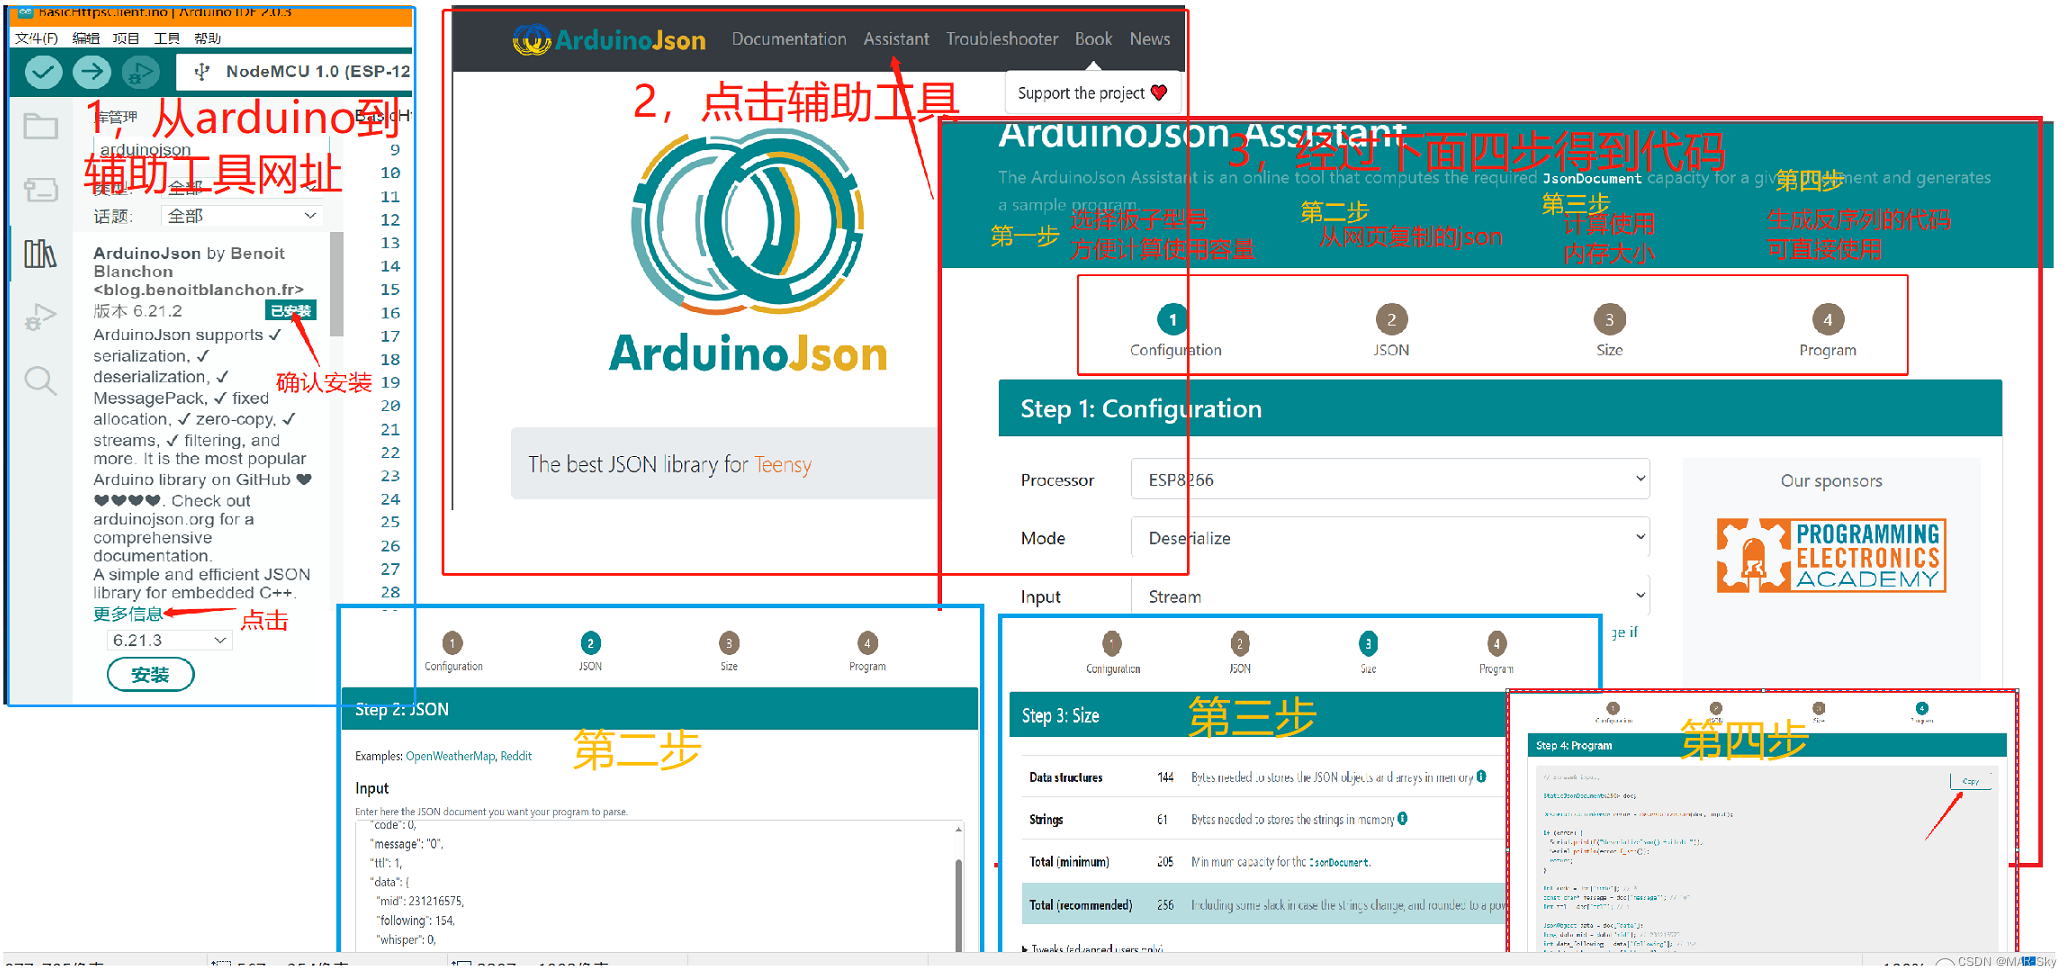
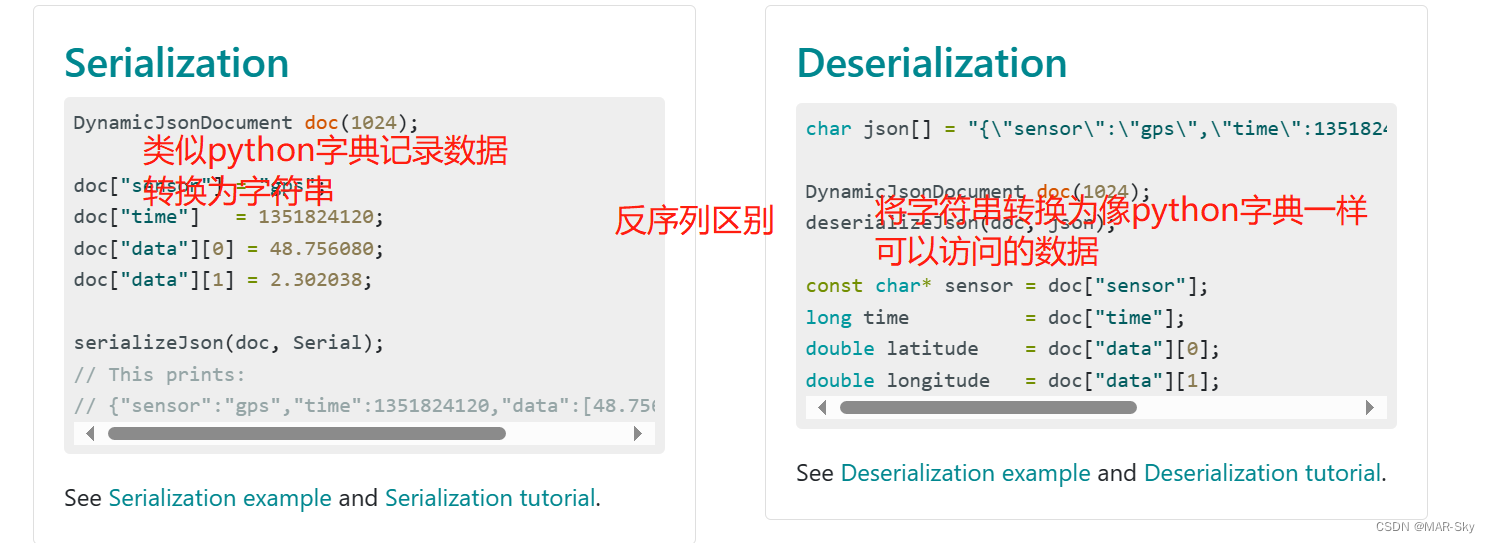
使用json辅助工具快速得到解析的文本
**使用转换工具的目的:**为了访问数据时更加方便
使用辅助工具的方法如下:第二步的时候把得到的json数据文本放入