在本项目中,您将学习如何使用 ESP8266 NodeMCU 板托管 Web 服务器并同时使用 ESP-NOW 通信协议。您可以让多个 ESP8266 板通过 ESP-NOW 将传感器读数发送到一个 ESP8266 接收器,该接收器在网络服务器上显示所有读数。软件代码使用 Arduino IDE 进行编程。

同时使用 ESP-NOW 和 Wi-Fi

如果您想使用 Wi-Fi 托管 Web 服务器并同时使用 ESP-NOW 从其他开发板接收传感器读数,则需要考虑一些事项:
- ESP8266 发送板必须使用与接收板相同的 Wi-Fi 通道。
- 接收板的 Wi-Fi 信道由您的 Wi-Fi 路由器自动分配。
- 接收板的Wi-Fi模式必须是接入点和站点(WIFI_AP_STA).
- 您可以手动设置相同的 Wi-Fi 通道,也可以在发送器上添加简单的代码,将其 Wi-Fi 通道设置为与接收板相同的 Wi-Fi 通道。
项目概况
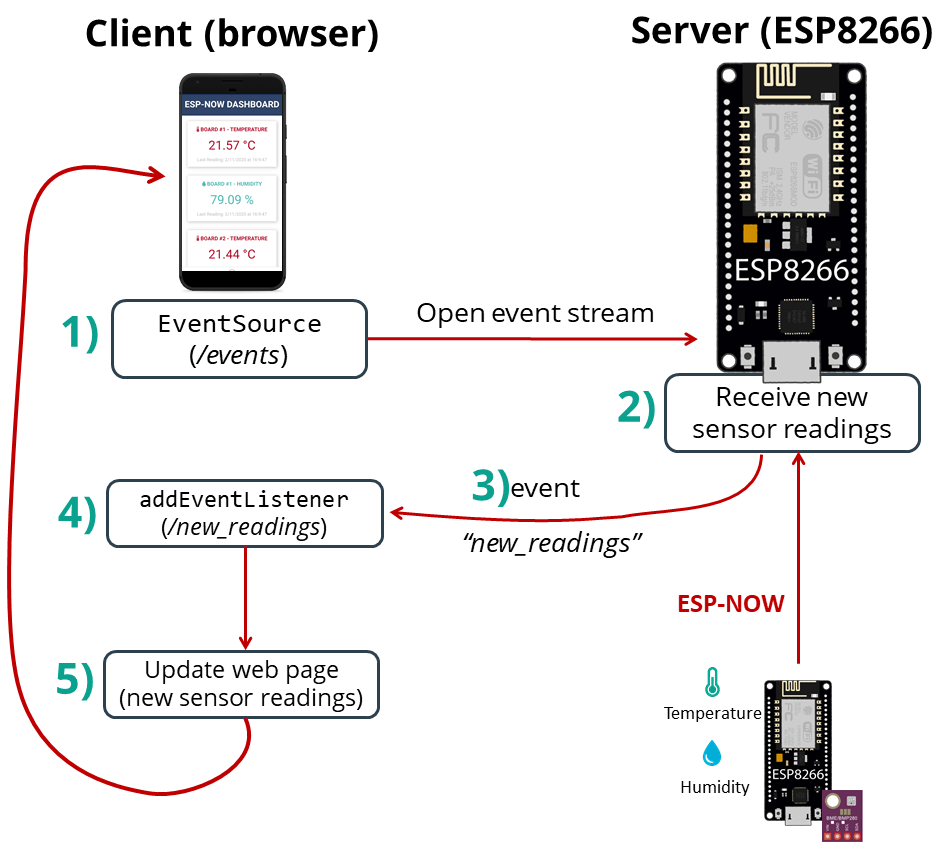
下图显示了我们将构建的项目的概览。
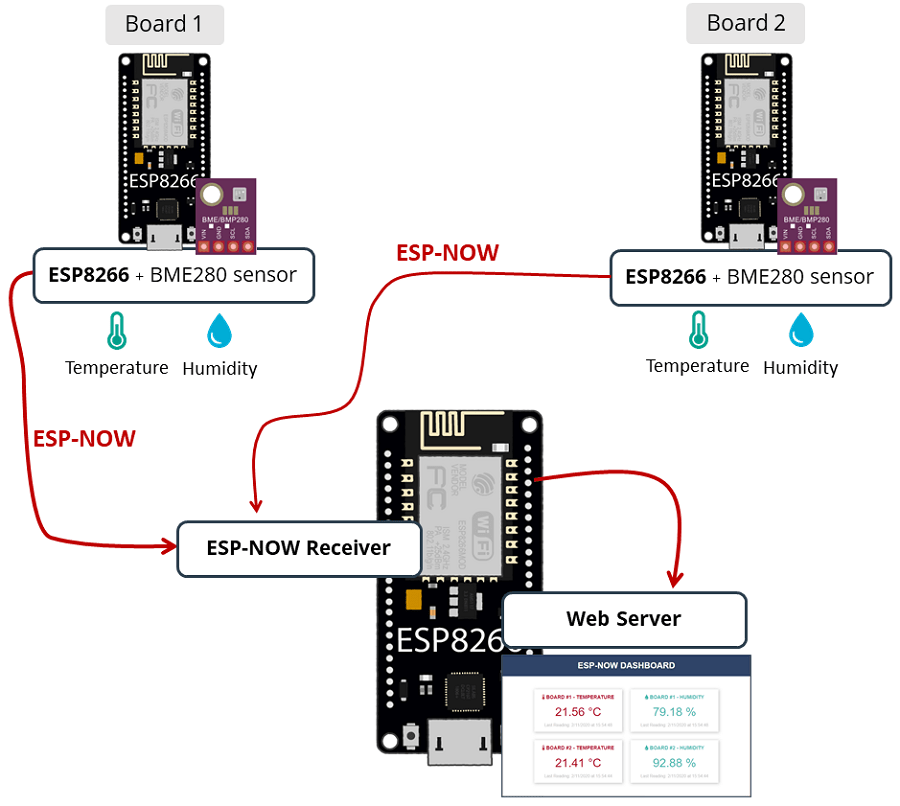
- 有两块 ESP8266 发送板,通过 ESP-NOW将BME280温度和湿度读数发送到一块 ESP8266 接收板( ESP-NOW 多对一配置);
- ESP8266 接收板接收数据包并在网络服务器上显示读数;
- 每次使用服务器发送事件 (SSE) 接收到新读数时,网页都会自动更新。
- 该网页还显示了上次使用 JavaScript 更新读数的时间。
前提条件
在继续此项目之前,请确保检查以下先决条件。
开发环境
我们将使用 Arduino IDE 对 ESP8266 板进行编程,因此在继续本教程之前,请确保您的 Arduino IDE 中安装了 ESP8266 板。
- 在 Arduino IDE(Windows、Mac OS X 和 Linux)中安装 ESP8266 开发板
BME280 图书馆
ESP8266 发送板将从 BME280 传感器发送温度和湿度读数。
要从 BME280 传感器读取数据,我们将使用Adafruit_BME280 库。要使用此库,您还需要安装 Adafruit Unified Sensor 库。按照后续步骤安装这些库。
在搜索框中搜索“ adafruit bme280 ”并安装库。

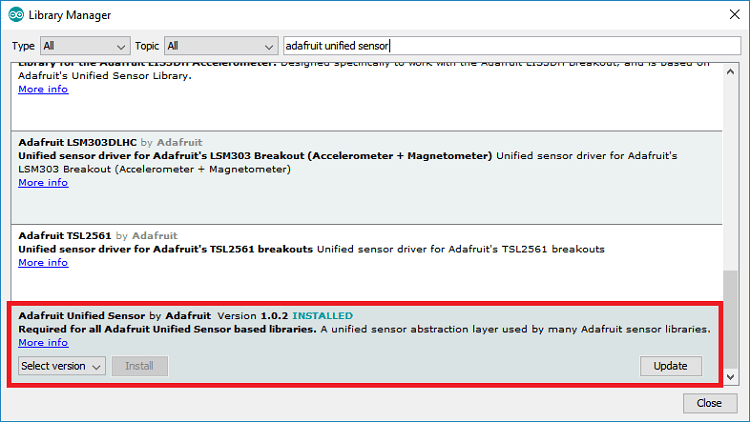
要使用 BME280 库,您还需要安装 Adafruit_Sensor 库。按照以下步骤在您的 Arduino IDE 中安装该库:
转到 Sketch > Include Library > Manage Libraries ,然后在搜索框中 键入“ Adafruit Unified Sensor ”。一直向下滚动以找到库并安装它。
要了解有关 BME280 温度、湿度和压力传感器的更多信息,请阅读我们的指南:ESP8266 和 BME280 使用 Arduino IDE(压力、温度、湿度)。
异步 Web 服务器库
要构建 Web 服务器,您需要安装以下库:
这些库无法通过 Arduino 库管理器安装,因此您需要将库文件复制到 Arduino Installation Libraries 文件夹中。或者,在您的 Arduino IDE 中,您可以转到 Sketch > Include Library > Add .zip Library 并选择您刚刚下载的库。
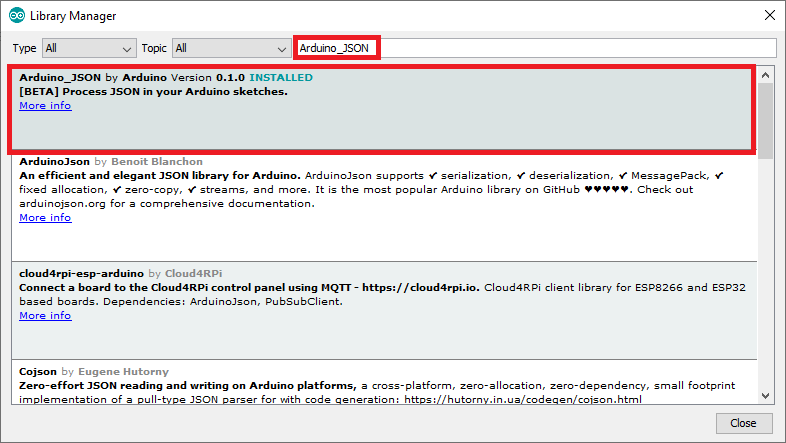
Arduino_JSON 库
您需要安装 Arduino_JSON 库。您可以在 Arduino IDE 库管理器中安装此库。只需转到 Sketch > Include Library > Manage Libraries 并搜索库名称,如下所示:
所需硬件
要学习本教程,您需要多个 ESP8266 开发板。我们将使用三个 ESP8266 板。您还需要:
- 3x ESP8266 (阅读 最佳 ESP8266 开发板)
- 2x BME280 传感器– ESP8266 的 BME280 指南
- 面包板
- 跳线
获取接收板MAC地址
要通过 ESP-NOW 发送消息,您需要知道接收板的。每块板都有一个唯一的 MAC 地址。
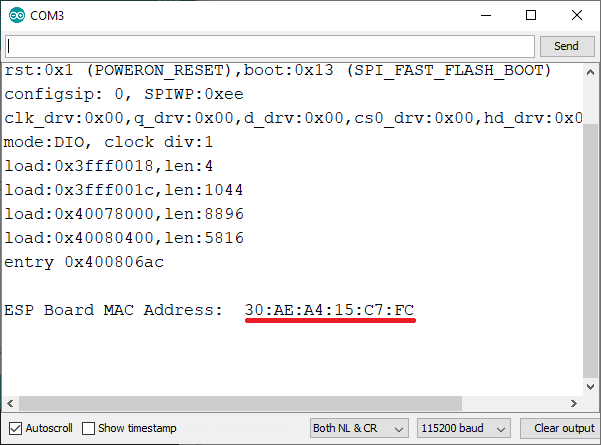
将以下代码上传到您的 ESP8266 接收板以获取其 MAC 地址。
// 获取和更改ESP MAC地址的完整代码:

#ifdef ESP32
  #include <WiFi.h>
#else
  #include <ESP8266WiFi.h>
#endif

void setup(){
  Serial.begin(115200);
  Serial.println();
  Serial.print("ESP Board MAC Address:  ");
  Serial.println(WiFi.macAddress());
}

void loop(){

}
上传代码后,按下 RST/EN 按钮,MAC 地址应该显示在串口监视器上。
ESP8266 接收器(ESP-NOW + Web 服务器)
ESP8266 NodeMCU 接收板接收来自发送板的数据包,并托管一个网络服务器以显示最新接收的读数。
将以下代码上传到您的接收板 - 该代码已准备好接收来自两个不同板的读数。
#include <espnow.h>
#include <ESP8266WiFi.h>
#include "ESPAsyncWebServer.h"
#include "ESPAsyncTCP.h"
#include <Arduino_JSON.h>
// Replace with your network credentials (STATION)
const char* ssid = "REPLACE_WITH_YOUR_SSID";
const char* password = "REPLACE_WITH_YOUR_PASSWORD";
// Structure example to receive data
// Must match the sender structure
typedef struct struct_message {
int id;
float temp;
float hum;
unsigned int readingId;
} struct_message;
struct_message incomingReadings;
JSONVar board;
AsyncWebServer server(80);
AsyncEventSource events("/events");
// callback function that will be executed when data is received
void OnDataRecv(uint8_t * mac_addr, uint8_t *incomingData, uint8_t len) {
// Copies the sender mac address to a string
char macStr[18];
Serial.print("Packet received from: ");
snprintf(macStr, sizeof(macStr), "%02x:%02x:%02x:%02x:%02x:%02x",
mac_addr[0], mac_addr[1], mac_addr[2], mac_addr[3], mac_addr[4], mac_addr[5]);
Serial.println(macStr);
memcpy(&incomingReadings, incomingData, sizeof(incomingReadings));
board["id"] = incomingReadings.id;
board["temperature"] = incomingReadings.temp;
board["humidity"] = incomingReadings.hum;
board["readingId"] = String(incomingReadings.readingId);
String jsonString = JSON.stringify(board);
events.send(jsonString.c_str(), "new_readings", millis());
Serial.printf("Board ID %u: %u bytes\n", incomingReadings.id, len);
Serial.printf("t value: %4.2f \n", incomingReadings.temp);
Serial.printf("h value: %4.2f \n", incomingReadings.hum);
Serial.printf("readingID value: %d \n", incomingReadings.readingId);
Serial.println();
}
const char index_html[] PROGMEM = R"rawliteral(
<!DOCTYPE HTML><html>
<head>
<title>ESP-NOW DASHBOARD</title>
<meta name="viewport" content="width=device-width, initial-scale=1">
<link rel="stylesheet" href="https://use.fontawesome.com/releases/v5.7.2/css/all.css" integrity="sha384-fnmOCqbTlWIlj8LyTjo7mOUStjsKC4pOpQbqyi7RrhN7udi9RwhKkMHpvLbHG9Sr" crossorigin="anonymous">
<link rel="icon" href="data:,">
<style>
html {font-family: Arial; display: inline-block; text-align: center;}
h1 { font-size: 2rem;}
body { margin: 0;}
.topnav { overflow: hidden; background-color: #2f4468; color: white; font-size: 1.7rem; }
.content { padding: 20px; }
.card { background-color: white; box-shadow: 2px 2px 12px 1px rgba(140,140,140,.5); }
.cards { max-width: 700px; margin: 0 auto; display: grid; grid-gap: 2rem; grid-template-columns: repeat(auto-fit, minmax(320px, 1fr)); }
.reading { font-size: 2.8rem; }
.timestamp { color: #bebebe; font-size: 1rem; }
.card-title{ font-size: 1.2rem; font-weight : bold; }
.card.temperature { color: #B10F2E; }
.card.humidity { color: #50B8B4; }
</style>
</head>
<body>
<div class="topnav">
<h1>ESP-NOW DASHBOARD</h1>
</div>
<div class="content">
<div class="cards">
<div class="card temperature">
<p class="card-title"><i class="fas fa-thermometer-half"></i> BOARD #1 - TEMPERATURE</p><p><span class="reading"><span id="t1"></span> °C</span></p><p class="timestamp">Last Reading: <span id="rt1"></span></p>
</div>
<div class="card humidity">
<p class="card-title"><i class="fas fa-tint"></i> BOARD #1 - HUMIDITY</p><p><span class="reading"><span id="h1"></span> %</span></p><p class="timestamp">Last Reading: <span id="rh1"></span></p>
</div>
<div class="card temperature">
<p class="card-title"><i class="fas fa-thermometer-half"></i> BOARD #2 - TEMPERATURE</p><p><span class="reading"><span id="t2"></span> °C</span></p><p class="timestamp">Last Reading: <span id="rt2"></span></p>
</div>
<div class="card humidity">
<p class="card-title"><i class="fas fa-tint"></i> BOARD #2 - HUMIDITY</p><p><span class="reading"><span id="h2"></span> %</span></p><p class="timestamp">Last Reading: <span id="rh2"></span></p>
</div>
</div>
</div>
<script>
function getDateTime() {
var currentdate = new Date();
var datetime = currentdate.getDate() + "/"
+ (currentdate.getMonth()+1) + "/"
+ currentdate.getFullYear() + " at "
+ currentdate.getHours() + ":"
+ currentdate.getMinutes() + ":"
+ currentdate.getSeconds();
return datetime;
}
if (!!window.EventSource) {
var source = new EventSource('/events');
source.addEventListener('open', function(e) {
console.log("Events Connected");
}, false);
source.addEventListener('error', function(e) {
if (e.target.readyState != EventSource.OPEN) {
console.log("Events Disconnected");
}
}, false);
source.addEventListener('message', function(e) {
console.log("message", e.data);
}, false);
source.addEventListener('new_readings', function(e) {
console.log("new_readings", e.data);
var obj = JSON.parse(e.data);
document.getElementById("t"+obj.id).innerHTML = obj.temperature.toFixed(2);
document.getElementById("h"+obj.id).innerHTML = obj.humidity.toFixed(2);
document.getElementById("rt"+obj.id).innerHTML = getDateTime();
document.getElementById("rh"+obj.id).innerHTML = getDateTime();
}, false);
}
</script>
</body>
</html>)rawliteral";
void setup() {
// Initialize Serial Monitor
Serial.begin(115200);
// Set the device as a Station and Soft Access Point simultaneously
WiFi.mode(WIFI_AP_STA);
// Set device as a Wi-Fi Station
WiFi.begin(ssid, password);
while (WiFi.status() != WL_CONNECTED) {
delay(1000);
Serial.println("Setting as a Wi-Fi Station..");
}
Serial.print("Station IP Address: ");
Serial.println(WiFi.localIP());
Serial.print("Wi-Fi Channel: ");
Serial.println(WiFi.channel());
// Init ESP-NOW
if (esp_now_init() != 0) {
Serial.println("Error initializing ESP-NOW");
return;
}
// Once ESPNow is successfully Init, we will register for recv CB to
// get recv packer info
esp_now_register_recv_cb(OnDataRecv);
server.on("/", HTTP_GET, [](AsyncWebServerRequest *request){
request->send_P(200, "text/html", index_html);
});
events.onConnect([](AsyncEventSourceClient *client){
if(client->lastId()){
Serial.printf("Client reconnected! Last message ID that it got is: %u\n", client->lastId());
}
// send event with message "hello!", id current millis
// and set reconnect delay to 1 second
client->send("hello!", NULL, millis(), 10000);
});
server.addHandler(&events);
server.begin();
}
void loop() {
static unsigned long lastEventTime = millis();
static const unsigned long EVENT_INTERVAL_MS = 5000;
if ((millis() - lastEventTime) > EVENT_INTERVAL_MS) {
events.send("ping",NULL,millis());
lastEventTime = millis();
}
}代码如何工作
首先,包括必要的库。
#include <espnow.h>
#include <ESP8266WiFi.h>
#include "ESPAsyncWebServer.h"
#include "ESPAsyncTCP.h"
#include <Arduino_JSON.h>这Arduino_JSON库是必需的,因为我们将使用从每个板接收到的数据创建一个 JSON 变量。这个 JSON 变量将用于将所有需要的信息发送到网页,您将在本项目的后面看到。 在以下行中插入您的网络凭据,以便 ESP8266 可以连接到您的本地网络。
const char* ssid = "REPLACE_WITH_YOUR_SSID";
const char* password = "REPLACE_WITH_YOUR_PASSWORD";数据结构
然后,创建一个包含我们将接收的数据的结构。我们称这种结构结构消息它包含电路板 ID、温度和湿度读数以及读数 ID。
typedef struct struct_message {
    int id;
    float temp;
    float hum;
    int readingId;
} struct_message;
创建一个新的类型变量结构消息它被称作传入读数这将存储变量值。
struct_message incomingReadings;创建一个名为board.
JSONVar board;在端口 80 上创建异步 Web 服务器。
AsyncWebServer server(80);创建事件源
要在新读数到达时自动在 Web 服务器上显示信息,我们将使用服务器发送事件 (SSE)。
下面一行创建了一个新的事件源。
AsyncEventSource events("/events");服务器发送事件允许网页(客户端)从服务器获取更新。当新的 ESP-NOW 数据包到达时,我们将使用它在 Web 服务器页面上自动显示新读数。
OnDataRecv() 函数
这OnDataRecv()当您收到新的 ESP-NOW 数据包时,函数将被执行。
void OnDataRecv(uint8_t * mac_addr, uint8_t *incomingData, uint8_t len) { 在该函数内,打印发件人的 MAC 地址:
char macStr[18];
Serial.print("Packet received from: ");
snprintf(macStr, sizeof(macStr), "%02x:%02x:%02x:%02x:%02x:%02x",
         mac_addr[0], mac_addr[1], mac_addr[2], mac_addr[3], mac_addr[4], mac_addr[5]);
Serial.println(macStr);
复制里面的信息输入数据变量传入读数结构变量。
memcpy(&incomingReadings, incomingData, sizeof(incomingReadings));然后,使用接收到的信息创建一个 JSON 字符串变量 :
board["id"] = incomingReadings.id;
board["temperature"] = incomingReadings.temp;
board["humidity"] = incomingReadings.hum;
board["readingId"] = String(incomingReadings.readingId);
String jsonString = JSON.stringify(board);这是一个收到的json字符串
board = {
  "id": "1",
  "temperature": "24.32",
  "humidity" = "65.85",
  "readingId" = "2"
}在收集到所有接收到的json字符串变量数据后,将该信息作为事件发送到浏览器(“new_readings”)。
events.send(jsonString.c_str(), "new_readings", millis());稍后,我们将看到如何在客户端处理这些事件。
最后,将接收到的信息打印到 Arduino IDE Serial Monitor 上进行调试:
Serial.printf("Board ID %u: %u bytes\n", incomingReadings.id, len);
Serial.printf("t value: %4.2f \n", incomingReadings.temp);
Serial.printf("h value: %4.2f \n", incomingReadings.hum);
Serial.printf("readingID value: %d \n", incomingReadings.readingId);
Serial.println();
构建网页
这index_html变量包含构建网页的所有 HTML、CSS 和 JavaScript。我不会详细介绍 HTML 和 CSS 的工作原理。我们只看一下如何处理服务器发送的事件。
处理事件
创建一个新的事件源对象并指定发送更新的页面的 URL。在我们的例子中它是事件源。
if (!!window.EventSource) {
var source = new EventSource('/events');一旦你实例化了一个事件源,你就可以开始监听来自服务器的消息了添加事件监听器().
这些是默认的事件侦听器,如 AsyncWebServer文档中所示。
source.addEventListener('open', function(e) {
  console.log("Events Connected");
}, false);
source.addEventListener('error', function(e) {
  if (e.target.readyState != EventSource.OPEN) {
    console.log("Events Disconnected");
  }
}, false);

source.addEventListener('message', function(e) {
  console.log("message", e.data);
}, false);然后,添加事件侦听器“new_readings”。
source.addEventListener('new_readings', function(e) {
当 ESP8266 收到一个新数据包时,它会发送一个带有读数的 JSON 字符串作为事件(“new_readings”) 给客户。以下几行处理浏览器收到该事件时发生的情况。
console.log("new_readings", e.data);
var obj = JSON.parse(e.data);
document.getElementById("t"+obj.id).innerHTML = obj.temperature.toFixed(2);
document.getElementById("h"+obj.id).innerHTML = obj.humidity.toFixed(2);
document.getElementById("rt"+obj.id).innerHTML = getDateTime();
document.getElementById("rh"+obj.id).innerHTML = getDateTime();基本上就是在浏览器控制台打印新的读数,把接收到的数据放到网页上对应id的元素中。我们还通过致电更新接收读数的日期和时间获取日期时间()JavaScript 函数。
function getDateTime() {
  var currentdate = new Date();
  var datetime = currentdate.getDate() + "/"
  + (currentdate.getMonth()+1) + "/"
  + currentdate.getFullYear() + " at "
  + currentdate.getHours() + ":"
  + currentdate.getMinutes() + ":"
  + currentdate.getSeconds();
  return datetime;
}
setup()
在里面setup(), 将 ESP8266 接收器设置为接入点和 Wi-Fi 站:
WiFi.mode(WIFI_AP_STA);以下行将 ESP8266 连接到您的本地网络并打印 IP 地址和 Wi-Fi 信道:
// Set device as a Wi-Fi Station
WiFi.begin(ssid, password);
while (WiFi.status() != WL_CONNECTED) {
  delay(1000);
  Serial.println("Setting as a Wi-Fi Station..");
}
Serial.print("Station IP Address: ");
Serial.println(WiFi.localIP());
Serial.print("Wi-Fi Channel: ");
Serial.println(WiFi.channel());
初始化 ESP-NOW。
if (esp_now_init() != 0) {
  Serial.println("Error initializing ESP-NOW");
  return;
}注册数据接收回调函数,以便在新的 ESP-NOW 数据包到达时执行。
esp_now_register_recv_cb(OnDataRecv);处理请求
当你在root上访问ESP8266的IP地址/URL,发送存储在index_html构建网页的变量。
server.on("/", HTTP_GET, [](AsyncWebServerRequest *request){
  request->send_P(200, "text/html", index_html);
});
服务器事件源
在服务器上设置事件源。
events.onConnect([](AsyncEventSourceClient *client){
  if(client->lastId()){
    Serial.printf("Client reconnected! Last message ID that it got is: %u\n", client->lastId());
  }
  // send event with message "hello!", id current millis
  // and set reconnect delay to 1 second
  client->send("hello!", NULL, millis(), 10000);
);
server.addHandler(&events);
最后,启动服务器。
server.begin();loop()
在里面loop(),每 5 秒发送一次 ping。这用于在客户端检查服务器是否仍在运行(这段代码不是强制性的)。
static unsigned long lastEventTime = millis();
static const unsigned long EVENT_INTERVAL_MS = 5000;
if ((millis() - lastEventTime) > EVENT_INTERVAL_MS) {
  events.send("ping",NULL,millis());
  lastEventTime = millis();
}
下图总结了服务器发送的事件如何在此项目上工作,以及它如何在不刷新网页的情况下更新值。
将代码上传到接收板后,按下板载 EN/RST 按钮。ESP8266 的 IP 地址应该打印在串行监视器和 Wi-Fi 通道上。

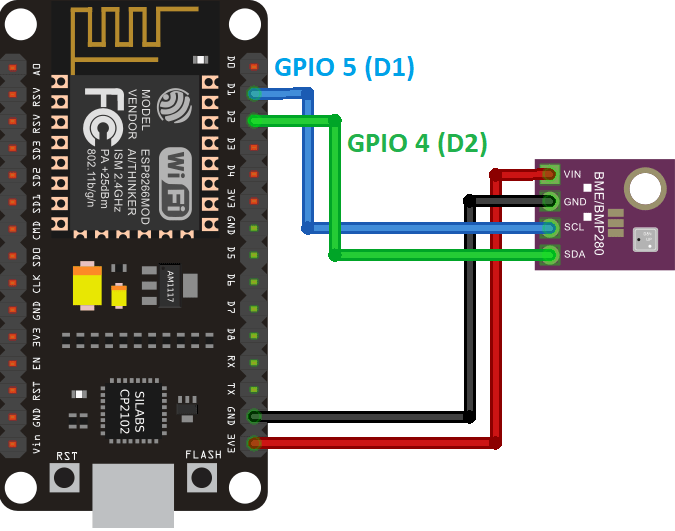
ESP8266 硬件的连接
ESP8266 开发板连接到 BME280 传感器。将传感器连接到默认的 ESP8266 I2C 引脚:
- 接口 5(D1) -> SCL
- 接口 4(D2) -> SDA
ESP8266 采集板代码 (ESP-NOW)
每个采集板将数据通过 ESP-NOW协议发送一个JSON,其中包含采集板 ID(以便您可以识别哪个板发送了读数)、温度、湿度和读数 ID。阅读 ID 是一个 int 数字,可以知道发送了多少条消息。

将以下代码上传到您的每个采集板上,不要忘记增加 ID 到每个发送板的编号,修改WIFI账号和密码信息。
/*
  Rui Santos
  Complete project details at https://RandomNerdTutorials.com/esp8266-esp-now-wi-fi-web-server/

  Permission is hereby granted, free of charge, to any person obtaining a copy
  of this software and associated documentation files.

  The above copyright notice and this permission notice shall be included in all
  copies or substantial portions of the Software.
*/

#include <espnow.h>
#include <ESP8266WiFi.h>
#include <Adafruit_BME280.h>
#include <Adafruit_Sensor.h>

// Set your Board ID (ESP32 Sender #1 = BOARD_ID 1, ESP32 Sender #2 = BOARD_ID 2, etc)
#define BOARD_ID 2

Adafruit_BME280 bme;

//MAC Address of the receiver
uint8_t broadcastAddress[] = {0xFF, 0xFF, 0xFF, 0xFF, 0xFF, 0xFF};

//Structure example to send data
//Must match the receiver structure
typedef struct struct_message {
    int id;
    float temp;
    float hum;
    int readingId;
} struct_message;

//Create a struct_message called myData
struct_message myData;

unsigned long previousMillis = 0;   // Stores last time temperature was published
const long interval = 10000;        // Interval at which to publish sensor readings

unsigned int readingId = 0;

// Insert your SSID
constexpr char WIFI_SSID[] = "REPLACE_WITH_YOUR_SSID";

int32_t getWiFiChannel(const char *ssid) {
  if (int32_t n = WiFi.scanNetworks()) {
    for (uint8_t i=0; i<n; i++) {
      if (!strcmp(ssid, WiFi.SSID(i).c_str())) {
        return WiFi.channel(i);
      }
    }
  }
  return 0;
}

void initBME(){
  if (!bme.begin(0x76)) {
    Serial.println("Could not find a valid BME280 sensor, check wiring!");
    while (1);
  }
}

float readTemperature() {
  float t = bme.readTemperature();
  return t;
}

float readHumidity() {
  float h = bme.readHumidity();
  return h;
}

// Callback when data is sent
void OnDataSent(uint8_t *mac_addr, uint8_t sendStatus) {
  Serial.print("Last Packet Send Status: ");
  if (sendStatus == 0){
    Serial.println("Delivery success");
  }
  else{
    Serial.println("Delivery fail");
  }
}

void setup() {
  //Init Serial Monitor
  Serial.begin(115200);
  initBME();

  // Set device as a Wi-Fi Station and set channel
  WiFi.mode(WIFI_STA);

  int32_t channel = getWiFiChannel(WIFI_SSID);

  WiFi.printDiag(Serial); // Uncomment to verify channel number before
  wifi_promiscuous_enable(1);
  wifi_set_channel(channel);
  wifi_promiscuous_enable(0);
  WiFi.printDiag(Serial); // Uncomment to verify channel change after

  // Init ESP-NOW
  if (esp_now_init() != 0) {
    Serial.println("Error initializing ESP-NOW");
    return;
  }

  // Once ESPNow is successfully Init, we will register for Send CB to
  // get the status of Trasnmitted packet
   esp_now_set_self_role(ESP_NOW_ROLE_CONTROLLER);

  esp_now_register_send_cb(OnDataSent);

  esp_now_add_peer(broadcastAddress, ESP_NOW_ROLE_SLAVE, 1, NULL, 0);
}

void loop() {
  unsigned long currentMillis = millis();
  if (currentMillis - previousMillis >= interval) {
    // Save the last time a new reading was published
    previousMillis = currentMillis;
    //Set values to send
    myData.id = BOARD_ID;
    myData.temp = readTemperature();
    myData.hum = readHumidity();
    myData.readingId = readingId++;

    esp_now_send(broadcastAddress, (uint8_t *) &myData, sizeof(myData));

    Serial.print("loop");
  }
}
代码如何工作
首先导入所需的库:
#include <espnow.h>
#include <ESP8266WiFi.h>
#include <Adafruit_BME280.h>
#include <Adafruit_Sensor.h>
设置板号
定义ESP8266采集板ID,例如setBOARD_ID 1对于 ESP8266 Sender #1,等等……
#define BOARD_ID 1BME280 传感器
创建一个Adafruit_BME280称为对象bme。
Adafruit_BME280 bme;接收者的 MAC 地址
在下一行插入接收方的 MAC 地址(例如):
uint8_t broadcastAddress[] = {0x30, 0xAE, 0xA4, 0x15, 0xC7, 0xFC};数据结构
然后,创建一个包含我们要发送的数据的结构。这结构消息包含电路板 ID、温度读数、湿度读数和读数 ID。
typedef struct struct_message {
    int id;
    float temp;
    float hum;
    int readingId;
} struct_message;创建一个新的类型变量结构消息它被称作我的资料存储变量的值。
struct_message myData;定时器间隔
创建一些辅助计时器变量以每 10 秒发布一次读数。您可以更改延迟时间间隔多变的。
unsigned long previousMillis = 0; // Stores last time temperature was published
const long interval = 10000; // Interval at which to publish sensor readings初始化阅读编号变量——它跟踪发送的读数数量。
unsigned int readingId = 0;更改 Wi-Fi 频道
现在,我们将获取接收器的 Wi-Fi 信道。这很有用,因为它允许我们自动将相同的 Wi-Fi 通道分配给采集板。
为此,您必须在以下行中插入您的 SSID:
constexpr char WIFI_SSID[] = "REPLACE_WITH_YOUR_SSID";然后,getWiFiChannel()函数扫描您的网络并获取其频道。
int32_t getWiFiChannel(const char *ssid) {
  if (int32_t n = WiFi.scanNetworks()) {
    for (uint8_t i=0; i<n; i++) {
      if (!strcmp(ssid, WiFi.SSID(i).c_str())) {
        return WiFi.channel(i);
      }
    }
  }
  return 0;
}
初始化 BME280 传感器
这initBME()函数初始化 BME280 传感器。
void initBME(){
  if (!bme.begin(0x76)) {
    Serial.println("Could not find a valid BME280 sensor, check wiring!");
    while (1);
  }
}
读数温度
这readTemperature()函数读取并返回 BME280 传感器的温度。
float readTemperature() {
  float t = bme.readTemperature();
  return t;
}
读数湿度
这readHumidity()函数读取并返回来自 BME280 传感器的湿度。
float readHumidity() {
  float h = bme.readHumidity();
  return h;
}
OnDataSent 回调函数
这OnDataSent ()发送消息时将执行回调函数。在这种情况下,此函数会打印消息是否已成功传递。
void OnDataSent(uint8_t *mac_addr, uint8_t sendStatus) {
  Serial.print("Last Packet Send Status: ");
  if (sendStatus == 0){
    Serial.println("Delivery success");
  }
  else{
    Serial.println("Delivery fail");
  }
}
setu()
初始化串行监视器。
Serial.begin(115200);初始化 BME280 传感器:
initBME();将 ESP8266 设置为 Wi-Fi 站点。
WiFi.mode(WIFI_STA);设置其频道以匹配接收器的 Wi-Fi 频道:
int32_t channel = getWiFiChannel(WIFI_SSID);

WiFi.printDiag(Serial); // Uncomment to verify channel number before
wifi_promiscuous_enable(1);
wifi_set_channel(channel);
wifi_promiscuous_enable(0);
WiFi.printDiag(Serial); // Uncomment to verify channel change after
初始化 ESP-NOW。
// Init ESP-NOW
if (esp_now_init() != 0) {
  Serial.println("Error initializing ESP-NOW");
  return;
}
设置 ESP8266 角色:
esp_now_set_self_role(ESP_NOW_ROLE_CONTROLLER);成功初始化 ESP-NOW 后,注册发送消息时调用的回调函数。在这种情况下,注册OnDataSent()之前创建的函数。
esp_now_register_send_cb(OnDataSent);添加同行
要将数据发送到另一块板(接收器),您需要将其配对为对等体。以下代码将注册接收方并添加为对等方。
esp_now_add_peer(broadcastAddress, ESP_NOW_ROLE_SLAVE, 1, NULL, 0);loop()
在里面loop(), 检查是否到了获取和发送新读数的时间。
unsigned long currentMillis = millis();
if (currentMillis - previousMillis >= interval) {
  // Save the last time a new reading was published
  previousMillis = currentMillis;
发送 ESP-NOW 消息
最后,通过 ESP-NOW 发送消息结构。
esp_now_send(broadcastAddress, (uint8_t *) &myData, sizeof(myData));将代码上传到您的采集板上。您应该注意到采集板将其 Wi-Fi 通道更改为接收板的通道。
示范
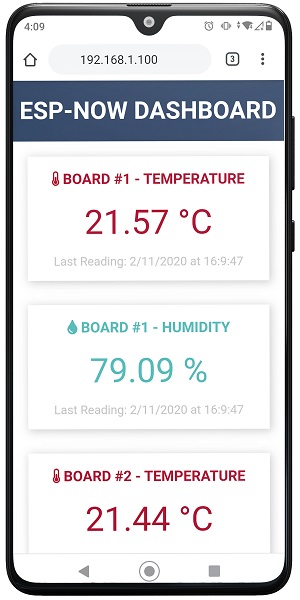
将代码上传到所有采集板后,如果一切按预期进行,ESP8266接收板应该开始从其他采集板接收传感器数据。
在本地网络上打开浏览器并输入 ESP8266 的 IP 地址。

它应该加载温度、湿度和最后一次在网页上为每块采集板更新读数的时间。收到新数据包后,您的网页会自动更新而无需刷新网页。
总结
在本教程中,您学习了如何使用 ESP-NOW 和 Wi-Fi 设置 Web 服务器以使用 ESP8266 NodeMCU 板从多个板(多对一配置)接收 ESP-NOW 数据包。
此外,您还使用服务器发送事件在每次收到新数据包时自动更新网页,而无需刷新网页。