1. 概述
利用keepalived实现Mysql数据库的高可用,Keepalived+Mysql双主来实现MYSQL-HA,我们必须保证两台Mysql数据库的数据完全一致,实现方法是两台Mysql互为主从关系,通过keepalived配置VIP,实现当其中的一台Mysql数据库宕机后,应用能够自动切换到另外一台Mysql数据库上去,保证系统的高可用。
2. 实验环境
| 操作系统 | Red Hat 4.8.5 |
|---|---|
| MySQL版本 | mysql 8.0.28 |
| Keepalived版本 | keepalibed-2.2.8 |
| Mysql-master-1 | 192.168.15.94 |
| Mysql-master-2 | 192.168.15.92 |
| Mysql-VIP | 192.168.15.100 |
3. 相关配置
3.1 关闭防火墙
两台机器安装mysql,关闭firewalld。
[root@skymachine ~]# systemctl stop firewalld
[root@skymachine ~]# systemctl disable firewalld
[root@skymachine ~]# systemctl status firewalld
● firewalld.service - firewalld - dynamic firewall daemon
   Loaded: loaded (/usr/lib/systemd/system/firewalld.service; disabled; vendor preset: enabled)
   Active: inactive (dead)
     Docs: man:firewalld(1)
3.2 修改master-1配置文件
MySQL 搭建主主需要配置 my.cnf ,在master-1库 my.cnf 的 [mysqld] 段落下添加如下内容:
vi /etc/my.cnf

[mysqld]

log-bin=mysql-bin                               #开启主从binlog(二进制日志),主库必须开启
binlog_format=mixed                             #指定二进制日志格式为mixed,即在语句和行两种模式之间自动切换
server-id=1                                     #配置server-id(唯一)标识主机,必须与从库不一致
relay-log=relay-bin                             #指定中继日志文件的名称为relay-bin,用于在主从复制中传输数据
relay-log-index=slave-relay-bin.index           #指定中继日志索引文件的名称,用于记录中继日志文件的位置。
auto_increment_increment=2                      #指定自增长ID的增量为2,用于在主从复制中避免ID冲突。
auto_increment_offset=1                         #指定自增长ID的起始值为1,用于在主从复制中避免ID冲突。

##保存退出,并重启MySQL服务
[root@skymachine ~]# service mysql restart
Shutting down MySQL.. SUCCESS!
Starting MySQL.. SUCCESS!
3.3 修改master-2配置文件
vi /etc/my.cnf
[mysqld]
log-bin=mysql-bin #开启主从binlog(二进制日志),主库必须开启
binlog_format=mixed #指定二进制日志格式为mixed,即在语句和行两种模式之间自动切换
server-id=2 #配置server-id(唯一)标识主机,必须与从库不一致
relay-log=relay-bin #指定中继日志文件的名称为relay-bin,用于在主从复制中传输数据
relay-log-index=slave-relay-bin.index #指定中继日志索引文件的名称,用于记录中继日志文件的位置。
auto_increment_increment=2 #指定自增长ID的增量为2,用于在主从复制中避免ID冲突。
auto_increment_offset=2 #指定自增长ID的起始值为2,用于在主从复制中避免ID冲突。
##保存退出,并重启MySQL服务
[root@skymachine ~]# service mysql restart
Shutting down MySQL.. SUCCESS!
Starting MySQL.. SUCCESS! 4. 配置双主模式
4.1 在两台节点分别创建同步用户
以root用户登录mysql
create user 'test'@'192.168.15.%' identified by 'Test12#$';
grant replication slave on *.* to 'test'@'192.168.15.%';
flush privileges;
select user,host from mysql.user;以下为运行结果
mysql> create user 'test'@'192.168.15.%' identified by 'Test12#$';
Query OK, 0 rows affected (0.20 sec)
mysql> grant replication slave on *.* to 'test'@'192.168.15.%';
Query OK, 0 rows affected (0.03 sec)
mysql> flush privileges;
Query OK, 0 rows affected (0.03 sec)
mysql> select user,host from mysql.user;
+------------------+--------------+
| user | host |
+------------------+--------------+
| user01 | % |
| test | 192.168.15.% |
| mysql.infoschema | localhost |
| mysql.session | localhost |
| mysql.sys | localhost |
| root | localhost |
+------------------+--------------+
6 rows in set (0.00 sec)4.2 在master-1上配置主服务器
在master-1上配置主服务器,需要先获取master-2的用户名、密码、ip、port、master_log_file、file,master_log_pos及get_master_public_key
4.2.1 获取master-2配置信息
在master-2服务器mysql命令行下,输入
show master status;mysql> show master status;
+------------------+----------+--------------+------------------+-------------------+
| File | Position | Binlog_Do_DB | Binlog_Ignore_DB | Executed_Gtid_Set |
+------------------+----------+--------------+------------------+-------------------+
| mysql-bin.000003 | 960 | | | |
+------------------+----------+--------------+------------------+-------------------+
1 row in set (0.00 sec)获取file和Position内容
4.2.2 配置主服务器
返回master-1服务器mysql命令行下,输入以下命令
stop slave;
reset slave;
change master to master_host='192.168.15.92',
master_port=3306,master_user='test',
master_password='Test12#$',
master_log_file='mysql-bin.000003',
master_log_pos=960,
get_master_public_key=1;
start slave;
show slave status\G;以下为运行结果,供参考
mysql> stop slave;
Query OK, 0 rows affected, 2 warnings (0.00 sec)
mysql> reset slave;
Query OK, 0 rows affected, 1 warning (0.07 sec)
mysql> change master to master_host='192.168.15.92',
-> master_port=3306,master_user='test',
-> master_password='Test12#$',
-> master_log_file='mysql-bin.000003',
-> master_log_pos=960,
-> get_master_public_key=1;
Query OK, 0 rows affected, 10 warnings (0.08 sec)
mysql> start slave;
Query OK, 0 rows affected, 1 warning (0.04 sec)
mysql> show slave status\G;
*************************** 1. row ***************************
Slave_IO_State: Waiting for source to send event
Master_Host: 192.168.15.92
Master_User: test
Master_Port: 3306
Connect_Retry: 60
Master_Log_File: mysql-bin.000003
Read_Master_Log_Pos: 960
Relay_Log_File: relay-bin.000002
Relay_Log_Pos: 326
Relay_Master_Log_File: mysql-bin.000003
Slave_IO_Running:  Yes
Slave_SQL_Running: Yes
Replicate_Do_DB:
Replicate_Ignore_DB:
Replicate_Do_Table:
Replicate_Ignore_Table:
Replicate_Wild_Do_Table:
Replicate_Wild_Ignore_Table:
Last_Errno: 0
Last_Error:
Skip_Counter: 0
Exec_Master_Log_Pos: 960
Relay_Log_Space: 530
Until_Condition: None
Until_Log_File:
Until_Log_Pos: 0
Master_SSL_Allowed: No
Master_SSL_CA_File:
Master_SSL_CA_Path:
Master_SSL_Cert:
Master_SSL_Cipher:
Master_SSL_Key:
Seconds_Behind_Master: 0
Master_SSL_Verify_Server_Cert: No
Last_IO_Errno: 0
Last_IO_Error:
Last_SQL_Errno: 0
Last_SQL_Error:
Replicate_Ignore_Server_Ids:
Master_Server_Id: 2
Master_UUID: 820016c0-131c-11ee-895a-00505682d637
Master_Info_File: mysql.slave_master_info
SQL_Delay: 0
SQL_Remaining_Delay: NULL
Slave_SQL_Running_State: Replica has read all relay log; waiting for more updates
Master_Retry_Count: 86400
Master_Bind:
Last_IO_Error_Timestamp:
Last_SQL_Error_Timestamp:
Master_SSL_Crl:
Master_SSL_Crlpath:
Retrieved_Gtid_Set:
Executed_Gtid_Set:
Auto_Position: 0
Replicate_Rewrite_DB:
Channel_Name:
Master_TLS_Version:
Master_public_key_path:
Get_master_public_key: 1
Network_Namespace:
1 row in set, 1 warning (0.01 sec)当下面两个配置出现YES是代表配置成功
Slave_IO_Running:  Yes
Slave_SQL_Running: Yes4.3 在master-2上配置主服务器
在master-2上配置主服务器,需要先获取master-1的用户名、密码、ip、port、master_log_file、file,master_log_pos及get_master_public_key
4.3.1 获取master-1配置信息
在master-1服务器mysql命令行下,输入
show master status;mysql> show master status;
+------------------+----------+--------------+------------------+-------------------+
| File | Position | Binlog_Do_DB | Binlog_Ignore_DB | Executed_Gtid_Set |
+------------------+----------+--------------+------------------+-------------------+
| mysql-bin.000002 | 157 | | | |
+------------------+----------+--------------+------------------+-------------------+
1 row in set (0.00 sec)获取file和Position内容
4.3.2 配置主服务器
返回master-2服务器mysql命令行下,输入以下命令
stop slave;
reset slave;
change master to master_host='192.168.15.94',
master_port=3306,master_user='test',
master_password='Test12#$',
master_log_file='mysql-bin.000002',
master_log_pos=157,
get_master_public_key=1;
start slave;
show slave status\G;以下为运行结果,供参考
mysql> stop slave;
Query OK, 0 rows affected, 1 warning (0.03 sec)
mysql> reset slave all;
Query OK, 0 rows affected, 1 warning (0.26 sec)
mysql> change master to master_host='192.168.15.94',
-> master_port=3306,master_user='test',
-> master_password='Test12#$',
-> master_log_file='mysql-bin.000002',
-> master_log_pos=157,
-> get_master_public_key=1;
Query OK, 0 rows affected, 10 warnings (0.12 sec)
mysql> start slave;
Query OK, 0 rows affected, 1 warning (0.05 sec)
mysql> show slave status\G;
*************************** 1. row ***************************
Slave_IO_State: Waiting for source to send event
Master_Host: 192.168.15.94
Master_User: test
Master_Port: 3306
Connect_Retry: 60
Master_Log_File: mysql-bin.000002
Read_Master_Log_Pos: 157
Relay_Log_File: relay-bin.000002
Relay_Log_Pos: 326
Relay_Master_Log_File: mysql-bin.000002
Slave_IO_Running: Yes
Slave_SQL_Running: Yes
Replicate_Do_DB:
Replicate_Ignore_DB:
Replicate_Do_Table:
Replicate_Ignore_Table:
Replicate_Wild_Do_Table:
Replicate_Wild_Ignore_Table:
Last_Errno: 0
Last_Error:
Skip_Counter: 0
Exec_Master_Log_Pos: 157
Relay_Log_Space: 530
Until_Condition: None
Until_Log_File:
Until_Log_Pos: 0
Master_SSL_Allowed: No
Master_SSL_CA_File:
Master_SSL_CA_Path:
Master_SSL_Cert:
Master_SSL_Cipher:
Master_SSL_Key:
Seconds_Behind_Master: 0
Master_SSL_Verify_Server_Cert: No
Last_IO_Errno: 0
Last_IO_Error:
Last_SQL_Errno: 0
Last_SQL_Error:
Replicate_Ignore_Server_Ids:
Master_Server_Id: 1
Master_UUID: b5609587-1307-11ee-96e9-00505682d2a5
Master_Info_File: mysql.slave_master_info
SQL_Delay: 0
SQL_Remaining_Delay: NULL
Slave_SQL_Running_State: Replica has read all relay log; waiting for more updates
Master_Retry_Count: 86400
Master_Bind:
Last_IO_Error_Timestamp:
Last_SQL_Error_Timestamp:
Master_SSL_Crl:
Master_SSL_Crlpath:
Retrieved_Gtid_Set:
Executed_Gtid_Set:
Auto_Position: 0
Replicate_Rewrite_DB:
Channel_Name:
Master_TLS_Version:
Master_public_key_path:
Get_master_public_key: 1
Network_Namespace:
1 row in set, 1 warning (0.01 sec)当下面两个配置出现YES是代表配置成功
Slave_IO_Running: Yes
Slave_SQL_Running: Yes5. 测试双主同步
5.1 在master-1主机上创建同步数据库
例如创建abcd,并在abcd中创建一张测试表如t1:
mysql> CREATE DATABASE IF NOT EXISTS abcd DEFAULT CHARSET utf8mb4 COLLATE utf8mb4_general_ci;
Query OK, 1 row affected (0.04 sec)
mysql> use abcd;
Database changed
mysql> show databases;
+--------------------+
| Database |
+--------------------+
| abcd |
| information_schema |
| mydb |
| mysql |
| performance_schema |
| sys |
+--------------------+
6 rows in set (0.00 sec)
mysql> create table t1(id int,name varchar(20));
Query OK, 0 rows affected (0.30 sec)
mysql> show tables;
+----------------+
| Tables_in_abcd |
+----------------+
| t1 |
+----------------+
1 row in set (0.00 sec)
mysql> select * from t1;
Empty set (0.01 sec)5.2 在master-2上查看是否同步了master-1的变化
mysql> show databases;
+--------------------+
| Database |
+--------------------+
| abcd |
| information_schema |
| mydb |
| mysql |
| performance_schema |
| sys |
+--------------------+
6 rows in set (0.01 sec)
mysql> use abcd;
Reading table information for completion of table and column names
You can turn off this feature to get a quicker startup with -A
Database changed
mysql> show tables;
+----------------+
| Tables_in_abcd |
+----------------+
| t1 |
+----------------+
1 row in set (0.00 sec)5.3 在master-2上插入一条数据查看master-1上是否同步更新
master-2
mysql> insert into t1 (id,name) values (3,'李四');
Query OK, 1 row affected (0.01 sec)
mysql> select * from t1;
+------+--------+
| id   | name   |
+------+--------+
|    3 | 李四   |
+------+--------+
1 row in set (0.00 sec)master-1
mysql> select * from t1;
+------+--------+
| id | name |
+------+--------+
| 3 | 李四 |
+------+--------+
1 row in set (0.00 sec)查询出数据代表主主配置同步成功!
6.主备库都关机后重新开启同步
若双主都关机后需要重新配置第4步
7.配置主主参数说明
7.1 状态参数说明
Slave_IO_state 显示当前IO线程的状态,一般情况下就是显示等待主服务器发送二进制日志。
Master_log_file 显示当前同步的主服务器的二进制日志。
Read_master_log_pos 显示当前同步到主服务器上二进制日志的偏移量位置。
Relay_master_log_file 当前中继日志同步的二进制日志。
Relay_log_file 显示当前写入的中继日志。
Relay_log_pos 显示当前执行到中继日志的偏移量位置。
Slave_IO_running 从服务器中IO线程的运行状态,yes代表正常
Slave_SQL_running 从服务器中sql线程的运行状态,YES代表正常
Exec_Master_log_pos 表示同步到主服务器的二进制日志的偏移量位置。
7.2 slave启停常用命令
STOP SLAVE IO_THREAD; 停止IO进程
STOP SLAVE SQL_THREAD; 停止SQL进程
STOP SLAVE; 停止IO和SQL进程
START SLAVE IO_THREAD; 启动IO进程
START SLAVE SQL_THREAD; 启动SQL进程
START SLAVE; 启动IO和SQL进程
RESET SLAVE; 用于让从属服务器忘记其在主服务器的二进制日志中的复制位置, 它会删除master.info和relay-log.info文件,以及所有的中继日志,并启动一个新的中继日志,当你不需要主从的时候可以在从上执行这个操作。
SHOW SLAVE STATUS; 查看MySQL同步状态
STOP SLAVE;SET GLOBAL SQL_SLAVE_SKIP_COUNTER=1;START SLAVE; 经常会朋友mysql主从同步遇到错误的时候,比如一个主键冲突等,那么我就需要在确保那一行数据一致的情况下临时的跳过这个错误,那就需要使用SQL_SLAVE_SKIP_COUNTER = n命令了,n是表示跳过后面的n个事件
CHANGE MASTER TO MASTER_HOST=‘10.1.1.75’, MASTER_USER=‘replication’, MASTER_PASSWORD=‘123456’, MASTER_LOG_FILE=‘mysql-bin.000006’, MASTER_LOG_POS=106; START SLAVE; 从指定位置重新同步
8.keepalived安装部署
在master-1、master-2服务器分别安装keepalived,安装步骤相同,配置文件不同,下面有介绍。
8.1 安装依赖包,下载keepalived
安装插件依赖包,下载keepalived2.2.8版本至/opt目录下并解压
yum -y install gcc openssl-devel popt-devel psmisc
yum install wget
Is this ok [y/d/N]: y #安装wget提示,输入y
cd /opt/
wget --no-check-certificate https://www.keepalived.org/software/keepalived-2.2.8.tar.gz
ll
tar -zxvf keepalived-2.2.8.tar.gz 以下为运行结果,供参考
[root@skymachine ~]# yum -y install gcc openssl-devel popt-devel psmisc
已加载插件:fastestmirror
Determining fastest mirrors
base | 1.8 kB 00:00:00
docker-ce-stable | 1.4 kB 00:00:00
epel | 1.8 kB 00:00:00
extras | 1.4 kB 00:00:00
...中间省略安装过程代码
作为依赖被安装:
cpp.x86_64 0:4.8.5-44.el7 glibc-devel.x86_64 0:2.17-326.el7_9 glibc-headers.x86_64 0:2.17-326.el7_9 kernel-headers.x86_64 0:3.10.0-1160.90.1.el7
keyutils-libs-devel.x86_64 0:1.5.8-3.el7 krb5-devel.x86_64 0:1.15.1-55.el7_9 libcom_err-devel.x86_64 0:1.42.9-19.el7 libkadm5.x86_64 0:1.15.1-55.el7_9
libmpc.x86_64 0:1.0.1-3.el7 libselinux-devel.x86_64 0:2.5-15.el7 libsepol-devel.x86_64 0:2.5-10.el7 libverto-devel.x86_64 0:0.2.5-4.el7
mpfr.x86_64 0:3.1.1-4.el7 pcre-devel.x86_64 0:8.32-17.el7 zlib-devel.x86_64 0:1.2.7-21.el7_9
作为依赖被升级:
e2fsprogs.x86_64 0:1.42.9-19.el7 e2fsprogs-libs.x86_64 0:1.42.9-19.el7 glibc.x86_64 0:2.17-326.el7_9 glibc-common.x86_64 0:2.17-326.el7_9
krb5-libs.x86_64 0:1.15.1-55.el7_9 libcom_err.x86_64 0:1.42.9-19.el7 libgcc.x86_64 0:4.8.5-44.el7 libgomp.x86_64 0:4.8.5-44.el7
libss.x86_64 0:1.42.9-19.el7 openssl.x86_64 1:1.0.2k-26.el7_9 openssl-libs.x86_64 1:1.0.2k-26.el7_9 zlib.x86_64 0:1.2.7-21.el7_9
完毕!
[root@skymachine opt]# yum install wget
已加载插件:fastestmirror
Loading mirror speeds from cached hostfile
正在解决依赖关系
--> 正在检查事务
---> 软件包 wget.x86_64.0.1.14-18.el7_6.1 将被 安装
--> 解决依赖关系完成
依赖关系解决
============================================================================================================================================================================
Package 架构 版本 源 大小
============================================================================================================================================================================
正在安装:
wget x86_64 1.14-18.el7_6.1 base 547 k
事务概要
============================================================================================================================================================================
安装 1 软件包
总下载量:547 k
安装大小:2.0 M
Is this ok [y/d/N]: y
Downloading packages:
wget-1.14-18.el7_6.1.x86_64.rpm | 547 kB 00:00:00
Running transaction check
Running transaction test
Transaction test succeeded
Running transaction
正在安装 : wget-1.14-18.el7_6.1.x86_64 1/1
验证中 : wget-1.14-18.el7_6.1.x86_64 1/1
已安装:
wget.x86_64 0:1.14-18.el7_6.1
完毕!
[root@skymachine ~]# cd /opt/
[root@skymachine opt]# wget --no-check-certificate https://www.keepalived.org/software/keepalived-2.2.8.tar.gz
--2023-06-27 09:32:19-- https://www.keepalived.org/software/keepalived-2.2.8.tar.gz
正在解析主机 www.keepalived.org (www.keepalived.org)... 91.121.30.175, 2001:41d0:1:71af::1
正在连接 www.keepalived.org (www.keepalived.org)|91.121.30.175|:443... 已连接。
警告: 无法验证 www.keepalived.org 的由 “/C=US/O=Let's Encrypt/CN=R3” 颁发的证书:
颁发的证书已经过期。
已发出 HTTP 请求,正在等待回应... 200 OK
长度:1202602 (1.1M) [application/octet-stream]
正在保存至: “keepalived-2.2.8.tar.gz”
100%[==================================================================================================================================>] 1,202,602 868KB/s 用时 1.4s
2023-06-27 09:32:21 (868 KB/s) - 已保存 “keepalived-2.2.8.tar.gz” [1202602/1202602])
[root@skymachine opt]# ll
总用量 1180
-rw-r--r-- 1 root root 1202602 5月 31 18:37 keepalived-2.2.8.tar.gz
drwxr-xr-x 3 root root 75 6月 25 13:49 software
[root@skymachine opt]# tar -zxvf keepalived-2.2.8.tar.gz
keepalived-2.2.8/
keepalived-2.2.8/tools/
keepalived-2.2.8/tools/timed_reload
keepalived-2.2.8/Dockerfile.in
keepalived-2.2.8/Makefile.in
keepalived-2.2.8/build-aux/
...中间省略安装过程代码
keepalived-2.2.8/keepalived/check/check_file.c
keepalived-2.2.8/keepalived/check/check_tcp.c
keepalived-2.2.8/keepalived/check/libipvs.c
keepalived-2.2.8/configure.ac
keepalived-2.2.8/aclocal.m48.2 配置keepalived并编译
cd keepalived-2.2.8
./configure --prefix=/opt/keepalived-2.2.8
make && make install以下为运行结果,供参考
[root@skymachine opt]# cd keepalived-2.2.8
[root@skymachine keepalived-2.2.8]# ./configure --prefix=/opt/keepalived-2.2.8
checking for a BSD-compatible install... /usr/bin/install -c
checking whether build environment is sane... yes
checking for a race-free mkdir -p... /usr/bin/mkdir -p
checking for gawk... gawk
checking whether make sets $(MAKE)... yes
checking whether make supports nested variables... yes
checking whether make supports nested variables... (cached) yes
...中间省略安装过程代码
Strict config checks : No
Build documentation : No
Default runtime options : -D
*** WARNING - this build will not support IPVS with IPv6. Please install libnl/libnl-3 dev libraries to support IPv6 with IPVS.
[root@skymachine keepalived-2.2.8]# make && make install
Making all in lib
make[1]: 进入目录“/opt/keepalived-2.2.8/lib”
make all-am
make[2]: 进入目录“/opt/keepalived-2.2.8/lib”
CC memory.o
CC utils.o
utils.c: 在函数‘dump_buffer’中:
utils.c:106:5: 警告:无法优化可能无穷的循环 [-Wunsafe-loop-optimizations]
for (j = i - 15; j <= i; j++)
^
...中间省略安装过程代码
make[3]: 对“install-data-hook”无需做任何事。
make[3]: 离开目录“/opt/keepalived-2.2.8”
make[2]: 离开目录“/opt/keepalived-2.2.8”
make[1]: 离开目录“/opt/keepalived-2.2.8”8.3 将文件复制到对应目录下
[root@128 keepalived-2.2.7]# mkdir /etc/keepalived
[root@128 keepalived-2.2.7]# cp keepalived/etc/keepalived/keepalived.conf.sample /etc/keepalived/keepalived.conf
[root@128 keepalived-2.2.7]# cp keepalived/etc/init.d/keepalived /etc/init.d/
[root@128 keepalived-2.2.7]# cp keepalived/etc/sysconfig/keepalived /etc/sysconfig/
[root@128 keepalived-2.2.7]# cp bin/keepalived /usr/sbin/
8.4 新建shutdown.sh文件
vi /etc/keepalived/keepalived.conf内容为
#!/bin/bash
#该脚本是在mysql服务出现异常时,将keepalived应用停止,从而使虚拟vip主机自动连接到另一台mysql上
killall keepalived
保存退出,将执行权限设置为可执行
[root@skymachine keepalived]# chmod +x /etc/keepalived/shutdown.sh8.5 ifconfig查看网卡名称
本机网卡名称为ens192
[root@skymachine keepalived-2.2.8]# ifconfig
ens192: flags=4163<UP,BROADCAST,RUNNING,MULTICAST> mtu 1500
inet 192.168.15.94 netmask 255.255.255.0 broadcast 192.168.15.255
inet6 fe80::5952:cea:7d3a:9438 prefixlen 64 scopeid 0x20<link>
inet6 fe80::e689:8ec0:4cf9:2338 prefixlen 64 scopeid 0x20<link>
inet6 fe80::ce71:1610:b52d:de15 prefixlen 64 scopeid 0x20<link>
ether 00:50:56:82:d1:76 txqueuelen 1000 (Ethernet)
RX packets 737719 bytes 964242277 (919.5 MiB)
RX errors 0 dropped 0 overruns 0 frame 0
TX packets 398867 bytes 29004910 (27.6 MiB)
TX errors 0 dropped 0 overruns 0 carrier 0 collisions 0
lo: flags=73<UP,LOOPBACK,RUNNING> mtu 65536
inet 127.0.0.1 netmask 255.0.0.0
inet6 ::1 prefixlen 128 scopeid 0x10<host>
loop txqueuelen 1000 (Local Loopback)
RX packets 58 bytes 5076 (4.9 KiB)
RX errors 0 dropped 0 overruns 0 frame 0
TX packets 58 bytes 5076 (4.9 KiB)
TX errors 0 dropped 0 overruns 0 carrier 0 collisions 08.6 修改master-1服务器keepalived配置文件
把原有的keepalived.conf更名为keepalived_bak.conf,然后新建keepalived.conf配置文件
cd /etc/keepalived/
[root@skymachine keepalived]# ll
总用量 4
-rw-r--r-- 1 root root 3550 6月  27 09:34 keepalived.conf
[root@skymachine keepalived]# mv keepalived.conf  keepalived_bak.conf
[root@skymachine keepalived]# ll
总用量 4
-rw-r--r-- 1 root root 3550 6月  27 09:34 keepalived_bak.conf
[root@skymachine keepalived]#  vi /etc/keepalived/keepalived.conf
把以下内容复制进去
! Configuration File for keepalived
#主要配置故障发生时的通知对象及机器标识
global_defs {
notification_email {
[email protected]
[email protected]
[email protected]
}
notification_email_from [email protected]
smtp_server 127.0.0.1
smtp_connect_timeout 30
router_id MYSQL-1 #主机标识符,唯一即可
vrrp_skip_check_adv_addr
vrrp_strict
vrrp_garp_interval 0
vrrp_gna_interval 0
}
#用来定义对外提供服务的VIP区域及相关属性
vrrp_instance VI_1 {
state BACKUP #表示keepalived角色,都是设成BACKUP则以优先级为主要参考
interface ens192 #指定HA监听的网络接口,刚才ifconfig查看的接口名称
virtual_router_id 151 #虚拟路由标识,取值0-255,master-1和master-2保持一致
priority 100 #优先级,用来选举master,取值范围1-255
advert_int 1 #发VRRP包时间间隔,即多久进行一次master选举
authentication {
auth_type PASS
auth_pass 1111
}
virtual_ipaddress { #虚拟出来的地址
192.168.15.100
}
}
#虚拟服务器定义
virtual_server 192.168.15.100 3306 { #虚拟出来的地址加端口
delay_loop 2 #设置运行情况检查时间,单位为秒
lb_algo rr #设置后端调度器算法,rr为轮询算法
lb_kind DR #设置LVS实现负载均衡的机制,有DR、NAT、TUN三种模式可选
persistence_timeout 50 #会话保持时间,单位为秒
protocol TCP #指定转发协议,有 TCP和UDP可选
real_server 192.168.15.94 3306 { #实际本地ip+3306端口
weight=5 #表示服务器的权重值。权重值越高,服务器在负载均衡中被选中的概率就越大
#当该ip 端口连接异常时,执行该脚本
notify_down /etc/keepalived/shutdown.sh #检查mysql服务down掉后执行的脚本
TCP_CHECK {
#实际物理机ip地址
connect_ip 192.168.15.94
#实际物理机port端口
connect_port 3306
connect_timeout 3
nb_get_retry 3
delay_before_retry 3
}
}
}
8.7 修改master-2服务器keepalived配置文件
把原有的keepalived.conf更名为keepalived_bak.conf,然后新建keepalived.conf配置文件
cd /etc/keepalived/
[root@skymachine keepalived]# ll
总用量 4
-rw-r--r-- 1 root root 3550 6月  27 09:34 keepalived.conf
[root@skymachine keepalived]# mv keepalived.conf  keepalived_bak.conf
[root@skymachine keepalived]# ll
总用量 4
-rw-r--r-- 1 root root 3550 6月  27 09:34 keepalived_bak.conf
[root@skymachine keepalived]#  vi /etc/keepalived/keepalived.conf
把以下内容复制进去,与master-1的配置不同地方为 router_id、priority、real_server、connect_ip 四个配置
! Configuration File for keepalived
#主要配置故障发生时的通知对象及机器标识
global_defs {
notification_email {
[email protected]
[email protected]
[email protected]
}
notification_email_from [email protected]
smtp_server 127.0.0.1
smtp_connect_timeout 30
router_id MYSQL-2 #主机标识符,唯一即可
vrrp_skip_check_adv_addr
vrrp_strict
vrrp_garp_interval 0
vrrp_gna_interval 0
}
#用来定义对外提供服务的VIP区域及相关属性
vrrp_instance VI_1 {
state BACKUP #表示keepalived角色,都是设成BACKUP则以优先级为主要参考
interface ens192 #指定HA监听的网络接口,刚才ifconfig查看的接口名称
virtual_router_id 151 #虚拟路由标识,取值0-255,master-1和master-2保持一致
priority 40 #优先级,用来选举master,取值范围1-255
advert_int 1 #发VRRP包时间间隔,即多久进行一次master选举
authentication {
auth_type PASS
auth_pass 1111
}
virtual_ipaddress { #虚拟出来的地址
192.168.15.100
}
}
#虚拟服务器定义
virtual_server 192.168.15.100 3306 { #虚拟出来的地址加端口
delay_loop 2 #设置运行情况检查时间,单位为秒
lb_algo rr #设置后端调度器算法,rr为轮询算法
lb_kind DR #设置LVS实现负载均衡的机制,有DR、NAT、TUN三种模式可选
persistence_timeout 50 #会话保持时间,单位为秒
protocol TCP #指定转发协议,有 TCP和UDP可选
real_server 192.168.15.92 3306 { #实际本地ip+3306端口
weight=5 #表示服务器的权重值。权重值越高,服务器在负载均衡中被选中的概率就越大
#当该ip 端口连接异常时,执行该脚本
notify_down /etc/keepalived/shutdown.sh #检查mysql服务down掉后执行的脚本
TCP_CHECK {
#实际物理机ip地址
connect_ip 192.168.15.92
#实际物理机port端口
connect_port 3306
connect_timeout 3
nb_get_retry 3
delay_before_retry 3
}
}
}
8.8 启动keepalived服务
将master-1、master-2服务器keepalived服务启动
[root@skymachine keepalived]# systemctl start keepalived
[root@skymachine keepalived]# systemctl status keepalived
systemctl enable keepalived #开机启动,根据需求设置
启动后keepalived状态为:active(running)则正常
以下为运行结果,供参考
[root@skymachine keepalived]# systemctl start keepalived
[root@skymachine keepalived]# systemctl status keepalived
● keepalived.service - LVS and VRRP High Availability Monitor
Loaded: loaded (/usr/lib/systemd/system/keepalived.service; disabled; vendor preset: disabled)
Active: active (running) since 二 2023-06-27 09:53:23 CST; 4s ago
Docs: man:keepalived(8)
man:keepalived.conf(5)
man:genhash(1)
https://keepalived.org
Process: 20817 ExecStart=/opt/keepalived-2.2.8/sbin/keepalived $KEEPALIVED_OPTIONS (code=exited, status=0/SUCCESS)
Main PID: 20818 (keepalived)
CGroup: /system.slice/keepalived.service
├─20818 /opt/keepalived-2.2.8/sbin/keepalived -D
├─20819 /opt/keepalived-2.2.8/sbin/keepalived -D
└─20820 /opt/keepalived-2.2.8/sbin/keepalived -D
6月 27 09:53:26 skymachine Keepalived_vrrp[20820]: (VI_1) received lower priority (40) advert from 192.168.15.92 - discarding
6月 27 09:53:26 skymachine Keepalived_vrrp[20820]: (VI_1) Receive advertisement timeout
6月 27 09:53:26 skymachine Keepalived_vrrp[20820]: (VI_1) Entering MASTER STATE
6月 27 09:53:26 skymachine Keepalived_vrrp[20820]: (VI_1) setting VIPs.
6月 27 09:53:26 skymachine Keepalived_vrrp[20820]: (VI_1) Sending/queueing gratuitous ARPs on ens192 for 192.168.15.100
6月 27 09:53:26 skymachine Keepalived_vrrp[20820]: Sending gratuitous ARP on ens192 for 192.168.15.100
6月 27 09:53:26 skymachine Keepalived_vrrp[20820]: Sending gratuitous ARP on ens192 for 192.168.15.100
6月 27 09:53:26 skymachine Keepalived_vrrp[20820]: Sending gratuitous ARP on ens192 for 192.168.15.100
6月 27 09:53:26 skymachine Keepalived_vrrp[20820]: Sending gratuitous ARP on ens192 for 192.168.15.100
6月 27 09:53:26 skymachine Keepalived_vrrp[20820]: Sending gratuitous ARP on ens192 for 192.168.15.1008.9 配置虚拟ip登录用户
在两台服务器上新建用户以验证keepalived服务是否配置成功
useradd -m keepalived
passwd keepalived
Qwe135.以下为运行结果,供参考
[root@skymachine ~]# useradd -m keepalived
[root@skymachine ~]# passwd keepalived
更改用户 keepalived 的密码 。
新的 密码:
重新输入新的 密码:
passwd:所有的身份验证令牌已经成功更新。
8.10 测试keepalived服务
启动后相当于虚拟出一个vip 192.168.15.100,用ssh工具连接服务器,输入ip和用户名及密码,登录至虚拟ip上 连接进去后使用ifconfig查看该虚拟vip实际上使用的实体服务器是master-1(192.168.15.94)服务器。
[root@skymachine keepalived]# systemctl stop keepalived
将master-1(192.168.15.94)服务器的keepalived应用停止,192.168.15.100服务器会断线,重新连接,再次查看192.168.15.100服务ifconfig,可以看到,192.168.15.100服务器自动将实体机ip漂移到了master-2(192.168.15.92)服务器上
在94服务器运行 systemctl stop keepalived
[root@skymachine keepalived]# systemctl stop keepalived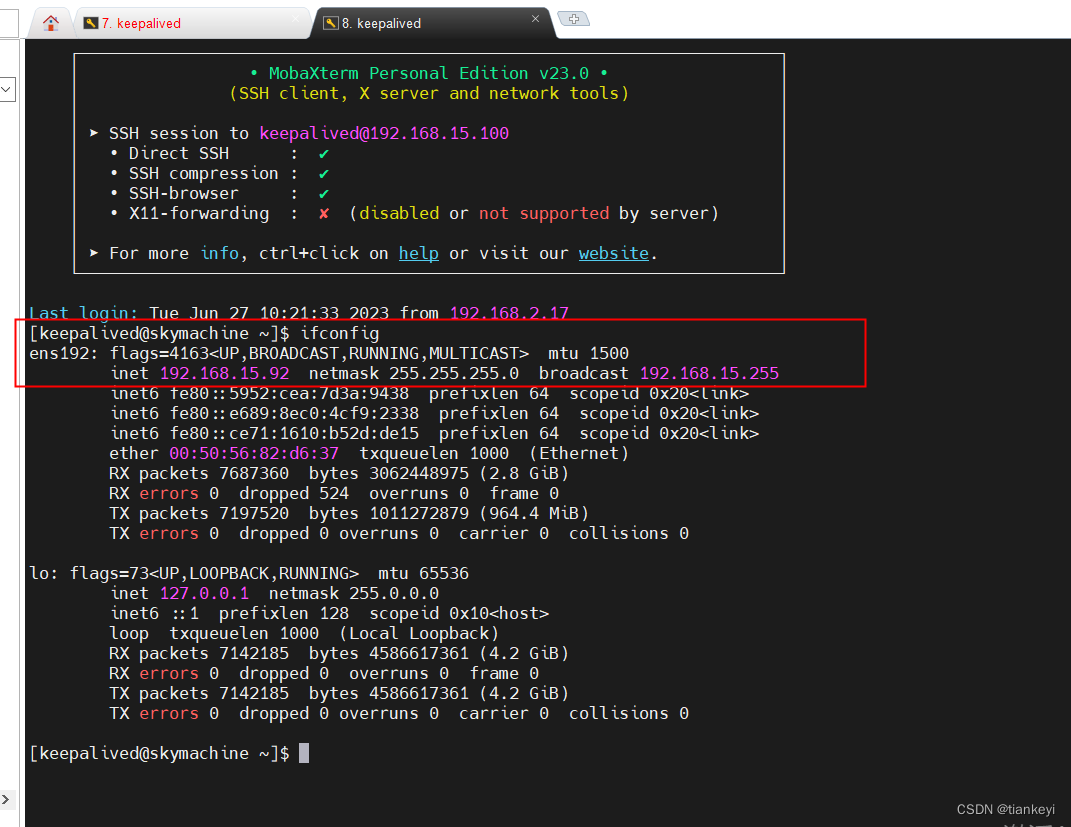
9. Mysql双主双活+keepalived高可用整体测试
9.1 启动服务(启动过不需要再启动)
首先将master-1、master-2两台服务器mysql、keepalived应用全部启动,然后新建一个用户,配置权限可以外网访问
mysql> CREATE DATABASE IF NOT EXISTS mydb DEFAULT CHARSET utf8mb4 COLLATE utf8mb4_general_ci;
Query OK, 1 row affected (0.10 sec)
mysql> create user 'user01'@'%' identified by 'Mysql12#$';
Query OK, 0 rows affected (0.19 sec)
mysql> grant all privileges on `mydb`.* to 'user01'@'%' ;
Query OK, 0 rows affected (0.02 sec)
mysql> flush privileges;
Query OK, 0 rows affected (0.02 sec)
mysql> select user,host from mysql.user;
+------------------+--------------+
| user | host |
+------------------+--------------+
| user01 | % |
| test | 192.168.15.% |
| mysql.infoschema | localhost |
| mysql.session | localhost |
| mysql.sys | localhost |
| root | localhost |
+------------------+--------------+
6 rows in set (0.00 sec)9.2 连接keepalived虚拟服务器
用mysql连接工具连接keepalived虚拟出来的192.168.15.100服务器
 9.3 建立测试数据
在192.168.15.100数据库mydb测试库新建一张表,表中插入一些数据
drop table ceshi1;
CREATE TABLE ceshi1(
ID int,
NAME VARCHAR(255),
subject VARCHAR(18),
score int);
insert into ceshi1 values(1,'张三','数学',90);
insert into ceshi1 values(2,'张三','语文',70);
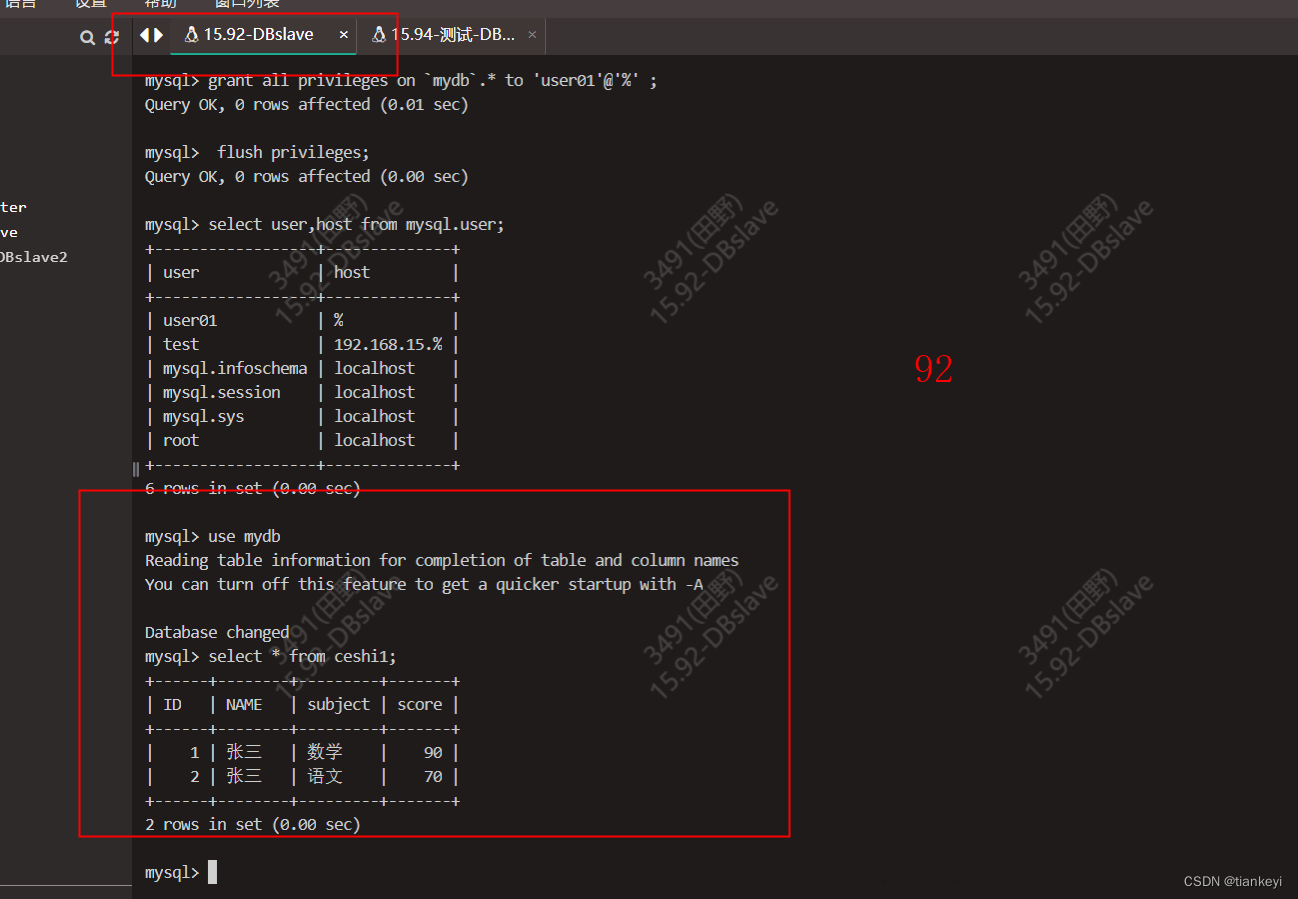
select * from ceshi1;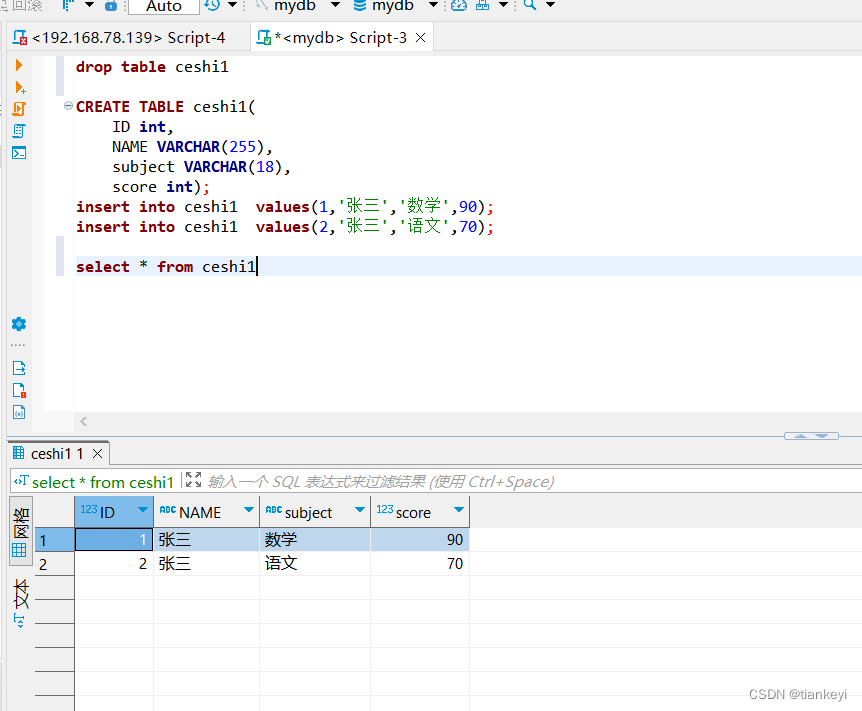 9.4 查看master-1、master-2同步情况
此时可以查看master-1、master-2数据库,数据已同步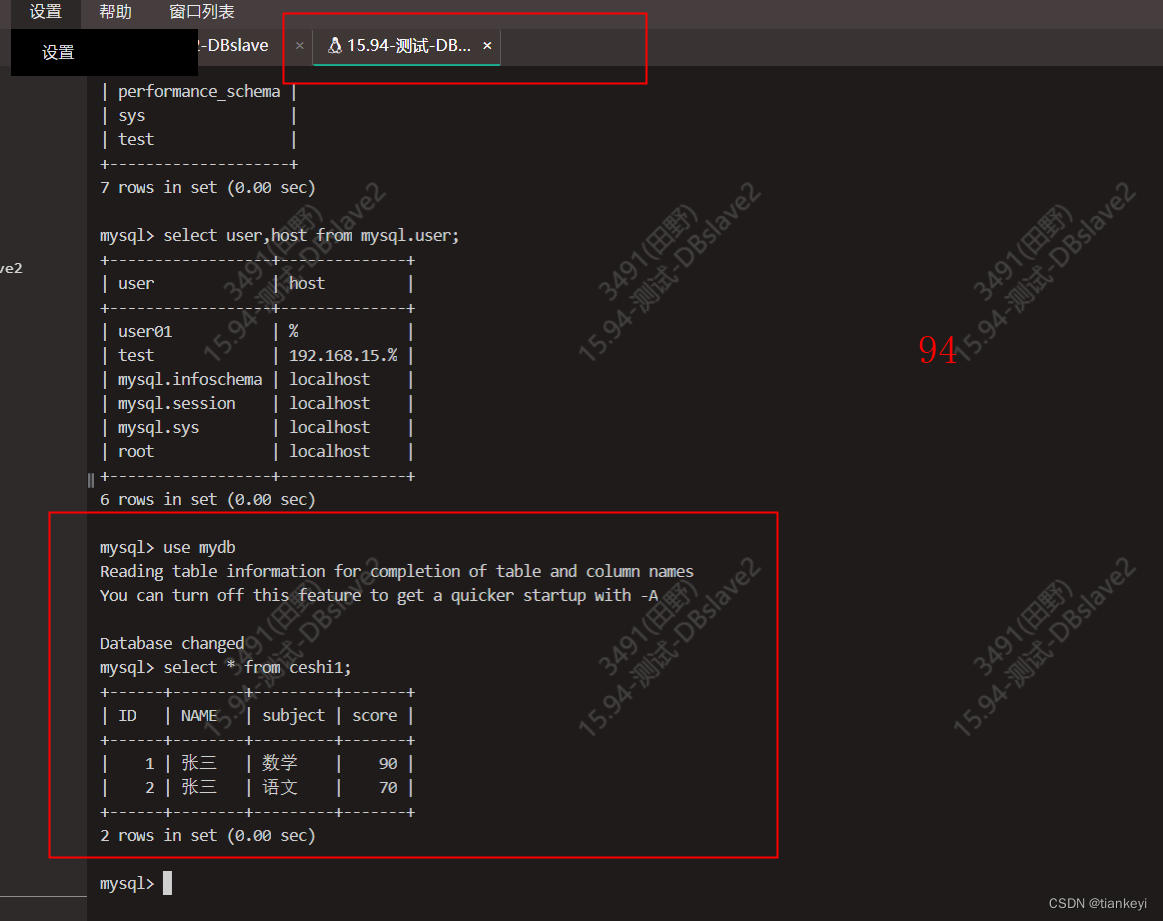
9.5 查看100服务器实际物理机ip
使用ifconfig命令查看实际使用的物理机为192.168.15.94,所以master-1(192.168.15.94)服务器mysql为主数据库。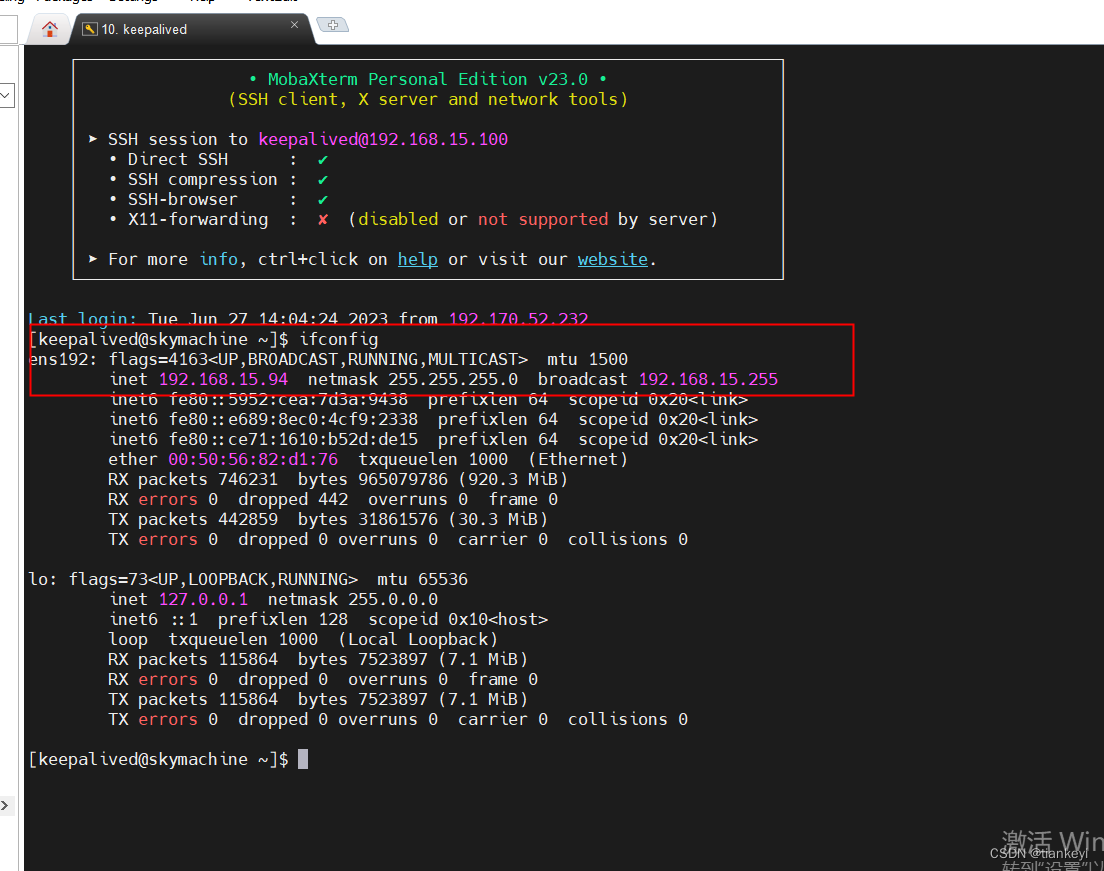
9.6 停止物理机mysql服务
此时手动将master-1服务器mysql停止,keepalived检测到192.168.15.94服务3306端口连接失败,会执行/etc/keepalived/shutdown.sh脚本,将192.168.15.94服务器keepalived应用结束
[root@skymachine ~]# service mysql stop
Shutting down MySQL............. SUCCESS!
9.7 查看漂移ip执行情况
此时再连接192.168.15.100服务下,ifconfig查看,发现已经实际将物理机由master-1(192.168.15.94)到master-2(192.168.15.92)服务器上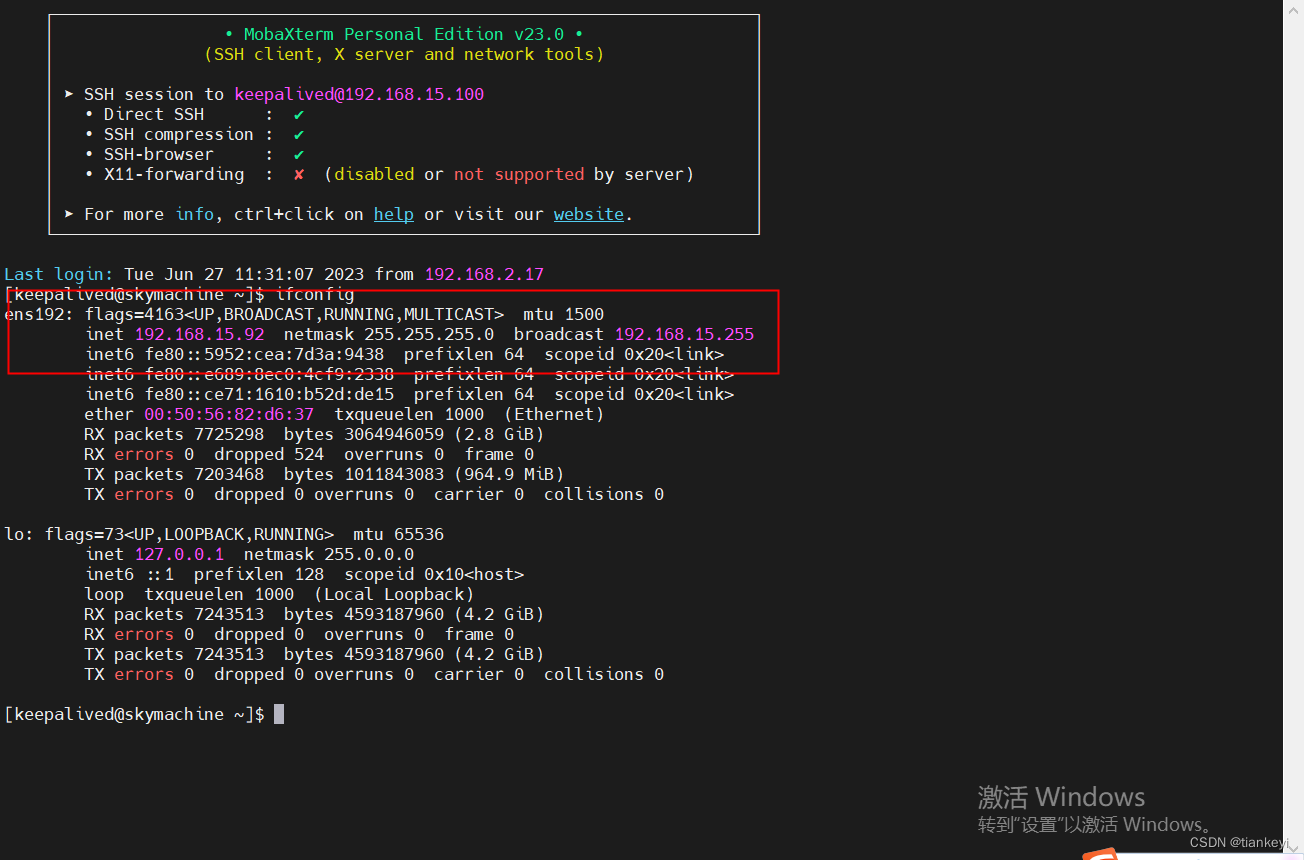
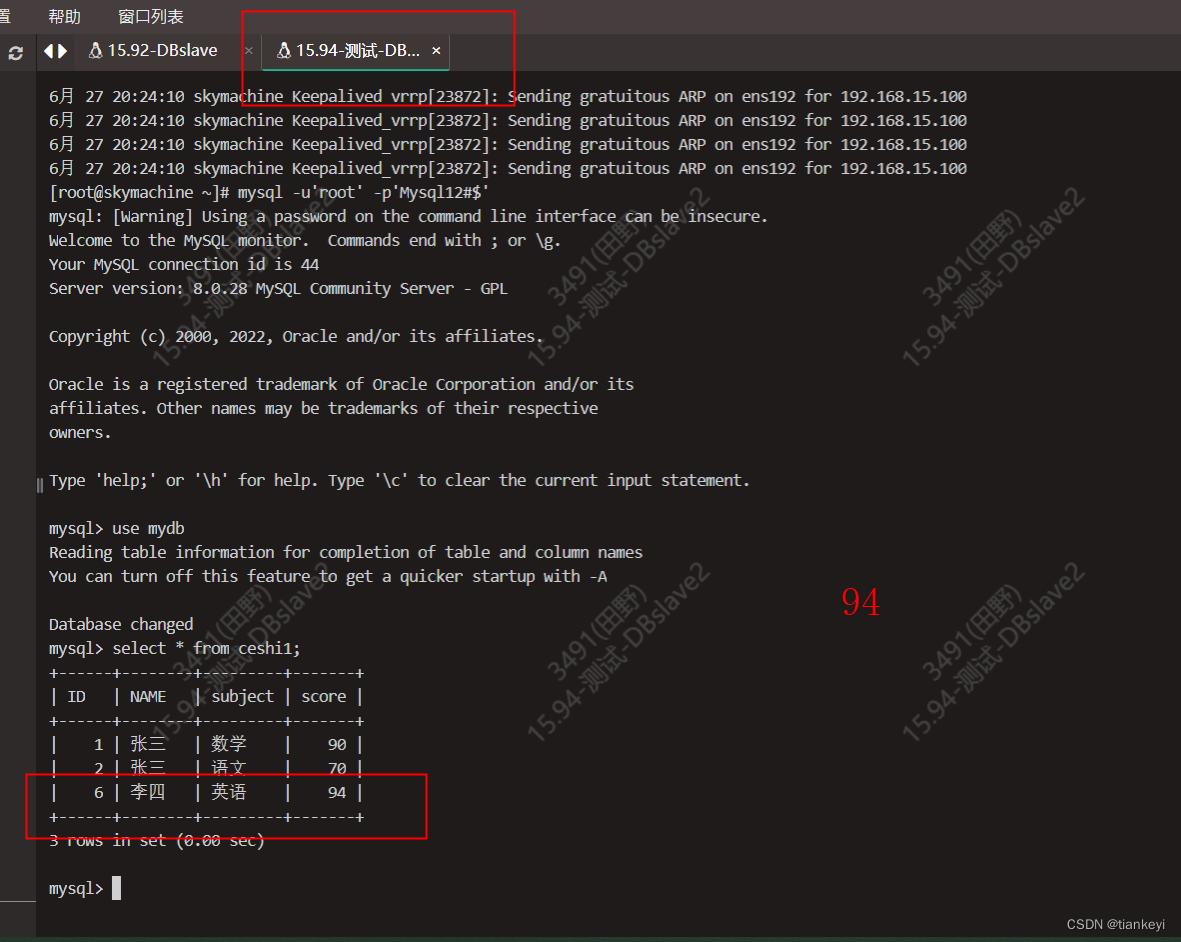
9.8 在新的主服务器插入数据
再使用mysql连接工具连接192.168.15.100的mysql,插入一条数据,测试是否将数据存入master-2(192.168.15.92)服务器mysql中
insert into ceshi1 values(6,'李四','英语',94);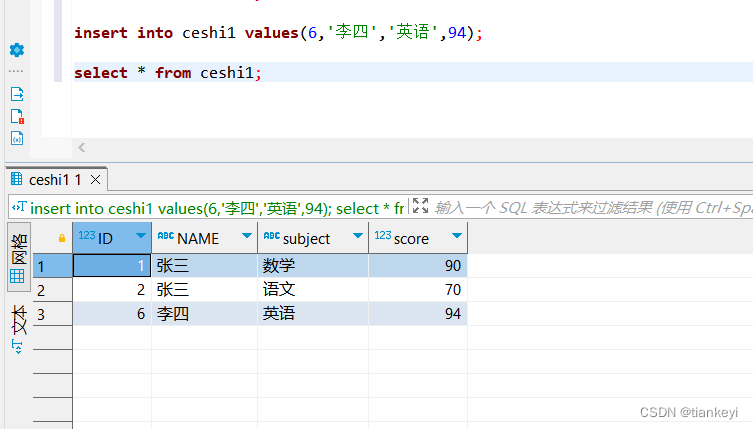
9.9 查看新主服务器数据
查看master-2服务器mysql数据,数据已同步,说明keepalived搭建高可用成功,当master-1服务器mysql出现问题后keepalived自动漂移IP到实体机master-2服务器上,从而使master-2服务器mysql作为主数据库。
9.10 重启master-1服务,查看数据同步情况
此时再启动master-1(192.168.15.94)服务器mysql、keepalived应用
service mysql start
systemctl start keepalived
systemctl status keepalived
以下为运行结果,供参考
[root@skymachine ~]# service mysql start
Starting MySQL... SUCCESS!
[root@skymachine ~]# systemctl start keepalived
[root@skymachine ~]# systemctl status keepalived
● keepalived.service - LVS and VRRP High Availability Monitor
Loaded: loaded (/usr/lib/systemd/system/keepalived.service; disabled; vendor preset: disabled)
Active: active (running) since 二 2023-06-27 20:24:07 CST; 7s ago
Docs: man:keepalived(8)
man:keepalived.conf(5)
man:genhash(1)
https://keepalived.org
Process: 23869 ExecStart=/opt/keepalived-2.2.8/sbin/keepalived $KEEPALIVED_OPTIONS (code=exited, status=0/SUCCESS)
Main PID: 23870 (keepalived)
CGroup: /system.slice/keepalived.service
├─23870 /opt/keepalived-2.2.8/sbin/keepalived -D
├─23871 /opt/keepalived-2.2.8/sbin/keepalived -D
└─23872 /opt/keepalived-2.2.8/sbin/keepalived -D
6月 27 20:24:10 skymachine Keepalived_vrrp[23872]: (VI_1) received lower priority (40) advert from 192.168.15.92 - discarding
6月 27 20:24:10 skymachine Keepalived_vrrp[23872]: (VI_1) Receive advertisement timeout
6月 27 20:24:10 skymachine Keepalived_vrrp[23872]: (VI_1) Entering MASTER STATE
6月 27 20:24:10 skymachine Keepalived_vrrp[23872]: (VI_1) setting VIPs.
6月 27 20:24:10 skymachine Keepalived_vrrp[23872]: (VI_1) Sending/queueing gratuitous ARPs on ens192 for 192.168.15.100
6月 27 20:24:10 skymachine Keepalived_vrrp[23872]: Sending gratuitous ARP on ens192 for 192.168.15.100
6月 27 20:24:10 skymachine Keepalived_vrrp[23872]: Sending gratuitous ARP on ens192 for 192.168.15.100
6月 27 20:24:10 skymachine Keepalived_vrrp[23872]: Sending gratuitous ARP on ens192 for 192.168.15.100
6月 27 20:24:10 skymachine Keepalived_vrrp[23872]: Sending gratuitous ARP on ens192 for 192.168.15.100
6月 27 20:24:10 skymachine Keepalived_vrrp[23872]: Sending gratuitous ARP on ens192 for 192.168.15.100查看master-1数据库ceshi1表数据,数据已同步成功。
 至此,mysql双主双活+keepalived高可用部署并测试完成。
10. 总结
1、 采用keepalived作为高可用方案时,两个节点最好都设置成BACKUP模式,避免因为意外情况下相互抢占导致两个节点内写入相同的数据而引发冲突;
2、 把两个节点的auto_increment_increment(自增步长)和auto_increment_offset(字增起始值)设置成不同值,其目的是为了避免master节点意外宕机时,可能会有部分binlog未能及时复制到slave上被应用,从而会导致slave新写入数据的自增值和原master上冲突,因此一开始就错开;
3、 Slave节点服务器配置不要太差,否则更容易导致复制延迟,作为热备节点的slave服务器,硬件配置不能低于master节点;
如果对延迟很敏感的话,可考虑使用MariaDB分支版本,利用多线程复制的方式可以很大降低复制延迟。
个人整理,非专业人员
参考文章
1.Mysql+Keepalived实现mysql数据库高可用_keepalived数据库_KaiA8的博客-CSDN博客
2.Mysql集群之mysql双主双活+keepalived实现高可用_mysql+keepalived搭建教程_天道酬勤-L的博客-CSDN博客