一、参考资料
二、开发环境搭建
1、安装脚手架
# 安装 volo-cli
cargo install volo-cli
# 验证安装
volo help
2、编写 IDL
# 文件 volo_demo.proto

syntax = "proto3";
package volo.demo;

message Item {
    int64 id = 1;
    string title = 2;
    string content = 3;

    map<string, string> extra = 10;
}

message GetItemRequest {
    int64 id = 1;
}

message GetItemResponse {
    Item item = 1;
}

service ItemService {
    rpc GetItem(GetItemRequest) returns (GetItemResponse);
}
IDL 全称为 Interface Definition Language ,即为 接口定义语言,具体语法参考 proto3。
为什么需要 IDL ?首先我们搞明白 RPC 是个什么概念:Remote Produce Call ,远程过程调用。说白了就是 A 机器从直接调用 B 机器上的某个函数或者方法。例如我在 A 机器用 Java 语言写了一个 Add 函数,返回变量加一后的结果,B 机器的 Go 语言程序想直接调用 A 机器的 Add 函数,就像在调用 B 机器本身程序内的函数一样。因此,需要引入 IDL 来定义这样一套接口标准,让 A、B 机器实现这种交互,就算开发语言不同,也能清楚对应调用哪个函数、什么类型的参数。
3、使用脚手架初始化项目
# 初始化项目,并生成模板代码
volo init --includes=idl volo-demo idl/volo_demo.proto

# 如果只需要增加一个 IDL(如 client 的 IDL)而不需要生成模板
volo idl add idl/volo_example.proto
#初始化项目后,项目根文件夹下多出以下内容
$ ls
Cargo.lock Cargo.toml idl/ rust-toolchain.toml src/ target/ volo-gen/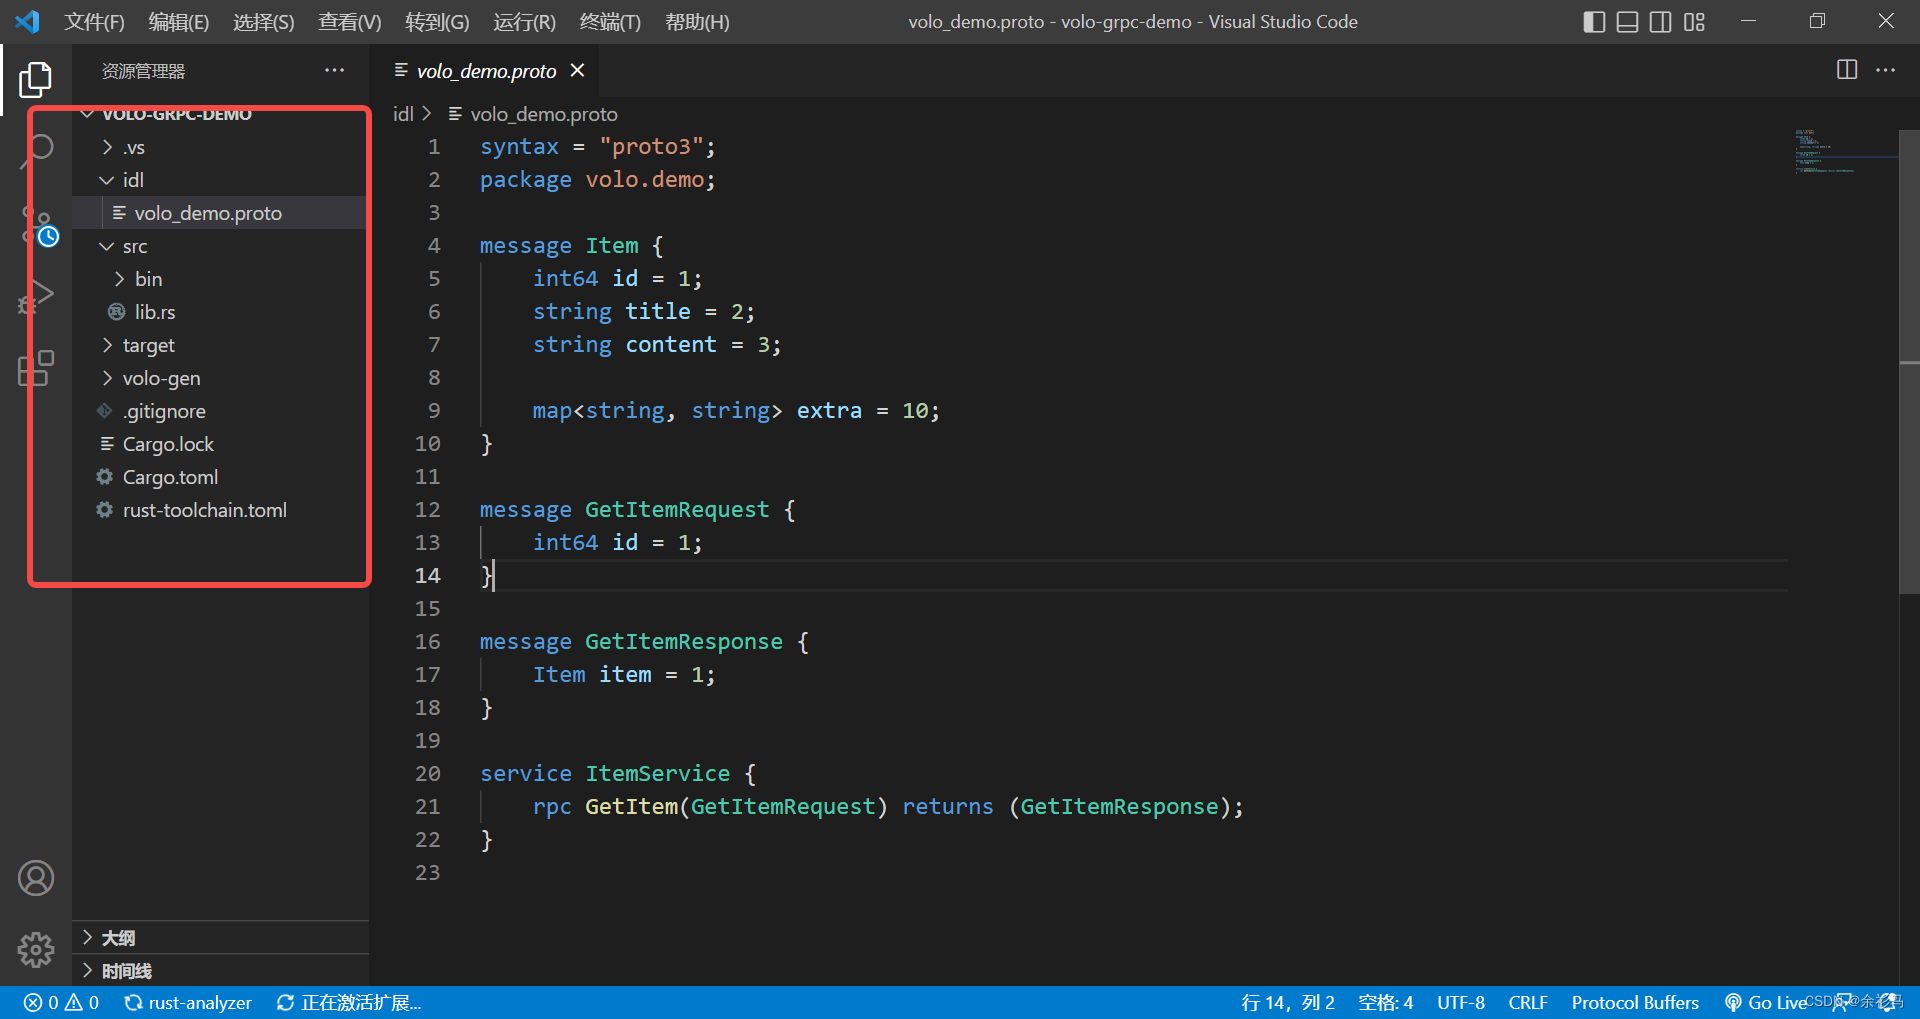 三、实现一个 gRPC Server
1、在 src/lib.rs 下实现一个 get_item 方法。
#![feature(type_alias_impl_trait)]

pub struct S;

#[volo::async_trait]
impl volo_gen::volo::demo::ItemService for S {
    // 这部分是我们需要增加的代码
    async fn get_item(
        &self,
        _req: volo_grpc::Request<volo_gen::volo::demo::GetItemRequest>,
    ) -> core::result::Result<volo_grpc::Response<volo_gen::volo::demo::GetItemResponse>, volo_grpc::Status>
    {
        Ok(volo_grpc::Response::new(Default::default()))
    }
}
2、然后执行指令编译二进制程序,生成指定的 volo_gen.rs 文件::
cargo update
cargo build
3、此时,我们就可以执行指令把 server 运行起来 :
cargo run --bin server
扫描二维码关注公众号,回复:
16975437 查看本文章

可以看到 Server 已经成功运行起来,这里用到了 tracing 日志监控输出,后续再详细介绍。
四、实现一个 Client
1、新增依赖
[package]
name = "volo_demo"
version = "0.1.0"
edition = "2021"

# See more keys and their definitions at https://doc.rust-lang.org/cargo/reference/manifest.html

[dependencies]
anyhow = "1"
async-trait = "0.1"
lazy_static = "1"
tokio = { version = "1", features = ["full"] }
tracing = "0.1"
prost = "0.11"

pilota = "*"      # we recommend to use the latest framework version for new features and bug fixes
volo = "*"        # we recommend to use the latest framework version for new features and bug fixes
volo-grpc = "*"   # we recommend to use the latest framework version for new features and bug fixes

volo-gen = { path = "./volo-gen" }

[profile.release]
opt-level = 3
debug = true
debug-assertions = false
overflow-checks = false
lto = true
panic = 'unwind'
incremental = false
codegen-units = 1
rpath = false

[workspace]
members = ["volo-gen"]
resolver = "2"
2、新增 client.rs
use lazy_static::lazy_static;
use std::net::SocketAddr;

lazy_static! {
    static ref CLIENT: volo_gen::volo::demo::ItemServiceClient = {
        let addr: SocketAddr = "127.0.0.1:8080".parse().unwrap();
        volo_gen::volo::demo::ItemServiceClientBuilder::new("volo_demo")
            .address(addr)
            .build()
    };
}

#[volo::main]
async fn main() {
    let req = volo_gen::volo::demo::GetItemRequest { id: 1024 };
    let resp = CLIENT.clone().get_item(req).await;
    match resp {
        Ok(info) => tracing::info!("{:?}", info),
        Err(e) => tracing::error!("{:?}", e),
    }
}
3、Client 请求 Server 测试
cargo run --bin server
cargo run --bin client
可以看到已经成功请求。
五、实现一个日志中间件
1、新增日志依赖
tracing = "0.1"
tracing-subscriber = "0.3"
2、在 lib.rs 中新增中间件服务
#![feature(type_alias_impl_trait)]

pub struct S;

#[volo::async_trait]
impl volo_gen::volo::demo::ItemService for S {
    // 这部分是我们需要增加的代码
    async fn get_item(
        &self,
        _req: volo_grpc::Request<volo_gen::volo::demo::GetItemRequest>,
    ) -> core::result::Result<volo_grpc::Response<volo_gen::volo::demo::GetItemResponse>, volo_grpc::Status>
    {
        Ok(volo_grpc::Response::new(Default::default()))
    }
}

// 中间件服务,打印出我们收到的请求、返回的响应以及消耗的时间
#[derive(Clone)]
pub struct LogService<S>(S);

#[volo::service]
impl<Cx, Req, S> volo::Service<Cx, Req> for LogService<S>
where
    Req: Send + 'static,
    S: Send + 'static + volo::Service<Cx, Req>,
    Cx: Send + 'static,
{
    async fn call(&mut self, cx: &mut Cx, req: Req) -> Result<S::Response, S::Error> {
        let now = std::time::Instant::now();
        let resp = self.0.call(cx, req).await;
        tracing::info!("Request took {}ms", now.elapsed().as_millis());
        resp
    }
}

// 我们给这个 Service 包装一层 Layer ,便于 server 、 client 调用
pub struct LogLayer;

impl<S> volo::Layer<S> for LogLayer {
    type Service = LogService<S>;

    fn layer(self, inner: S) -> Self::Service {
        LogService(inner)
    }
}
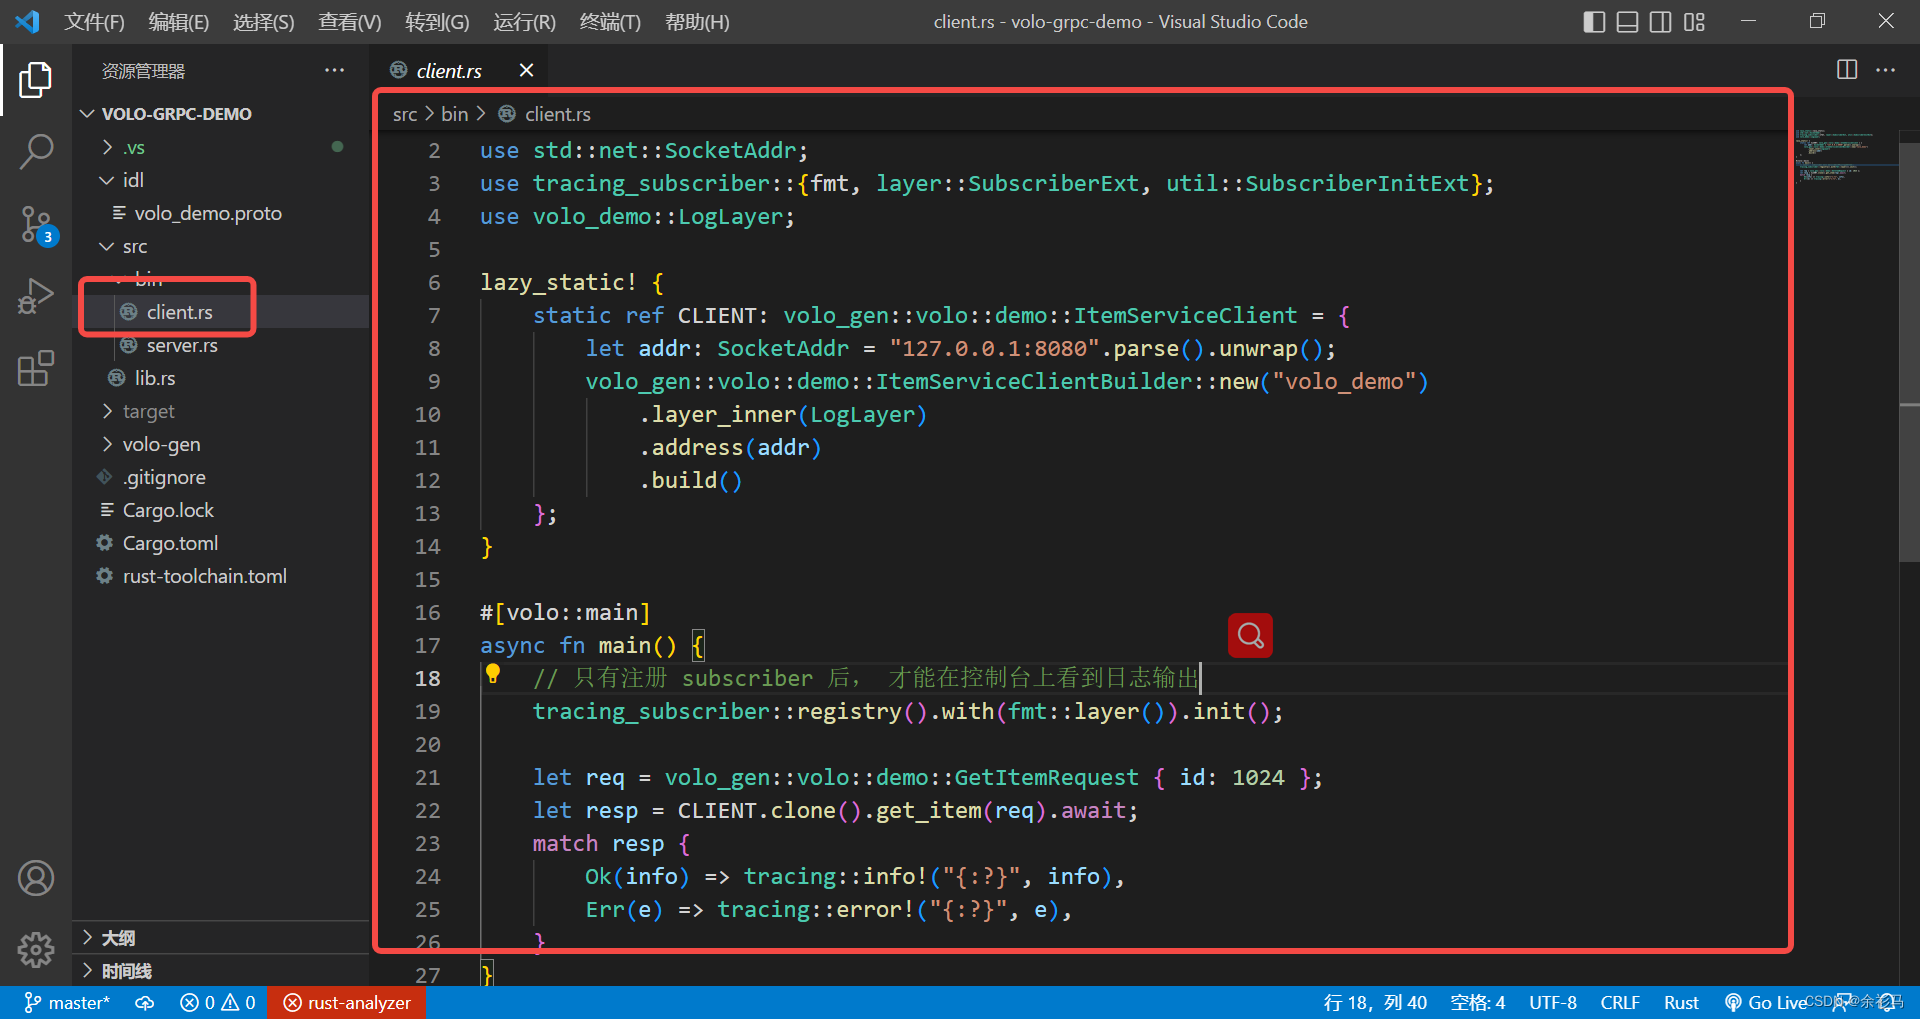
3、在 Server/Client 中加入日志中间件
use tracing_subscriber::{fmt, layer::SubscriberExt, util::SubscriberInitExt};

// 只有注册 subscriber 后, 才能在控制台上看到日志输出
tracing_subscriber::registry().with(fmt::layer()).init();


// client

use lazy_static::lazy_static;
use std::net::SocketAddr;
use volo_demo::LogLayer;
use tracing_subscriber::{fmt, layer::SubscriberExt, util::SubscriberInitExt};

lazy_static! {
    static ref CLIENT: volo_gen::volo::demo::ItemServiceClient = {
        let addr: SocketAddr = "127.0.0.1:8080".parse().unwrap();
        volo_gen::volo::demo::ItemServiceClientBuilder::new("volo_demo")
            .layer_inner(LogLayer)
            .address(addr)
            .build()
    };
}

#[volo::main]
async fn main() {

    // 只有注册 subscriber 后, 才能在控制台上看到日志输出
    tracing_subscriber::registry().with(fmt::layer()).init();
    let req = volo_gen::volo::demo::GetItemRequest { id: 1024 };
    let resp = CLIENT.clone().get_item(req).await;
    match resp {
        Ok(info) => tracing::info!("{:?}", info),
        Err(e) => tracing::error!("{:?}", e),
    }
}
4、自定义函数返回
#[volo::async_trait]
impl volo_gen::volo::demo::ItemService for S {
    // 这部分是我们需要增加的代码
    async fn get_item(
        &self,
        _req: volo_grpc::Request<volo_gen::volo::demo::GetItemRequest>,
    ) -> core::result::Result<
        volo_grpc::Response<volo_gen::volo::demo::GetItemResponse>,
        volo_grpc::Status,
    > {
        // 默认返回空
        // Ok(volo_grpc::Response::new(Default::default()))

        // 返回自定义数据
        Ok(volo_grpc::Response::new(
            volo_gen::volo::demo::GetItemResponse {
                item: Some(volo_gen::volo::demo::Item {
                    id: 1024,
                    title: "hello".to_string(),
                    content: "just for test.".to_string(),
                    extra: Default::default(),
                }),
            },
        ))
    }
}
5、测试

可以看到 gRPC 调用成功,并且日志输出了自定义的返回值!
六、跨语言通讯
Client : Rust 语言
Server : C# 语言
1、公共 IDL
syntax = "proto3";

option csharp_namespace = "PrinterGrpcService";

package greet;

// The greeting service definition.
service Greeter {
  // Sends a greeting
  rpc SayHello (HelloRequest) returns (HelloReply);
}

// The request message containing the user's name.
message HelloRequest {
  string name = 1;
}

// The response message containing the greetings.
message HelloReply {
  string message = 1;
}
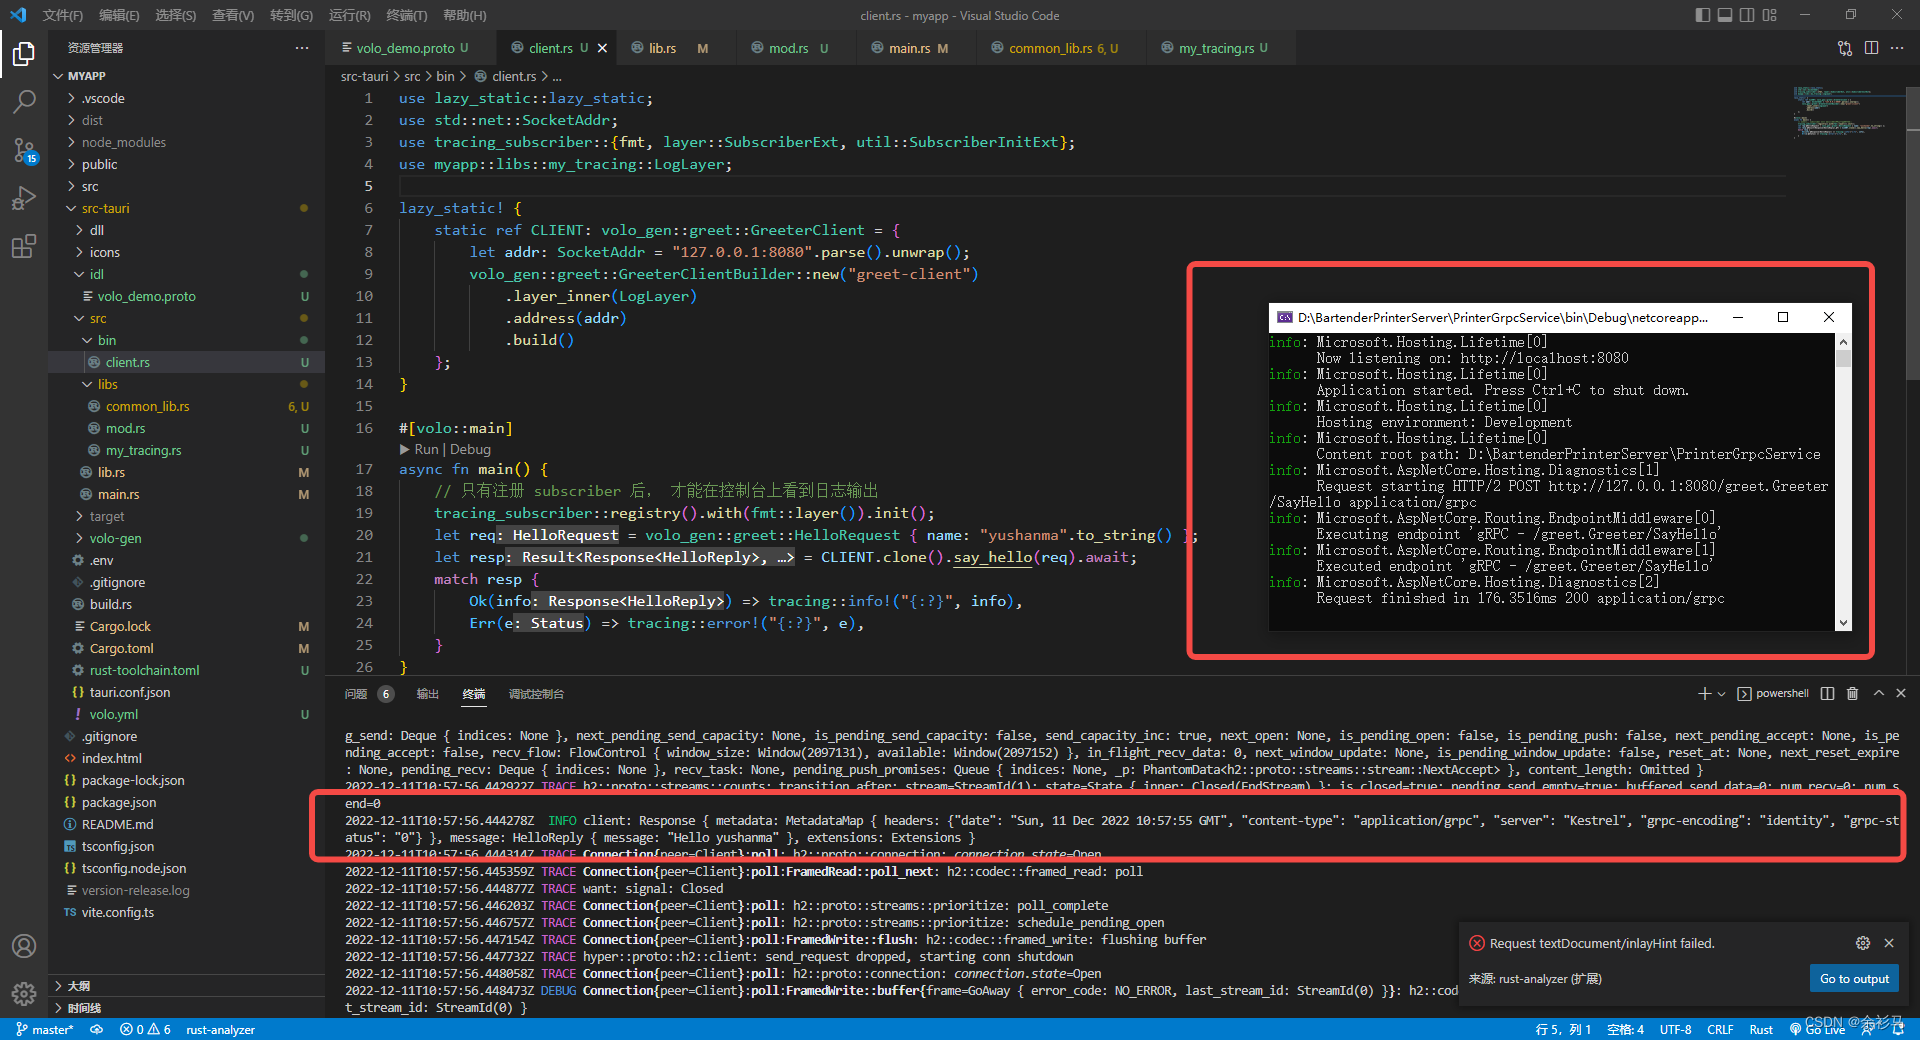
2、Client 端
按照上述流程,编写 client.rs
use lazy_static::lazy_static;
use std::net::SocketAddr;
use tracing_subscriber::{fmt, layer::SubscriberExt, util::SubscriberInitExt};
use myapp::libs::my_tracing::LogLayer;

lazy_static! {
    static ref CLIENT: volo_gen::greet::GreeterClient = {
        let addr: SocketAddr = "127.0.0.1:8080".parse().unwrap();
        volo_gen::greet::GreeterClientBuilder::new("greet-client")
            .layer_inner(LogLayer)
            .address(addr)
            .build()
    };
}

#[volo::main]
async fn main() {
    // 只有注册 subscriber 后, 才能在控制台上看到日志输出
    tracing_subscriber::registry().with(fmt::layer()).init();
    let req = volo_gen::greet::HelloRequest { name: "yushanma".to_string() };
    let resp = CLIENT.clone().say_hello(req).await;
    match resp {
        Ok(info) => tracing::info!("{:?}", info),
        Err(e) => tracing::error!("{:?}", e),
    }
}
2、Server 端
使用 .Net Core 框架创建模板


生成的代码文件跟 volo 如出一辙:定义 IDL,定义服务函数,启动 Server 监听请求。
启动服务端后再启动客户端测试:请求成功!