nacos我们都知道是微服务中用来做注册中心和配置中心的中间件,本文就来探讨一下Spring Cloud是如何将服务注册到注册中心,而nacos又是如何在上述规范中实现自己代码逻辑的。本文中使用的是nacos作为例子。
过程
我们都知道Spring提供了很多的扩展点,包括在BeanFactory的后置处理器BeanFactoryPostProcessor、在某个Bean创建后的BeanPostProcessor等等。
- 那么服务注册是如何实现的呢?
要解决这个问题,我们先查看Spring中核心代码。
AbstractApplicationContext#refresh()
@Override
public void refresh() throws BeansException, IllegalStateException {


	synchronized (this.startupShutdownMonitor) {


		// Prepare this context for refreshing.
		prepareRefresh();

		// Tell the subclass to refresh the internal bean factory.
		ConfigurableListableBeanFactory beanFactory = obtainFreshBeanFactory();

		// Prepare the bean factory for use in this context.
		prepareBeanFactory(beanFactory);

		try {


			// Allows post-processing of the bean factory in context subclasses.
			postProcessBeanFactory(beanFactory);

			// Invoke factory processors registered as beans in the context.
			invokeBeanFactoryPostProcessors(beanFactory);

			// Register bean processors that intercept bean creation.
			registerBeanPostProcessors(beanFactory);

			// Initialize message source for this context.
			initMessageSource();

			// Initialize event multicaster for this context.
			initApplicationEventMulticaster();

			// Initialize other special beans in specific context subclasses.
			onRefresh();

			// Check for listener beans and register them.
			registerListeners();

			// Instantiate all remaining (non-lazy-init) singletons.
			finishBeanFactoryInitialization(beanFactory);

			// Last step: publish corresponding event.
			// nacos客户端注册处
			finishRefresh();
		} catch (BeansException ex) {


			if (logger.isWarnEnabled()) {


				logger.warn("Exception encountered during context initialization - " +
						"cancelling refresh attempt: " + ex);
			}

			// Destroy already created singletons to avoid dangling resources.
			destroyBeans();

			// Reset 'active' flag.
			cancelRefresh(ex);

			// Propagate exception to caller.
			throw ex;
		}

		finally {


			// Reset common introspection caches in Spring's core, since we
			// might not ever need metadata for singleton beans anymore...
			resetCommonCaches();
		}
	}
}
在整个容器刷新结束阶段,nacos会进行服务注册。那么我们看看在这是如何进行服务注册的。
@Override
public void publishEvent(ApplicationEvent event) {


	publishEvent(event, null);
}
首先发布了个事件 ServletWebServerInitializedEvent,这个事件会被所有监听器监听,然后触发。

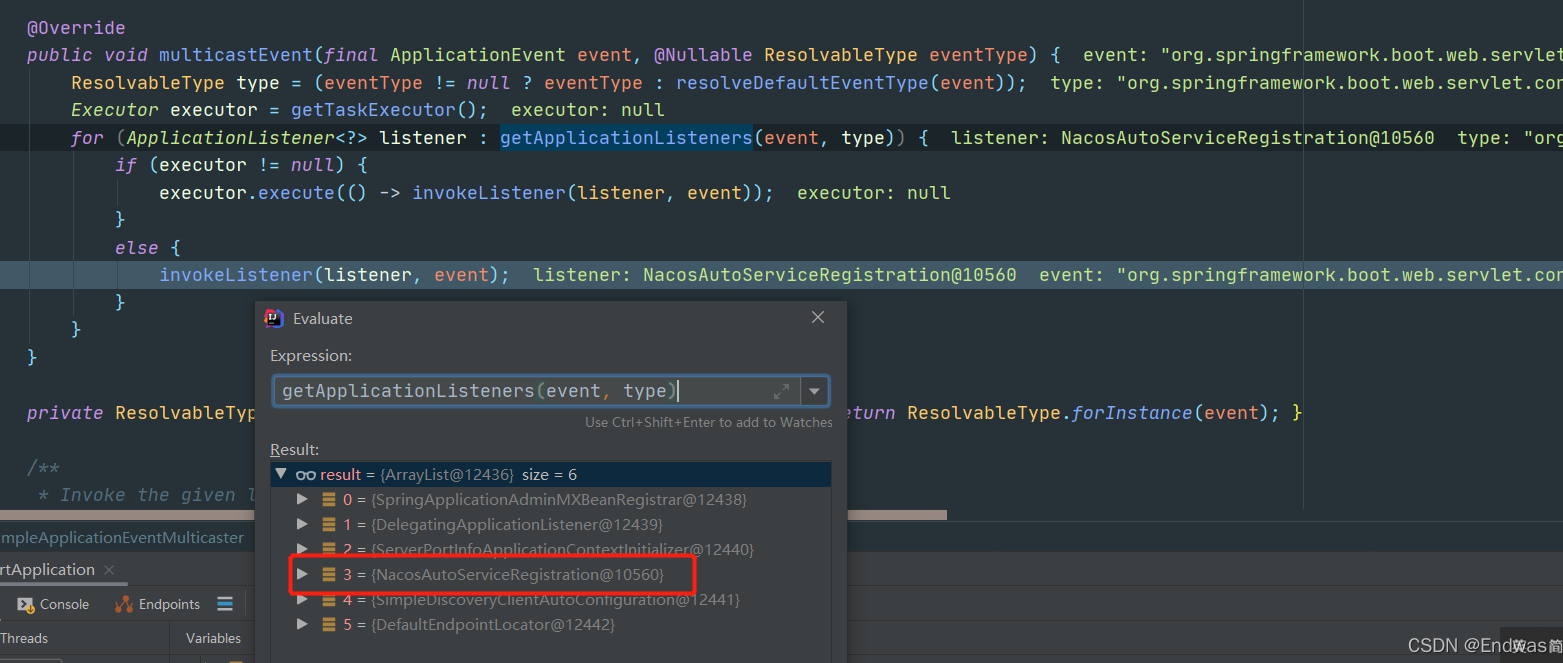
@Override
public void multicastEvent(final ApplicationEvent event, @Nullable ResolvableType eventType) {


	ResolvableType type = (eventType != null ? eventType : resolveDefaultEventType(event));
	Executor executor = getTaskExecutor();
	for (ApplicationListener<?> listener : getApplicationListeners(event, type)) {


		if (executor != null) {


			executor.execute(() -> invokeListener(listener, event));
		}
		else {


			invokeListener(listener, event);
		}
	}
}
- 获取到所有的监听器,逐一调用事件,典型的观察者设计模式。
最后我们发现Nacos往容器中注册了一个监听器 NacosAutoServiceRegistration
这个类实现了ApplicationListener,所以肯定会在监听到ServletWebServerInitializedEvent事件时候,回调onApplicationEvent方法。但他并没有重写onApplicationEvent方法,那么他就是调用了父类的onApplicationEvent方法。
我们可以去看AbstractAutoServiceRegistration中的onApplicationEvent。
/**
 * Register the local service with the {@link ServiceRegistry}.
 */
protected void register() {


	this.serviceRegistry.register(getRegistration());
}
最后经过端口绑定、判断是否开启服务注册等后,进行向注册中心注册的方法。
// NacosAutoServiceRegistration#register
@Override
protected void register() {


	if (!this.registration.getNacosDiscoveryProperties().isRegisterEnabled()) {


		log.debug("Registration disabled.");
		return;
	}
	if (this.registration.getPort() < 0) {


		this.registration.setPort(getPort().get());
	}
	super.register();
}

// super.register调用的该处代码AbstractAutoServiceRegistration#register
protected void register() {


	this.serviceRegistry.register(getRegistration());
}
以上其实都是Spring Cloud帮助我们封装好的规范,最终我们需要调用
this.serviceRegistry.register(getRegistration());
去进行对应注册操作,而像nacos、erueka则调用对应实现类即可。
2.封装
我们从上文得知,nacos本质就是往容器中放置了一个listener,通过监听到web服务初始化事件ServletWebServerInitializedEvent进而进行注册操作。
那么我们来看看放了什么进入容器、怎么放入容器的
1.自动装配
我们都知道,Spring boot自动装配,通过在jar包中配置spring.factories文件进行。那么我们看看nacos是否也是这样放入自己实现类的。
查看nacos discovery下的META-INF/spring.factories文件
果然发现了自动注册客户端的配置类
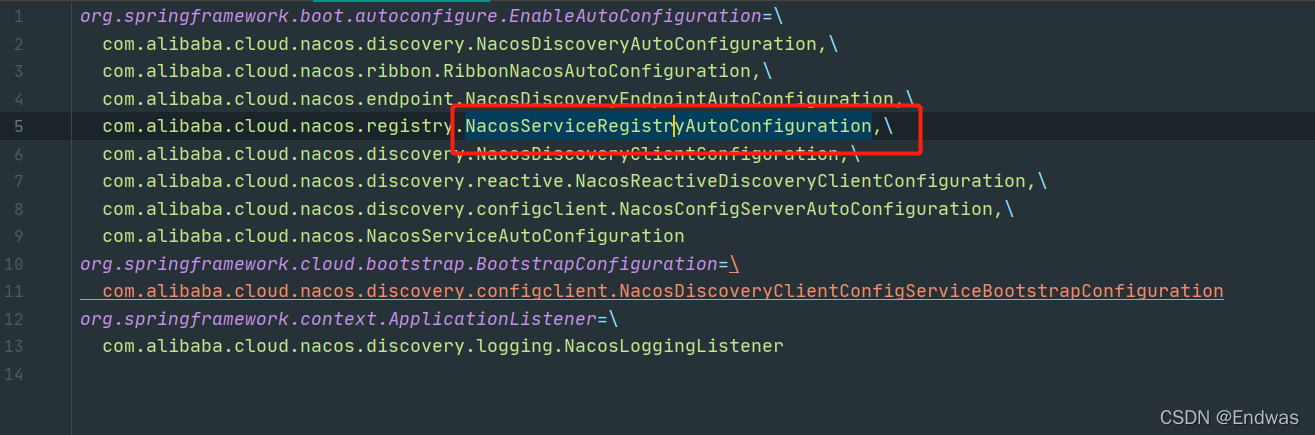
我们看看这个配置类,往容器引入了什么类。果然我们发现了上节说到了自动注册组件实现类。
/*
 * Copyright 2013-2018 the original author or authors.
 *
 * Licensed under the Apache License, Version 2.0 (the "License");
 * you may not use this file except in compliance with the License.
 * You may obtain a copy of the License at
 *
 *      https://www.apache.org/licenses/LICENSE-2.0
 *
 * Unless required by applicable law or agreed to in writing, software
 * distributed under the License is distributed on an "AS IS" BASIS,
 * WITHOUT WARRANTIES OR CONDITIONS OF ANY KIND, either express or implied.
 * See the License for the specific language governing permissions and
 * limitations under the License.
 */

package com.alibaba.cloud.nacos.registry;

// 省略
import *

/**
 * @author xiaojing
 * @author <a href="mailto:[email protected]">Mercy</a>
 */
@Configuration(proxyBeanMethods = false)
@EnableConfigurationProperties
@ConditionalOnNacosDiscoveryEnabled
@ConditionalOnProperty(value = "spring.cloud.service-registry.auto-registration.enabled",
		matchIfMissing = true)
@AutoConfigureAfter({

     AutoServiceRegistrationConfiguration.class,
		AutoServiceRegistrationAutoConfiguration.class,
		NacosDiscoveryAutoConfiguration.class })
public class NacosServiceRegistryAutoConfiguration {


	@Bean
	public NacosServiceRegistry nacosServiceRegistry(
			NacosDiscoveryProperties nacosDiscoveryProperties) {


		return new NacosServiceRegistry(nacosDiscoveryProperties);
	}

	@Bean
	@ConditionalOnBean(AutoServiceRegistrationProperties.class)
	public NacosRegistration nacosRegistration(
			ObjectProvider<List<NacosRegistrationCustomizer>> registrationCustomizers,
			NacosDiscoveryProperties nacosDiscoveryProperties,
			ApplicationContext context) {


		return new NacosRegistration(registrationCustomizers.getIfAvailable(),
				nacosDiscoveryProperties, context);
	}

	/**
	*	注册实例的关键类,通过使用上面NacosServiceRegistry进行NacosRegistration注册
	*/
	@Bean
	@ConditionalOnBean(AutoServiceRegistrationProperties.class)
	public NacosAutoServiceRegistration nacosAutoServiceRegistration(
			NacosServiceRegistry registry,
			AutoServiceRegistrationProperties autoServiceRegistrationProperties,
			NacosRegistration registration) {


		return new NacosAutoServiceRegistration(registry,
				autoServiceRegistrationProperties, registration);
	}

}
在创建NacosAutoServiceRegistration 时,传入了NacosServiceRegistry、NacosRegistration。
使得在注册时候调用进行注册。
protected void register() {


	this.serviceRegistry.register(getRegistration());
}
3.总结
Spring Cloud服务注册原理,从Spring容器初始化后通过监听器监听,然后进行对应监听器调用进行服务注册,Nacos实现了全套的注册组件,只需引入后配置好地址就可以实现,自动化服务注册功能。