1,运行状态:当一个碎片是可见的,并且它们关联的活动正处于运行状态时,该碎片也处于运行状态
2,暂停状态:当一个活动进入暂停状态时由于另一个未占满屏幕的活动被添加到了栈顶),与它相关联的可见碎片就会进入到暂停状态。
3,停止状态:当一个活动进入停止状态时,与它相关联的碎片就会进入到停止状态。或者通过调用FragmentTransaction的remove(),replace()方法将碎片从活动中移除,但有事务提交之前调用addToBackStack()方法,这时的碎片也会进入到停止状态。总的来说,进入停止状态的碎片对用户来说是完全不可见的,有可能会被系统回收
4,销毁状态:碎片总是依附于活动而存在的,因此当活动被销毁时,与它相关联的碎片就会进入到销毁状态。或者通过调用FragmentTransaction的remove(),replace()方法将碎片从 动中移除,但在事务提交之前并没有调用addToBackStack()方法,这时的碎片也会进入到销毁状态。
二,碎片的回调方法:
片段类提供了一系列的回调方法,以覆盖碎片的每个环节,主要的回调方法有:
1,onAttach():当碎片和活动建立关联的时候调用
2,onCreateView():为片段创建视图(加载布局)时调用
3,onActivityCreated():确保与碎片相关联的活动一定已经创建完毕的时候调用
4,onDestroyView():当与碎片关联的视图被移除的时候调用
5,onDetach():当碎片和活动解除关联的时候调用。
三,碎片完整的生命周期,如下图所示

四,接下来附上一个例子来实践一下碎片的生命周期:
如图1所示,首先新建一个项目,项目名为FragmentTest4,项目结构图如下:

2,项目效果如下

点击Hello Lc按钮后,如下图所示:

3,首先,新建3个碎片的布局文件,分别为fragment1.xml,fragment2.xml,fragment3.xml,其中第三个碎片的布局中的TextView设置无内容,代码分别如下:
fragment1.xml:
<LinearLayout xmlns:android="http://schemas.android.com/apk/res/android"
    android:layout_width="match_parent"
    android:layout_height="match_parent"
    android:orientation="vertical" >

    <Button
        android:id="@+id/button"
        android:layout_width="wrap_content"
        android:layout_height="wrap_content"
        android:layout_gravity="center"
        android:text="Hello Lc"/>

</LinearLayout>
fragment2.xml:
<LinearLayout xmlns:android="http://schemas.android.com/apk/res/android"
    android:layout_width="match_parent"
    android:layout_height="match_parent"
    android:orientation="vertical" >

    <TextView
        android:id="@+id/textView"
        android:layout_width="wrap_content"
        android:layout_height="wrap_content"
        android:layout_gravity="center"
        android:text="Hello xg"
        android:textSize="20sp"/>

</LinearLayout>
fragment3.xml:
<LinearLayout xmlns:android="http://schemas.android.com/apk/res/android"
    android:layout_width="match_parent"
    android:layout_height="match_parent"
    android:orientation="vertical" >

    <TextView
        android:id="@+id/textView1"
        android:layout_width="wrap_content"
        android:layout_height="wrap_content"
        android:layout_gravity="center"
        android:textSize="20sp"/>

</LinearLayout>
4,新建三个类,分别为片段1,Fragment2,Fragment3类,继承于片段类,用来加载碎片布局文件,代码分别如下:
Fragment1.java:
import android.support.v4.app.Fragment;
import android.os.Bundle;
import android.view.LayoutInflater;
import android.view.View;
import android.view.ViewGroup;

public class Fragment1 extends Fragment {

    @Override
    public View onCreateView(LayoutInflater inflater, ViewGroup container,
                             Bundle savedInstanceState) {
        // TODO Auto-generated method stub
        View view=inflater.inflate(R.layout.fragment1, container);
        return view;
    }

}
Fragment2.java,分别添加了碎片的回调方法,打印相关的信息:
import android.support.v4.app.Fragment;
import android.app.Activity;
import android.os.Bundle;
import android.util.Log;
import android.view.LayoutInflater;
import android.view.View;
import android.view.ViewGroup;
import android.widget.TextView;

public class Fragment2 extends Fragment {

    public static final String TAG = "Fragment2";//声明一个字符串常量,打印信息时的TAG
    public TextView textView;//声明一个TextView对象
    private Fragment2 fragment2;//声明Fragment2对象
    private String xg;//声明字符串对象

    @Override
    public void onAttach(Activity activity) {
        // TODO Auto-generated method stub
        Log.i(TAG, "onAttach");
        super.onAttach(activity);
    }

    @Override
    public void onCreate(Bundle savedInstanceState) {
        // TODO Auto-generated method stub
        Log.i(TAG, "onCreate");
        super.onCreate(savedInstanceState);
    }

    @Override
    public View onCreateView(LayoutInflater inflater, ViewGroup container,
                             Bundle savedInstanceState) {
        Log.i(TAG, "onCreateView");
        View view = inflater.inflate(R.layout.fragment2, container);//加载fragment2.xml布局文件
        textView=(TextView)view.findViewById(R.id.textView);//获得fragment2.xml文件的TextView控件实例
        MainActivity activity=(MainActivity) getActivity();//获得MainActivity实例
        fragment2=(Fragment2) activity.getFragmentManager().findFragmentById(R.id.fragment2);//通过活动实例获得Fragment2对象
        xg=fragment2.textView.getText().toString();//获取文本内容
        return view;//返回此视图
    }

    @Override
    public void onActivityCreated(Bundle savedInstanceState) {
        // TODO Auto-generated method stub
        Log.i(TAG, "onActivityCreated");
        super.onActivityCreated(savedInstanceState);
    }

    @Override
    public void onStart() {
        // TODO Auto-generated method stub
        Log.i(TAG, "onStart");
        super.onStart();
    }

    @Override
    public void onResume() {
        // TODO Auto-generated method stub
        Log.i(TAG, "onResume");
        //假如此碎片恢复的话
        if(fragment2.isResumed()){
            textView.setText(xg);//设置文本视图显示
        }
        super.onResume();
    }

    @Override
    public void onPause() {
        // TODO Auto-generated method stub
        Log.i(TAG, "onPause");
        super.onPause();
    }

    @Override
    public void onStop() {
        // TODO Auto-generated method stub
        Log.i(TAG, "onStop");
        super.onStop();
    }

    @Override
    public void onDestroyView() {
        // TODO Auto-generated method stub
        Log.i(TAG, "onDestoryView");
        super.onDestroyView();
    }

    @Override
    public void onDestroy() {
        // TODO Auto-generated method stub
        Log.i(TAG, "onDestroy");
        super.onDestroy();
    }

    @Override
    public void onDetach() {
        // TODO Auto-generated method stub
        Log.i(TAG, "onDetach");
        super.onDetach();
    }

}
Fragment3.java
public class Fragment3 extends Fragment {

    public TextView textView1;
    @Override
    public View onCreateView(LayoutInflater inflater, ViewGroup container,
                             Bundle savedInstanceState) {
        View view=inflater.inflate(R.layout.fragment3, container,false);//加载fragment3.xml布局文件
        textView1=(TextView)view.findViewById(R.id.textView1);//获取fragment3.xml文件的TextView控件实例
        MainActivity activity=(MainActivity) getActivity();//获取MainActivity活动实例
        Fragment2 fragment2=(Fragment2) activity.getFragmentManager().findFragmentById(R.id.fragment2);//通过活动实例获取Fragment2对象
        fragment2.textView.setText("");//设置Fragment2碎片的TextView为空
        String text=activity.button.getText().toString();//获取到MainActivity中按钮的文本内容
        textView1.setText(text);//设置Fragment3碎片的TextView的内容
        return view;//返回视图
    }

}
我在上面加了一些逻辑,此项目点击Hello Lc按钮后,右边碎片改变为此按钮的文本内容“Hello Lc”,而点击返回键要返回上一个碎片,所以必须在Fragment2类中的onResume()方法重新设置该文本内容。
5、接着打开默认的activity_main.xml布局文件,用来添加两个碎片。其中右边碎片放在FrameLayout容器中,以便动态调用碎片,代码如下:
<LinearLayout xmlns:android="http://schemas.android.com/apk/res/android"
    xmlns:tools="http://schemas.android.com/tools"
    android:layout_width="match_parent"
    android:layout_height="match_parent" >

    <fragment
        android:id="@+id/fragment1"
        android:name="com.example.fragmenttest4.Fragment1"
        android:layout_width="0dp"
        android:layout_height="match_parent"
        android:layout_weight="1"/>

    <FrameLayout
        android:id="@+id/frameLayout"
        android:layout_width="0dp"
        android:layout_height="match_parent"
        android:layout_weight="1" >

        <fragment
            android:id="@+id/fragment2"
            android:name="com.example.fragmenttest4.Fragment2"
            android:layout_width="match_parent"
            android:layout_height="match_parent"/>

    </FrameLayout>
</LinearLayout>
6、修改默认类MianActivity,实现了动态调用碎片的方法,代码如下:
public class MainActivity extends Activity {

    public Button button;//声明Button对象

    @Override
    protected void onCreate(Bundle savedInstanceState) {
        super.onCreate(savedInstanceState);
        setContentView(R.layout.activity_main);//加载activity_main.xml文件
        button = (Button) findViewById(R.id.button);//获取到左边碎片的按钮控件实例
        //添加按钮点击事件监听器
        button.setOnClickListener(new OnClickListener() {

            @Override
            public void onClick(View arg0) {
                // TODO Auto-generated method stub
                Fragment3 fragment3=new Fragment3();//实例化Fragment3对象
                FragmentManager fragmentManager=getFragmentManager();//获取FragmentManager对象
                FragmentTransaction fragmentTransaction=fragmentManager.beginTransaction();//开始事务
                fragmentTransaction.replace(R.id.frameLayout, fragment3);//动态调用碎片,即将原始右边碎片Fragment2改为Fragment3碎片
                fragmentTransaction.addToBackStack(null);//添加到返回栈,即点击返回键返回上一个碎片
                fragmentTransaction.commit();//提交事务
            }
        });
    }

}
7、运行后效果如上所说一样,此项目的回调方法都是放在Fragment2碎片中:
(1)、然后开始运行此应用时,Log打印如下: 
当 Fragment2第一次被加载到屏幕上时,会依次执行 onAttach() 、onCreate() 、onCreateView() 、onActivityCreated() 、onStart() 和 onResume() 方法。
(2)、然后点击Fragment1中的按钮,如下图所示: 
由于Fragment3替换了Fragment2,此时的Fragment2进入了停止状态,因此 onPause()、onStop()和 onDestroyView()方法会得到执行。当然如果在替换的时候没有调用addToBackStack()方法,此时的 RightFragment 就会进入销毁状态,onDestroy()和onDetach()方法就会得到执行。
(3)、接着,按下返回物理键,Fragment2会重新回到屏幕,此时打印信息如下: 
由于Fragment2重新回到了运行状态,因此onActivityCreated()、onStart()和 onResume()方法会得到执行。注意此时 onCreate()和 onCreateView()方法并不会执行,因为我们借助了addToBackStack()方法使得Fragment2和它的视图并没有销毁。
(4)、再次按返回物理键,打印信息如下: 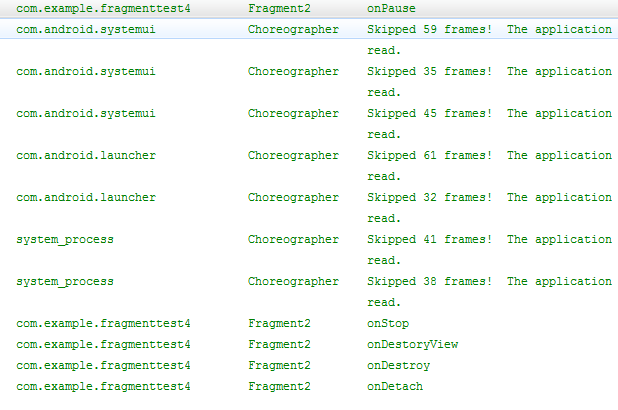
依次会执行 onPause()、onStop()、onDestroyView()、onDestroy()和 onDetach()方法,最终将活动和碎片一起销毁。
五、学习了碎片的生命周期,我们可以在碎片的某种特定状态下进行我们的逻辑操作,比如,我上面举的例子,就是在Fragment2重新回到运行状态,即回调方法onResume()中进行操作,使得重新回到运行状态的Fragment2碎片的TextView显示原来的内容。