普通项目:
这样一个账号可以在多个地方进行登录。在这个基础上修改实现一个账号只能登录一次,再次登录会把上次的登录的给挤掉,类似于QQ。

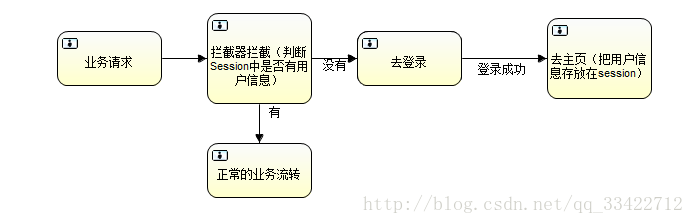
难点:怎么通过sessionId销毁session。因为Servlet2.1之后不支持SessionContext里面getSession(String id)方法。我们可以自己实现一个SessionContext。然后通过sessionId获取session,再通过session.invalidate();
1、实现SessionContext。
import java.util.HashMap;
import java.util.Map;

import javax.servlet.http.HttpSession;

public class MySessionContext {
	private static MySessionContext context;

	private Map<String, HttpSession> map;

	private MySessionContext() {
		map = new HashMap<>();
	}

	public static MySessionContext getSessionContext() {
		if(context == null) {
			context = new MySessionContext();
		}
		return context;
	}

	//添加
	public synchronized void addSession(HttpSession session) {
		if(session!= null)
			map.put(session.getId(), session);
	}

	//获取
	public synchronized HttpSession getSession(String sessionId) {
		if(sessionId == null)
			return null;
		return map.get(sessionId);
	}

	//删除
	public synchronized void delSession(HttpSession session) {
		if(session!= null)
			map.remove(session.getId());
	}

}
2、配置Session监听,在web.xml配置。
<!-- session监听 类实现 HttpSessionListener 接口方法 -->
	<listener>
		<listener-class>com.it.listeners.SessionListener</listener-class>
	</listener>
3、编写com.it.listeners.SessionListener
import javax.servlet.ServletContext;
import javax.servlet.http.HttpSessionEvent;
import javax.servlet.http.HttpSessionListener;

import org.springframework.context.ApplicationContext;
import org.springframework.web.context.support.WebApplicationContextUtils;

import com.it.data.MySessionContext;
import com.it.pojo.User;
import com.it.service.UserServies;

public class SessionListener implements HttpSessionListener {
	private MySessionContext context = MySessionContext.getSessionContext();

	@Override
	public void sessionCreated(HttpSessionEvent e) {
		context.addSession(e.getSession());
	}

	@Override
	public void sessionDestroyed(HttpSessionEvent e) {
		User user = (User)e.getSession().getAttribute("user");

		//获取service
		UserServies userServies =(UserServies) getObjectFromApplication(e.getSession().getServletContext(),"userServies");

		//获取用户的sessionId和用户在线状态
		User tempUser = userServies.selectUserByKey(user.getId());

		//如果用户在线且sessionId和e.getSession().getId()相同说明下线,不是更替。
		//则修改用户的在线状态和session设置null。
		if(tempUser.getOnlinestatus() == 1 && e.getSession().getId().equals(tempUser.getSessionid())) {
			tempUser.setOnlinestatus(0);
			tempUser.setSessionid(null);
			userServies.updateByPrimaryKey(tempUser);
		}

		context.delSession(e.getSession());
	}

	private Object getObjectFromApplication(ServletContext servletContext,String beanName){
        //通过WebApplicationContextUtils 得到Spring容器的实例。
        ApplicationContext application=WebApplicationContextUtils.getWebApplicationContext(servletContext);
        //返回Bean的实例。
        return application.getBean(beanName);
    }
}
4、配置拦截器,在springmvc.xm配置
<!--拦截器 -->
 	<mvc:interceptors>
 		<mvc:interceptor>
 			<mvc:mapping path="/**"/>
 			<mvc:exclude-mapping path="/login**"/>
 			<bean class="com.it.interceptor.LoginInterceptor"></bean>
 		</mvc:interceptor>
 	</mvc:interceptors>
5、编写com.it.interceptor.LoginInterceptor,该类实现HandlerInterceptor接口。
import javax.servlet.http.HttpServletRequest;
import javax.servlet.http.HttpServletResponse;
import javax.servlet.http.HttpSession;

import org.slf4j.LoggerFactory;
import org.slf4j.Logger;
import org.springframework.web.servlet.HandlerInterceptor;
import org.springframework.web.servlet.ModelAndView;

public class LoginInterceptor implements HandlerInterceptor{

	Logger logger = LoggerFactory.getLogger(getClass());

	@Override
	public boolean preHandle(HttpServletRequest request, HttpServletResponse response, Object handler)
			throws Exception {
		logger.info("在 登录拦截器。 ");
		HttpSession session = request.getSession();
		if(session.getAttribute("user") != null) {
			return true;
		}
		request.getRequestDispatcher("/WEB-INF/web/login.jsp").forward(request, response);
		return false;
	}
}
6、登录逻辑
import javax.servlet.http.HttpServletRequest;
import javax.servlet.http.HttpSession;

import org.springframework.beans.factory.annotation.Autowired;
import org.springframework.stereotype.Controller;
import org.springframework.ui.Model;
import org.springframework.web.bind.annotation.GetMapping;
import org.springframework.web.bind.annotation.PostMapping;
import org.springframework.web.bind.annotation.RequestParam;

import com.it.constant.RoleConstant;
import com.it.data.MySessionContext;
import com.it.pojo.User;
import com.it.service.UserServies;

@Controller
public class LoginController {

	@Autowired
	private UserServies userServies ;

	private MySessionContext context = MySessionContext.getSessionContext();
	//处理登录请求
	@PostMapping("/login")
	public String login(HttpServletRequest request, HttpSession session,Model model,@RequestParam(required=true) String id,@RequestParam(required=true)String password) {
		User user = userServies.selectUserByKey(id);
		//密码和id匹配
		if(user != null && password.equals(user.getPassword())) {

			session.setAttribute("user",user);

			User tempuser = new User();
			tempuser.setOnlinestatus(1);
			tempuser.setSessionid(session.getId());
			tempuser.setId(id);
			userServies.updateByPrimaryKeySelective(tempuser);

			//删除上一个登录的session
			if(user.getOnlinestatus() == 1 && user.getSessionid() != null) {
				HttpSession oldSession = context.getSession(user.getSessionid());
				if(oldSession != null)
					oldSession.invalidate();
			}

			return "redirect:index";
		}else {
			model.addAttribute("msg", "用户名或密码不正确");
			return "login";
		}

	}

	//去登陆
	@GetMapping("/login")
	public String login(HttpSession session) {
		if(session.getAttribute("user") != null)
			return "redirect:index";
		return "login";
	}
}
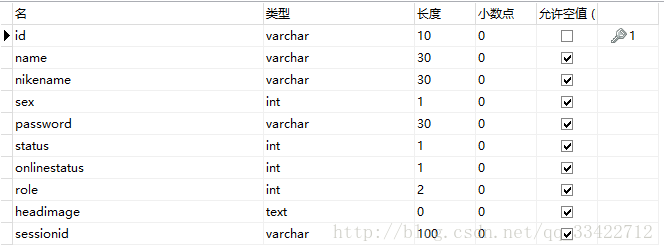
7、user表结构
8、还需要解决的问题。session已经清掉了,但是第一个用户需要发送一个业务请求,这时会去登录页面。如果想第二次登录时第一个用户马上给出提示,则需要在前端做一个方法一直请求后台。但是这种做法我不知道合不合理。