
GTA5
2 前向渲染
前向渲染是三个光照技术中最简单的,也是游戏图形渲染中最常见的技术。出于这个原因,也是光照计算最昂贵的技术,它不允许在场景中出现大量的动态光源。
大部分使用前向渲染的图形引擎会采用一些技术来模拟场景中大量的光源的情况,例如,lightmap(光照贴图)和lightProbe(light probe)都是采用从场景中放置的静态光源预先计算光照贡献的方法,并将这些光照贡献存储在纹理中,以便在运行时加载。不幸的是,lightmap和lightprobe不能模拟场景中的动态光源,因为这些光源产生的光照贴图常常在运行时会被废弃掉(discard)。
在这个实验中,前向渲染的结果被用作与另外两个渲染技术进行对比的基准。前向渲染技术也被用来构建与其它渲染技术进行性能对比的基准(baseline)。
很多在前向渲染中的方法会在延迟和forward+中被复用,例如,前向渲染中的顶点着色器也会被用在延迟渲染和forward+渲染中。同样,计算最终光照和材质着色的方法也被用于所有的渲染技术。
在下一部分,我会描述前向渲染的实现细节。
2.1 顶点着色器(vertex shader)
vertex shader对所有的渲染技术是通用的,在这个实验中,只支持静态几何体,没有骨骼动画和地表,这些需要不同的vertex shader。 vertex shader尽可能简单到可以支持pixel shader中的一些功能,如法线映射(normal mapping)。
在展示vertex shader的代码之前,我会描述一下vertex shader使用的数据结构。
// CommonInclude.hlsl
140 struct AppData
141 {
142 float3 position : POSITION;
143 float3 tangent : TANGENT;
144 float3 binormal : BINORMAL;
145 float3 normal : NORMAL;
146 float2 texCoord : TEXCOORD0;
147 };
AppData这个结构定义的需要被应用程序代码发送到GPU端的数据。除了用于法线映射的normal向量,我们也需要发送切线(tagent)向量,副法线(或副切线)向量是可选的。切线和副法线即可以由3D美术师创建模型时生成,也可以由模型加载器进行生成。在本例中,如果它们没有被3D美术师生成,我则使用Open Asset Import Library[7]来生成切线和副切线。
在vertex shader中,我们也需要知道如何将模型空间向量变换成Pixel shader中需要的视图空间(view space)向量,为了实现这个变换,我们需要发送world, view以及投影(projection)矩阵到vertex shader。为了存储这些vertex shader中需要的每个模型的变量,我会创建一个常量缓冲区(constant buffer)。
// CommonInclude.hlsl
149 cbuffer PerObject : register( b0 )
150 {
151 float4x4 ModelViewProjection;
152 float4x4 ModelView;
153 };
因为我不需要单独存储世界矩阵,因此我在应用程序中预计算组合的model和view矩阵,以及组合的model、view和projection矩阵,为vertex shader将它们发送到一个单独的常量缓冲区中。
vertex shader的输出(也即是pixel shader的输入)看起来是这样的:
CommonInclude.hlsl
181 struct VertexShaderOutput
182 {
183 float3 positionVS : TEXCOORD0; // View space position.
184 float2 texCoord : TEXCOORD1; // Texture coordinate
185 float3 tangentVS : TANGENT; // View space tangent.
186 float3 binormalVS : BINORMAL; // View space binormal.
187 float3 normalVS : NORMAL; // View space normal.
188 float4 position : SV_POSITION; // Clip space position.
189 };
VertexShaderOutput结构用来传递变换过的顶点属性(vertex attribute)到Pixel shader,vs后缀的成员表示该向量是view空间的。我选择在view空间做所有的光照,而不是在世界空间,这是因为在实现延迟渲染和Forward+渲染时在view空间坐标下更容易。
vertex shader是很直接而简短的,它唯一的目标是将应用程序传来的模型空间向量变换成pxiel shader中使用的view空间向量。
vertex shader也必须要计算出光栅器(rasterizer)需要的在裁剪空间(clip space)中的position,用于vertex shader输出的SV_POSITION被用于裁剪空间的位置,但该语义也可以作为pixel shader的输入变量。当SV_POSITION被用作pixel shader的输入时,该值表示屏幕空间(screen space)的位置[8],在延迟渲染和forward+的shader中,我会使用该语义来获取当前像素在屏幕空间的位置。
// ForwardRendering.hlsl
3 VertexShaderOutput VS_main( AppData IN )
4 {
5 VertexShaderOutput OUT;
6
7 OUT.position = mul( ModelViewProjection, float4( IN.position, 1.0f ) );
8
9 OUT.positionVS = mul( ModelView, float4( IN.position, 1.0f ) ).xyz;
10 OUT.tangentVS = mul( ( float3x3 )ModelView, IN.tangent );
11 OUT.binormalVS = mul( ( float3x3 )ModelView, IN.binormal );
12 OUT.normalVS = mul( ( float3x3 )ModelView, IN.normal );
13
14 OUT.texCoord = IN.texCoord;
15
16 return OUT;
17 }
你会注意到我会使用矩阵乘以输入向量(矩阵在前,向量在后),这意味着矩阵是以主列(column-major)顺序进行存储的。DirectX 10之前,HLSL中的矩阵是以主行(row-major)的顺序进行加载的,输入的向量是后乘矩阵的(向量在前,矩阵在后),DirectX 10之后,矩阵默认加载的是主列顺序。你可以通过在矩阵的声明处指定主行修饰符来改变默认顺序[9]。
2.2 像素着色器(Pixel Shader)
pixel shader会计算所有的光照和着色,用于决定一个屏幕像素的最终颜色。在Pixel shader中采用的光照方程参考DirectX 11中的纹理和光照,如果你对光照方程不熟悉的话,在继续之前需要去阅读这篇文章。
pixel shader使用几个结构来做这项工作,Material结构存储了描述被着色对象表面材质的所有信息,Light struct包含了描述场景灯光的所有参数。
2.2.1 材质(Material)
Material定义了用于描述当前着色对象表面的所有属性,因为一些材质属性可能还有相关的纹理(如,diffuse纹理,specular纹理,或者法线贴图),我们也会使用材质来指明这个纹理是否呈现在这个对象上。
// CommonInclude.hlsl
10 struct Material
11 {
12 float4 GlobalAmbient;
13 //-------------------------- ( 16 bytes )
14 float4 AmbientColor;
15 //-------------------------- ( 16 bytes )
16 float4 EmissiveColor;
17 //-------------------------- ( 16 bytes )
18 float4 DiffuseColor;
19 //-------------------------- ( 16 bytes )
20 float4 SpecularColor;
21 //-------------------------- ( 16 bytes )
22 // Reflective value.
23 float4 Reflectance;
24 //-------------------------- ( 16 bytes )
25 float Opacity;
26 float SpecularPower;
27 // For transparent materials, IOR > 0.
28 float IndexOfRefraction;
29 bool HasAmbientTexture;
30 //-------------------------- ( 16 bytes )
31 bool HasEmissiveTexture;
32 bool HasDiffuseTexture;
33 bool HasSpecularTexture;
34 bool HasSpecularPowerTexture;
35 //-------------------------- ( 16 bytes )
36 bool HasNormalTexture;
37 bool HasBumpTexture;
38 bool HasOpacityTexture;
39 float BumpIntensity;
40 //-------------------------- ( 16 bytes )
41 float SpecularScale;
42 float AlphaThreshold;
43 float2 Padding;
44 //--------------------------- ( 16 bytes )
45 }; //--------------------------- ( 16 * 10 = 160 bytes )
GlobalAmbient用来描述全局地作用于所有对象上的环境光属性,从技术上而言,该变量应当是一个全局变量(不指定到单一对象),但因为在一个pixel shader一次只有一个材质,因此我认为这是一个比较好的位置来存储它。
ambient, emissive, diffuse和specular颜色与在DirectX 11中的纹理和光照中具有相同的意义,所以这里不再进一步解释。
Reflectance用来表示应当与diffuse颜色混合的反射颜色的数量,这需要环境贴图(cube texture)来实现,在该实验中不会用到。
Opacity用来决定一个对象的总的不透明度,这个值可以用来让物体显示透明,该属性用来在透明pass中渲染半透明物体,如果该值小于1(1表示完全不透明,0表示完全透明),该物体会被认为是透明的,将会在透明Pass中渲染这个物体,而不是在opaque pass中。
变量SpecularPower用来决定对象看起来有多闪亮,在DirectX 11中的纹理和光照中有对该变量的详细解释。
在29-38行定义的变量HasTexture指明该对象是否使用相关的纹理进行渲染,如果该参数为true,相应的纹理会被采样,采样得到的纹素(texel, 与pixel进行区分)会与相应的材质颜色进行混合。
BumpIntensity被用来缩放从bump贴图中得到的高度值(不要与法线映射混淆,法线不会进行缩放),以此来平滑(soften)或强化物体表面的起伏。大多数情况下,模型会使用法线贴图来增加没有细分(tessellation)的物体表面的细节,但也可以使用高度图(heightmap)来做同样的事情。如果模型使用了bump贴图,材质的HasBumpTexture属性会被设置为true,这种情况下模型使用被bump映射而不是法线映射。
SpecularScale用来缩放从高光强度纹理中读取的高光强度值(specular power value)。因为纹理通常保存无符号的归一化(normalized)的值,从纹理中采样的值被读取为[0..1]范围的浮点数。1.0的高光强度没有意义,所以从纹理中读取的高光强度在参与最终的光照计算之前会被SpecularScale进行缩放。
AlphaThreshold用来丢弃不透明度低于某个值的像素,通常在pixel shader中使用"discard"。这可以被用于"cut-out"材质,使用该材质的物体不需要alpha进行blend,但在物体上却有洞(例如链接的栅栏)。
Padding用来显式的增加8个字节来填充material结构。尽管HLSL会隐式上增加这个填充(8个字节)到该结构,以确保该结构是16字节的倍数,显式的增加填充会更加明确该结构的尺寸和对齐方式与相应的C++副本一致。
材质属性通过一个常量缓冲区传递给pixel shader。
// CommonInclude.hlsl
155 cbuffer Material : register( b2 )
156 {
157 Material Mat;
158 };
常量缓冲区与buffer寄存器的slot分配被用于该本文的所有pixel shader。
2.2.2 纹理
材质已经支持了8种不同类型的纹理
- 环境贴图-Ambient
- 自发光贴图-Emissive
- 漫反射贴图-Diffuse
- 高光贴图-Specular
- 高光强度贴图-SpecularPower
- 法线贴图-Normals
- 凹凸贴图-Bump
- 不透明度贴图-Opacity
并非所有的场景对象会用到所有的纹理插槽(slot)(法线贴图和bump贴图是互斥的,所以它们可能可以复用同一个纹理插槽),这取决于3D美术师让场景中的模型使用哪些纹理。应用程序会加载一个材质相关的纹理,一个纹理参数和一个相关的纹理插槽为每个这些材质属性而声明。
// CommonInclude.hlsl
167 Texture2D AmbientTexture : register( t0 );
168 Texture2D EmissiveTexture : register( t1 );
169 Texture2D DiffuseTexture : register( t2 );
170 Texture2D SpecularTexture : register( t3 );
171 Texture2D SpecularPowerTexture : register( t4 );
172 Texture2D NormalTexture : register( t5 );
173 Texture2D BumpTexture : register( t6 );
174 Texture2D OpacityTexture : register( t7 );
在本文的每个pixel shader中,纹理插槽0-7为这些纹理而保留。
2.2.3 灯光
Light结构存储了场景中定义一个灯光所需的所有信息。聚光灯,点光源和方向光没有分开到不同的结构中,定义任意一种类型的灯光所有必须的属性都存储在一个结构中。
CommonInclude.hlsl
47 struct Light
48 {
49 /**
50 * Position for point and spot lights (World space).
51 */
52 float4 PositionWS;
53 //--------------------------------------------------------------( 16 bytes )
54 /**
55 * Direction for spot and directional lights (World space).
56 */
57 float4 DirectionWS;
58 //--------------------------------------------------------------( 16 bytes )
59 /**
60 * Position for point and spot lights (View space).
61 */
62 float4 PositionVS;
63 //--------------------------------------------------------------( 16 bytes )
64 /**
65 * Direction for spot and directional lights (View space).
66 */
67 float4 DirectionVS;
68 //--------------------------------------------------------------( 16 bytes )
69 /**
70 * Color of the light. Diffuse and specular colors are not seperated.
71 */
72 float4 Color;
73 //--------------------------------------------------------------( 16 bytes )
74 /**
75 * The half angle of the spotlight cone.
76 */
77 float SpotlightAngle;
78 /**
79 * The range of the light.
80 */
81 float Range;
82
83 /**
84 * The intensity of the light.
85 */
86 float Intensity;
87
88 /**
89 * Disable or enable the light.
90 */
91 bool Enabled;
92 //--------------------------------------------------------------( 16 bytes )
93
94 /**
95 * Is the light selected in the editor?
96 */
97 bool Selected;
98
99 /**
100 * The type of the light.
101 */
102 uint Type;
103 float2 Padding;
104 //--------------------------------------------------------------( 16 bytes )
105 //--------------------------------------------------------------( 16 * 7 = 112 bytes )
106 };
Position和Direction同时存储了世界空间(_WS_后缀)和视图空间(_VS_后缀)中的位置和方向。当然,位置属性只应用于点光源和聚光灯,方向属性只作用于聚光灯和方向光。之所只同时存储了两个不同空间,是因为在应用程序阶段世界空间更易于使用,然后在传递给GPU之前将世界空间转换成视图空间,使用这种方式可以不再需要多余的GPU存储空间来管理多个灯光列表。因为10,000灯光才只需要1.12MB的GPU内存,所以这是一个合理的牺牲。但是最小化灯光结构对GPU缓存有积极的一面,并能提高渲染性能。
在一些光照模型中,漫反射和高光光照贡献是分开的,因为这种差异很小,这里选择不分开两者的贡献,而是将两者存储在Color变量中。
SpotlightAngle是以角度来表示的聚光灯圆椎体的半角,使用角度比弧度(radian)更加直观。当然聚光灯的角度会在shader中计算余弦(consine)时被转换成弧度。

- 图 聚光灯的角度
Range决定了灯光到达表面的距离,同时也决定了灯光达表面的贡献。虽然在物理上不完全正确(真实的灯光有一个衰减,实际上不会是0),灯光需要有一个有限的范围来实现延迟着色和Forward+渲染技术。这个范围的单位是场景特定的,但这里会使用1单位是1米的规格。对于点光源,范围是代表光的球体的半径,对于聚光灯,范围是代表光的圆锥体的长度。方向光不使用范围,因为它们被认为是无限远的,且指向同一个方向。
Intensity用于调节计算出的光贡献。默认情况下,这个值是1,它可以用来调节灯的亮度。
Enabled标志可以控制场景中灯光的开启或关闭,Enabled为false的灯会在shader中被跳过。
在本demo中,灯光是可以被编辑的,可以通过在demo中点击一个灯来选中它,它的属性也可以被修改,为了表明一个灯被选中,Selected标记会被设置为true。当一个灯在场景中被选中时,它会表现的暗一些,以表明它被中了。
Type用来指定该灯光的类型,可以是下面其中之一:
// CommonInclude.hlsl
6 #define POINT_LIGHT 0
7 #define SPOT_LIGHT 1
8 #define DIRECTIONAL_LIGHT 2
再一次给Light结构显式地添加8个字节的填充,以匹配C++中的struct布局,并使用该结构满足HLSL需要的16字节对齐。
灯光数组通过StructuredBuffer进行访问,大部分光照Shader的实现都会使用常量缓冲区(constant buffer)进行存储,但是常量缓冲区限制64KB的大小,这也意味着在耗尽GPU上的常量内存之前最多可以使用570个动态光源。结构化的缓冲区(structured buffer)存储在纹理内存上,它受限于GPU提供的可用纹理内存数量(在桌面GPU上通常按GB来算)。在大部分GPU上纹理内存是很快的,所以使用纹理内存存储灯光不会有性能上的影响,事实上,在一些特定的GPU上(NVIDIA GeForce GTX 680),将数据放在结构化的缓冲区上反而有一定的性能提升。
// CommonInclude.hlsl
176 StructuredBuffer<Light> Lights : register( t8 );
2.3 Pixel Shader Continued
相比于vertex shader,前向渲染的Pixel shader相对会更加复杂一点,这里会详细解释该pixel shader,因为它是本文中所所有渲染算法的基础。
2.3.1 材质
首先,我们需要收到材质的所有材质属性,如果一个材质包含纹理和相应的组件(component),这些纹理会在光照计算之前被采样。在所有的材质属性被初始化后,场景中所有的灯光会被遍历,光照贡献会随着材质属性的积累和调整而产生最终的像素颜色。
ForwardRendering.hlsl
19 [earlydepthstencil]
20 float4 PS_main( VertexShaderOutput IN ) : SV_TARGET
21 {
22 // Everything is in view space.
23 float4 eyePos = { 0, 0, 0, 1 };
24 Material mat = Mat;
函数之前的[earlydepthstencil]属性表明GPU应该先做早期深度和模板剔除( early depth and stencil culling)[10],这会让depth/stencil测试在pixel shader之前执行。这个属性不能用于使用SV_Depth语义来修改深度的shader。因为这个pixel shader只使用了SV_TARGET语义来输出颜色,因此当一个像素被reject时可以利用早期深度和模板测试(early depth/stencil test)来提升性能。大部分的GPU都会执行early depth/stencil test,甚至在没有[earlydepthstencil]属性的情况下,虽然添加这个属性不会有一个明显的性能影响,但我还是保留这个属性。
因为所有的光照计算都在视图空间,所以眼睛的位置(相机的位置)总是(0, 0, 0),这是使用视图空间积极的一面,因此相机的位置不需要另一个参数传递给shader。
第24行拷贝了一个材质,这是因为如果有关联的纹理到材质属性,材质的属性在shader中将会发生改变(会从纹理中加载相应的属性)。因为材质属性存储在一个常量缓冲区,没有办法直接更新一个常量缓冲区中的uniform变量,所以使用了一个临时变量。
2.3.1.1 漫反射(Diffuse)
Diffuse颜色是读取到的第一个材质属性。
// ForwardRendering.hlsl
26 float4 diffuse = mat.DiffuseColor;
27 if ( mat.HasDiffuseTexture )
28 {
29 float4 diffuseTex = DiffuseTexture.Sample( LinearRepeatSampler, IN.texCoord );
30 if ( any( diffuse.rgb ) )
31 {
32 diffuse *= diffuseTex;
33 }
34 else
35 {
36 diffuse = diffuseTex;
37 }
38 }
默认的diffuse颜色是材质中的DiffuseColor,如果该材质有一个关联的diffuse纹理,该颜色会与diffuse纹理中加载的颜色进行混合。如果材质中的颜色是黑色(0, 0, 0),会直接使用diffuse纹理加载的颜色。HLSL内置的_any_函数可以用来判断是否有一个颜色通道不为0。
2.3.1.2 不透明度(Opacity)
决定了像素的alpha值。
ForwardRendering.hlsl
41 float alpha = diffuse.a;
42 if ( mat.HasOpacityTexture )
43 {
44 // If the material has an opacity texture, use that to override the diffuse alpha.
45 alpha = OpacityTexture.Sample( LinearRepeatSampler, IN.texCoord ).r;
46 }
默认情况下,片元(fragment)的透明值(也即alpha值)由diffuse颜色的alpha决定。如果材质有关联的opacity纹理,opacity纹理的红色通道(r通道)会代替diffuse纹理中的alpha值,来作为diffuse颜色的alpha值。大多数情况下,opacity纹理只存储一个通道在颜色的第一个component,被采样时也会返回到第一个component。为了从单通道纹理中读取值,我们必须从红色(r)通道中读,而不是alpha通道,因为单通道纹理中的alpha值始终为1.
2.3.1.3 环境光和自发光(Ambient和Emissive)
环境光(Ambient)和自发光(Emissive)颜色的读取与diffuse颜色类似,环境光颜色也需要与材质中的GlobalAmbient变量进行混合。
// ForwardRendering.hlsl
48 float4 ambient = mat.AmbientColor;
49 if ( mat.HasAmbientTexture )
50 {
51 float4 ambientTex = AmbientTexture.Sample( LinearRepeatSampler, IN.texCoord );
52 if ( any( ambient.rgb ) )
53 {
54 ambient *= ambientTex;
55 }
56 else
57 {
58 ambient = ambientTex;
59 }
60 }
61 // Combine the global ambient term.
62 ambient *= mat.GlobalAmbient;
63
64 float4 emissive = mat.EmissiveColor;
65 if ( mat.HasEmissiveTexture )
66 {
67 float4 emissiveTex = EmissiveTexture.Sample( LinearRepeatSampler, IN.texCoord );
68 if ( any( emissive.rgb ) )
69 {
70 emissive *= emissiveTex;
71 }
72 else
73 {
74 emissive = emissiveTex;
75 }
76 }
2.3.1.4 Specular Power
接下来会计算高光强度。
// ForwardRendering.hlsl
78 if ( mat.HasSpecularPowerTexture )
79 {
80 mat.SpecularPower = SpecularPowerTexture.Sample( LinearRepeatSampler, IN.texCoord ).r \
81 * mat.SpecularScale;
82 }
如果材质有关联的SpecularPower纹理,该纹理的红色component会被采样,然后使用缩放材质中的SpecularScale对其进行缩放。在本例中,材质中的SpecularPower会被纹理中缩放过的值所取代。
2.3.1.5 法线(Normal)
If the material has either an associated normal map or a bump map, normal mapping or bump mapping will be performed to compute the normal vector. If neither a normal map nor a bump map texture is associated with the material, the input normal is used as-is.
如果纹理中有关联的法线贴图(normal map)或凹凸贴图(bump map),会执行法线映射或凹凸映射来计算法线向量,如果两者都没有,则使用输入的法线(从vertex shader中输出)。
// ForwardRendering.hlsl
85 // Normal mapping
86 if ( mat.HasNormalTexture )
87 {
88 // For scenes with normal mapping, I don't have to invert the binormal.
89 float3x3 TBN = float3x3( normalize( IN.tangentVS ),
90 normalize( IN.binormalVS ),
91 normalize( IN.normalVS ) );
92
93 N = DoNormalMapping( TBN, NormalTexture, LinearRepeatSampler, IN.texCoord );
94 }
95 // Bump mapping
96 else if ( mat.HasBumpTexture )
97 {
98 // For most scenes using bump mapping, I have to invert the binormal.
99 float3x3 TBN = float3x3( normalize( IN.tangentVS ),
100 normalize( -IN.binormalVS ),
101 normalize( IN.normalVS ) );
102
103 N = DoBumpMapping( TBN, BumpTexture, LinearRepeatSampler, IN.texCoord, mat.BumpIntensity );
104 }
105 // Just use the normal from the model.
106 else
107 {
108 N = normalize( float4( IN.normalVS, 0 ) );
109 }
2.3.1.6 法线映射(Normal Mapping)
函数DoNormalMapping会使用TBN(切线(tangent),副切线/副法线(bitangent/binormal),法线(normal))矩阵和法线贴图计算法线映射(Normal Mapping)。
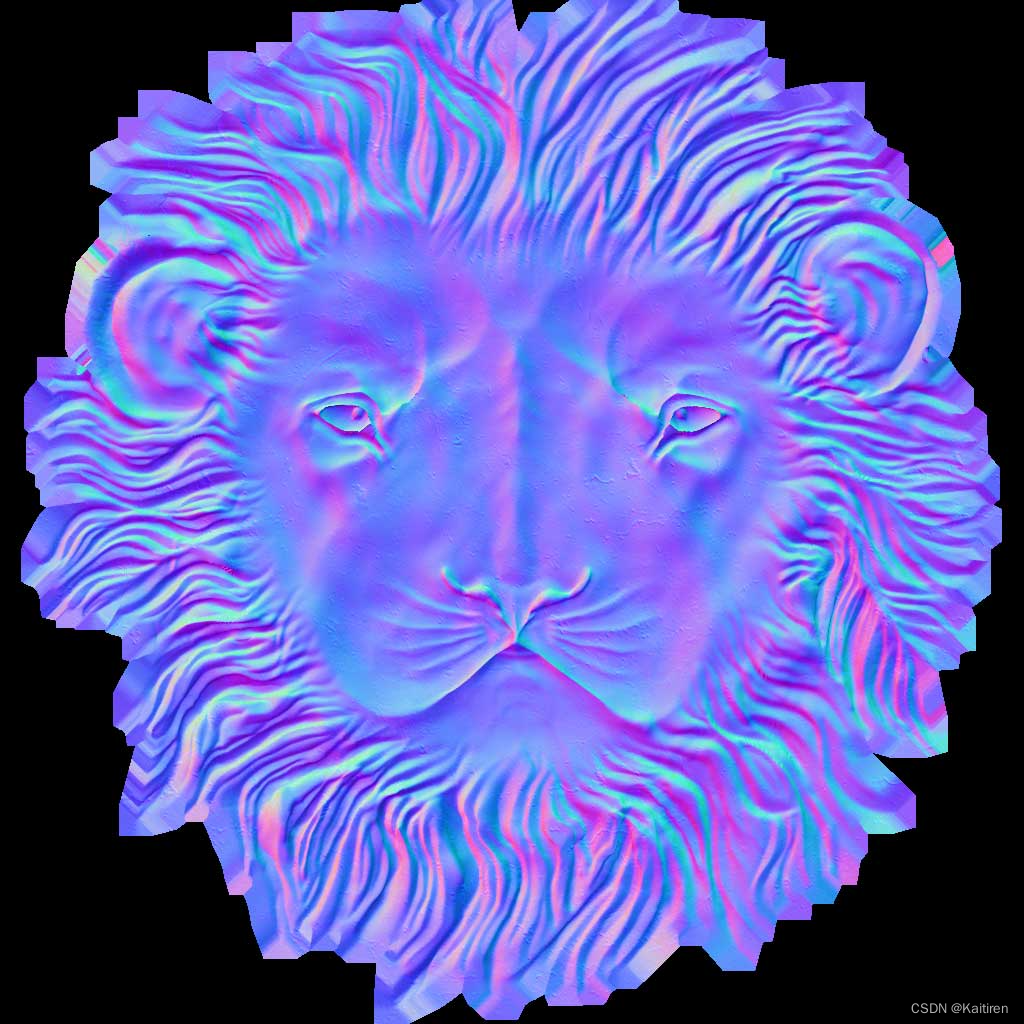
- 一个狮子头的法线贴图示例. [11]
CommonInclude.hlsl
323 float3 ExpandNormal( float3 n )
324 {
325 return n * 2.0f - 1.0f;
326 }
327
328 float4 DoNormalMapping( float3x3 TBN, Texture2D tex, sampler s, float2 uv )
329 {
330 float3 normal = tex.Sample( s, uv ).xyz;
331 normal = ExpandNormal( normal );
332
333 // Transform normal from tangent space to view space.
334 normal = mul( normal, TBN );
335 return normalize( float4( normal, 0 ) );
336 }
法线映射很简单,这文章法线映射中有详细的解释。简单来说我们只需要从法线贴图中采样法线,展开法线到[-1..1]范围,然后通过后乘TBN矩阵将其从切线空间变换到视图空间。
2.3.1.7 凹凸映射(Bump Mapping)
凹凸映射原理类似,除了bump纹理中不是直接存储的法线,而是[0..1]范围的高度值。法线可以通过计算bump纹理在U和V坐标方向上高度的梯度(gradient)来生成,通过两个方向上梯度的叉积(cross product)来得到纹理空间的法线,然后通过后乘TBN矩阵将其从切线空间变换到视图空间。可以通过缩放从bump贴图中读取的高度值来产生更大(更小)的凹凸。

凹凸纹理(左)和相应的人头模型(右)[12]
CommonInclude.hlsl
333 float4 DoBumpMapping( float3x3 TBN, Texture2D tex, sampler s, float2 uv, float bumpScale )
334 {
335 // Sample the heightmap at the current texture coordinate.
336 float height = tex.Sample( s, uv ).r * bumpScale;
337 // Sample the heightmap in the U texture coordinate direction.
338 float heightU = tex.Sample( s, uv, int2( 1, 0 ) ).r * bumpScale;
339 // Sample the heightmap in the V texture coordinate direction.
340 float heightV = tex.Sample( s, uv, int2( 0, 1 ) ).r * bumpScale;
341
342 float3 p = { 0, 0, height };
343 float3 pU = { 1, 0, heightU };
344 float3 pV = { 0, 1, heightV };
345
346 // normal = tangent x bitangent
347 float3 normal = cross( normalize(pU - p), normalize(pV - p) );
348
349 // Transform normal from tangent space to view space.
350 normal = mul( normal, TBN );
351
352 return float4( normal, 0 );
353 }
这里并不能保证bump映射算法100%正确,没有找到相关资源说如何正确进行bump映射,如果有更好的方来执行bump映射,请留言讨论。
如果材质没有关联的法线贴图或凹凸贴图,直接使用vertex shader中输出的法线向量。
现在我们用了计算光照所需要的所有数据。
2.3.2 光照(Lighting)
The lighting calculations for the forward rendering technique are performed in the DoLighting function. This function accepts the following arguments:
前向渲染技术的光照计算在函数DoLighting执行,该函数接受如下的参数:
- lights: 光源的数组(structured buffer)。
- mat: 我们前面计算的材质属性。
- eyePos: 视图空间的相机坐标(总是(0, 0, 0))。
- P: 被着色点在视图空间中的位置。
- N: 被着色点在视图空间中的法线。
函数DoLighting返回一个包含场景中所有灯光的diffuse和高光光照贡献的DoLighting结构。
// ForwardRendering.hlsl
425 // This lighting result is returned by the
426 // lighting functions for each light type.
427 struct LightingResult
428 {
429 float4 Diffuse;
430 float4 Specular;
431 };
432
433 LightingResult DoLighting( StructuredBuffer<Light> lights, Material mat, float4 eyePos, float4 P, float4 N )
434 {
435 float4 V = normalize( eyePos - P );
436
437 LightingResult totalResult = (LightingResult)0;
438
439 for ( int i = 0; i < NUM_LIGHTS; ++i )
440 {
441 LightingResult result = (LightingResult)0;
442
443 // Skip lights that are not enabled.
444 if ( !lights[i].Enabled ) continue;
445 // Skip point and spot lights that are out of range of the point being shaded.
446 if ( lights[i].Type != DIRECTIONAL_LIGHT &&
447 length( lights[i].PositionVS - P ) > lights[i].Range ) continue;
448
449 switch ( lights[i].Type )
450 {
451 case DIRECTIONAL_LIGHT:
452 {
453 result = DoDirectionalLight( lights[i], mat, V, P, N );
454 }
455 break;
456 case POINT_LIGHT:
457 {
458 result = DoPointLight( lights[i], mat, V, P, N );
459 }
460 break;
461 case SPOT_LIGHT:
462 {
463 result = DoSpotLight( lights[i], mat, V, P, N );
464 }
465 break;
466 }
467 totalResult.Diffuse += result.Diffuse;
468 totalResult.Specular += result.Specular;
469 }
470
471 return totalResult;
472 }
视线向量(V)通过眼睛位置和被着色像素点在视图空间的位置计算而来。
灯光缓冲区的迭代在439行,因为被禁用的光源和超出范围的光源不会贡献任何光照,所以可以跳过这些光源,否则会根据光源类型来调用相应的光照函数。
每个不同类型的光源会计算他们的diffuse和specular光照贡献,因为对不同类型光源,计算diffuse和specular的方式相同,所以我会定义不依赖于光源类型的函数来计算diffuse和specular光照贡献。
2.3.2.1 漫反射光照(Diffuse Lighting)
函数DoDiffuse非常简单,并且只需要知道光向量(L)和表面法线(N)。
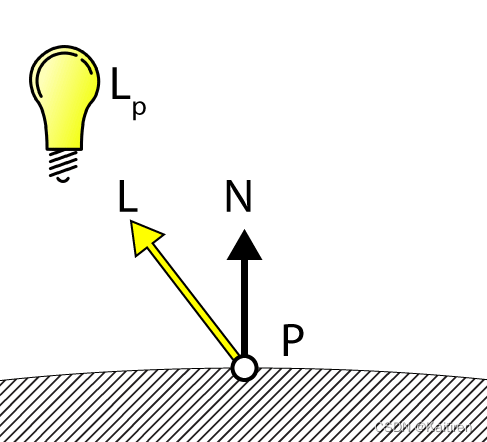
图漫反射光照
// CommonInclude.hlsl
355 float4 DoDiffuse( Light light, float4 L, float4 N )
356 {
357 float NdotL = max( dot( N, L ), 0 );
358 return light.Color * NdotL;
359 }
漫反射光照的计算采用光向量(L)和表面法线(N)的点积(dot product),两个向量需要是归一化的(normalized),通过将点积的结果与灯光的颜色相乘来得到该灯光的光照贡献。
下面,我们来计算灯光的specular贡献。
2.3.2.2 高光光照(Specular Lighting)
函数DoSpecular用来计算灯光的specular贡献,除了光向量(L)和表面法线(N),该函数也需要视线向量(V来计算该灯光的specular贡献。

Specular Lighting
CommonInclude.hlsl
361 float4 DoSpecular( Light light, Material material, float4 V, float4 L, float4 N )
362 {
363 float4 R = normalize( reflect( -L, N ) );
364 float RdotV = max( dot( R, V ), 0 );
365
366 return light.Color * pow( RdotV, material.SpecularPower );
367 }
因为光线向量L是从被着色点到光源的向量,所以在计算反射向量(R)之前需要将L取负,以使向量从光源指向被着色点。反射向量(R)和视线向量(V)的点积被用来计算的高光强度值的幂,然后使用光线颜色进行调制,切记范围是(0..1)高光强度的是无意义的。
2.3.2.3 衰减(Attenuation)
衰减(Attenuation)是光的强度下降,因为光离被着色的点更远。在传统的光照模型中,衰减被计算为三个衰减因子的和乘以到光源的距离的倒数(如衰减中所解释的):
- 常量衰减
- 线性衰减
- 二次方衰减
然而,这个方法计算的衰减是假设光永远不会衰减到0的(光具有无限的范围)。对于延迟渲染和forward+,我们必须得能表示场景中的灯光具有有限的范围,所以我们以一种差分的方法来计算光的衰减。
一种可行的方法的是做一个0到1的线性插值来计算光的衰减,其中1表示靠近光源,0表示点到光源的距离超过光的范围,然而线性衰减看起来不是很真实,事实上衰减更像是二次方函数的倒数。
我打算使用HLSL内置的smoothstep函数,该函数返回一个在最小和最大值之间平滑的插值。
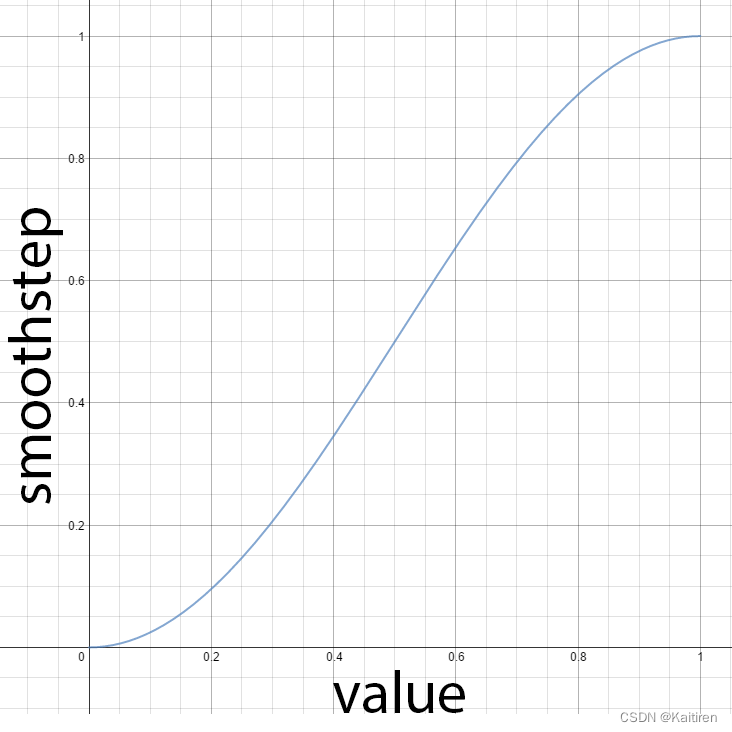
HLSL内置的smoothstep函数
// CommonInclude.hlsl
396 // Compute the attenuation based on the range of the light.
397 float DoAttenuation( Light light, float d )
398 {
399 return 1.0f - smoothstep( light.Range * 0.75f, light.Range, d );
400 }
如果到光源的距离(d)/小于光范围的¾,函数smoothstep返回0,如果距离大于光的范围则返回1,通过从1中减去这个值就可以得到我们需要的衰减。
或者,我们可以通过在上面的方程中参数化0.75f来调整光的衰减的平滑度。平滑系数0.0应该导致光的强度保持1.0,直到光的最大范围,而平滑系数1.0应该导致光的强度内插通过整个光的范围。
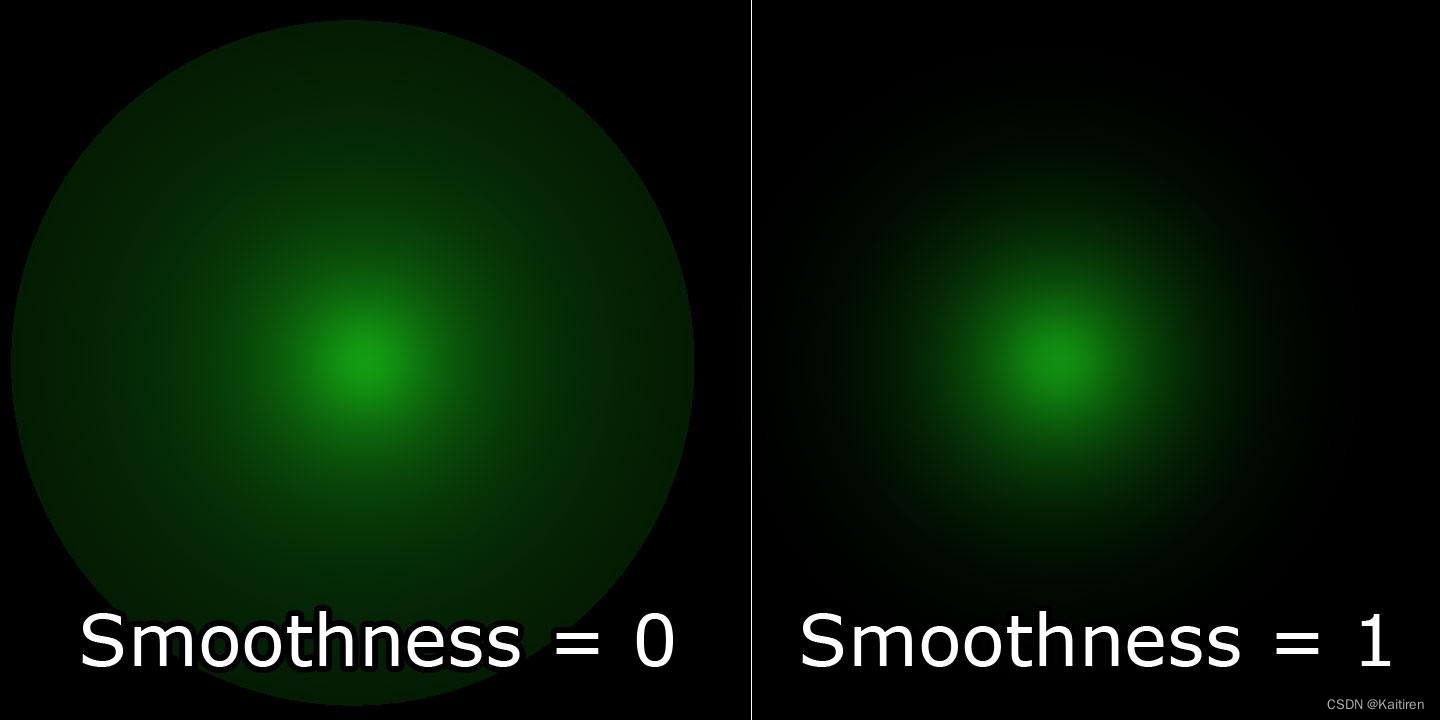
可变的衰减平滑
现在,让我们将diffuse,specular和衰减因子组合在一起为不同的灯光类型计算光光照贡献。
2.3.2.4 点光源(Point Light)
点光源组合衰减,diffuse和specular来决定最终的光照贡献。
// ForwardRendering.hlsl
390 LightingResult DoPointLight( Light light, Material mat, float4 V, float4 P, float4 N )
391 {
392 LightingResult result;
393
394 float4 L = light.PositionVS - P;
395 float distance = length( L );
396 L = L / distance;
397
398 float attenuation = DoAttenuation( light, distance );
399
400 result.Diffuse = DoDiffuse( light, L, N ) *
401 attenuation * light.Intensity;
402 result.Specular = DoSpecular( light, mat, V, L, N ) *
403 attenuation * light.Intensity;
404
405 return result;
406 }
在400和401行,diffuse和specular的贡献被衰减和光强度(Intensity)进行缩放。
2.3.2.5 聚光灯(Spot Light)
除了衰减因子,聚光灯还有一个锥角。在这种情况下,光的强度是由光向量(L)和聚光灯方向之间的点积决定的。如果光向量与聚光方向之间的夹角小于聚光锥角,则点应由聚光灯点亮。否则聚光灯不应该为被着色点的点提供任何光照。DoSpotCone函数将根据聚光锥的角度计算光强。
// CommonInclude.hlsl
375 float DoSpotCone( Light light, float4 L )
376 {
377 // If the cosine angle of the light's direction
378 // vector and the vector from the light source to the point being
379 // shaded is less than minCos, then the spotlight contribution will be 0.
380 float minCos = cos( radians( light.SpotlightAngle ) );
381 // If the cosine angle of the light's direction vector
382 // and the vector from the light source to the point being shaded
383 // is greater than maxCos, then the spotlight contribution will be 1.
384 float maxCos = lerp( minCos, 1, 0.5f );
385 float cosAngle = dot( light.DirectionVS, -L );
386 // Blend between the minimum and maximum cosine angles.
387 return smoothstep( minCos, maxCos, cosAngle );
388 }
首先,计算聚光灯锥的余弦,如果聚光灯的方向和光向量(L)之间的点积小于最小该余弦值,那么光的贡献将是0。如果点积大于最大余弦角,那么聚光灯的贡献将是1。

聚光灯的最小和最大余弦角
最大余弦角比最小余弦角小,这似乎是违反直觉的,但是不要忘记0°的余弦是1,90°的余弦是0。
DoSpotLight函数将计算聚光灯的贡献,与计算点光源的贡献类似,另外算上聚光灯的余弦角。
// ForwardRendering.hlsl
418 LightingResult DoSpotLight( Light light, Material mat, float4 V, float4 P, float4 N )
419 {
420 LightingResult result;
421
422 float4 L = light.PositionVS - P;
423 float distance = length( L );
424 L = L / distance;
425
426 float attenuation = DoAttenuation( light, distance );
427 float spotIntensity = DoSpotCone( light, L );
428
429 result.Diffuse = DoDiffuse( light, L, N ) *
430 attenuation * spotIntensity * light.Intensity;
431 result.Specular = DoSpecular( light, mat, V, L, N ) *
432 attenuation * spotIntensity * light.Intensity;
433
434 return result;
435 }
2.3.2.6 方向光(Directional Lights)
方向光是最简单的灯光类型,因为它们在被着色点上不会衰减。
// ForwardRendering.hlsl
406 LightingResult DoDirectionalLight( Light light, Material mat, float4 V, float4 P, float4 N )
407 {
408 LightingResult result;
409
410 float4 L = normalize( -light.DirectionVS );
411
412 result.Diffuse = DoDiffuse( light, L, N ) * light.Intensity;
413 result.Specular = DoSpecular( light, mat, V, L, N ) * light.Intensity;
414
415 return result;
416 }
2.3.2.7 最终着色
现在我们有了材质属性和场景中所有灯光的叠加照明效果,我们可以将它们结合起来进行最终的着色。
// ForwardRendering.hlsl
111 float4 P = float4( IN.positionVS, 1 );
112
113 LightingResult lit = DoLighting( Lights, mat, eyePos, P, N );
114
115 diffuse *= float4( lit.Diffuse.rgb, 1.0f ); // Discard the alpha value from the lighting calculations.
116
117 float4 specular = 0;
118 if ( mat.SpecularPower > 1.0f ) // If specular power is too low, don't use it.
119 {
120 specular = mat.SpecularColor;
121 if ( mat.HasSpecularTexture )
122 {
123 float4 specularTex = SpecularTexture.Sample( LinearRepeatSampler, IN.texCoord );
124 if ( any( specular.rgb ) )
125 {
126 specular *= specularTex;
127 }
128 else
129 {
130 specular = specularTex;
131 }
132 }
133 specular *= lit.Specular;
134 }
135
136 return float4( ( ambient + emissive + diffuse + specular ).rgb,
137 alpha * mat.Opacity );
138
139 }
在第113行,光照贡献是使用刚才描述的DoLighting函数计算的。
在第115行,材质的漫反射颜色(diffuse color)是由光的diffuse贡献调节的。
如果材质的高光强度低于1.0,则不会考虑它参与最终着色。如果材质没有高光,一些美术师会指定一个小于1的高光强度。在这种情况下,我们只是忽略了高光的贡献和材质被认为是只有漫反射的(lambert反射)。否则,如果材质有与之相关的高光纹理,它将被采样,并与材质的高光颜色相结合,然后再用光的高光贡献进行调制。
最后的像素颜色是环境、自发光、漫反射和高光颜色的总和,像素的不透明度由pixel shader中先前确定的alpha值决定。
游戏渲染技术:前向渲染 vs 延迟渲染 vs Forward+渲染 (一)_Kaitiren的博客-CSDN博客