如果你的项目是一个小型项目,就用不着使用模块化;
但是,如果你参与的项目是一个中大型项目,那Vuex模块化,必不可少,否则整个文件很臃肿,也很难管理。
通过模块化管理:各自模块下都有自己的state及方法,各自模块管理自己的数据,这样不容易造成混乱。
第一步:安装Vuex
安装方法一:
如果你使用的是vue create xxx 方法来创建项目时,那你在创建时就把vuex勾选上,会自动帮你下载安装
安装方法二:
npm install vuex@next --save
or
yarn add vuex@next --save
但是第二步手动下载的时候,需要在main.js中导入并挂载
第二步: 在store文件夹中创建modules文件夹
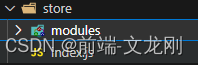
第三步:在store/modules文件夹下创建你需要的模块js文件

第四步:创建模块的内部结构

第五步:将各个模块导入至根目录store/index.js文件中,并挂载
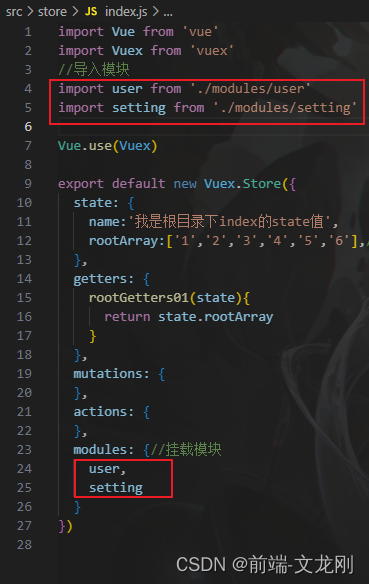
(只要把模块挂载到根目录下,默认是挂载到全局的,除非你开启了命名空间namespaced: true)
第六步:开始使用
一、访问state数据
①我们直接调用根目录下index.js的state:
console.log(this.$store.state)②使用映射的方法
import {  mapGetters, mapState, mapMutations, mapActions } from 'vuex';
...mapGetters(['rootGetters01']),
③:通过映射的方法访问某个模块下的数据
user:是模块名、userInfo和numberArr都是user模块下的state属性( 能访问某个模块里的属性前提是他们各自开启了命名空间 )...mapState('user',['userInfo','numberArr'])
二、触发mutations
方法①:
页面内容
<el-button type="primary" size="small" @click="updateName">更新名称</el-button>updateName(){//更新姓名(user模块) //$store.commit('模块名/mutation名',额外参数) this.$store.commit('user/setName','回流生') },user模块内容
const state = {
    userInfo:{
        name:'文龙刚',
        job:'前端开发工程师',
        age:'18'
    },
}

const mutations={
    setName(state,Newname){//更新名字
        state.userInfo.name = Newname
    },
}
方法②:触发模块下映射的方法
...mapMutations('user',['addUserArr']),...mapMutations('模块名',['方法名']),方法③:直接使用标签并传参
<el-button type="primary" size="small" @click="setUserSecond('56')">使用模块映射方法并传参</el-button>
还有触发actions方法,跟上面的mutations 用法一致,不过actions触发方法是
this.$store.dispatch('模块名/模块中的方法','参数')
以下是具体代码,可运行查看相应效果
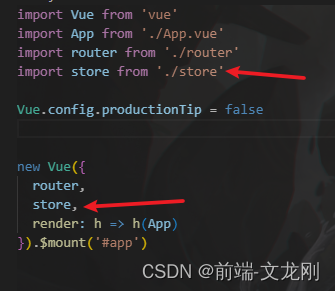
//  store/index.js

import Vue from 'vue'
import Vuex from 'vuex'
//导入模块
import user from './modules/user'
import setting from './modules/setting'

Vue.use(Vuex)

export default new Vuex.Store({
  state: {
    name:'我是根目录下index的state值',
    rootArray:['1','2','3','4','5','6'],//根目录下rootArray值
  },
  getters: {
    rootGetters01(state){
      return state.rootArray
    }
  },
  mutations: {
  },
  actions: {
  },
  modules: {//挂载模块
    user,
    setting
  }
})
//    store/modules/user.js

//用户模块
const state = {
    userInfo:{
        name:'文龙刚',
        job:'前端开发工程师',
        age:'18'
    },
    list:[
        {goods:'苹果',system:'IOS',price:'8590'},
        {goods:'华为',system:'鸿蒙',price:'7500'},
        {goods:'vivo',system:'安卓',price:'4500'},
    ],
    english:'abcd',
    numberArr:['1','2','3','4','5','6','7','8']
}

const mutations={
    setName(state,Newname){//更新名字
        state.userInfo.name = Newname
    },
    addUserArr(state,addArr){//给 numberArr 增加数据
        return state.numberArr.push(addArr)
    }
}
const actions ={//不能直接更改state的数据,必须通过mutations
    setUserSecond(context,addNewArr){
        //将异步在action中进行封装
        setTimeout(()=>{
            //调用mutation context上下文,默认提交的就是自己模块下的
            context.commit('addUserArr',addNewArr)//调用本模块下的 addUserArr 方法
            // context.commit('setting/addUserArr',addNewArr)//调用setting模块下的方法
        },1000)
    }
}

const getters ={
    //分模块后,state指子模块的state
    UpperCaseName(state){//第一个参数永远是state,
        return state.english.toUpperCase()
    },
    list(state){
        let money=0
        state.list.map((item)=>{
            money+=parseInt(item.price)
        })
        return money
    }
}

export default {
    namespaced: true,//开启命名空间,用来映射子模块
    state,
    mutations,//如果开启了命名空间,就直接挂载到子模块上了,默认是挂载到全局的
    actions,
    getters
}
//store/modules/setting.js
//设置模块
const state = {
theme:'我是setting模块下的 theme 值',
sex:'男',
school:'西安电子科技大学',
date:'2023年7月25日',
}
const mutations={
setSex(state,newSex){//更新性别
state.sex = newSex
}
}
const actions ={}
const getters ={}
export default {
namespaced: true,//开启命名空间,用来映射子模块
state,
mutations,
actions,
getters
}