首先,先创建数据库 -----sushe,然后创建表 person,表结构是这样的,一共四个字段。

向里面添加一些寝室成员数据即可。
INSERT INTO person(p_id,p_name,p_phone,p_score)VALUES
(1,'李阳','123456','7890'),
(2,'张骞','123456','7890'),
(3,'马康敬','123456','7890'),
(4,'尚世宇','123456','7890'),
(5,'赵题','123456','7890'),
(6,'王澳','123456','7890');
下面来到idea,创建springboot项目,无需添加组件。
在setting中导入本地maven模块

然后在pom中加入依赖,注意springboot的parent的版本不易过高,2.1.5.RELRASE 即可。
<?xml version="1.0" encoding="UTF-8"?>
<project xmlns="http://maven.apache.org/POM/4.0.0" xmlns:xsi="http://www.w3.org/2001/XMLSchema-instance"
         xsi:schemaLocation="http://maven.apache.org/POM/4.0.0 https://maven.apache.org/xsd/maven-4.0.0.xsd">
    <modelVersion>4.0.0</modelVersion>
    <parent>
        <groupId>org.springframework.boot</groupId>
        <artifactId>spring-boot-starter-parent</artifactId>
        <version>2.1.5.RELEASE</version>
        <relativePath/> <!-- lookup parent from repository -->
    </parent>
    <groupId>com.example</groupId>
    <artifactId>sushe</artifactId>
    <version>0.0.1-SNAPSHOT</version>
    <name>sushe</name>
    <description>sushe</description>
    <properties>
        <java.version>8</java.version>
    </properties>
    <dependencies>

        <!--分页插件,使用后可以很轻松的进行分页功能-->
        <dependency>
            <groupId>com.github.pagehelper</groupId>
            <artifactId>pagehelper-spring-boot-starter</artifactId>
            <version>1.2.3</version>
        </dependency>
        <dependency>
            <groupId>org.springframework.boot</groupId>
            <artifactId>spring-boot-starter-data-jpa</artifactId>
        </dependency>
        <!--thymeleaf模板-->
        <dependency>
            <groupId>org.springframework.boot</groupId>
            <artifactId>spring-boot-starter-thymeleaf</artifactId>
        </dependency>
        <dependency>
            <groupId>org.springframework.boot</groupId>
            <artifactId>spring-boot-starter-web</artifactId>
        </dependency>

        <dependency>
            <groupId>org.springframework.boot</groupId>
            <artifactId>spring-boot-starter-test</artifactId>
            <scope>test</scope>
        </dependency>
       <!--数据库版本为8.0.32,注意与5.0的不一致,并且配置也不一样-->
        <dependency>
            <groupId>mysql</groupId>
            <artifactId>mysql-connector-java</artifactId>
            <version>8.0.32</version>
        </dependency>

    </dependencies>

    <build>
        <plugins>
            <plugin>
                <groupId>org.springframework.boot</groupId>
                <artifactId>spring-boot-maven-plugin</artifactId>
            </plugin>
        </plugins>
    </build>

</project>
然后配置application.properties
spring.datasource.url=jdbc:mysql://localhost:3306/sushe?charaterEncoding=utf-8&serverTimezone=UTC
spring.datasource.driver-class-name=com.mysql.cj.jdbc.Driver
spring.datasource.username=root
spring.datasource.password=*********

spring.jpa.hibernate.ddl-auto=update
spring.jpa.properties.hibernate.show_sql=true
spring.jpa.properties.hibernate.format_sql=true
spring.jpa.database=mysql
spring.jpa.properties.hibernate.enable.enable_lazy_load_no_trans=true

#thymleaf模板
spring.thymeleaf.cache=false
spring.thymeleaf.prefix=classpath:/templates/
spring.thymeleaf.suffix=.html

mybatis.type-aliases-package=com.example.sushe.dao
mybatis.mapper-locations=classpath:mapper/*.xml
项目大概的架构是这样的

首先实体类dao包的Person代码
package com.example.sushe.dao;

public class Person {

    private String pId;
    private String pName;
    private String pPhone;
    private String pScore;

    public Person() {
    }

    public Person(String pId, String pName, String pPhone, String pScore) {
        this.pId = pId;
        this.pName = pName;
        this.pPhone = pPhone;
        this.pScore = pScore;
    }

    public String getpId() {
        return pId;
    }

    public void setpId(String pId) {
        this.pId = pId;
    }

    public String getpName() {
        return pName;
    }

    public void setpName(String pName) {
        this.pName = pName;
    }

    public String getpPhone() {
        return pPhone;
    }

    public void setpPhone(String pPhone) {
        this.pPhone = pPhone;
    }

    public String getpScore() {
        return pScore;
    }

    public void setpScore(String pScore) {
        this.pScore = pScore;
    }

    @Override
    public String toString() {
        return "Person{" +
                "pId='" + pId + '\'' +
                ", pName='" + pName + '\'' +
                ", pPhone='" + pPhone + '\'' +
                ", pScore='" + pScore + '\'' +
                '}';
    }
}
然后是mapper层PersonMapper代码
package com.example.sushe.mapper;

import com.example.sushe.dao.Person;
import org.apache.ibatis.annotations.Mapper;

import java.util.List;

//查询数据的话应该要用链表或者数组,甚至实体类 Zsgc进行接收数据
//如果是功能类,类似于添加,删除,修改等使用void返回

@Mapper
public interface PersonMapper {

    //查询所有,使用list集合来接收
    List<Person> findAll();

    //根据单个ID进行查询
    Person findPersonById(String pId);

    //向寝室中增加一条数据
    void addPerson(Person person);

    //修改一条寝室成员信息
    void updatePerson(Person person);

    //删除一条寝室成员信息
    void deletePerson(String pId);
}
然后是PersonMapper.xml 增删改查代码
<?xml version="1.0" encoding="UTF-8" ?>
<!DOCTYPE mapper
        PUBLIC "-//mybatis.org//DTD Mapper 3.0//EN"
        "http://mybatis.org/dtd/mybatis-3-mapper.dtd">
<mapper namespace="com.example.sushe.mapper.PersonMapper">

<!--    mybatis写SQL时没有黄色背景,将上面的https改为http即可-->
    <select id="findAll" resultType="com.example.sushe.dao.Person">
        select
            p_id AS pId,
            p_name AS pName,
            p_phone AS pPhone,
            p_score AS pScore
        from
            person
    </select>

    <select id="findPersonById" resultType="com.example.sushe.dao.Person">
        select
            p_id AS pId,
            p_name AS pName,
            p_phone AS pPhone,
            p_score AS pScore
        from
            person
        where p_id=#{pId}
    </select>

    <insert id="addPerson" parameterType="com.example.sushe.dao.Person">
        insert into person(p_id,p_name,p_phone,p_score)
        values(#{pId},#{pName},#{pPhone},#{pScore})
    </insert>

    <update id="updatePerson">
        update person
        set p_id=#{pId},p_name=#{pName},p_phone=#{pPhone},p_score=#{pScore}
        where p_id=#{pId}
    </update>

    <delete id="deletePerson" parameterType="com.example.sushe.dao.Person">
        delete from person where p_id=#{pId}
    </delete>

</mapper>
然后是service层的PersonService,采用接口设计
package com.example.sushe.service;

import com.example.sushe.dao.Person;

import java.util.List;

public interface PersonService {

    List<Person> findAll();

    Person findPersonById(String pId);

    void addPerson(Person person);

    void updatePerson(Person person);

    void deletePerson(String pId);


}
后面的impl中的PersonServiceImpl继承PersonService的接口,并调用PersonMapper中的增删改查与数据库进行交互。
package com.example.sushe.service.impl;

import com.example.sushe.dao.Person;
import com.example.sushe.mapper.PersonMapper;
import com.example.sushe.service.PersonService;
import org.springframework.beans.factory.annotation.Autowired;
import org.springframework.stereotype.Service;

import java.util.List;

@Service
public class PersonServiceImpl implements PersonService {
   @Autowired
    private PersonMapper personMapper;


    @Override
    public List<Person> findAll() {
        return personMapper.findAll();
    }

    @Override
    public Person findPersonById(String pId) {
        return personMapper.findPersonById(pId);
    }

    @Override
    public void addPerson(Person person) {
          personMapper.addPerson(person);
    }

    @Override
    public void updatePerson(Person person) {
         personMapper.updatePerson(person);
    }

    @Override
    public void deletePerson(String pId) {
        personMapper.deletePerson(pId);
    }
}
最后就是controller层的PersonController
package com.example.sushe.controller;

import com.example.sushe.dao.Person;
import com.example.sushe.service.PersonService;
import com.github.pagehelper.PageHelper;
import com.github.pagehelper.PageInfo;
import org.springframework.beans.factory.annotation.Autowired;
import org.springframework.stereotype.Controller;
import org.springframework.ui.Model;
import org.springframework.web.bind.annotation.RequestMapping;
import org.springframework.web.bind.annotation.RequestParam;

import java.util.List;


//重定向return "redirect:/zsgc/findAll"  中是进行二次发送请求,不是返回html页面
//在springmvc中,除了重定向就是页面请求,而一般springmvc会将页面的前缀、/templates/,后缀.html除去

@Controller
@RequestMapping("/person")
public class PersonController {

    @Autowired
    private PersonService personService;

    /**
     * 执行分页查询
     * 1、介入pagehelper插件
     * 2、一旦插件介入之后,查询所有的数据将会自动分页
     * 3、封装分页数据
     * 4、将分页数据转入model,跳转页面显示即可
     * pageInfo对象基本属性
     * list:分页集合数据
     * total:总记录数
     * isFistPage:是否第一页
     * isLastPage:是否最后一页
     * prePage:上一页
     * nextPage:下一页
     * firstPage:第一页
     * lastPage:最后一页
     */

    @RequestMapping("/findAll")
    public String findAll(@RequestParam(name="pageNum",defaultValue = "1")Integer pageNum,
                          @RequestParam(name = "pageSize",defaultValue = "6")Integer pageSize,
                          Model model){
        /**
         * 介入pageHelper插件,指定页码和页面大小
         * pageNum:页码,一般默认是首次为1
         * pageSize:页面大小,由客户和后台指定,默认值由后台提供
         * */
        PageHelper.startPage(pageNum,pageSize);

        List<Person> allStudent=personService.findAll();

        PageInfo<Person> pageInfo=new PageInfo<>(allStudent);

        model.addAttribute("list",pageInfo);

        return "/person/person-list";

    }

    @RequestMapping("/add")
    public String add(){
        return "/person/person-add";
    }

    @RequestMapping("/addPerson")
    public String addPerson(Person person){

        personService.addPerson(person);

        return "redirect:/person/findAll";
    }

    @RequestMapping("/update")
    public String update(String pId,Model model){

        Person updatePerson=personService.findPersonById(pId);

        model.addAttribute("updateP",updatePerson);

        return "/person/person-update";
    }

    @RequestMapping("/updatePerson")
    public String updatePerson(Person person){
        personService.updatePerson(person);

        return "redirect:/person/findAll";
    }

    @RequestMapping("/delete")
    public String delete(String pId){
        personService.deletePerson(pId);
        return "redirect:/person/findAll";
    }


}
最后,就是三个小页面
person-list.html
<!DOCTYPE html>
<html lang="en" xmlns:th="http://www.thymeleaf.org">
<head>
<meta charset="UTF-8">
<title>员工列表</title>
<style>
tr:hover {
background-color: darkgrey;
}
button {
background-color: skyblue;
}
a {
text-decoration: none;
color: white;
}
</style>
</head>
<body>
<button style="margin-left: 205px">
<a th:href="@{/person/add}">添加</a>
</button>
<br>
<!--查询所有员工分页数据--->
<div th:if="${list}" align="center" style="margin-top: 8px;margin-bottom: 8px">
<table border="1" style="border-collapse: collapse;width: 70%">
<!--表头-->
<tr>
<th>员工编号</th>
<th>姓名</th>
<th>电话号码</th>
<th>身份证号码</th>
<th>操作</th>
</tr>
<!--表数据-->
<tr th:each="person,personStat:${list.list}" align="center">
<td th:text="${person.pId}"></td>
<td th:text="${person.pName}"></td>
<td th:text="${person.pPhone}"></td>
<td th:text="${person.pScore}"></td>
<td>
<button>
<a th:href="@{/person/update(pId=${person.pId})}" onclick="return check()">编辑</a>
</button>
<button>
<a th:href="@{/person/delete(pId=${person.pId})} " onclick="return checkDel()">删除</a>
</button>
</td>
</tr>
</table>
<br>
<!--分页基础数据-->
<span th:text="|共有${list.total}条|"></span>
<span th:text="|共有${list.pages}页|"></span>
<span th:text="|当前${list.pageNum}页|"></span>
<br>
<!--分页查询按钮-->
<button>
<!--默认查询第一页即可-->
<a th:href="@{/person/findAll}">首页</a>
</button>
<button>
<a th:href="@{/person/findAll(pageNum=${list.isFirstPage}?${list.firstPage}:${list.prePage})}">上一页</a>
</button>
<button>
<a th:href="@{/person/findAll(pageNum=${list.isLastPage}?${list.lastPage}:${list.nextPage})}">下一页</a>
</button>
<button>
<a th:href="@{/person/findAll(pageNum=${list.pages})}">尾页</a>
</button>
</div>
<!--js脚本-->
<script>
function checkDel() {
if (confirm("确认删除")) {
return true;//删除
} else {
return false;//取消
}
}
function check() {
if (confirm("确认修改")) {
return true;//修改
} else {
return false;//取消
}
}
</script>
</body>
</html>
person-add.html
<!DOCTYPE html>
<html lang="en" xmlns:th="http://www.thymeleaf.org">
<head>
<meta charset="UTF-8">
<title>员工添加</title>
</head>
<body>
<div align="center" style="margin-top: 25%">
<!--添加表单-->
<!--在表单提交后进行请求/zsgc/addZsgc处理-->
<form th:action="@{/person/addPerson}" method="post" onsubmit="return checkAdd()">
姓名:
<input id="pName" name="pName" placeholder="输入姓名"><br>
电话号码:
<input id="pPhone" name="pPhone" placeholder="输入电话号码"><br>
身份证号:
<input id="pScore" name="pScore" placeholder="输入身份证号码"><br>
<br>
<input type="submit" value="确认添加"><br>
</form>
</div>
<!--js脚本-->
<script>
function checkAdd() {
//获取用户输入的值
var same = document.getElementById("pName").value;
var age = document.getElementById("pPhone").value;
var address = document.getElementById("pScore").value;
//校验数据(只判断是否为空)
//对于数据,还需判断输入的值能否正确转换为数值
if (pName == "" || pName == null) {
alert("姓名不能为空");
return false;
} else if (pPhone == "" || pPhone == null) {
alert("电话号码不能为空");
return false;
} else if (pScore == "" || pScore == null) {
alert("身份证号码必填");
return false;
} else {
return true;//允许提交表单
}
}
</script>
</body>
</html>
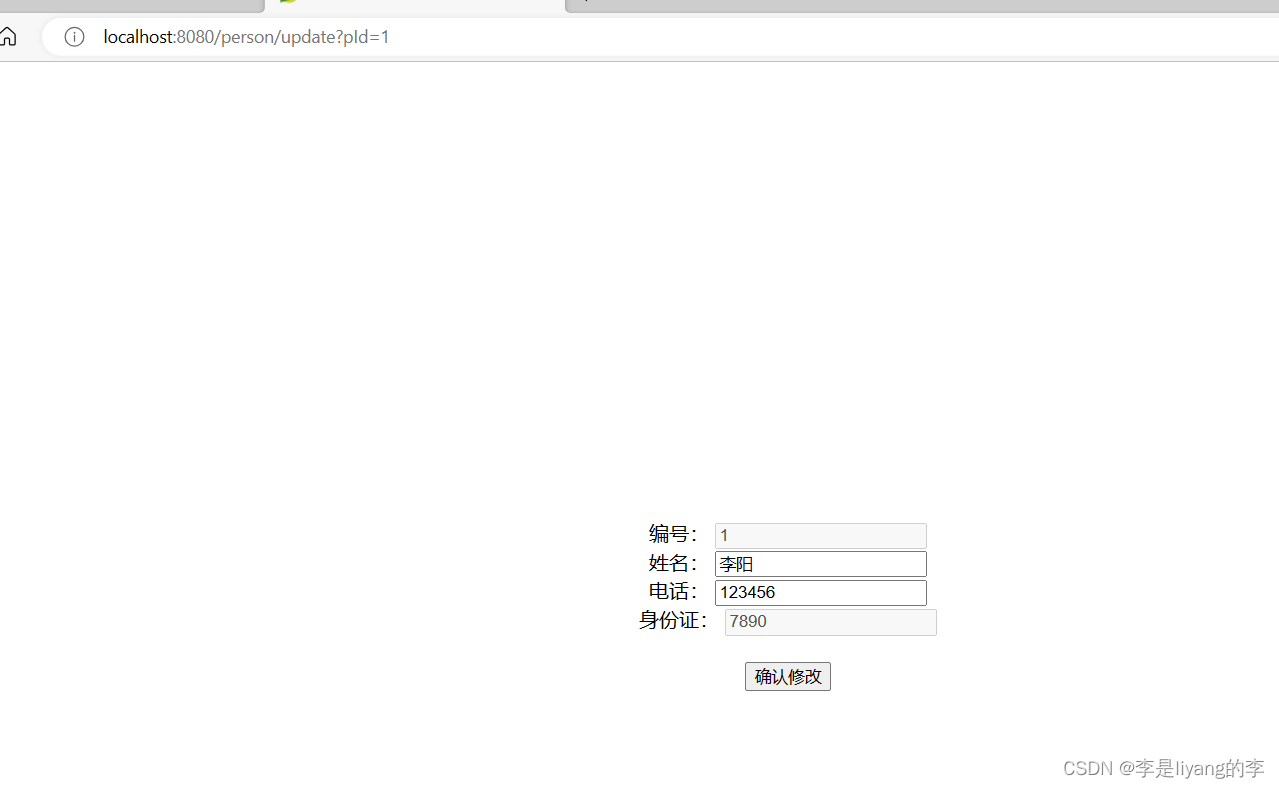
person-update.html
<!DOCTYPE html>
<html lang="en" xmlns:th="http://www.thymeleaf.org">
<head>
    <meta charset="UTF-8">
    <title>员工信息修改</title>
</head>
<body>
<div align="center" style="margin-top: 25%">
    <!--修改表单-->
    <form th:action="@{/person/updatePerson(pId=${updateP.pId})}" method="post" onsubmit="return checkAdd()">
        <!--disabled="disabled"是用来将信息锁定的,是禁止修改的-->
        编号:
        <input th:value="${updateP.pId}" id="pId" name="pId" disabled="disabled"><br>
        姓名:
        <input th:value="${updateP.pName}" id="pName" name="pName" placeholder="输入姓名"><br>
        电话:
        <input th:value="${updateP.pPhone}" id="pPhone" name="pPhone" placeholder="输入年龄"><br>
        身份证:
        <input th:value="${updateP.pScore}" id="pNumber" name="pNumber" disabled="disabled"><br>
        <br>
        <input type="submit" value="确认修改"><br>
    </form>
</div>
<!--js脚本-->
<script>
    function checkAdd() {
        //获取输入的值
        var same = document.getElementById("pName").value;
        var age = document.getElementById("pPhone").value;
        //校验数据(只判断是否为空)
        //对于年龄等数据,还需判断输入的值能否正确转换为数值
        if (pName == "" || pName == null) {
            alert("姓名不能为空");
            return false;
        } else if (pPhone == "" || pPhone == null) {
            alert("电话号码不能为空");
            return false;
        }  else {
            return true;//允许提交表单
        }
    }
</script>
</body>
</html>
最后运行即可
展示页面
主页面
增加页面

更新页面