知识点1【HTML概述】
HTML是超文本标记语言(Hyper Text Markup Language)
HTML由各种各样的标签(tag)组成,如<html></html> <body></body>
HTML标签
(1)由尖括号包围的关键词比如
(2)通常是成对(开始标签,结束标签)出现的比如,例外:
(3)注释标签:、注释
2、HTML元素
(1)开始标签(start tag)到结束标签(end tag)的所有代码
3、HTML属性
(1)在HTML元素的开始标签中规定
(2)以名称/值对的形式出现:<img src = "1.png">
例子(01_first_html.html):
<!-- this is my first html(the content cannot display in html,because it's just a note)-->
<html>
    <head>
        <title>01_first_html</title>
    </head>
    <body>
        <label>hello, HTML!!!</label>
        <br>
        <img src="./image/01_first_html.png">
    <body>
</html>
1、元信息标记
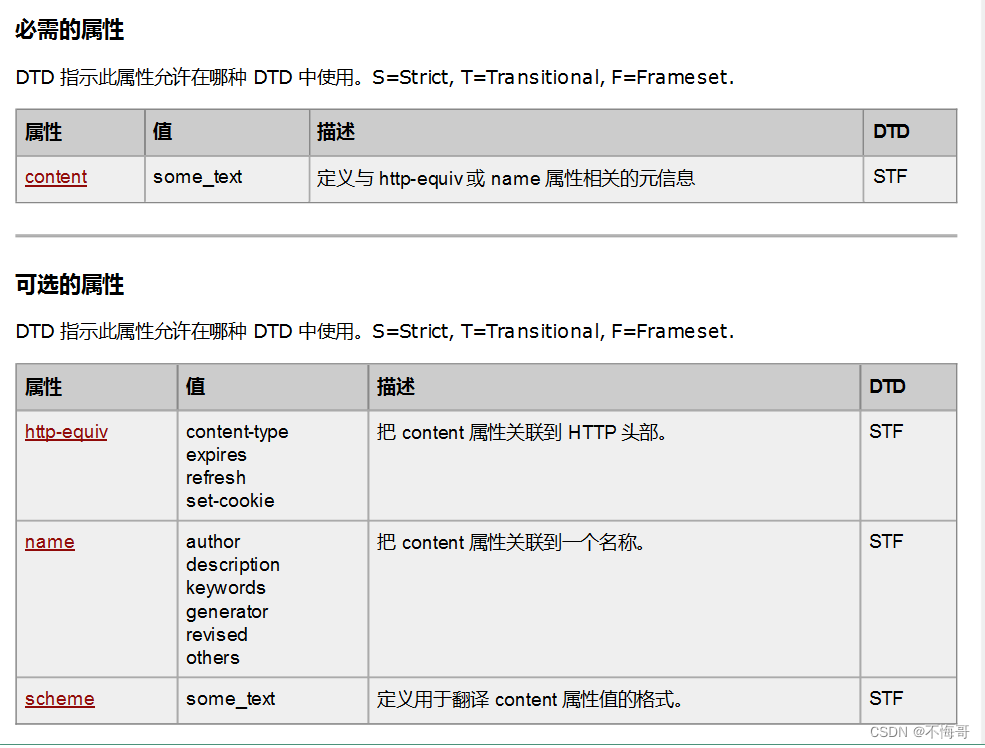
提供有关页面的元信息,比如针对搜索引擎和更新频度的描述和关键词
2、<meta>标签位于文档的头部,不包含任何内容。
3、<meta>签的属性定义了与文档相关联的名称/值对。
4、在 HTML 中,标签没有结束标签。
5、<meta>标签永远位于 head 元素内部。
6、元数据总是以名称/值的形式被成对传递的
案例1:
例子(02_meta.html):
<html>
    <head>
        <title>02_meta</title>
        <meta charset="UTF-8"/>
        <meta http-equiv="refresh" content="5;url=http://www.baidu.com/">
        <meta name="keywords" content="jump">
    </head>
    <body>
    5秒后我们将去一个神奇的地方!(这个网页的关键字是:jump)
    </body>
</html>
知识点2【文字标签】
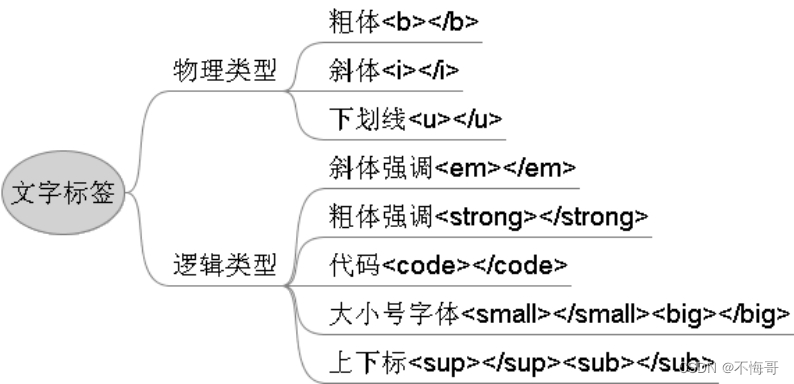
案例:
<html>
<head>
<title>03_char</title>
<meta charset="UTF-8">
</head>
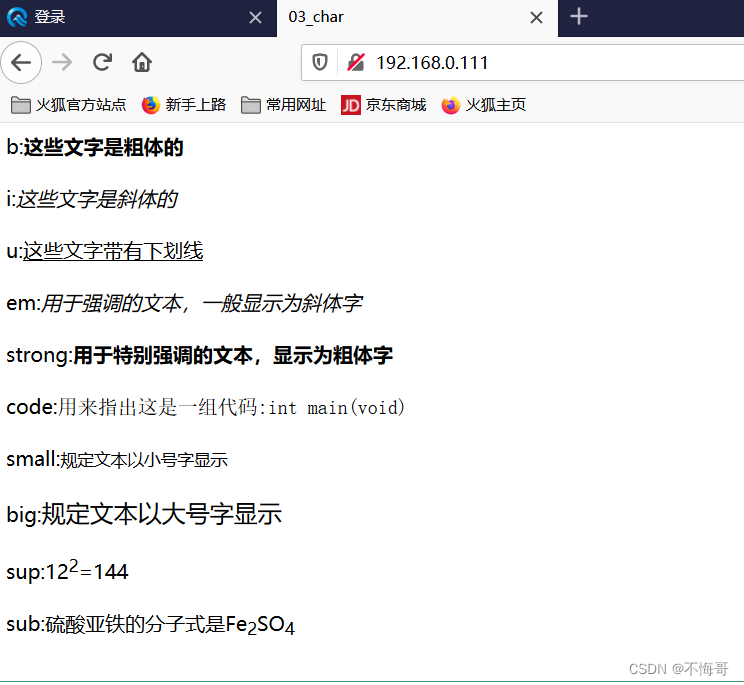
<body>
b:<b>这些文字是粗体的</b>
<br>
<br>
i:<i>这些文字是斜体的</i>
<br>
<br>
u:<u>这些文字带有下划线</u>
<br>
<br>
em:<em>用于强调的文本,一般显示为斜体字</em>
<br>
<br>
strong:<strong>用于特别强调的文本,显示为粗体字</strong>
<br>
<br>
code:<code>用来指出这是一组代码:int main(void)</code>
<br>
<br>
small:<small>规定文本以小号字显示</small>
<br>
<br>
big:<big>规定文本以大号字显示</big>
<br>
<br>
sup:12<sup>2</sup>=144
<br>
<br>
sub:硫酸亚铁的分子式是Fe<sub>2</sub>SO<sub>4</sub>
<br>
<br>
</body>
</html>运行结果:
知识点3【标题】
<h1>—<h6>一级标题 -->6级标题
以及标题字体最大
<html>
	<head>
		<title>04_head_style</title>
	</head>
	<body style="background-color:#90EE90">
		<br>
		<h1 style="color:red" >一级标题</h1>
		<h2 style="color:orange">二级标题</h2>
		<h3 style="color:yellow">三级标题</h3>
		<h4 style="color:green">四级标题</h4>
		<h5 style="color:black">五级标题</h5>
		<h6 style="color:blue">六级标题</h6>
		<p style="background-color: white; font-family: arial; color: #ff00ff; font-size:50px; text-align: center">普通段落</p>
		<br>
	</body>
</html>
运行结果:

知识点4【超链接】
超链接<a><a>
(1)页面内的超链接电子邮件超链接
<a href="mailto:[email protected]?subject=Hi"></a>
注:subject ---主题
(2)页面内的超链接
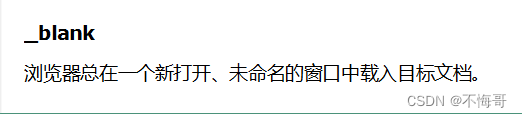
回到顶部:<a href="#top"></a>
回到某一位置:<a name="tome"></a>
<a href="#tome"><></a>
(3)页面外的超链接
外网:<a href="http://www.baidu.com/"></a>
内网:<a href="a.html" target="_blank"></a>
(4)图片超链接
<a src="a.html"><img src="image/a.jpg"></a>
<html>
<head>
<title>05_a_href</title>
<meta charset="UTF-8">
</head>
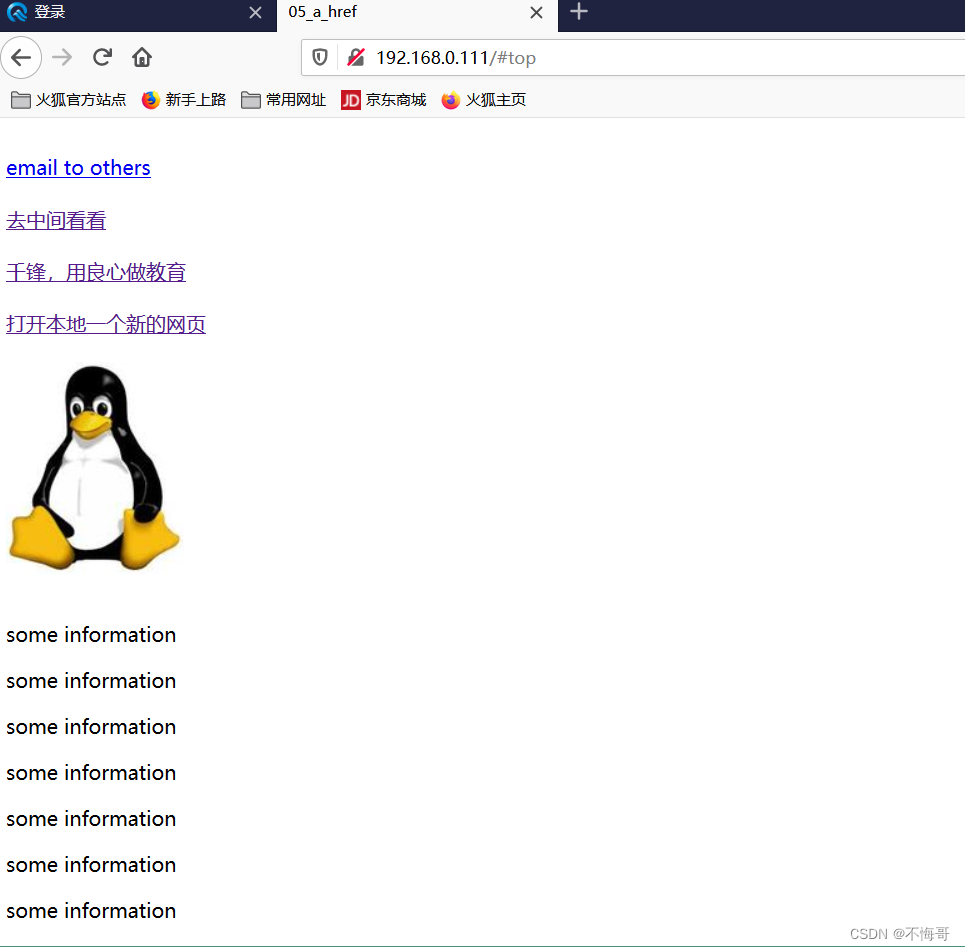
<body>
<br>
<a href="mailto:[email protected]?subject=Hi">email to others</a>
<br>
<br>
<a href="#mike">去中间看看</a>
<br>
<br>
<a href="http://www.1000phone.com">千锋,用良心做教育</a>
<br>
<br>
<a href="a.html" target="_blank">打开本地一个新的网页</a>
<br>
<br>
<a href="a.html"><img src="image/a.jpg"></a>
<br>
<br>
<p>some information</p>
<p>some information</p>
<p>some information</p>
<p>some information</p>
<p>some information</p>
<p>some information</p>
<p>some information</p>
<p>some information</p>
<p>some information</p>
<p>some information</p>
<p>some information</p>
<p>some information</p>
<p>some information</p>
<p>some information</p>
<p>some information</p>
<p>some information</p>
<p>some information</p>
<p>some information</p>
<p>some information</p>
<p>some information</p>
<p><a name="mike">中间</a></p>
<p>some information</p>
<p>some information</p>
<p>some information</p>
<p>some information</p>
<p>some information</p>
<p>some information</p>
<p>some information</p>
<p>some information</p>
<p>some information</p>
<p>some information</p>
<p>some information</p>
<p>some information</p>
<p>some information</p>
<p>some information</p>
<p>some information</p>
<p>some information</p>
<p>some information</p>
<p>some information</p>
<p>some information</p>
<p>some information</p>
<p>some information</p>
<p>some information</p>
<p>some information</p>
<p>some information</p>
<p>some information</p>
<p>some information</p>
<p>some information</p>
<p>some information</p>
<a href="#top">回到顶部</a>
<br>
</body>
</html>运行结果:
知识点5【table表格标签】(重要)
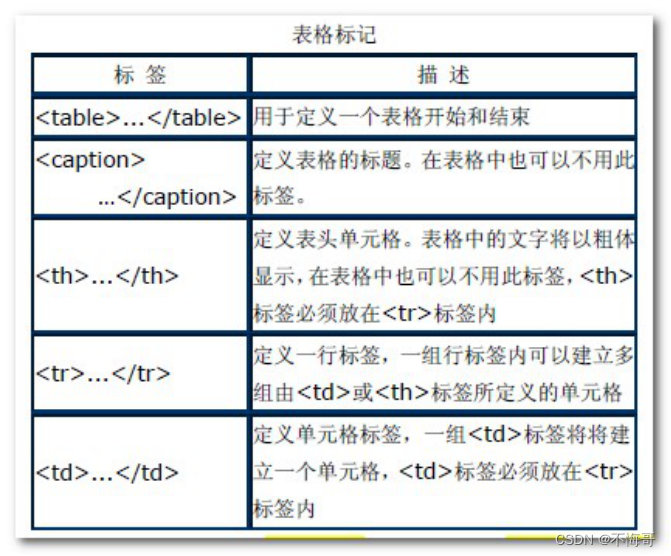
案例:(晚上敲)
<html>
    <head>
        <title>table</title>
        <meta charset="UTF-8">
    </head>
    <body>
        <table border="1" align="center"><!--border表示线宽-->
            <caption>统计学生信息</caption><!--表头信息-->
            <tr align="center">
                <td colspan="3"><b>学生信息</b></td><!--单元格信息-->
                <td colspan="2"><b>成绩信息</b></td><!--colspan 跨列-->
                <td rowspan="2">照片</td><!--rowspan 跨行-->
            </tr><!--行标签-->

            <tr align="center">
                <td>姓名</td><!--单元格信息-->
                <td>性别</td>
                <td>专业</td><!--单元格信息-->
                <td>课程</td>
                <td>分数</td><!--单元格信息-->
            </tr>

            <tr align="center">
                <td>郑涵</td><!--单元格信息-->
                <td>男</td>
                <td>电子信息</td><!--单元格信息-->
                <td>web开发</td>
                <td>99</td><!--单元格信息-->
                <td>调皮</td><!--单元格信息-->
            </tr>

        </table>
    </body>
</html>
运行结果:

知识点6【form表单】(重要)
HTML页面与服务器交互的手段
(1)属性
name:表单的名称
method:表单数据从浏览器传输到服务器的方法
get:将表单数据附加在URL地址后面,长度不超过8192个字符,不具有保密性,默认为get
post:将表单数据包含在表单的主体中,一起传输到服务器上。没有长度限制,密文传输
action:用来定义表单处理程序
(2)<form></form>内的标签
a、 <input>表单输入标签
常用的文本域、按钮都是使用这个标签
属性:
name 域名称
type 域类型
value 元素值
type属性值:
text 文字域 password 密码域
file 文件域 checkbox 复选框
radio 单选框 button 普通按钮
submit 提交按钮 reset 重置按钮
hidden 隐藏域 image 图像域
b、选择列表
菜单和列表是为了节省网页的空间而产生的
属性
name 菜单和列表的名称
size 显示的选项数目
multiple 列表中的选项为多项
selected 默认被选中的选项(option中的属性)
c、文本域<textarea></textarea>
用来制作多行文本输入域
属性
name 文字域的名称
rows 文字域的行数
cols 文字域的列数
案例1:input输入框
<html>
<head>
<title>table</title>
<meta charset="UTF-8">
</head>
<body>
<h3>这是一个表单的案例</h3>
<form method="GET" action="deal.cgi">
用户名:<input type="text" name="usr">
<br>
密     码:<input type="password" name="pwd">
<br>
请选择你要上传的文件:<input type="file" name="file">
<br>
请选择你的爱好:<input type="checkbox" name="hobby" value="LoL">LOL
<input type="checkbox" name="hobby" value="王者">王者
<input type="checkbox" name="hobby" value="吃鸡">吃鸡
<br>
你的性别:<input type="radio" name="sex" value="男">男
<input type="radio" name="sex" value="女">女
<br>
<input type="button" value="错我呀">
<br>
你猜猜这是谁:<input type="image" src="./image/zkd.jpg">
<br>
<input type="submit" value="提交">         <input type="reset" value="复位">
</form>
</body>
</html>运行结果:

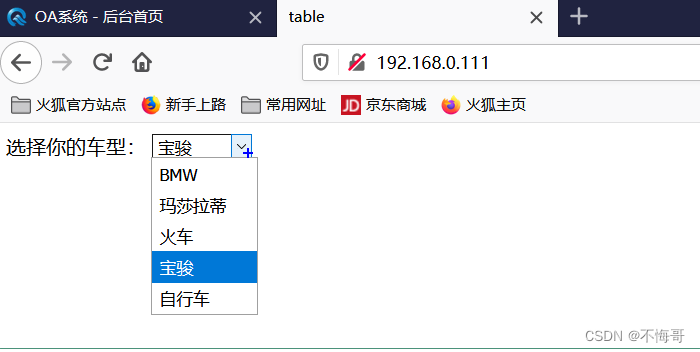
a、选择列表<select><option></option></select>
菜单和列表是为了节省网页的空间而产生的
属性
name 菜单和列表的名称
size 显示的选项数目
multiple 列表中的选项为多项
selected 默认被选中的选项(option中的属性)
<html>
    <head>
        <title>table</title>
        <meta charset="UTF-8">
    </head>
    <body>
        选择你的车型:
       <select>
        <option>BMW</option>
        <option>玛莎拉蒂</option>
        <option>火车</option>
        <option selected>宝骏</option>
        <option>自行车</option>
       </select>
    </body>
</html>
运行结果:
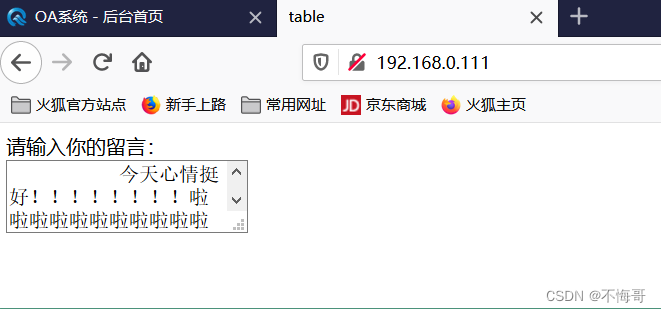
案例3:文本域
a、文本域<textarea> </textarea>
用来制作多行文本输入域
属性
name 文字域的名称
rows 文字域的行数
cols 文字域的列数
<html>
    <head>
        <title>table</title>
        <meta charset="UTF-8">
    </head>
    <body>
       请输入你的留言:
       <br>
       <textarea>
           今天心情挺好!!!!!!!!啦啦啦啦啦啦啦啦啦啦啦啦啦啦啦啦
       </textarea>
    </body>
</html>
运行结果:
知识点7【JavaScript的概述】让网页动起来
1、什么是 Javascript?
Javascript是一种基于对象并具有安全性能的脚本语言,是由浏览器内解释器翻译成可执行格式后执行,在概念和设计方面,Java和Jvascript是两种完全不同的语言。
Javascript的四个特点:基于对象的语言、简单性、动态性、跨平台性
| break |
case |
catch |
continue |
debugger |
| default |
delete |
do |
else |
false |
| finally |
for |
function |
if |
in |
| Instanceof |
new |
null |
return |
switch |
| this |
throw |
true |
try |
typeof |
| var |
void |
while |
with |
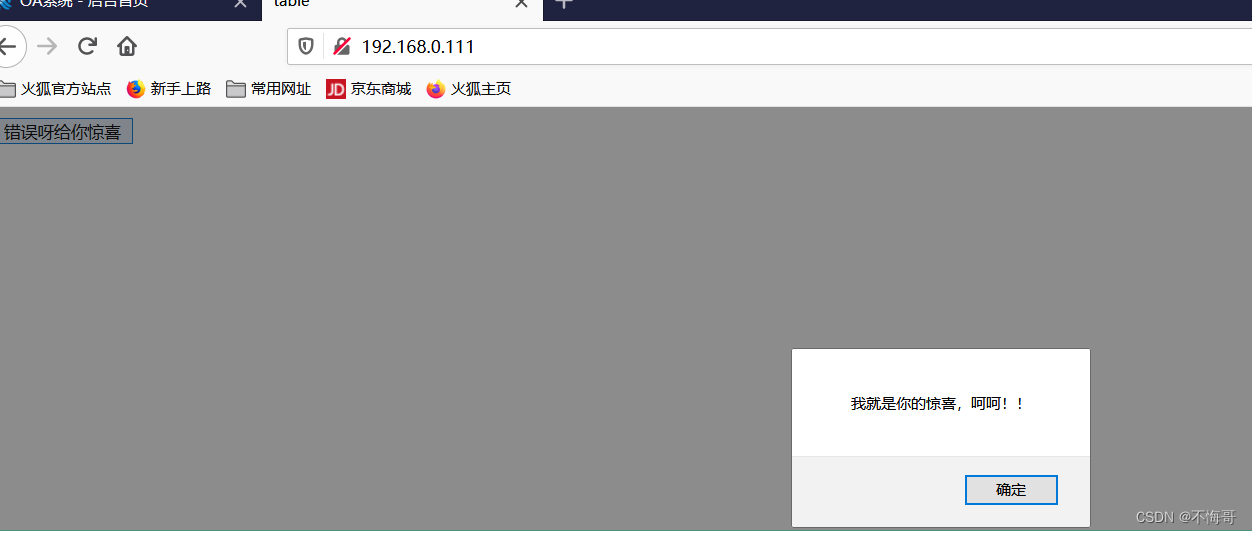
2、网页使用js脚本的三种方式
直接添加脚本 使用script标记插入脚本 链接脚本文件(推荐)
1、直接添加脚本
<html>
<head>
<title>table</title>
<meta charset="UTF-8">
</head>
<body>
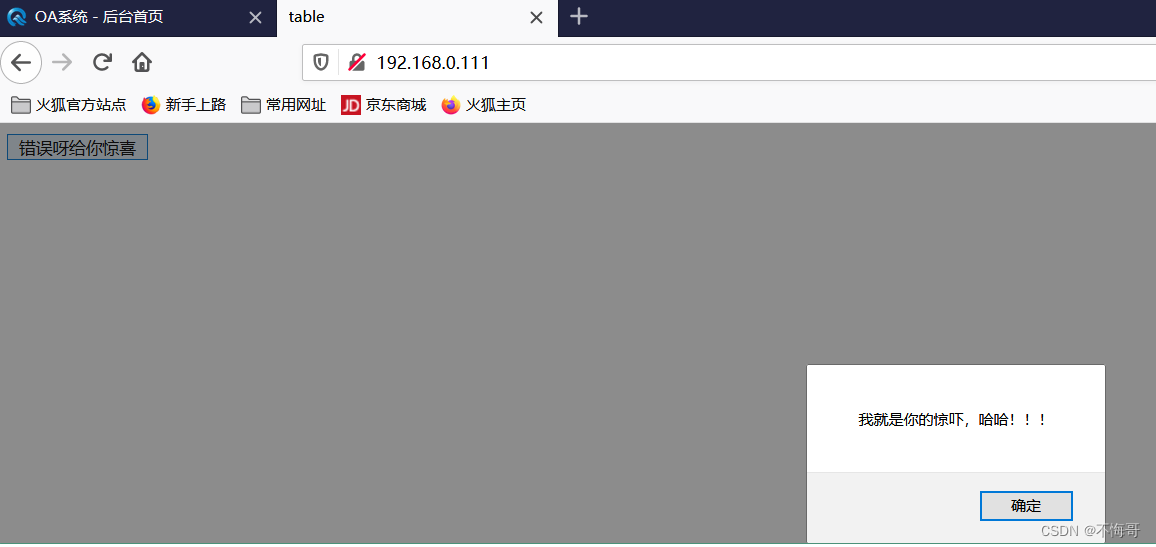
<!--alert会弹出一个对话框-->
<input type="button" value="错误呀给你惊喜" onclick='alert("我就是你的惊喜,呵呵!!")' >
</body>
</html>运行结果:
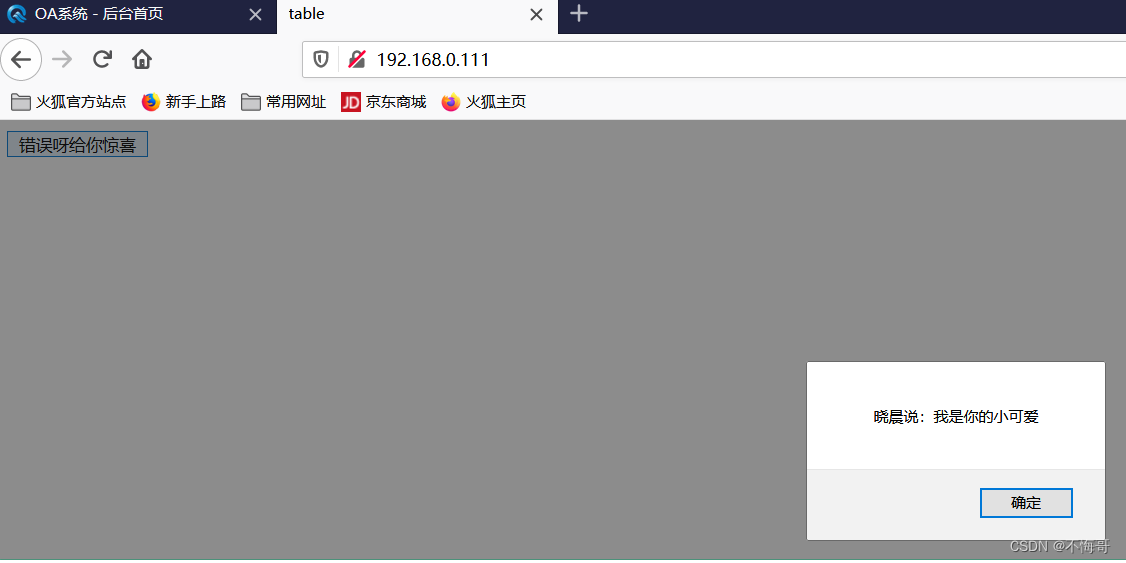
2、使用script标记插入脚本
<html>
    <head>
        <title>table</title>
        <meta charset="UTF-8">
        <script type="text/javascript">
            function my_button()
            {
                alert("我就是你的惊吓,哈哈!!!");
            }
        </script>
    </head>
    <body>
        <!--alert会弹出一个对话框-->
        <input type="button" value="错误呀给你惊喜" onclick="my_button();" >
    </body>
</html>
运行结果:
3、链接脚本文件(推荐)
<html>
    <head>
        <title>table</title>
        <meta charset="UTF-8">
        <!--这是描述 js中的函数来之哪个js文件-->
        <script type="text/javascript" src="01_js.js"></script>
    </head>
    <body>
        <!--alert会弹出一个对话框-->
        <input type="button" value="错误呀给你惊喜" onclick="my_button();" >
    </body>
</html>
运行结果:
4、运算符
(1)算数运算符
+、-、*、/、%、++、--
(2)逻辑运算符
&&、||、!
(3)比较运算符
==、>、=、
(4)位运算符
~、&、|、^、>、>>>(无符号右移)
(5)字符串运算符
+(合并运算符)
(6)赋值运算符
=、+=、-=、 *=、/=、%=
(7)条件运算符
? :(条件 ?结果1 :结果2)
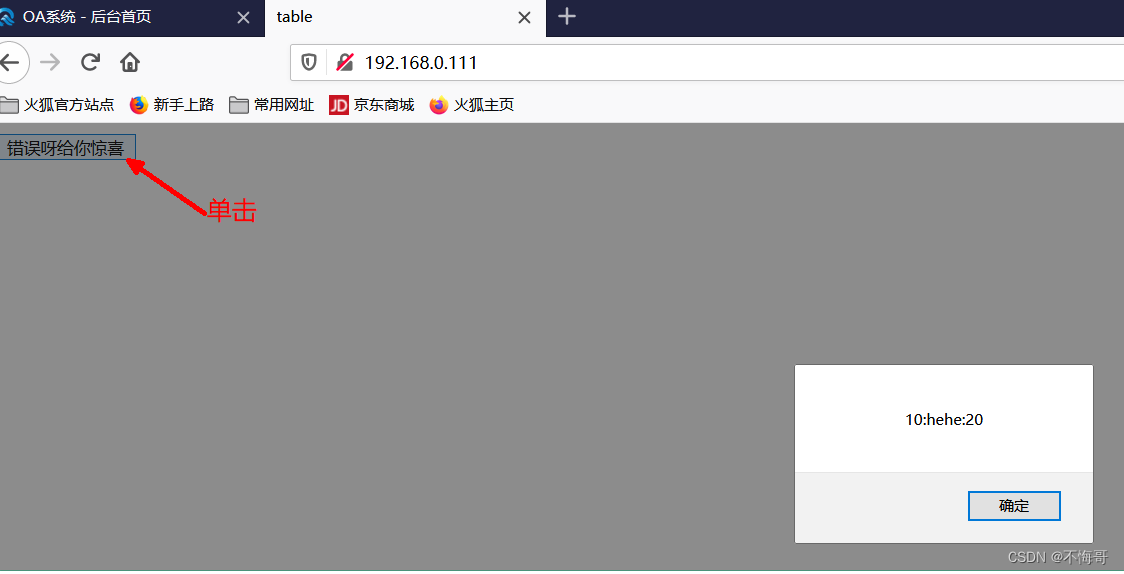
知识点8【js的函数】
函数的语法结构:
   function 函数名(参数1,参数2,…){
   函数体
}
案例:
index.html
<input type="button" value="错误呀给你惊喜" onclick='my_button(10,"hehe",20);' >deal.js
//arg1, arg2, arg3 不用写类型
function my_button(arg1, arg2, arg3)
{
    var data="";
    data += arg1;
    data +=":"
    data +=arg2;
    data +=":"
    data += arg3;
    //10:hehe:20
    alert(data);
}
运行结果:
知识点9【JS的对象】
1、浏览器对象(window对象)
Window 对象表示浏览器中打开的窗口,打开一个HTML网页会创建一个window对象
Window 对象是全局对象
window.open()打开一个新的窗口
window.close()关闭当前窗口
window.location.href:返回完整的URL;对其进行赋值,则能够跳转到相应的网页
function my_button()
{
//open在新的窗口中打开网页
//window.open("http://www.baidu.com");
//在当前窗口中打开网页
//window.location.href="http://www.baidu.com";
//获取当前网页的url
//alert(window.location.href);
//关闭close关闭窗口
window.close();
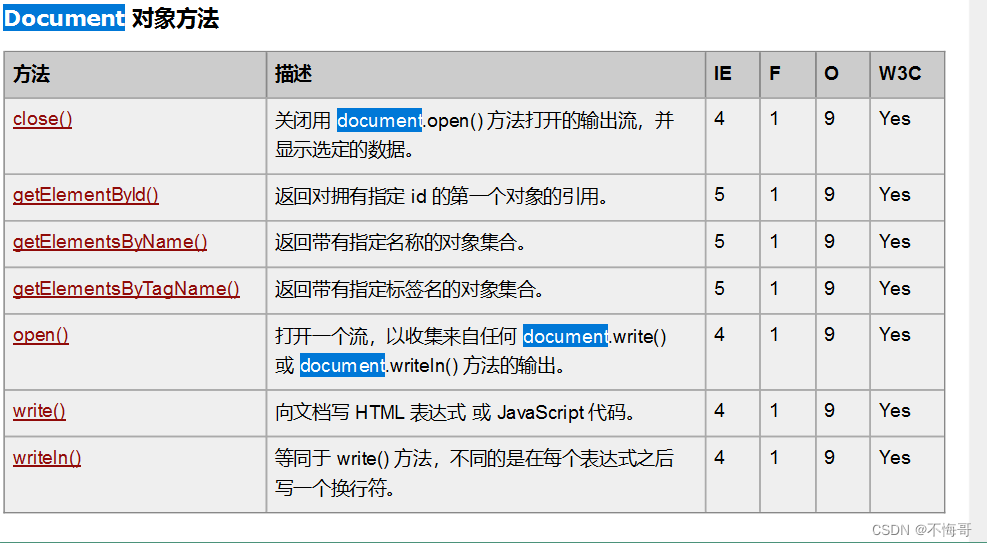
}2、文本对象(Document对象)(重要)
每个载入浏览器的 HTML 文档都会成为 Document 对象。
Document 对象使我们可以从脚本中对 HTML 页面中的所有元素进行访问
1、提供了从JS脚本中对 HTML 页面中的所有元素进行访问
2、可以通过getElementById()方法,来根据对应的ID号去访问、控制HTML页面中的标签元素
3、可以通过title,URL属性获取当前文档的标题,URL信息等
4、可以通过write方法在HTML页面中写入HTML表达式
案例1:登录界面 value
index.html
<html>
<head>
<title>table</title>
<meta charset="UTF-8">
<!--这是描述 js中的函数来之哪个js文件-->
<script type="text/javascript" src="14_js.js"></script>
</head>
<body>
<!--id是唯一 标记一个个标签-->
用户名:<input type="text" id="usr">
<br>
密码:<input type="password" id="pwd">
<br>
<input type="button" value="登录" onclick="my_button(1);">
<input type="button" value="取消" onclick="my_button(0);">
</body>
</html>14_js.js
function my_button(arg)
{
    if(arg == 1)//登录 admin 123456
    {
        //获取网页上输入框的用户名密码
        var usr = document.getElementById("usr").value;//重点
        var pwd = document.getElementById("pwd").value;
        if(usr=="admin" && pwd=="123456")
        {
            window.location.href="http://www.baidu.com";
        }
        else
        {
            alert("用户名或密码错误请重新输入");
            //清空用户名密码的输入框
            document.getElementById("usr").value="";
            document.getElementById("pwd").value="";
        }
    }
    else if(arg == 0)//取消
    {
        //清空用户名密码的输入框
        document.getElementById("usr").value="";
        document.getElementById("pwd").value="";
    }
}
运行结果:
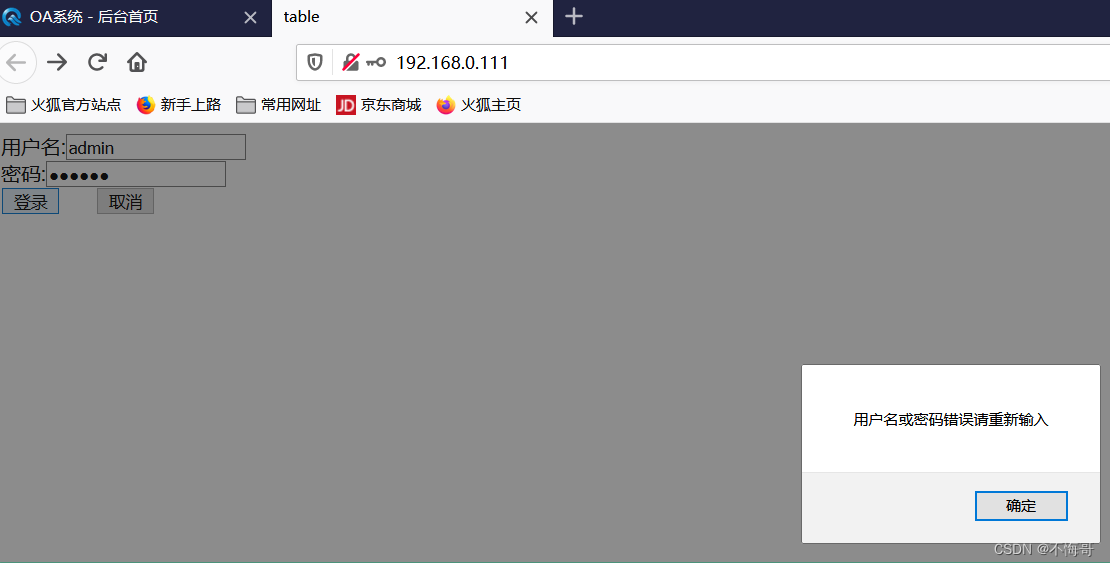
总结: document.getElementById("usr").value value一般用于输入框
2、案例 document获得label的内容 innerHTML
var text = document.getElementById("addr").innerHTML;index.html
<html>
    <head>
        <title>table</title>
        <meta charset="UTF-8">
        <!--这是描述 js中的函数来之哪个js文件-->
        <script type="text/javascript" src="15_js.js"></script>
    </head>
    <body>
        地址:<label id="addr">BJ</label>
        <br>
        <input type="button" value="单击改变地址" onclick="change_fun();">
    </body>
</html>
15_js.js
function change_fun()
{
    //获取label的内容 对于label 而是innerHTML
    var text = document.getElementById("addr").innerHTML;
    alert("获得的内容为:"+text);

    //更改label的内容
    document.getElementById("addr").innerHTML="SZ";

}
3、案例 document获得img的内容 src
index.html
<html>
    <head>
        <title>table</title>
        <meta charset="UTF-8">
        <!--这是描述 js中的函数来之哪个js文件-->
        <script type="text/javascript" src="16_js.js"></script>
    </head>
    <body>
        此处有帅哥:
        <br>
        <img src="./image/zkd.jpg" id="img">
        <br>
        <input type="button" value="单击改变图片" onclick="change_fun();">
    </body>
</html>
16_js.js
function change_fun()
{
//更改img的内容 src
document.getElementById("img").src="./image/0001.png";
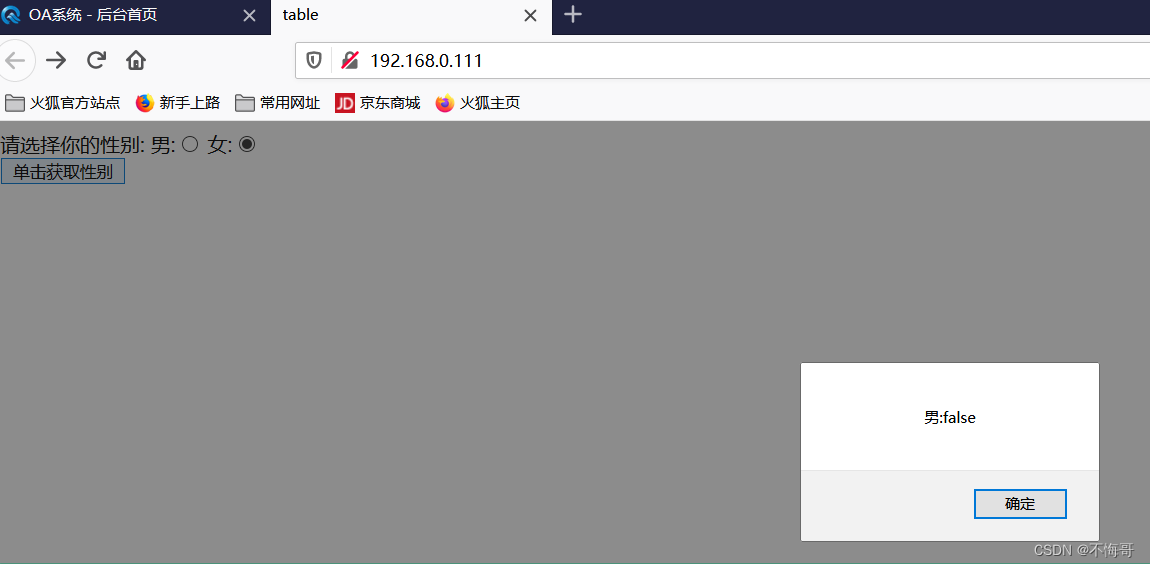
}4、案例 document获得单选框的内容
index.html
<html>
    <head>
        <title>table</title>
        <meta charset="UTF-8">
        <!--这是描述 js中的函数来之哪个js文件-->
        <script type="text/javascript" src="17_js.js"></script>
    </head>
    <body>
        请选择你的性别:
        男:<input type="radio" name="sex" id="nan">
        女:<input type="radio" name="sex" id="nv">
        <br>
        <input type="button" value="单击获取性别" onclick="sex_fun();">
    </body>
</html>
17_js.js
function sex_fun()
{
    alert("男:"+document.getElementById("nan").checked);//选中true 否则false
    alert("女:"+document.getElementById("nv").checked);//选中true 否则false
}
运行结果:
5、案例 document获得复选框的内容
<html>
<head>
<title>table</title>
<meta charset="UTF-8">
<!--这是描述 js中的函数来之哪个js文件-->
<script type="text/javascript" src="18_js.js"></script>
</head>
<body>
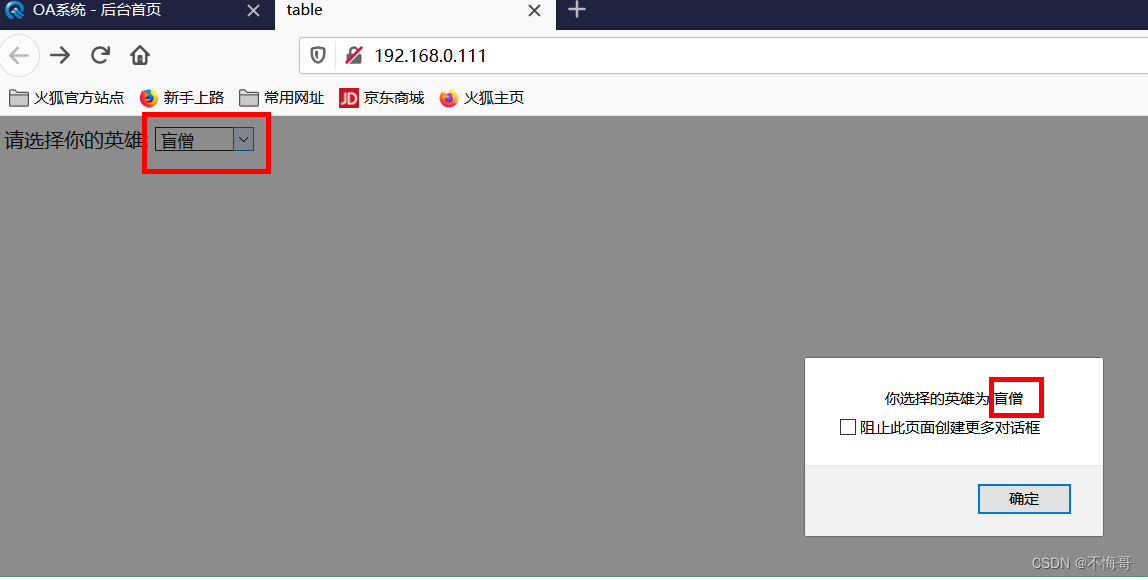
请选择你的英雄:
<!--onchange 下拉列表框被选择的时候自动调用hero_fun函数-->
<select onchange="hero_fun();" id="hero">
<option>德玛西亚</option>
<option>烬</option>
<option>小法</option>
<option>盲僧</option>
<option>小炮</option>
</select>
</body>
</html>18_js.js
function hero_fun()
{
    //获取下拉列表框被选中的索引号
    var index = document.getElementById("hero").selectedIndex;

    //根据索引号 从选项数据中options[]中得到选中的内容
    var hero_name = document.getElementById("hero").options[index].value;
    alert("你选择的英雄为:"+hero_name);
}
运行结果: