目录
概述
Gradle的出现可以说是为Android的项目构建插上了翅膀,让Android的apk打包构建更简单高效。开发者可以自己去定义打包的过程,比如在打包的过程中进行字节码插桩,多渠道打包,在老版本的Android中还可以依赖Gradle实现APP的插件化开发。但是Gradle是使用Groovy语言开发的,虽然说是和JAVA语言差不多,语法啥的差异也不大,但是终究他们两个还是不同的语言,开发者要想做Android打包的配置,还需要去了解Groovy语言,这无疑增加了开发者的负担。
但是由于Oracle公司将Google公司给告了,导致google不得不将Android的官方语言改成Kotlin,这一改,很多开发者之前可就不开心了,包括我也一样。但是后面真香定律生效了,Kotlin是真的香。更爽的是Google推出了ComposeUI,让使用XML写布局的时代渐行渐远了。这让我特别开心,因为我只需要学习Kotlin,一种语言,我就可以进行Android开发了,不需要再去记忆xml中的那些语法了。然后我意识到,构建工具还是其他语言呀,要是能都用Kotlin就爽了。然后Google仿佛听到了我的心声,推出了基于Kotlin dsl的gradle,也就是说,我们也可以使用Kotlin来编写Gradle脚本了。真的是爽翻天了呀,然后我就去尝试了下,真的很爽,依赖管理啥的特别清晰。而且只需要一次定义,然后在很多地方都可以使用,本文就是记录如何使用Kotlin dsl语言来编写Android项目的构建插件
1.Gradle Kotlin-DSL配置
Android的构建产物一般有两种,一种是APK的形式,直接可以安装运行,另外一种是AAR的形式,作为SDK库提供给其他应用使用。本文会分别介绍这两种方式的配置和编写。步骤如下:
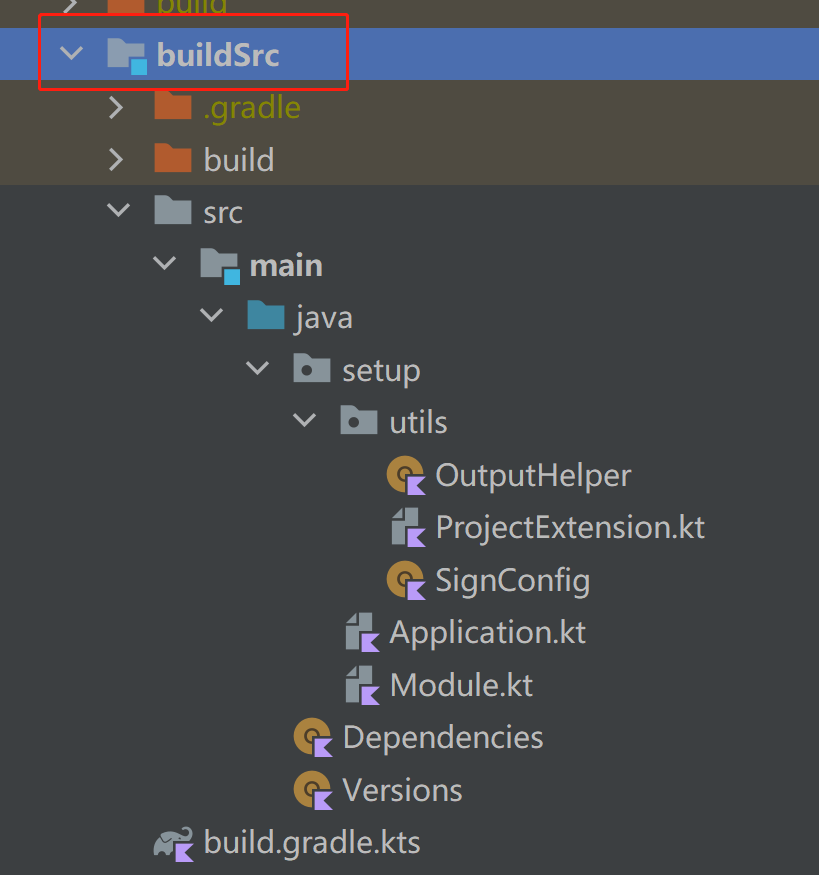
1.1 在根目录下建立一个buildSrc目录,
这里需要注意的是名字必须是buildSrc,这个目录是gradle插件的一种方式,也就是这个目录会被自动参与构建,在目录下面创建出下图中的包结构和类,准备开始编写我们的项目构建脚本
1.2.新建build.gradle.kts文件并添加Kotlin dsl相关配置
要想使用 KotlinDsl,需要我们引入kotlin 的插件,我们在上一步创建的buildSrc目录下新建build.gradle.kts并引入kotlin相关的配置,代码如下:
plugins {


    `kotlin-dsl`
}

repositories {


    google()
    mavenCentral()
}

dependencies {


    implementation("com.android.tools.build:gradle:7.2.2")
    implementation(kotlin("gradle-plugin","1.7.10"))
}
这样就将Kotlin dsl引入到项目中了,下面我们需要使用Kotlin编写我们构建Android项目时的配置了。
2.Gradle Kotlin DSL 的编写
在新建完buildSrc目录和build.gradle.kts文件引入了kotlin dsl的插件后,我们就可以使用Kotlin dsl插件配置构建Android项目了,步骤如下:
2.1 定义项目的版本号信息
在构建Android项目时,我们需要定义项目的最小支持Android SDK和最大支持的Android SDK,以及编译使用的SDK等信息,这些信息我们可以在buildSrc目录下新建一个Version类保存,代码如下所示:
object Versions {


    const val applicationId = "com.xxx.xxxx" // apk的包名
    const val compileSdkVersion = 33
    const val minSdkVersion = 24
    const val targetSdkVersion = 33
    const val versionCode = 1
    const val versionName = "1.0.0"
}
2.2.定义Dependencies管理项目中需要使用的库依赖
在之前使用groovy语言定义的依赖中,我们在需要第三方库或者官方库的时候,都会去使用 implementation("xxx.xxx.xxx.A库") 这种方式引入依赖,假设在项目的另一个Module中也需要使用这个库,因为是implementation的,所以另一个模块需要再去引用这个库,这些都还好,主要是涉及库的版本更新时不好管理,假设两个模块使用的库版本不一致,而恰好这两个版本的库中的功能做了修改,那么就会导致一个模块能工作另一个模块不能工作了,所以将依赖集中到一个地方管理很有必要,下面我们可以使用一个Dependencies类管理我们项目中的所有依赖,代码如下:
object Dependencies {


    private object DependencieVersions {


        const val kotlin = "1.5.31"
        const val kotlin_coroutines = "1.6.4"
        const val arouter = "1.5.2"
        const val retrofit = "2.9.0"
        const val exoplayer = "2.18.1"
        const val compose_ui_version = "1.3.0"
        const val moshi = "1.13.0"
        const val room = "2.4.3"
    }

    fun getComposeUiVersion(): String {


        return DependencieVersions.compose_ui_version
    }

    object Apache {


        const val commons_net = "commons-net:commons-net:3.7.2"
    }


    object Alibaba {


        const val arouter_api = "com.alibaba:arouter-api:${

      DependencieVersions.arouter}"
        const val arouter_compiler = "com.alibaba:arouter-compiler:${

      DependencieVersions.arouter}"
    }

    object AndroidX {


        const val junit_ext = "androidx.test.ext:junit:1.1.1"
        const val espresso = "androidx.test.espresso:espresso-core:3.2.0"
        const val core = "androidx.core:core-ktx:1.8.0"
        const val activity_ktx = "androidx.activity:activity-ktx:1.5.1"
        const val appcompat = "androidx.appcompat:appcompat:1.5.0"
        const val lifecycle_runtime_ktx = "androidx.lifecycle:lifecycle-runtime-ktx:2.3.1"

        const val room_ktx = "androidx.room:room-ktx:${

      DependencieVersions.room}"
        const val room = "androidx.room:room-runtime:${

      DependencieVersions.room}"
        const val room_compiler = "androidx.room:room-compiler:${

      DependencieVersions.room}"
        const val androidx_recyclerview = "androidx.recyclerview:recyclerview:1.3.0"
        const val constraintlayout = "androidx.constraintlayout:constraintlayout:2.1.4"
        const val swiperefreshlayout = "androidx.swiperefreshlayout:swiperefreshlayout:1.1.0"
        const val androidx_collection_ktx = "androidx.collection:collection-ktx:1.2.0"

        const val paging = "androidx.paging:paging-runtime-ktx:3.1.1"
    }

    object ComposeUI {


        const val activity_compose = "androidx.activity:activity-compose:1.3.1"
        const val compose_ui = "androidx.compose.ui:ui:${

      DependencieVersions.compose_ui_version}"
        const val compose_ui_tooling_preview =
            "androidx.compose.ui:ui-tooling-preview:${

      DependencieVersions.compose_ui_version}"
        const val compose_material = "androidx.compose.material:material:1.2.0"
        const val compose_ui_test_manifest =
            "androidx.compose.ui:ui-test-manifest:${

      DependencieVersions.compose_ui_version}"
    }

    object Junit {


        const val junit = "junit:junit:4.12"
    }

    object Kotlin {


        const val lib = "org.jetbrains.kotlin:kotlin-stdlib:${

      DependencieVersions.kotlin}"
        const val stdlib_jdk7 =
            "org.jetbrains.kotlin:kotlin-stdlib-jdk7:${

      DependencieVersions.kotlin}"
        const val coroutines_core =
            "org.jetbrains.kotlinx:kotlinx-coroutines-core:${

      DependencieVersions.kotlin_coroutines}"
        const val coroutines_android =
            "org.jetbrains.kotlinx:kotlinx-coroutines-android:${

      DependencieVersions.kotlin_coroutines}"
    }


    object Square {


        const val leakcanary = "com.squareup.leakcanary:leakcanary-android:2.9.1"
        const val retrofit = "com.squareup.retrofit2:retrofit:${

      DependencieVersions.retrofit}"
        const val retrofit_moshi =
            "com.squareup.retrofit2:converter-moshi:${

      DependencieVersions.retrofit}"
        const val moshi = "com.squareup.moshi:moshi:${

      DependencieVersions.moshi}"
        const val moshi_codegen =
            "com.squareup.moshi:moshi-kotlin-codegen:${

      DependencieVersions.moshi}"
    }

    object GitHub {


        //switch keyboard panel
        const val keyboard_panel = "com.github.albfernandez:juniversalchardet:2.4.0"

        const val banner = "io.github.youth5201314:banner:2.2.2"
        const val glide = "com.github.bumptech.glide:glide:4.13.2"

        //ftp
        const val nano_http = "org.nanohttpd:nanohttpd:2.3.1"

        //smb
        const val smbj = "com.hierynomus:smbj:0.10.0"
        const val dcerpc = "com.rapid7.client:dcerpc:0.10.0"
        const val jsoup = "org.jsoup:jsoup:1.11.2"
    }

    object Google {


        const val material = "com.google.android.material:material:1.8.0-alpha01"

        const val exoplayer =
            "com.google.android.exoplayer:exoplayer:${

      DependencieVersions.exoplayer}"
        const val exoplayer_core =
            "com.google.android.exoplayer:exoplayer-core:${

      DependencieVersions.exoplayer}"
        const val exoplayer_dash =
            "com.google.android.exoplayer:exoplayer-dash:${

      DependencieVersions.exoplayer}"
        const val exoplayer_hls =
            "com.google.android.exoplayer:exoplayer-hls:${

      DependencieVersions.exoplayer}"
        const val exoplayer_smoothstraming =
            "com.google.android.exoplayer:exoplayer-smoothstreaming:${

      DependencieVersions.exoplayer}"
        const val exoplayer_rtmp =
            "com.google.android.exoplayer:extension-rtmp:${

      DependencieVersions.exoplayer}"
    }

    object Tencent {


        const val mmkv = "com.tencent:mmkv-static:1.2.14"
        const val bugly = "com.tencent.bugly:crashreport:4.1.9"
    }

    object VLC {


        const val vlc = "org.videolan.android:libvlc-all:3.5.1"
    }
}
如上面的类所示,我们将所有依赖都分类管理,当需要使用的时候,直接找对应的依赖就行了
2.3 定义APK的打包脚本
在此之前,我们可以先准备好相关的辅助工具类,如下所示:
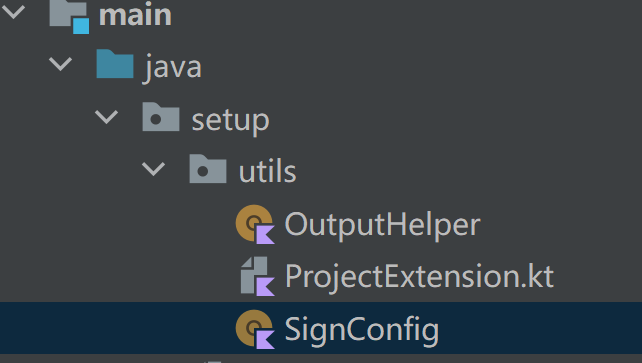 首先是OutputHelper,主要时定义输出的产物名称之类的配置,代码如下所示:
object OutputHelper {


    private val format = SimpleDateFormat("MMddHHmm", Locale.CHINA)

    fun outputFileName(variant: BaseVariantOutput):String{


        val time = format.format(Date())
      return"otterPlayer_v
      ${

    Versions.versionName}_${

    variant.name}_$time.apk"
    }
}
然后是ProjectExtension.kt,这个类主要做的是一些Project的扩展,使用kotlin的扩展函数定义,主要用于做一些默认的配置,签名的配置等,由于项目中的很多配置可能都是相同的,所以为了不重复定义,可以在这里添加上默认的这些配置,代码如下:
fun BaseExtension.setupKotlinOptions() {


    val extensions = (this as ExtensionAware).extensions
    val kotlinOptions = extensions.getByName<KotlinJvmOptions>
    ("kotlinOptions")
    kotlinOptions.apply {


        jvmTarget = JavaVersion.VERSION_1_8.toString()
    }
}

fun BaseExtension.setUpComposeFeature() {


    val extensions = (this as ExtensionAware).extensions
    val kotlinOptions = extensions
    .getByName<KotlinJvmOptions>("kotlinOptions")
}

fun Project.setupDefaultdDependencies() {


    dependencies.apply {


        add(
            "implementation",
            fileTree("include" to listOf("*.jar"), "dir" to "libs")
        )

        add("testImplementation", Dependencies.Junit.junit)
        add("androidTestImplementation", Dependencies.AndroidX.junit_ext)
        add("androidTestImplementation", Dependencies.AndroidX.espresso)
    }
}

fun AppExtension.setUpSignConfigs(project: Project) =
    apply {


        signingConfigs {


            named("debug") {


                SignConfig.debug(project, this)
            }

            create("release") {


                SignConfig.release(project, this)
            }
        }

        buildTypes {


            getByName("debug") {


                signingConfig = signingConfigs.findByName(this.name)
                isMinifyEnabled = false
                proguardFiles(
                    getDefaultProguardFile(
                    "proguard-android-optimize.txt"),"proguard-rules.pro"
                )
            }

            getByName("release") {


                signingConfig = signingConfigs.findByName(this.name)
                isMinifyEnabled = false
                proguardFiles(
                    getDefaultProguardFile(
                    "proguard-android-optimize.txt"),"proguard-rules.pro"
                )
            }

            create("beta") {


                initWith(getByName("release"))
            }
        }
    }

fun AppExtension.setupOutputApk() = apply {


    applicationVariants.all {


        outputs.forEach {


            if (it is ApkVariantOutput) {


                it.outputFileName = OutputHelper.outputFileName(it)
            }
        }
    }
}
最后是签名配置,我们可以把签名的信息放到gradle文件夹下,如下:
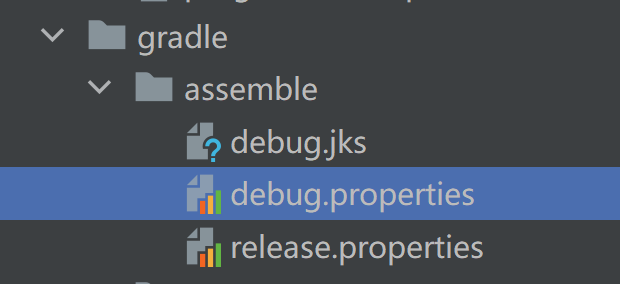
注意:不要把项目上线时使用的签名信息放到这里,不安全
然后我们使用一个配置类去读取这个配置,代码如下所示:
object SignConfig {


    fun debug(project: Project, config: SigningConfig) {


        val properties = loadProperties(project) ?: return
        config.apply {


            storeFile(project.getAssembleFile(properties["KEY_LOCATION"]
            .toString()))
            storePassword(properties["KEYSTORE_PASS"].toString())
            keyAlias(properties["ALIAS_NAME"].toString())
            keyPassword(properties["ALIAS_PASS"].toString())

            enableV1Signing = true
        }
    }

    fun release(project: Project, config: SigningConfig) {


        val keystoreFile = project.getAssembleFile("dandanplay.jks")
        config.apply {


            storeFile = keystoreFile
            storePassword(System.getenv("KEYSTORE_PASS"))
            keyAlias(System.getenv("ALIAS_NAME"))
            keyPassword(System.getenv("ALIAS_PASS"))
        }
    }

    private fun loadProperties(project: Project): Properties? {


        var propertiesFile = project.getAssembleFile("keystore.properties")
        if (propertiesFile.exists().not()) {


            propertiesFile = project.getAssembleFile("debug.properties")
        }
        if (propertiesFile.exists()) {


            val properties = Properties()
            properties.load(FileInputStream(propertiesFile))
            return properties
        }
        return null
    }

    private fun Project.getAssembleFile(fileName: String): File {


        return File(rootDir, "gradle/assemble/$fileName")
    }
}
定义完辅助的工具类后,我们就可以开始编写我们的项目构建脚本了,我们都知道Android可以有两种构建方式,一种是构建应用,输出的是一个APK的文件,可以放到Android手机上安装运行,另一种是库文件,包括AAR和JAR。所以我们需要对这两种构建方式分别配置,使用的时候选择对应的配置使用就行了。首先是构建APK
构建APK的类
un Project.applicationSetup(isComposeUi: Boolean) {


    extensions.getByName<AppExtension>("android").apply {


        compileOptions {


            sourceCompatibility = JavaVersion.VERSION_1_8
            targetCompatibility = JavaVersion.VERSION_1_8
        }

        buildFeatures.apply {


            dataBinding.isEnabled = true
        }

        setupKotlinOptions()
        setUpSignConfigs(this@applicationSetup)
        setupOutputApk()
        if (isComposeUi) {


            buildFeatures.apply {


                compose = true
            }

            composeOptions.apply {


                kotlinCompilerExtensionVersion =
                    Dependencies.getComposeUiVersion()
            }
        }
    }

    setupDefaultdDependencies()
}
构建Module的类
fun Project.moduleSetup() {


    extensions.getByName<LibraryExtension>("android").apply {


        compileSdk = Versions.compileSdkVersion
        defaultConfig {


            minSdk = Versions.minSdkVersion
            targetSdk = Versions.targetSdkVersion
        }

        buildTypes {


            getByName("release") {


                isMinifyEnabled = false
                proguardFiles(
                    getDefaultProguardFile(
                    "proguard-android-optimize.txt"),
                    "proguard-rules.pro"
                )
            }

            getByName("debug") {


                initWith(buildTypes.getByName("debug"))
            }

            create("beta") {


                initWith(buildTypes.getByName("beta"))
            }

            compileOptions {


                sourceCompatibility = JavaVersion.VERSION_1_8
                targetCompatibility = JavaVersion.VERSION_1_8
            }

            buildFeatures {


                dataBinding = true
            }

            setupKotlinOptions()
        }

        setupDefaultdDependencies()
    }
}
代码很好懂,就不一行行的解释了,构建脚本嘛能用就行了,主要原理就是Kotlin的扩展函数和使用提供的kotlin dsl gradle插件来编写Android 项目的构建脚本
3.使用Gradle Kotlin DSL
当我们的构建脚本编写完后就可以使用了,使用起来很简单,我们新建完Module或者应用模块后,只需要将对应的build.gradle文件改造一下就好了,如下所示:
3.1 新建应用模块,产物是APK
如果新建的是一个应用模块,我们需要使用的是applicationSetup这个扩展函数,应用模块下的build.gradle.kts代码如下所示:
import setup.applicationSetup // 引入我们之前编写的kotlin dsl构建脚本

plugins {


    id("com.android.application") // 表示包产物是应用
    kotlin("android")
    kotlin("kapt")
}
applicationSetup(true) // 调用构建APK的扩展函数
// remove warning message because of @Incubating
@Suppress("UnstableApiUsage")
android {


    compileSdk = Versions.compileSdkVersion
    defaultConfig {


        namespace = Versions.applicationId
        applicationId = Versions.applicationId
        minSdk = Versions.minSdkVersion
        targetSdk = Versions.targetSdkVersion
        targetSdk = Versions.targetSdkVersion
        versionCode = Versions.versionCode
        versionName = Versions.versionName
        multiDexEnabled = true
        testInstrumentationRunner
         = "androidx.test.runner.AndroidJUnitRunner"
    }
}

dependencies {


// 引入依赖
    implementation(Dependencies.Junit.junit)
    implementation(Dependencies.AndroidX.lifecycle_runtime_ktx)
    implementation(Dependencies.AndroidX.espresso)

    implementation(Dependencies.AndroidX.core)
    implementation(Dependencies.ComposeUI.compose_ui)
    implementation(Dependencies.ComposeUI.activity_compose)
    implementation(Dependencies.ComposeUI.compose_material)
    implementation(Dependencies.ComposeUI.compose_ui_test_manifest)
    implementation(Dependencies.ComposeUI.compose_ui_tooling_preview)
}
3.2 构建库Module
若新建的是一个module,即产物是AAR或者JAR,我们可以使用moduleSetup() 构建,代码如下:
import setup.moduleSetup

plugins {


    id("com.android.library")
    kotlin("android")
    kotlin("kapt")
    id("kotlin-parcelize")
}

moduleSetup() // 使用构建module的方式构建模块

// remove warning message because of @Incubating
@Suppress("UnstableApiUsage")
android {


    namespace = "com.otter.core.player"
    sourceSets {


        getByName("main") {


            jniLibs.srcDir("libs")
        }
    }
}
kapt {


    arguments {


        arg("AROUTER_MODULE_NAME", name)
    }
}

dependencies {


    implementation(Dependencies.VLC.vlc)

    implementation(Dependencies.AndroidX.appcompat)
    implementation(Dependencies.AndroidX.activity_ktx)
    implementation(Dependencies.AndroidX.core)
    implementation(Dependencies.AndroidX.room)
    implementation(Dependencies.AndroidX.junit_ext)
    implementation(Dependencies.AndroidX.androidx_recyclerview)
    implementation(Dependencies.AndroidX.constraintlayout)
    implementation(Dependencies.AndroidX.swiperefreshlayout)
    implementation(Dependencies.AndroidX.androidx_collection_ktx)
}
构建库和构建应用的步骤差不多,建议读者可以去多实践下,体验一下kotlin gradle dsl带来的便利。若有高见,欢迎评论区留言哦