1 apache shiro框架简介
官网:shiro.apache.org
shiro框架的核心功能:
认证
授权
会话管理
加密
shiro框架认证流程
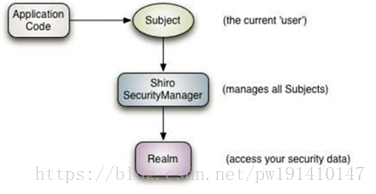
Application Code:应用程序代码,由开发人员负责开发的
Subject:框架提供的接口,代表当前用户对象
SecurityManager:框架提供的接口,代表安全管理器对象
Realm:可以开发人员编写,框架也提供一些,类似于Dao,用于访问权限数据

好了,简单的介绍说完了,接下来开始整合:
第一步:导包(springmvc+spring+mybatis的框架自己先搭建好)
<!-- 引入ehcache的依赖,给shiro做缓存权限用的 -->
		<dependency>
			<groupId>net.sf.ehcache</groupId>
			<artifactId>ehcache-core</artifactId>
			<version>2.6.6</version>
		</dependency>
		<!-- 引入shiro框架的依赖 -->
		<dependency>
			<groupId>org.apache.shiro</groupId>
			<artifactId>shiro-all</artifactId>
			<version>1.2.2</version>
		</dependency>
第二步:在web.xml中配置shiro的核心过滤器
<!-- 配置shiro的过滤器 -->
	<filter>
		<filter-name>shiroFilter</filter-name>
		<filter-class>org.springframework.web.filter.DelegatingFilterProxy</filter-class>
	</filter>
	<filter-mapping>
		<filter-name>shiroFilter</filter-name>
		<url-pattern>/*</url-pattern>
	</filter-mapping>
第三步:编写一个自定义realm
package com.itpengwei.bos.service.realm;

import org.apache.commons.lang3.StringUtils;
import org.apache.shiro.SecurityUtils;
import org.apache.shiro.authc.AuthenticationException;
import org.apache.shiro.authc.AuthenticationInfo;
import org.apache.shiro.authc.AuthenticationToken;
import org.apache.shiro.authc.SimpleAuthenticationInfo;
import org.apache.shiro.authc.UsernamePasswordToken;
import org.apache.shiro.authz.AuthorizationInfo;
import org.apache.shiro.authz.SimpleAuthorizationInfo;
import org.apache.shiro.realm.AuthorizingRealm;
import org.apache.shiro.subject.PrincipalCollection;
import org.springframework.beans.factory.annotation.Autowired;

import com.itpengwei.bos.mapper.UserMapper;
import com.itpengwei.bos.pojo.User;

/**
 * 自定义realm
 *
 * @author pengwei
 *
 */
public class GloabRealm extends AuthorizingRealm {
	@Autowired
	private UserMapper userMapper;

	// 授权方法
	@Override
	protected AuthorizationInfo doGetAuthorizationInfo(PrincipalCollection principals) {
		System.out.println("授权方法执行了........");
		SimpleAuthorizationInfo info = new SimpleAuthorizationInfo();
		// 测试为用户授权
		info.addStringPermission("staff-list");
		// TODO 自己根据当前登录用户查询数据库权限,为用户授权,这是两种获取当前用户的方法
		User user1 = (User) SecurityUtils.getSubject().getPrincipal();
		User user2 = (User) principals.getPrimaryPrincipal();
		System.out.println(user1 == user2);
		return info;
	}

	// 认证方法
	@Override
	protected AuthenticationInfo doGetAuthenticationInfo(AuthenticationToken token) throws AuthenticationException {
		System.out.println("------自定义realm执行了认证方法......");
		UsernamePasswordToken mytoken = (UsernamePasswordToken) token;
		if (StringUtils.isNotBlank(mytoken.getUsername())) {
			// 1,取出用户名
			String username = mytoken.getUsername();
			// 2,去数据库中查询用户信息根据用户名
			User user = userMapper.findUserByUsername(username);
			if (user == null) {
				// 3,用户不存在,返回null框架抛出异常,到controller进行统一处理
				return null;
			}
			// 4,到这里说明数据已经查询到了,让shiro进行对页面提交的密码和数据库中的密码进行校验
			// 第一个:参数数据库查询出来的用户对象,第二个:数据库密码,第三个参数:当前Realm名字
			AuthenticationInfo info = new SimpleAuthenticationInfo(user, user.getPassword(), getName());
			return info;
		}
		// 用户名为空,返回null抛出异常提示用户
		return null;
	}

}
第四步:创建一个spring的配置文件名字随自己的习惯(我这里用的是applicationContext-shiro.xml)
<?xml version="1.0" encoding="UTF-8"?>
<beans xmlns="http://www.springframework.org/schema/beans"
	xmlns:context="http://www.springframework.org/schema/context"
	xmlns:p="http://www.springframework.org/schema/p"
	xmlns:aop="http://www.springframework.org/schema/aop"
	xmlns:tx="http://www.springframework.org/schema/tx"
	xmlns:xsi="http://www.w3.org/2001/XMLSchema-instance"
	xsi:schemaLocation="http://www.springframework.org/schema/beans http://www.springframework.org/schema/beans/spring-beans-4.2.xsd
	http://www.springframework.org/schema/context http://www.springframework.org/schema/context/spring-context-4.2.xsd
	http://www.springframework.org/schema/aop http://www.springframework.org/schema/aop/spring-aop-4.2.xsd http://www.springframework.org/schema/tx http://www.springframework.org/schema/tx/spring-tx-4.2.xsd
	http://www.springframework.org/schema/util http://www.springframework.org/schema/util/spring-util-4.2.xsd">
	<!-- 配置shiro框架的过滤器工厂bean -->
	<bean id="shiroFilter"
		class="org.apache.shiro.spring.web.ShiroFilterFactoryBean">
		<property name="securityManager" ref="securityManager" />
		<property name="loginUrl" value="/login.jsp" />
		<property name="successUrl" value="/successUrl.jsp" />
		<property name="unauthorizedUrl" value="/unauthorizedUrl.jsp" />
		<!-- 指定URL拦截策略 ,静态资源放行,登录放行,其他的需要认证也就是登录-->
		<property name="filterChainDefinitions">
			<value>
				/css/**=anon
				/js/**=anon
				/images/**=anon
				/login.jsp*=anon
				//user/login.action=anon
				/validatecode.jsp*=anon
				/**=authc
			</value>
		</property>
	</bean>
	<!-- 配置安全管理器 -->
	<bean id="securityManager"
		class="org.apache.shiro.web.mgt.DefaultWebSecurityManager">
		<property name="realm" ref="gloabRealm" />
		<!-- 注入缓存管理器 -->
		<property name="cacheManager" ref="cacheManager" />
	</bean>
	<!-- 注册自定义realm -->
	<bean id="gloabRealm"
		class="com.itpengwei.bos.service.realm.GloabRealm" />
	<!-- 注册缓存管理器 -->
	<bean id="cacheManager"
		class="org.apache.shiro.cache.ehcache.EhCacheManager">
		<!-- 注入ehcache配置文件 -->
		<property name="cacheManagerConfigFile"
			value="classpath:ehcache.xml" />
	</bean>
	<!-- 开启shiro注解加到springmvc.xml中去了,因为不加那里会导致注解失效 -->
</beans>
第五步:开启shiro注解支持,本文使用注解方式进行权限控制
注意事项:开启注解配置需要写在springmvc.xml文件的最上方,要不然@RequiresPermissions会失效
<!-- 配置shiro开启注解支持 -->
	<bean id="defaultAdvisorAutoProxyCreator"
		class="org.springframework.aop.framework.autoproxy.DefaultAdvisorAutoProxyCreator">
		<!-- 强行指定使用cglib代理 -->
		<property name="proxyTargetClass" value="true" />
	</bean>
	<!-- 配置shiro框架提供的切面类,用于创建代理对象 -->
	<bean
		class="org.apache.shiro.spring.security.interceptor.AuthorizationAttributeSourceAdvisor" />
第六步:在方法上面添加权限注解(到此就完成了注解方式的权限控制)
@RequiresPermissions("staff-list")
	@RequestMapping(value = "/staff/getlist")
	@ResponseBody
	public List<Staff> getList() {
		List<Staff> list = staffService.getList();
		return list;
	}
第七步:实现使用shiro框架进行认证
// 用户登录使用shiro进行验证
	@RequestMapping(value = "/user/login", method = RequestMethod.POST)
	public String checkLogin1(User user, String checkcode, HttpServletRequest request) {
		HttpSession session = request.getSession();
		if (StringUtils.isNotBlank(checkcode)) {
			String key = (String) session.getAttribute("key");
			if (checkcode.equals(key)) {
				// 使用shiro框架的方式进行认证
				Subject subject = SecurityUtils.getSubject();// 获取当前用户登录对象,现在状态为“未认证”
				// 用户名和密码令牌
				AuthenticationToken token = new UsernamePasswordToken(user.getUsername(),
						MD5Utils.md5(user.getPassword()));
				try {
					subject.login(token);
					User loginUser = (User) subject.getPrincipal();
					session.setAttribute("loginUser", loginUser);
					// 登录成功,跳转到首页
					return "pages/common/index";
				} catch (Exception e) {
					e.printStackTrace();
					// 验证失败,重定向到登录页面
					return "redirect:" + request.getContextPath() + "/login.jsp";
				}

			}
		}
		// 登录失败重定向到登录页面
		return "redirect:" + request.getContextPath() + "/login.jsp";
	}
第八步:把缓存的配置文件加上(前面差点忘了不好意思)
我这里使用的文件名是classpath:ehcache.xml
<ehcache xmlns:xsi="http://www.w3.org/2001/XMLSchema-instance" xsi:noNamespaceSchemaLocation="../config/ehcache.xsd">
    <diskStore path="java.io.tmpdir"/>
    <defaultCache
            maxElementsInMemory="10000"
            eternal="false"
            timeToIdleSeconds="120"
            timeToLiveSeconds="120"
            overflowToDisk="true"
            maxElementsOnDisk="10000000"
            diskPersistent="false"
            diskExpiryThreadIntervalSeconds="120"
            memoryStoreEvictionPolicy="LRU"
            />
</ehcache>
到换成此就介绍完了ssm+shiro整合实现认证和授权了,其他两个会话管理和加密下次有时间一起发出来。请留个赞