Windows on Snapdragon 使用指南(6)
4.3 构建人工智能应用程序
构建适用于 Windows 或 Linux 平台的应用程序。
在 ARM64 Windows 上构建 Windows 应用程序
使用 CMake,构建可以在 Windows PC 或 Windows 设备上执行神经网络模型的 C++ 示例应用程序。
在 Ubuntu 20.04 x86_64 Windows WSL 上构建 Linux 应用程序
构建一个可以在 X86_64 Linux 系统上执行神经网络模型的 C++ 示例应用程序。
4.3.1 在 ARM64 Windows 上构建 Windows 应用程序
使用 CMake,构建可以在 Windows PC 或 Windows 设备上执行神经网络模型的 C++ 示例应用程序。
在基于 ARM® 处理器的 Windows 计算机上设置 SDK。
-
复制高通® 神经处理 SDK /SNPE 文件夹(使用设置神经处理 SDK 中的高通® 包管理器下载)。
-
将文件夹粘贴到适当的文件夹中,例如 c:/snpe-sdk。
-
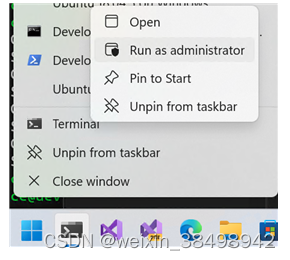
以管理员身份运行,在命令提示符中打开 SDK 文件夹。
-
设置高通® 神经处理 SDK 的系统环境变量。
setx SNPE_SDK_ROOT %cd% /m && set SNPE_SDK_ROOT=%cd% && set SNPE_SDK_ROOT例如:
c:\snpe-sdk>setx SNPE_SDK_ROOT %cd% /m && set SNPE_SDK_ROOT=%cd% && set SNPE_SDK_ROOT SUCCESS: Specified value was saved. SNPE_SDK_ROOT=c:\snpe-sdk -
生成可执行文件和SNPE.dll。
cd %SNPE_SDK_ROOT%/examples/SNPE/NativeCpp/SampleCode_Windows
mkdir build & cd build
选择一个平台,
x64或ARM64。 以下示例使用 ARM64。cmake ../ -G "Visual Studio 17 2022" -A ARM64 cmake --build ./ --config Release例如:
C:\snpe-sdk\examples\SNPE\NativeCpp\SampleCode_Windows> mkdir build & cd build C:\snpe-sdk\examples\SNPE\NativeCpp\SampleCode_Windows\build> cmake ../ -G "Visual Studio 17 2022" -A ARM64 -- The C compiler identification is MSVC 19.36.32530.0 -- The CXX compiler identification is MSVC 19.36.32530.0 -- Detecting C compiler ABI info -- Detecting C compiler ABI info - done -- Check for working C compiler: C:/Program Files/Microsoft Visual Studio/2022/Preview/VC/Tools/MSVC/14.36.32530/bin/Hostarm64/arm64/cl.exe - skipped -- Detecting C compile features -- Detecting C compile features - done -- Detecting CXX compiler ABI info -- Detecting CXX compiler ABI info - done -- Check for working CXX compiler: C:/Program Files/Microsoft Visual Studio/2022/Preview/VC/Tools/MSVC/14.36.32530/bin/Hostarm64/arm64/cl.exe - skipped -- Detecting CXX compile features -- Detecting CXX compile features - done Linking with ARM64 SNPE -- Configuring done -- Generating done -- Build files have been written to: C:/snpe-sdk/examples/SNPE/NativeCpp/SampleCode_Windows/build C:\snpe-sdk\examples\SNPE\NativeCpp\SampleCode_Windows\build> cmake --build ./ --config Release MSBuild version 17.6.3+07e294721 for .NET Framework Checking Build System Building Custom Rule C:/snpe-sdk/examples/SNPE/NativeCpp/SampleCode_Windows/CMakeLists.txt main.cpp -
验证 snpe-sample.exe 和 SNPE.dll 是否位于 Release 文件夹下。
Directory of C:\snpe-sdk\examples\SNPE\NativeCpp\SampleCode_Windows\build\Release

05/12/2023  01:24 PM    <DIR>          .
05/12/2023  01:24 PM    <DIR>          ..
05/12/2023  01:24 PM           118,272 snpe-sample.exe
05/12/2023  01:24 PM         6,342,656 SNPE.dll
4.3.2在 Ubuntu 20.04 x86_64 Windows WSL 上构建 Linux 应用程序
构建一个可以在 X86_64 Linux 系统上执行神经网络模型的 C++ 示例应用程序。
注意
这适用于 Qualcomm® 神经处理 SDK Linux 版本。 示例代码和 Makefile 不适用于 Windows SDK。
- 使用 WSL 终端检查 ~/snpe-sdk/examples/SNPE/NativeCpp/SampleCode 上的示例 makefile。 (X86_64 主机 Ubuntu20.04 上的先决模型准备和 DLC 生成部分。
ce@dev:~/snpe-sdk/examples/SNPE/NativeCpp/sampleCode$ ll total 8 drwxr-xr-x 1 ce dev 4096 Apr 27 23:14 ./ drwxr-xr-x 1 ce dev 4096 Apr 27 23:14 ../ -rw-r--r-- 1 ce dev 1229 Apr 27 22:12 Makefile.x86_64-linux-clang -rw-r--r-- 1 ce dev 619 Apr 23 2022 README.txt drwxr-xr-x 1 ce dev 4096 Apr 27 23:14 jini/ - 在 Makefile.x86_64-linux-clang 文件中,将包含路径从 $(SNPE_ROOT)/include/zdl 更改为 $(SNPE_ROOT)/include/SNPE。
# Include paths INCLUDES += -I $(SNPE_ROOT)/include/SNPE - 使用 make 命令编译目标 Makefile 以构建应用程序。
make -f Makefile.x86_64-linux-clang CXX=g++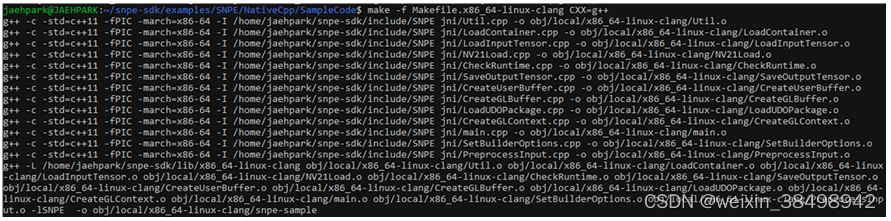
- 检查 .obj/local/x86_64-linux-clang 文件夹下生成的 snpe-sample 应用程序。
ce@dev:~/snpe-sdk/examples/SNPE/NativeCpp/sampleCode$ ll total 8 drwxr-xr-x 1 ce dev 4096 May 12 13:52 ./ drwxr-xr-x 1 ce dev 4096 May 12 13:31 ../ -rw-r--r-- 1 ce dev 6888 May 12 13:52 CheckRuntime.o -rw-r--r-- 1 ce dev 1088 May 12 13:52 CreateGLBuffer.o -rw-r--r-- 1 ce dev 1088 May 12 13:52 CreateGLContext.o -rw-r--r-- 1 ce dev 354024 May 12 13:52 CreateUserBuffer.o -rw-r--r-- 1 ce dev 19360 May 12 13:52 LoadContainer.o -rw-r--r-- 1 ce dev 246784 May 12 13:52 LoadInputTensor.o -rw-r--r-- 1 ce dev 56624 May 12 13:52 LoadUDOPackage.o -rw-r--r-- 1 ce dev 41160 May 12 13:52 NV21Load.o -rw-r--r-- 1 ce dev 120232 May 12 13:52 PreprocessInput.o -rw-r--r-- 1 ce dev 78608 May 12 13:52 SaveOutputTensor.o -rw-r--r-- 1 ce dev 23784 May 12 13:52 SetBuilderOptions.o -rw-r--r-- 1 ce dev 119416 May 12 13:52 Util.o -rw-r--r-- 1 ce dev 119416 May 12 13:52 main.o -rwxr-xr-x 1 ce dev 119416 May 12 13:52 snpe-sample* - 使用您的模型测试生成的 snpe 样本。 (例如,上面使用的带有 Resnet50 的 snpe-sample)
例如:snpe-sdk/examples/SNPE/NativeCpp/SampleCode/obj/local/x86_64-linux-clang/snpe-sample -d ~/resnet50-v1-7_quantized.dlc -i ~/input_list.txtce@dev:~$ snpe-sdk/examples/SNPE/NativeCpp/SampleCode/obj/local/x86_64-linux-clang/snpe-sample -d ~/resnet50-v1-7_quantized.dlc -i ~/input_list.txt 7Failed to start Logger! [1] QnnDsp <E> Unsupported SnapdragonModel = 0 by HTP backend, assuming fp16 is not supported Batch size for the container is 1 Processing DNN Input: ./data.raw
4.4 在目标设备上运行 Windows 应用程序
-
将来自在 ARM64 Windows 上构建 Windows 应用程序的 snpe-sample.exe 和 SNPE.dll 文件以及来自 DLC 生成的示例资源复制到 WoS。
- 从 WSL:
- ~/file_list.txt
- ~/chairs.raw
- ~/notice_sign.raw
- ~/plastic_cup.raw
- ~/trash_bin.raw
- ~/resnet50-v1-7_quantized.dlc
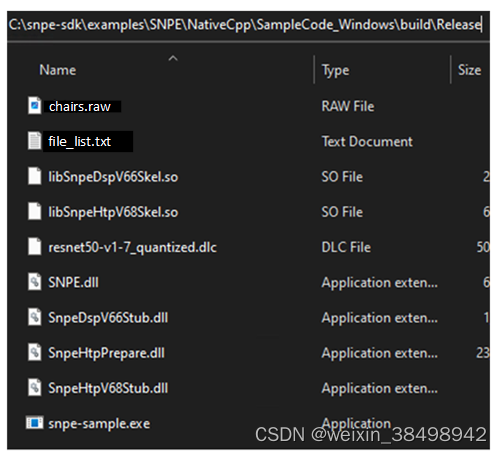
请将 file_list.txt 文件中的原始绝对路径与复制的执行位置相匹配。 例如,如果chairs.raw文件放在C:\snpe-sdk\examples\SNPE\NativeCpp\SampleCode_Windows\build\Release中,则file_list.txt中的路径应编写如下:
C:\snpe-sdk\examples\SNPE\NativeCpp\SampleCode_Windows\build\Release\chairs.raw
- 从 Windows:
- %SNPE_SDK_ROOT%\examples\SNPE\NativeCpp\SampleCode_Windows\build\Release\snpe-sample.exe
- %SNPE_SDK_ROOT%\examples\SNPE\NativeCpp\SampleCode_Windows\build\Release\SNPE.dll
- 从 WSL:
-
将 DSP 共享对象和动态链接库文件复制到 DSP 运行时的同一文件夹中。 例如,c:\snpe-sdk\examples\SNPE\NativeCpp\SampleCode_Windows\build\Release\。
- %SNPE_SDK_ROOT%/lib/hexagon-v66/libSnpeDspV66Skel.so
- %SNPE_SDK_ROOT%/lib/hexagon-v68/libSnpeHtpV68Skel.so
- %SNPE_SDK_ROOT%/lib/aarch64-windows-msvc/SnpeDspV66Stub.dll
- %SNPE_SDK_ROOT%/lib/aarch64-windows-msvc/SnpeHtpPrepare.dll
- %SNPE_SDK_ROOT%/lib/aarch64-windows-msvc/SnpeHtpV68Stub.dll
支持的产品基于高通® Kryo™ CPU 和高通® 骁龙 8c 芯片组。
-
在命令提示符下通过网络运行可执行文件。 输出张量作为原始二进制文件转储到输出文件夹。
snpe-sample.exe --container resnet50-v1-7_quantized.dlc --input_list file_list.txt --runtime dsp例如,将显示类似于以下内容的消息。
C:\snpe-sdk\examples\SNPE\NativeCpp\SampleCode_Windows\build\Release> snpe-sample.exe --container resnet50-v1-7_quantized.dlc --input_list file_list.txt --runtime dsp SNPE Version: 2.12.1.230626174329_59328 Batch size for the container is 1 Processing DNN Input: chairs.raw Processing DNN Input: notice_sign.raw Processing DNN Input: plastic_cup.raw Processing DNN Input: trash_bin.raw -
使用 snpe-throughput-net-run.exe 检查推理时间。
使用 snpe-throughput-net-run.exe 检查推理时间。例如,将显示类似于以下内容的消息。
C:\snpe-sdk\examples\SNPE\NativeCpp\SampleCode_Windows\build\Release>snpe-throughput-net-run.exe
--container resnet50-v1-7_quantized.dlc --duration 5 --perf_profile burst --use_dsp
-------------------------------------------------------------------------------
[Thread 0 - dsp_fixed8_tf] 709.769 infs/sec - Number of images processed: 3547 - Build time: 175797
microseconds - Elapsed time: 5000733 microseconds - Real time: 4997398 microseconds - Teardown time:
9829 microseconds - Batch : 1
Total throughput: 709.769 infs/sec