什么是pygame?
Pygame 是一个专门用来开发游戏的 Python 模块,主要为开发、设计 2D 电子游戏而生,具有免费、开源,支持多种操作系统,具有良好的跨平台性等优点。它提供了诸多操作模块,比如图像模块(image)、声音模块(mixer)、输入/输出(鼠标、键盘、显示屏)模块等。简单来说,如果你使用pygame,理论上可以开发设计市面上所有的2d类型游戏(仅仅是理论上)。
一.pygame模块的安装
使用pip接口进行安装
pip install pygamepip接口详细说明可以看:https://blog.csdn.net/pengneng123/article/details/129556320
二.pygame库基本函数使用
pygame.init() 初始化,调用pygame的任何函数之前都要调用这个函数。
pygame.init() pygame.display.set_mode((400,300)) 创建窗口,传入宽和高
screen = pygame.display.set_mode((400,300))pygame.display.set_caption("xxxx") 设置窗口顶部标题名称
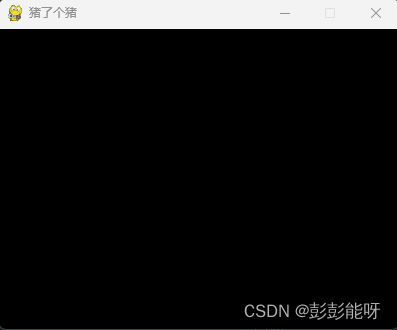
pygame.display.set_caption("猪了个猪")运行上述代码:
import pygame

pygame.init()

screen = pygame.display.set_mode((400,300))

pygame.display.set_caption("猪了个猪")
运行上面代码你会发现左上角出现一个窗口,然后一闪即过,这是正常的。这里就要思考python代码的运行,通过执行上述代码,你创建了一个黑色窗口,但是当代码执行完会发生什么,当然是python自动退出了。所以你要使用一定的方法不让代码结束运行,这就要添加“死循环”了,这很好理解,while true 会一遍又一遍的运行里面的代码而不退出。
5.while True让游戏无限循环
while True:  # 死循环确保窗口一直显示
    for event in pygame.event.get():  # 遍历所有事件
        if event.type == pygame.QUIT:  # 如果单击关闭窗口,则退出
            sys.exit()  #按X 退出
6.完整代码示例:
import pygame
import sys

pygame.init()

screen = pygame.display.set_mode((400,300))

pygame.display.set_caption("猪了个猪")

while True:

    for event in pygame.event.get():

        if event.type == pygame.QUIT:

            sys.exit()
输出:
这样,一个游戏的最基础框架就出来了。
三.操作pygame
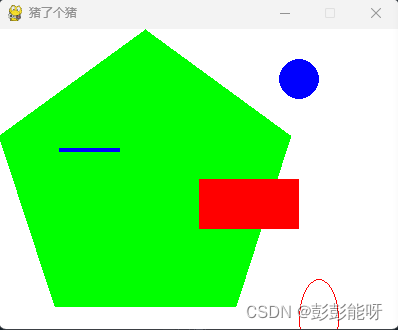
颜色与绘制,screen.fill() 对颜色进行填充
#设置颜色
Black = (0,0,0)
White = (255,255,255)
Red = (255,0,0)
Green = (0,255,0)
Blue = (0,0,255)

screen.fill(White)
2.绘制图形
###绘制多边形,pylygon(surface,color,pointlist,width)pointlist参数是一个元组或者点的
pygame.draw.polygon(screen,Green,((146,0),(291,106),(236,277),(56,277),(0,106)))

####画线,参数为 surface,color,起始位置,终止位置,粗细
pygame.draw.line(screen,Blue,(60,120),(120,120),4)

#画圆,参数为surface,color,圆心,半径,边粗细(0填充)
pygame.draw.circle(screen,Blue,(300,50),20,0)

#画椭圆,参数为surface,color,边界矩形(以矩形的位置来画椭圆),边粗细
pygame.draw.ellipse(screen,Red,(300,250,40,80),1)

#画矩形,参数为surface,color,矩形(左上角x坐标,左上角y坐标,宽,高),边粗细
pygame.draw.rect(screen,Red,(200,150,100,50))
3.pygame.display.flip() 更新全部显示
pygame.display.flip()4.pygame.quit() #退出pygame
pygame.quit()输出上述代码:
import pygame
import sys

pygame.init()

screen = pygame.display.set_mode((400,300))
color = (0, 0, 0)  # 设置颜色
pygame.display.set_caption("猪了个猪")
Black = (0,0,0)
White = (255,255,255)
Red = (255,0,0)
Green = (0,255,0)
Blue = (0,0,255)

screen.fill(White)

###绘制多边形,pylygon(surface,color,pointlist,width)pointlist参数是一个元组或者点的
pygame.draw.polygon(screen,Green,((146,0),(291,106),(236,277),(56,277),(0,106)))

####画线,参数为 surface,color,起始位置,终止位置,粗细
pygame.draw.line(screen,Blue,(60,120),(120,120),4)

#画圆,参数为surface,color,圆心,半径,边粗细(0填充)
pygame.draw.circle(screen,Blue,(300,50),20,0)

#画椭圆,参数为surface,color,边界矩形(以矩形的位置来画椭圆),边粗细
pygame.draw.ellipse(screen,Red,(300,250,40,80),1)

#画矩形,参数为surface,color,矩形(左上角x坐标,左上角y坐标,宽,高),边粗细
pygame.draw.rect(screen,Red,(200,150,100,50))


while True:

    for event in pygame.event.get():

        if event.type == pygame.QUIT:

            exit()
    pygame.display.flip()  # 更新全部显示
pygame.quit()
输出:
5.图片插入pygame.image.load('xxx.png')
pygame.image.load('1158.png')6.screen.blit(xx,(0,0))##写入到背景
screen.blit(xx,(0,0))##写入到背景
输出:
7.pygame.time.Clock()设置时钟
clock = pygame.time.Clock() # 设置时钟8.看一段完整的代码,更好的理解pygame
import pygame
import time

pygame.init()  # 初始化pygame

size = width, height = 480, 700  # 设置窗口大小
screen = pygame.display.set_mode(size)  # 显示窗口
pygame.display.set_caption("猪了个猪")
color = (0, 0, 0)  # 设置颜色

pig = pygame.image.load('1158.png')  # 加载图片
beijing121 = pygame.image.load("gr/147.png")##加载背景图片
beijing131 = pygame.image.load("gr/189.png")##加载背景图片
beijing141 = pygame.image.load("gr/199.png")##加载背景图片
beijing151 = pygame.image.load("gr/200.png")##加载背景图片


pigrect = pig.get_rect()  # 获取矩形区域
pigrect1 = beijing121.get_rect()  # 获取矩形区域

speed = [1, 1]  # 设置移动的X轴、Y轴
speed1 = [80, 80]
speed2 = [160, 160]
speed3 = [200, 120]
speed4 = [120, 260]  # 设置移动的X轴、Y轴

clock = pygame.time.Clock()  # 设置时钟


def Map():
    screen.fill((255,255,255))##填充颜色
    screen.blit(background,(0,0))##写入到背景

while True:  # 死循环确保窗口一直显示
    clock.tick(10)  # 每秒执行10次
    for event in pygame.event.get():  # 遍历所有事件
        if event.type == pygame.QUIT:  # 如果单击关闭窗口,则退出
            sys.exit()

    background = pygame.image.load("beijing1.png")##加载背景图片

    Map()

    pigrect = pigrect.move(speed)  # 移动小猪
    pigrect1 = pigrect.move(speed1)  # 移动小猪
    pigrect2 = pigrect.move(speed2)
    pigrect3 = pigrect.move(speed3)
    pigrect4 = pigrect.move(speed4)

    # 碰到左右边缘
    if pigrect.left < 0 or pigrect.right > width:
        speed[0] = -speed[0]
    # 碰到上下边缘
    if pigrectt.top < 0 or pigrect.bottom > height:
        speed[1] = -speed[1]


    if pigrect1.left < 0 or pigrect1.right > width:
        speed[0] = -speed[0]
    # 碰到上下边缘
    if pigrect1.top < 0 or pigrect1.bottom > height:
        speed[1] = -speed[1]


    if pigrect2.left < 0 or pigrect2.right > width:
        speed[0] = -speed[0]
    # 碰到上下边缘
    if pigrect2.top < 0 or pigrect2.bottom > height:
        speed[1] = -speed[1]


    if pigrect3.left < 0 or pigrect3.right > width:
        speed[0] = -speed[0]
    # 碰到上下边缘
    if pigrect3.top < 0 or pigrect3.bottom > height:
        speed[1] = -speed[1]


    if pigrect4.left < 0 or pigrect4.right > width:
        speed[0] = -speed[0]
    # 碰到上下边缘
    if pigrect4.top < 0 or pigrect4.bottom > height:
        speed[1] = -speed[1]


    screen.blit(ball, ballrect)  # 将图片画到窗口上
    screen.blit(beijing121, ballrect1)  # 将图片画到窗口上
    screen.blit(beijing131, ballrect2)  # 将图片画到窗口上
    screen.blit(beijing141, ballrect3)  # 将图片画到窗口上
    screen.blit(beijing151, ballrect4)  # 将图片画到窗口上


    pygame.display.flip()  # 更新全部显示

pygame.quit()  # 退出pygame
最后输出:
最后可以根据自己想做的东西,慢慢尝试去实现啦。
@Neng