第七章:播放页布局-歌曲进度控制-歌词的展示
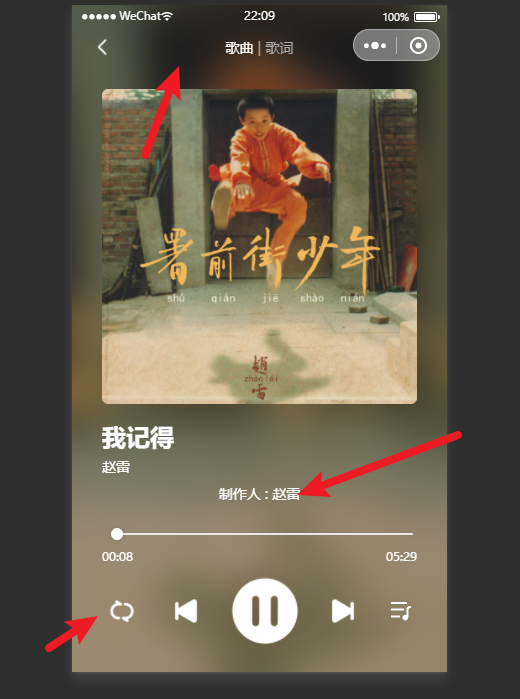
01_(了解)之前页面的回顾和播放页的介绍
功能介绍
02_(掌握)播放页-点击Item跳转到播放页和传入ID
功能概览
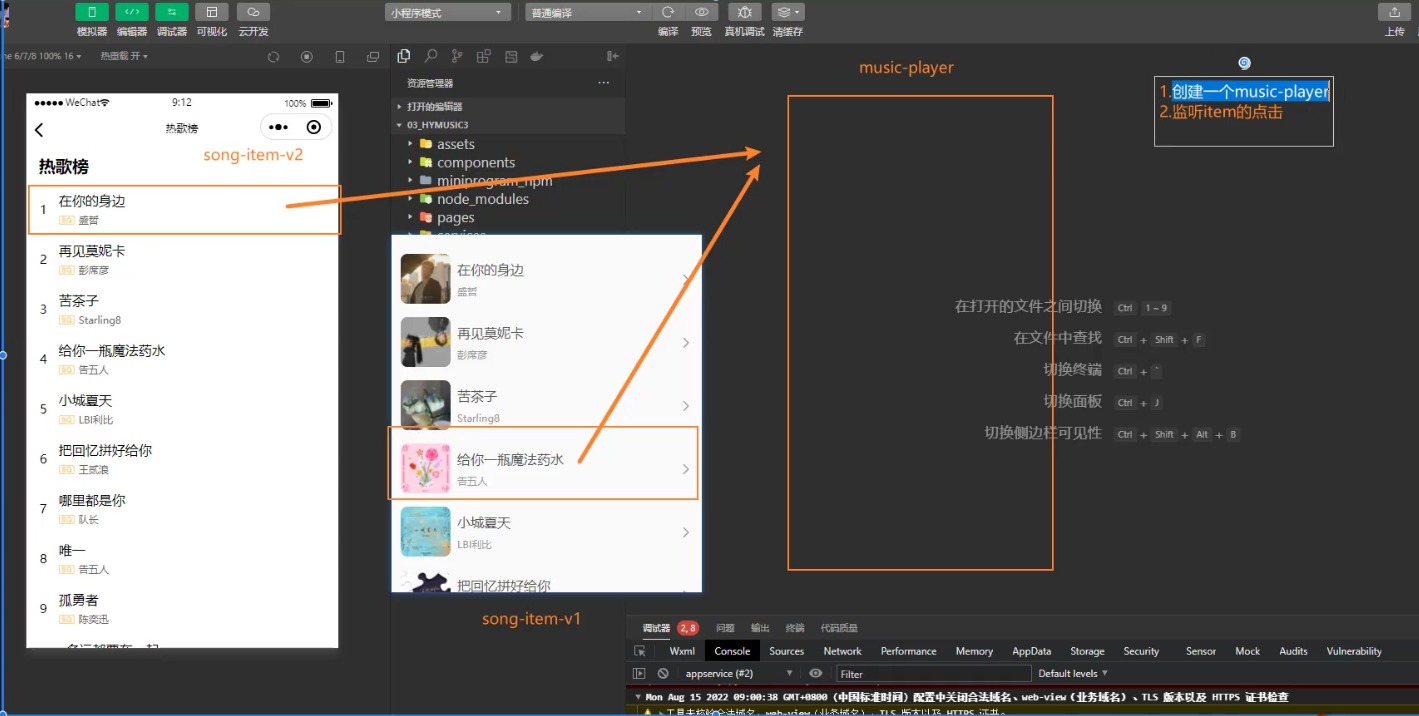
1.创建页面music-player
2.监听item的点击
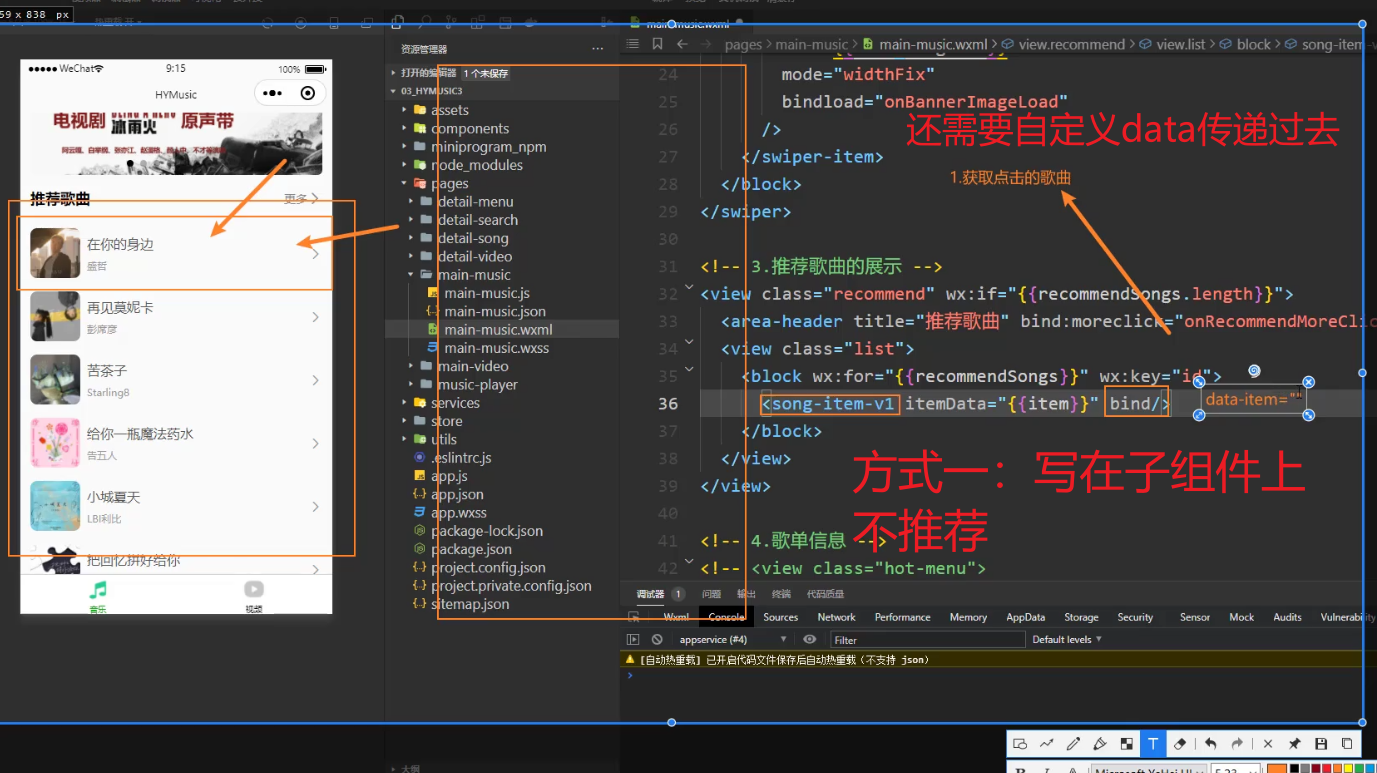
方式一:直接写在子组件上
绑定监听点击 需要获取点击的歌曲 和 歌曲播放的列表数据
为了获取item 我们需要自定义data-item=“” ,将数据传递过去
方式二:在封装的组件上的更元素上绑定
本身properties上有itemData,不需要传递数据
v1
<view class="song-item" bindtap="onSongItemTap">

// components/song-item-v1/song-item-v1.js
Component({


  properties: {


    itemData: {


      type: Object,
      value: {

    }
    }
  },
  methods: {


    onSongItemTap() {


      const id = this.properties.itemData.id
      wx.navigateTo({


        url: `/pages/music-player/music-player?id=${

      id}`,
      })
    }
  }
})
v2
<!--components/song-item-v2/song-item-v2.wxml-->
<view class="item" bindtap="onSongItemTap">

// components/song-item-v2/song-item-v2.js
Component({


  properties: {


    itemData: {


      type: Object,
      value: {

    }
    },
    index: {


      type: Number,
      value: -1
    }
  },
  methods: {


    onSongItemTap() {


      const id = this.properties.itemData.id
      wx.navigateTo({


        url: `/pages/music-player/music-player?id=${

      id}`,
      })
    }
  }
})
3.获取id
<text>{

    {

    id}}</text>

Page({


  data:{


    id:0
  },
  onLoad(options){


    // option 就是传递过来的数据
    console.log(options);
    const id = options.id
    this.setData({

    id})
  }
})
03_(掌握)播放页-获取歌曲详情和歌词信息
通过id可以获取我们更加具体的数据,获取数据展示到页面中
0.封装播放相关的接口 services文件夹下player.js
import {

     hyRequest } from "./index"

export function getSongDetail(ids) {


  return hyRequest.get({


    url: "/song/detail",
    data: {


      ids
    }
  })
}

export function getSongLyric(id) {


  return hyRequest.get({


    url: "/lyric",
    data: {


      id
    }
  })
}
1.调用接口请求数据获取歌曲详情和歌词信息,通过data保存数据
import {

     getSongDetail, getSongLyric } from "../../services/player";


Page({


  data:{


    id:0,
    currentSong:{

    },
    lrcString:""
  },
  onLoad(options){


    // 1.获取传入的id值
    // option 就是传递过来的数据
    console.log(options);
    const id = options.id
    this.setData({

    id})
    // 2.根据id获取歌曲的详情
    getSongDetail(id).then(res =>{


      this.setData({

    currentSong :res.songs[0]})
    })

    // 3.根据id获取歌词的信息
    getSongLyric(id).then(res =>{


      this.setData({

    lrcString:res.lrc.lyric})
    })
  }
})
2.展示数据
<!--pages/music-player/music-player.wxml-->
<view>{

    {

    currentSong.name}}</view>
<image src="{

    {currentSong.al.picUrl}}"></image>
04_(掌握)播放页-背景图片和背景毛玻璃效果
播放页功能实现
1.将默认导航变成自定义导航
在对应页面的json文件中配置 自定义导航
"navigationStyle": "custom",
2.背景图片和背景毛玻璃效果
2.1结构与样式
<image class="bg-image"  src="{

    {currentSong.al.picUrl}}" mode="aspectFill"></image>
<view class="bg-cover"></view>

/* pages/music-player/music-player.wxss */
.bg-image, .bg-cover {


  position: fixed;
  left: 0;
  top: 0;
  width: 100%;
  height: 100%;
  z-index: -1;
}
.bg-cover {


  background-color: rgba(0, 0, 0, 0.2);
  backdrop-filter:blur(10px) ;
}
05_(掌握)播放页-自定义状态栏和导航栏的流程
1.实现自定义导航栏
一旦自定义导航的时候,导航栏会消失,状态栏也会消失不见(statuBar)都会消失,不在占据位置,我们的内容也都会上移,
但是我们状态栏我们并不希望展示东西,状态栏我们展示电池量时间等,
使用我们会在自定义导航的位置,中添加一个view,给他设置一个动态高度用来动态响应不同的手机
0.动态获取高度
在app,.js中获取设备信息中的状态栏高度
// app.js
App({


  globalData: {


    screenWidth: 375,
    screenHeight: 667,
   //导航栏高度
    statusHeight: 20,
    contentHeight: 500
  },
  onLaunch() {


    // 1.获取设备的信息
    wx.getSystemInfo({


      success: (res) => {


        this.globalData.screenWidth = res.screenWidth
        this.globalData.screenHeight = res.screenHeight
       //   获取导航栏高度
        this.globalData.statusHeight = res.statusBarHeight
        this.globalData.contentHeight = res.screenHeight - res.statusBarHeight - 44
      },
    })
  }
})
在js通过getApp()拿到app.js 来获取高度
const app = getApp()

data:{


    statusHeight:20
}
 // 0.获取设备信息
onLoad(){


     this.setData({


      statusHeight: app.globalData.statusHeight,
    })
}

<view class="status" style="height: {

    {statusHeight}}px;"></view>
1.展示结构
<!-- 2.自定义导航栏 -->
<view class="nav-bar">
  <view class="status" style="height: {

    {statusHeight}}px;"> </view>
  <view class="nav">
    <view class="left">返回</view>
    <view class="center">歌曲播放</view>
    <view class="right"></view>
  </view>
</view>
2.调整样式
/* 自定义导航 */
.nav {


  display: flex;
  height: 44px;
  color: #fff;
}

.left, .right, .center {


  display: flex;
  justify-content: center;
  align-items: center;
}

.nav .left, .nav .right {


  width: 120rpx;
}

.nav .center {


  flex: 1;
}
06_(掌握)播放页-自定义导航栏的封装和插槽
1.自定义导航栏初始的封装
0.封装成组件nav-bar 初始迁移–新建页面
// components/nav-bar/nav-bar.js
const app = getApp()

Component({


  data:{


    statusHeight:20
  },
  lifetimes: {


    attached() {


      this.setData({

     statusHeight: app.globalData.statusHeight })
    }
  },
})

<!--components/nav-bar/nav-bar.wxml-->
<view class="nav-bar">
  <view class="status" style="height: {

    {statusHeight}}px;"> </view>
  <view class="nav">
    <view class="left">返回</view>
    <view class="center">歌曲播放</view>
    <view class="right"></view>
  </view>
</view>

/* 自定义导航 */
.nav {


  display: flex;
  height: 44px;
  color: #fff;
}

.left, .right, .center {


  display: flex;
  justify-content: center;
  align-items: center;
}

.nav .left, .nav .right {


  width: 120rpx;
}

.nav .center {


  flex: 1;
}
1.使用的页面进行注册
 "usingComponents": {


    "nav-bar":"/components/nav-bar/nav-bar"
  }
2.使用组件
<!-- 2.自定义导航栏 -->
<nav-bar></nav-bar>
1.通过插槽自定义导航栏内容
1.定义插槽 通过调整样式来显示和隐藏插槽
// components/nav-bar/nav-bar.js
const app = getApp()

Component({


  options: {


    multipleSlots: true
  },
  properties: {


    title: {


      type: String,
      value: "导航标题"
    }
  },
  data: {


    statusHeight: 20
  },
  lifetimes: {


    attached() {


      this.setData({

     statusHeight: app.globalData.statusHeight })
    }
  },
  methods: {


    onLeftClick() {


      this.triggerEvent("leftclick")
    }
  }
})


<!--components/nav-bar/nav-bar.wxml-->
<view class="nav-bar">
  <view class="status" style="height: {

    {statusHeight}}px;"></view>
  <view class="nav">
    <view class="left" bindtap="onLeftClick">
      <view class="slot">
        <slot name="left"></slot>
      </view>
      <view class="default">
        <image class="icon" src="/assets/images/icons/arrow-left.png"></image>
      </view>
    </view>
    <view class="center">
      <view class="slot">
        <slot name="center"></slot>
      </view>
      <view class="default">
        {

    {

    title}}
      </view>
    </view>
    <view class="right"></view>
  </view>
</view>

/* components/nav-bar/nav-bar.wxss */
/* 自定义导航 */
.nav {


  display: flex;
  height: 44px;
  color: #fff;
}

.left, .right, .center {


  display: flex;
  justify-content: center;
  align-items: center;
}

.nav .left, .nav .right {


  width: 120rpx;
}

.nav .center {


  flex: 1;
}

.left .icon {


  width: 40rpx;
  height: 40rpx;
}
/* 控制内容显示 */
.default {


  display: none;
}

.slot:empty + .default {


  display: flex;
}
2.使用插槽
<!-- 2.自定义导航栏 -->
//如果有插槽使用插槽里面的,没有则使用父组件传递的数据,如果没有则使用默认值
<nav-bar title="111" >
<text slot="center">呵呵呵</text>
</nav-bar>
07_(掌握)播放页-歌曲和歌词的页面-导航切换
歌曲和歌词的页面-导航切换–可以当做轮播图用来切换
1.使用swiper来实现切换
注意点1.bindchange=“onSwiperChange” 当轮播图发送变化的时候,会调用本函数
注意点2.轮播图的高度是内容包裹的高度,但是我们需要的占据剩下的使用页面高度,所以我们需要响应的改变轮播图的高度
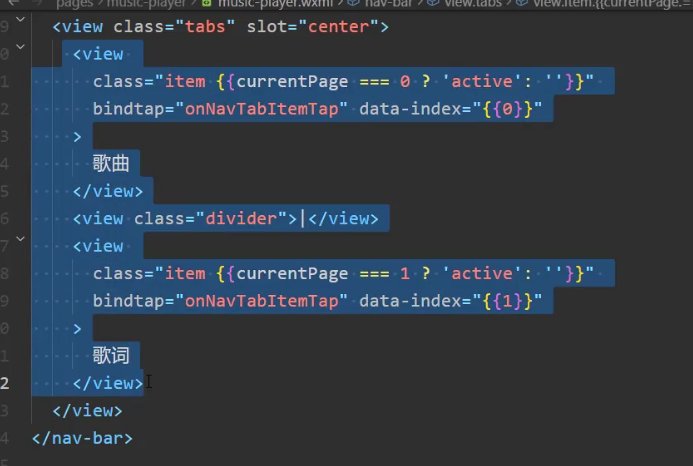
<!-- 2.自定义导航栏 -->
<nav-bar>
  <view class="tabs" slot="center">
    <view class="item {

    {currentPage === 0 ? 'active': ''}}">歌曲</view>
    <view class="divider">|</view>
    <view class="item {

    {currentPage === 1 ? 'active': ''}}">歌词</view>
  </view>
</nav-bar>

<!-- 具体内容 -->
<swiper bindchange="onSwiperChange" style="height: {

    {contentHeight}}px;" >
  <swiper-item>课词</swiper-item>
  <swiper-item>课曲</swiper-item>
</swiper>


Page({


  data:{


    currentPage:0,
    contentHeight: 500,
  },
  onLoad(options){


    // 0.获取设备信息
    this.setData({


      statusHeight: app.globalData.statusHeight,
      contentHeight: app.globalData.contentHeight
    })
  },

    // ==================== 事件监听 ====================
    onSwiperChange(event) {


      this.setData({

     currentPage: event.detail.current })
    },
})
2.需要获取需要滚动的动态区域在app.json
// app.js
App({


  globalData: {


    screenWidth: 375,
    screenHeight: 667,
    statusHeight: 20,
    contentHeight: 500
  },
  onLaunch() {


    // 1.获取设备的信息
    wx.getSystemInfo({


      success: (res) => {


        this.globalData.screenWidth = res.screenWidth
        this.globalData.screenHeight = res.screenHeight
        this.globalData.statusHeight = res.statusBarHeight
        this.globalData.contentHeight = res.screenHeight - res.statusBarHeight - 44
      },
    })
  }
})
08_(掌握)播放页-歌曲分页整体的布局
1.大致结构布局
 <swiper-item class="music">
    <!-- 封面区 -->
    <view class="album">
      <image class="image" src="{

    {currentSong.al.picUrl}}" mode="widthFix"></image>
    </view>
    <!-- 歌曲信息 -->
    <view class="info">
      <view class="name">{

    {

    currentSong.name}}</view>
      <view class="singer">{

    {

    currentSong.ar[0].name}}</view>
    </view>
    <!-- 课词  -->
    <view class="lyric">
      {

    {

    currentLyricText}}
    </view>
    <!-- 时长 -->
    <view class="progress">
      <slider
        class="slider"
        block-size="12"
        value="{

    {sliderValue}}"
        bindchange="onSliderChange"
        bindchanging="onSliderChanging"
      />
      <view class="time">
        <view class="current">{

    {

    fmt.formatTime(currentTime)}}</view>
        <view class="duration">{

    {

    fmt.formatTime(durationTime)}}</view>
      </view>
    </view>
    <!-- 控制台 -->
    <view class="controls">
      <image
        class="btn mode"
        src="/assets/images/player/play_{

    {playModeName}}.png"
        bindtap="onModeBtnTap"
      />
      <image
        class="btn prev"
        src="/assets/images/player/play_prev.png"
        bindtap="onPrevBtnTap"
      />
      <image
        class="btn play"
        src="/assets/images/player/play_{

    { isPlaying ? 'pause': 'resume' }}.png"
        bindtap="onPlayOrPauseTap"
      />
      <image
        class="btn next"
        src="/assets/images/player/play_next.png"
        bindtap="onNextBtnTap"
      />
      <image class="btn list" src="/assets/images/player/play_music.png"/>
    </view>
  </swiper-item>
09_(掌握)播放页-导航标题的点击和切换
导航标题的点击和切换
注意点:轮播图里面的current属性可以显示当前展示的页面
1.需要监听点击事件,设置data数组变量,通过for循环抽出去进行遍历显示
<!-- 2.自定义导航栏 -->
<nav-bar bind:leftclick="onNavBackTap">
  <view class="tabs" slot="center">
    <block wx:for="{

    {pageTitles}}" wx:key="*this">
      <view
        class="item {

    {currentPage === index ? 'active': ''}}"
        bindtap="onNavTabItemTap" data-index="{

    {index}}"
      >
        {

    {

    item}}
      </view>
      <view class="divider" wx:if="{

    {index !== pageTitles.length - 1}}">|</view>
    </block>
  </view>
</nav-bar>

data:{


    pageTitles: ["歌曲", "歌词"],
}

  onNavTabItemTap(event) {


    const index = event.currentTarget.dataset.index
    this.setData({

     currentPage: index })
  },
2.在轮播图中通过current属性动态显示当前展示的页面
<swiper  current="{

    {currentPage}}">
10_(掌握)播放页-歌曲页面的内容布局
结构
<!-- 具体内容 -->
<swiper bindchange="onSwiperChange" style="height: {

    {contentHeight}}px;" current="{

    {currentPage}}">
  <swiper-item class="music">
    <!-- 封面区 -->
    <view class="album">
      <image class="image" src="{

    {currentSong.al.picUrl}}" mode="widthFix"></image>
    </view>
    <!-- 歌曲信息 -->
    <view class="info">
      <view class="name">{

    {

    currentSong.name}}</view>
      <view class="singer">{

    {

    currentSong.ar[0].name}}</view>
    </view>
    <!-- 课词  -->
    <view class="lyric">
      {

    {

    currentLyricText}}
    </view>
    <!-- 时长 -->
    <view class="progress">
      <slider
        class="slider"
        block-size="12"
      />
      <view class="time">
        <view class="current">01:33</view>
        <view class="duration">05:39</view>
      </view>
    </view>
    <!-- 控制台 -->
    <view class="controls">
      <image
        class="btn mode"
        src="/assets/images/player/play_order.png"
        bindtap="onModeBtnTap"
      />
      <image
        class="btn prev"
        src="/assets/images/player/play_prev.png"
        bindtap="onPrevBtnTap"
      />
      <image
        class="btn play"
        src="/assets/images/player/play_pause.png"
        bindtap="onPlayOrPauseTap"
      />
      <image
        class="btn next"
        src="/assets/images/player/play_next.png"
        bindtap="onNextBtnTap"
      />
      <image class="btn list" src="/assets/images/player/play_music.png"/>
    </view>
  </swiper-item>
  <swiper-item>课曲</swiper-item>
</swiper>
样式
/* 歌曲布局 */
.music {


  display: flex;
  flex-direction: column;
  box-sizing: border-box;
  padding: 40rpx 60rpx;
  font-size: 28rpx;
  color: #fff;
}

.music .album {


  flex: 1;
}

.music .album .image {


  width: 100%;
  border-radius: 12rpx;
}

.music .info .name {


  font-size: 48rpx;
  font-weight: 700;
}

.music .info .singer {


  margin-top: 10rpx;
}

.music .lyric {


  text-align: center;
  margin: 16rpx 0;

  overflow: hidden;
  text-overflow: ellipsis;
  white-space: nowrap;
}

.music .progress {


  margin: 12rpx 0;
}

.music .progress .slider {


  margin: 16rpx 8rpx 10rpx 18rpx;
}

.music .progress .time {


  display: flex;
  justify-content: space-between;
  font-size: 24rpx;
}

.music .controls {


  display: flex;
  justify-content: space-between;
  align-items: center;
  margin: 12rpx 0;
}

.music .controls .btn {


  width: 60rpx;
  height: 60rpx;
}

.music .controls .btn.mode {


  width: 80rpx;
  height: 80rpx;
}

.music .controls .btn.play {


  width: 140rpx;
  height: 140rpx;
}
第七章:下午
11_(掌握)播放页-创建播放器和播放泡沫歌曲
1.创建一个播放器 ,开启播放
//创建一个播放器的上下文wx.createInnerAudioContext() 我们这个不用放到onLoad中,提前创建,只用创建一次就好,我们先放到最外层,最后我们一个独立的文件,进行维护
const audioContext = wx.createInnerAudioContext()

onLoad(){
    audioContext.src = `https://music.163.com/song/media/outer/url?id=${id}.mp3`
	//audioContext.src = `(播放地址)`
	audioContext.autoplay = true
}
12_(掌握)播放页-监听歌曲播放的时间和展示
监听歌曲播放的时间 onTimeUpdate
music-player.js
data:{


    //当前歌曲播放的时间
	currentTime: 0,
    //当前歌曲播放的总时间
	durationTime: 0,
    //当前歌曲滑块进度
    sliderValue: 0,
}

onLoad(){


// 2.1根据id获取歌曲的详情和------歌曲总时长(只用获取一次就好)
    getSongDetail(id).then(res =>{


      this.setData({


          currentSong :res.songs[0],
          durationTime:res.songs[0].dt

       })
    })


 // 4.监听播放的进度
    audioContext.onTimeUpdate(() => {


         // 1.获取当前播放的时间
        this.setData({

    currentTime:audioContext.currentTime * 1000})
         //2修改滑块 sliderValue
        const sliderValue = this.data.currentTime / this.data.durationTime *100
        this.setData({

    silderValue})
     })
}
结构
<wxs src="/utils/format.wxs" module="fmt"></wxs>
  <!-- 时长 -->
    <view class="progress">
      <slider
        class="slider"
        block-size="12"
        value="{

    {sliderValue}}"
      />
      <view class="time">
        <view class="current">{

    {

    fmt.formatTime(currentTime)}}</view>
        <view class="duration">{

    {

    fmt.formatTime(durationTime)}}</view>
      </view>
    </view>
13_(掌握)播放页-点击滑块改变歌曲播放的进度
各种事件可以通过查文档
点击滑块改变歌曲播放的进度
完成一次拖动后触发的事件事件:点击滑块事件 bindchange
注意点:当我们点击滑块事件bindchange 歌曲会进入等待,不在监听播放进度(系统bug),所以我们需要手动跳整,让他进行继续监听
onLoad(){


  audioContext.onWaiting(() => {


  	 audioContext.pause()
})
   audioContext.onCanplay(() => {


  	 audioContext.play()
})
}
nSliderChange事件
  // onSliderChange事件
  onSliderChange(event) {


    // 1.获取点击滑块位置对应的值
    const value = event.detail.value

    // 2.计算出要播放的位置时间
    const currentTime = value / 100 * this.data.durationTime

    // 3.设置播放器,播放计算的时间
    audioContext.seek(currentTime / 1000)
    this.setData({


      currentTime
    })
  }

 <!-- 时长 -->
    <view class="progress">
      <slider class="slider" block-size="12" value="{

    {sliderValue}}" bindchange="onSliderChange" bindchanging="onSliderChanging" />
      <view class="time">
        <view class="current">{

    {

    fmt.formatTime(currentTime)}}</view>
        <view class="duration">{

    {

    fmt.formatTime(durationTime)}}</view>
      </view>
    </view>
14_(掌握)播放页-滑动滑块改变歌曲播放进度
拖动过程中触发的事件 动滑块改变歌曲播放进度事件 bindchanging
 // onSliderChangeing事件,滑动滑块松下的时候调用
  onSliderChangeing(event){


    //1.获取滑块到的位置的valuer
    const value = event.detail.value
    //2.根据当前的值,计算出对应的事件
    const currentTime = value / 100 * this.data.durationTime
    this.setData({

    currentTime})
    //3.变量记录滑块当前正在滑动
    this.data.isSliderChanging =true
  }
滑块改变歌曲播放进度事件可能会导致滑块反复横跳,因为手指滑动改变滑块,但是歌曲也在正常播放改变滑块,所以会导致反复横跳
但是在我们滑动的过程当中,我们不希望我们歌曲改变滑块sliderValue,也不希望改变当前时间currentTime
我们可以通过一个变量isSliderChanging用来记录是否滑动滑块,什么时候需要设置时间,什么时候不需要设置时间
如果正在滑动,就不在改变sliderValue,currentTime
通过 bindchanging 和 bindchange 用来判断变量是否播放
data:{


    isSliderChanging:false
}
当滑块当前正在滑动 设置为true
 // onSliderChangeing事件,滑动滑块松下的时候调用
  onSliderChangeing(event){


    //1.获取滑块到的位置的valuer
    const value = event.detail.value
    //2.根据当前的值,计算出对应的事件
    const currentTime = value / 100 * this.data.durationTime
    this.setData({

    currentTime})
    //3.变量记录滑块当前正在滑动
 1.   this.data.isSliderChanging =true
  }
当滑块没有滑动滑动 设置为false监听播放的进度
  // onSliderChange事件
  onSliderChange(event) {


    // 1.获取点击滑块位置对应的值
    const value = event.detail.value
    // 2.计算出要播放的位置时间
    const currentTime = value / 100 * this.data.durationTime
    // 3.设置播放器,播放计算的时间
    audioContext.seek(currentTime / 1000)
1    this.setData({


      currentTime,isSliderChanging:false
    })
  },

     // 4.监听播放的进度
    audioContext.onTimeUpdate(() => {


       // if里面的变量为true的时候才执行
 1     if(!this.data.isSliderChanging){


        // 1.获取当前播放的时间
      this.setData({


        currentTime: audioContext.currentTime * 1000
      })
      //2修改滑块 sliderValue
      const sliderValue = this.data.currentTime / this.data.durationTime * 100
      this.setData({


        sliderValue
      })
      }
    })

<slider class="slider" block-size="12" value="{

    {sliderValue}}" bindchange="onSliderChange" bindchanging="onSliderChangeing" />
15_(理解)播放页-点击滑块跳动的bug问题处理
点击滑块跳动的bug会出现跳跃
点击之后应该保留的是当前时间,而不是之前的时间,小程序的内部bug
方式一:
在onSliderChange中强制设置sliderValue:value
 onSliderChange(event) {


    // 1.获取点击滑块位置对应的值
    const value = event.detail.value
    // 2.计算出要播放的位置时间
    const currentTime = value / 100 * this.data.durationTime
    // 3.设置播放器,播放计算的时间
    audioContext.seek(currentTime / 1000)
    this.setData({


      currentTime,isSliderChanging:false,sliderValue:value
    })
  },
方式二:通过节流不让更新的很频繁
1.导入节流函数
import {

     throttle } from 'underscore'

// 4.监听播放的进度
    const throttleUpdateProgress = throttle(this.updateProgress,800,{

    leading:false})
    audioContext.onTimeUpdate(() => {


      // if里面的变量为true的时候才执行
      if(!this.data.isSliderChanging){


        throttleUpdateProgress()
      }
    })

  updateProgress(){


    // 1.获取当前播放的时间
    this.setData({


      currentTime: audioContext.currentTime * 1000
    })
    //2修改滑块 sliderValue
    const sliderValue = this.data.currentTime / this.data.durationTime * 100
    this.setData({


      sliderValue
    })
  },
方式三:定时器
2.通过变量 isWaiting 定时器来改变isWaiting 的值
data:{


   isWaiting:false
}
 if(!this.data.isSliderChanging && !this.data.isWaiting){


        throttleUpdateProgress()
}
  // onSliderChange事件
  onSliderChange(event) {


    this.data.isWaiting = true
    setTimeout(()=>{


      this.data.isWaiting = false
    },1500)
    // 1.获取点击滑块位置对应的值
    const value = event.detail.value
    // 2.计算出要播放的位置时间
    const currentTime = value / 100 * this.data.durationTime
    // 3.设置播放器,播放计算的时间
    audioContext.seek(currentTime / 1000)
    this.setData({


      currentTime,isSliderChanging:false,sliderValue:value
    })
  },
16_(掌握)播放页-暂停-播放按钮的点击和控制
播放按钮的点击 监听点击事件 bindtap=“onPlayOrPauseTap”
通过变量记录isPlaying
在结构中定义图片动态切换
data:{


    isPlaying:true
}

onPlayOrPauseTap(){


    console.log(111);
    if(!audioContext.paused){


      audioContext.pause()
      this.setData({

    isPlaying:false})
    }else{


      audioContext.play()
      this.setData({

    isPlaying:true})
    }
  }


 <image class="btn play"
        src="/assets/images/player/play_{

    { isPlaying ? 'pause': 'resume' }}.png"
        bindtap="onPlayOrPauseTap"/>
17_(掌握)播放页-歌词的获取和解析过程
歌词的获取
[外链图片转存失败,源站可能有防盗链机制,建议将图片保存下来直接上传(img-zcLhgPgB-1675305572113)(null)]
import {

     parseLyric } from "../utils/parse-lyric"

data:{


     lyricInfos: [],
}
onLoad(options) {


    // 2.2根据id获取歌词的信息
    getSongLyric(id).then(res => {


      const lrcString =res.lrc.lyric
      const lyricInfos = parseLyric(lrcString)
       this.setData({

    lyricInfos})
    })
}
封装歌词解析的工具 parse-lyric.js
// [01:18.86]基于你还爱我
const timeReg = /\[(\d{2}):(\d{2})\.(\d{2,3})\]/

export function parseLyric(lrcString) {


  const lyricInfos = []

  const lyricLines = lrcString.split("\n")
  for (const lineString of lyricLines) {


    const results = timeReg.exec(lineString)
    // console.log(results,1111,lineString);
    if (!results) continue
    const minute = results[1] * 60 * 1000
    const second = results[2] * 1000
    const mSecond = results[3].length === 2 ? results[3] * 10: results[3] * 1
    const time = minute + second + mSecond
    const text = lineString.replace(timeReg, "")
    lyricInfos.push({

     time, text })
  }
  return lyricInfos
}
18_(掌握)播放页-歌词的精准匹配和记录展示
根据时间匹配歌词
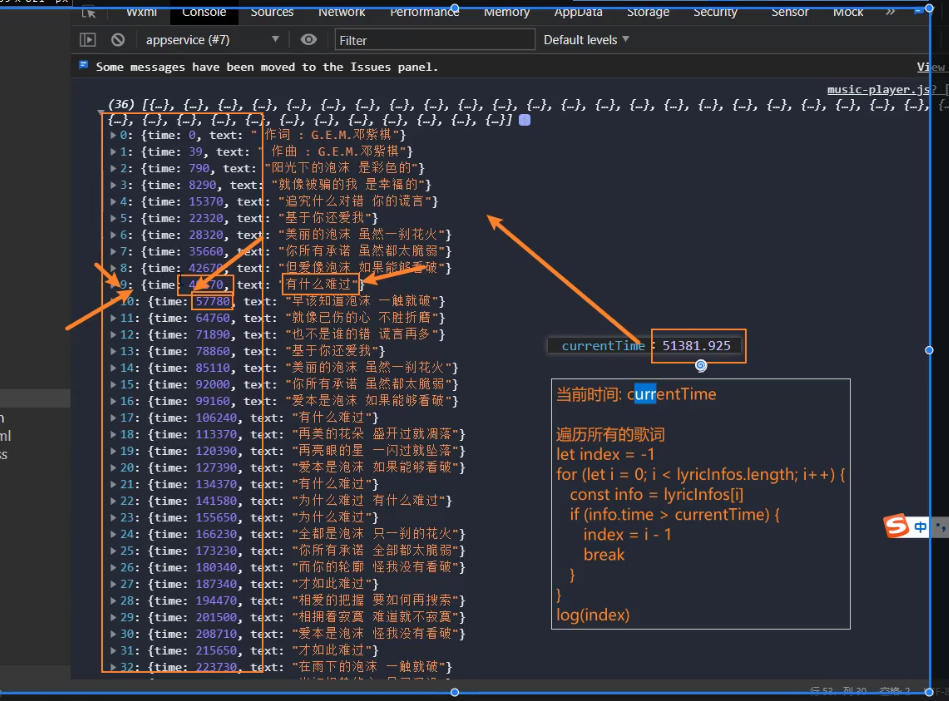
1…匹配正确的歌词 2.展示歌词,放入data,进行展示
    <!-- 课词  -->
<view class="lyric">
   {

    {

    currentLyricText}}
</view>


data: {


	currentLyricText: "",
    currentLyricIndex: -1,

}


// 4.监听播放的进度
    const throttleUpdateProgress = throttle(this.updateProgress,800,{

    leading:false})
    audioContext.onTimeUpdate(() => {


      // 1.更新歌曲的进度
      // if里面的变量为true的时候才执行
      if(!this.data.isSliderChanging && !this.data.isWaiting){


        throttleUpdateProgress()
      }
      // 2.匹配正确的歌词
      if(!this.data.lyricInfos.length) return
      // 初始默认值是最后一句歌词
      let index = this.data.lyricInfos.length -1
      for(let i =0; i<this.data.lyricInfos.length;i++){


        const info = this.data.lyricInfos[i]
        if(info.time > audioContext.currentTime * 1000){


          index = i-1
          break
        }
      }
      console.log(index,this.data.lyricInfos[index].text);
        if(index === this.data.currentLricIndex) return
		const currentLyricText = this.data.lyricInfos[index].text
		this.setData({

    currentLyricText,currentLyricIndex:index})
    })
19_(掌握)播放页-点击跳动bug处理和歌词每个字的匹配
应为trailing的时间节点和刚好点击的时间节点碰到一起,trailing为true会帮我们执行一次,所以出现的bug
trailing为true会帮我们执行一次(默认为true)
	// 4.监听播放的进度
    const throttleUpdateProgress = throttle(this.updateProgress,800,{

    leading:false,trailing:false})
歌词每个字的精确匹配需要后端传过来的数据也是包含每个字的精确字符串时间,所以我们没办法实现
但是我们可以模拟实现 根据播完这个课词的所耗时的时间范围,播完这个歌词完成平均的动画渲染
20_(掌握)播放页-完整的歌词在Item中展示和滚动
结构
  <swiper-item>
    <scroll-view class="lyric-list" scroll-y>
    <block wx:for="{

    {lyricInfos}}" wx:key="time">
      <view class="item">{

    {

    item.text}}</view>
    </block>
    </scroll-view>
  </swiper-item>
样式
/* 歌词的样式 */
.lyric-list {


  color: #aaa;
  font-size: 28rpx;
  text-align: center;
  height: 100%;
  box-sizing: border-box;
  padding: 40rpx;
}

.lyric-list ::-webkit-scrollbar {


  display: none;
}

.lyric-list .item {


  margin: 40rpx;
}

.lyric-list .item.active {


  color: #0f0;
  font-size: 32rpx;
}
21_(理解)内容回顾和作业布置
第七章:内容回顾
一. 播放页布局
1.0. 点击Item跳转
1.1. 背景毛玻璃
- image -> 背景
- view -> blur毛玻璃
1.2. 自定义导航栏(掌握)
1.3. 导航栏标题和页面左右滚动
- Swiper/Swiper-Item 轮播图
- 标题的点击 -> 轮播图的切换
1.4. 歌曲页面的布局
- album
- info
- lyric
- progress
- controls
二. 歌曲进度的控制
2.1. 歌曲播放
- audioContext = wx.createInnerAudioContext()
- src属性
- autoplay
2.2. onTimeUpdate
- 改变当前的时间和sliderValue
2.3. 监听slider的点击
- bindchange
- value
- 计算currentTime
- seek(currentTime)
- setData({currentTime, value})
2.4. 监听slider的滑动
- bindchanging
- value
- currentTime
- isSliderChanging
2.5. seek(time) bug处理
- throttle: 节流控制
- leading: false
- trailing: false
- isWaiting: true
2.6. 播放和暂停功能
三. 歌词的展示
3.1. 请求和解析歌词
- 正则表达式
3.2. time匹配歌词
-
循环所有的歌词, 找到第一个比当前时间大的一句歌词
- i - 1
-
index: length - 1
-
currentLyricText
-
currentLyricIndex
- 性能优化 index === currentLyricIndex return