前言:
欢迎阅读Spring MVC入门必读!在这篇文章中,我们将探索这个令人兴奋的框架,它为您提供了一种高效、灵活且易于维护的方式来构建Web应用程序。通过使用Spring MVC,您将享受到以下好处:简洁的代码、强大的功能和与Spring生态系统的无缝集成。

在本指南中,我们将深入探讨Spring MVC的关键步骤,包括注解的使用、参数传递、返回值处理以及页面跳转。这些技术将帮助您更好地理解Spring MVC的核心概念,并使您能够更轻松地应对实际开发中的挑战。
1.常用注解
1.1.@RequestMapping
@RequestMapping注解是一个用来处理请求地址映射的注解,可用于映射一个请求或一个方法,可以用在类或方法上。
- 标注在方法上
用于方法上,表示在类的父路径下追加方法上注解中的地址将会访问到该方法
@Controller
public class ParamController {


    @RequestMapping("/hello1")
    public String jslx(String bname, Integer bid) {


        log.info("参数类型参数 bname:{},bid:{}", bname, bid);
        return "index";
    }
此时请求映射所映射的请求的请求路径为:
http://localhost:8080/springmvc01/hello1
其中的路径springmvc01表示项目名
- 标注在类和方法上
用于类上,表示类中的所有响应请求的方法都是以该地址作为父路径。
注意:当你在类上添加RequestMapping注解后,如果要请求映射,就意味着请求要先映射到标注类的位置,然后再映射到该类的方法上
@Controller
@RequestMapping("/param")
public class ParamController {


    @RequestMapping("/hello1")
    public String jslx(String bname, Integer bid) {


        log.info("参数类型参数 bname:{},bid:{}", bname, bid);
        return "index";
    }
此时请求映射所映射的请求的请求路径为:
http://localhost:8080/springmvc01/param/hello1
其中的路径springmvc01表示项目名
- 参数列表
| 参数 | 说明 |
|---|---|
| value | @RequestMapping 的 value 属性必须设值; @RequestMapping 的 value 属性是通过当前请求的请求地址来匹配请求; 从源码中可以看到value属性是一个字符串类型的数组,因此说明可以将多个请求映射到一个方法上,只需要给 value 来指定一个包含多个路径的数组。 |
| method | @RequestMapping的method属性是通过当前请求的请求方式来匹配请求; 浏览器向服务器发送请求,请求方式有很多GET、HEAD、POST、PUT、PATCH、DELETE、OPTIONS、TRACE。可以使用 method 属性来约束请求方式。 |
| headers | @RequestMapping的headers属性是通过当前请求的请求头信息来匹配请求; @RequestMapping的headers属性是一个字符串类型的数组,可以通过下面四种表达是来设置匹配关系 例如: “header”:要求请求映射的请求必须为包含 header的请求头信息 “!header”:要求请求映射的请求必须为不包含 header的请求头信息 “header=value”:要求请求映射的请求必须为包含 header的请求头信息,并且header的值必须为value “header!=value”:要求请求映射的请求必须为包含 header的请求头信息,并且header的值必须不是value |
| params | @RequestMapping的params属性是通过当前请求的请求参数来匹配请求; @RequestMapping的params属性是一个字符串类型的数组,可以通过下面四种表达是来设置匹配关系 例如: “param”:要求请求映射的请求必须为包含 param的请求参数 “!param”:要求请求映射的请求是不能包含param的请求参数 “param=value”:要求请求映射的请求必须包含 param 的请求参数,且 param 参数的值必须为 value “param!=value”: 要求请求映射的请求是必须包含 param 的请求参数,其值不能为 value。 |
示例一:@RequestMapping的params属性
@RequestMapping(value = "/test",params = "username")
public String test(){


	return "success";
}
注意:我们设置了params属性,就意味着该请求映射的请求必须包含username才能够请求成功。
示例二:@RequestMapping的headers属性
@RequestMapping(value = "/test",headers = "Host = localhost:8081")
public String test(){


	return "success";
}
注意:如果当前请求不满足headers属性,此时页面就会显示404错误,即资源未找到。
扩展:
@GetMapping:处理get方式请求的映射
@PostMapping:处理post方式请求的映射
@PutMapping:处理put方式请求的映射
@DeleteMapping:处理delete方式请求的映射
@GetMapping就相当于@RequestMapping(method=RequestMethod.GET),它会将get映射到特定的方法上。
1.2.@RequestParam
@RequestParam主要用于将请求参数区域的数据映射到控制层方法的参数上
| 参数 | 说明 |
|---|---|
| value | 请求中传入参数的名称,如果不设置后台接口的value值,则会默认为该变量名。 |
| required | 该参数是否为必传项。默认是true,表示请求中一定要传入对应的参数,否则会报404错误,如果设置为false时,当请求中没有此参数,将会默认为null,而对于基本数据类型的变量,则必须有值,这时会抛出空指针异常。如果允许空值,则接口中变量需要使用包装类来声明。 |
| defaultValue | 参数的默认值,如果请求中没有同名的参数时,该变量默认为此值。注意默认值可以使用SpEL表达式,如"#{systemProperties[‘java.vm.version’]}" |
示例:
    @RequestMapping("/hello3")
    public String requestParam(
            @RequestParam String bname,
            @RequestParam(required = false)  Integer bid) {


        log.info("requestParam类型参数 bname:{},bid:{}", bname, bid);
        return "index";
    }
1.3.@ModelAttribute
@ModelAttribute一个具有如下三个作用:
-
绑定请求参数到命令对象:放在功能处理方法的入参上时,用于将多个请求参数绑定到一个命令对象,从而简化绑定流程,而且自动暴露为模型数据用于视图页面展示时使用;
-
暴露表单引用对象为模型数据:放在处理器的一般方法(非功能处理方法)上时,是为表单准备要展示的表单引用对象,如注册时需要选择的所在城市等,而且在执行功能处理方法(@RequestMapping注解的方法)之前,自动添加到模型对象中,用于视图页面展示时使用;
-
暴露@RequestMapping方法返回值为模型数据:放在功能处理方法的返回值上时,是暴露功能处理方法的返回值为模型数据,用于视图页面展示时使用。
示例一:绑定请求参数到命令对象
如用户登录,我们需要捕获用户登录的请求参数(用户名、密码)并封装为用户对象,此时我们可以使用@ModelAttribute绑定多个请求参数到我们的命令对象。
public String test1(@ModelAttribute("user") UserModel user)
它的作用是将该绑定的命令对象以“user”为名称添加到模型对象中供视图页面展示使用。我们此时可以在视图页面使用${user.username}来获取绑定的命令对象的属性。
示例二:暴露表单引用对象为模型数据
@ModelAttribute
public void init(Model model){


	model.addAttribute("book",new Book());
}
如上代码会在执行功能处理方法之前执行,并将其自动添加到模型对象中。
@RequestMapping("/toBookList")
public String toBookList(){


    System.out.println("toBookList");
    return "book/bookList";
}
示例三:暴露@RequestMapping方法返回值为模型数据
@ModelAttribute注解的返回值会覆盖@RequestMapping注解方法中的@ModelAttribute注解的同名命令对象。
public @ModelAttribute("user2") UserModel test3(@ModelAttribute("user2") UserModel user)
1.4.@SessionAttributes
在默认情况下,当ModelMap中的属性作用域是request级别时,也就是说,当本次请求结束后,ModelMap中的属性将销毁。如果希望在多个请求中共享ModelMap中的属性,必须将其属性转存到session中,这样ModelMap的属性才会被跨请求访问;
spring允许我们有选择地指定ModelMap中的哪些属性需要转存到session中,以便下一个请求属对应的ModelMap的属性列表中还能访问到这些属性。
SpringMVC为我们提供这样一个注解来实现上面的场景:@SessionAttributes:将ModelMap的属性值共享到session中。
注意:@SessionAttributes注解只能使用在类上,用于在多个请求之间传递参数,类似于Session的Attribute,但不完全一样,一般来说@SessionAttributes设置的参数只用于暂时的传递(存入sessionAttributeStore),而不是长期的保存,长期保存的数据还是要放到Session中。
有两种方式将ModelMap中的属性值共享到session中:
- 使用注解的value属性:可以通过属性名指定需要放到会话中的属性;
@Controller
@SessionAttributes("user")	//将ModelMap中key为user的属性共享到session中
public class DemoController {


	@RequestMapping("/hello")
	public String hello(ModelMap model) {


		//向ModelMap中添加key为user和user1的属性
        model.addAttribute("user", new User(520, "U love me"));
        model.addAttribute("user1", new User("I love U"));
        return "result";
    }
}
- 使用注解的types属性:还可以通过模型属性的对象类型指定哪些模型属性需要放到会话中。
@SessionAttributes(types = {

    User.class})
@Controller
public class DemoController{


    @RequestMapping("/hello")
    public String hello(Map<String, Object> map){


        map.put("user1", new User(520, "U love me"));
        return "hello";
    }
}
1.5.@RequestBody
@RequestBody主要用来接收前端传递给后端的json字符串中的数据的(即请求体中的数据的);
GET方式无请求体,所以使用@RequestBody接收数据时,前端不能使用GET方式提交数据,而是用POST方式进行提交。在后端的同一个接收方法里,@RequestBody与@RequestParam()可以同时使用,@RequestBody最多只能有一个,而@RequestParam()可以有多个。
简言之:
- 一个请求:只有一个@RequestBody;
- 一个请求:可以有多个@RequestParam。
Content-type:
(1)application/x-www-form-urlencoded:@RequestBody不是必须加的
(2)mutipart/form-data:@RequestBody不能处理这种格式
(3)其他格式,比如application/json,application/xml等,必须使用@RequestBody来处理
   @RequestMapping("/hello6")
    public String RequestBody2(@RequestBody Map map) {


        log.info("RequestBody map:{}",map);
        return "index";
    }
@RequestBody注解对应的类在将HTTP的输入流(含请求体)装配到目标类(即:@RequestBody后面的类)时,会根据json字符串中的key来匹配对应实体类的属性,如果匹配一致且json中的该key对应的值符合(或可转换为)实体类的对应属性的类型要求时,会调用实体类的setter方法将值赋给该属性。
1.6.@RequestHeader
使用 @RequestHeader 注解可以获取指定的请求头信息。如果想要获取所有的请求头信息,可以使用 Map<String,String>、MultiValueMap<String,String>、HttpHeaders 这三个 Map 中的任何一个封装所有请求头的 name 和 value。
参数列表
| 参数 | 说明 |
|---|---|
| name | name 和 value 互为别名,当只有一个参数时,可以省略 value,直接(“xxx”) 就可以了 |
| value | name 和 value 互为别名,当只有一个参数时,可以省略 value,直接(“xxx”) 就可以了 |
| required | 默认情况下,如果请求头中缺少了指定的 name,那么将会报错。 如果没有添加required = false,当请求头中没有这个zking请求头时就会报错。 |
| defaultValue | 如果请求头中缺少了指定的 name ,那么会报错,可以使用 defaultValue 这个属性指定默认值,就可以避免报错 ;如果请求头缺少指定 name ,该属性设置的值将会作为默认值,如果该属性不设置值,它有自己的默认值 DEFAULT_NONE |
示例:
@GetMapping("/headParams")
public Map userInfo(
    @RequestHeader(value = "zking",defaultValue = "hello zking") String username,
    // 将请求头中 name=Accept-Encoding 赋值给形参 encoding
    @RequestHeader("Accept-Encoding") String encoding,
    // 将请求头中 name=Host 赋值给形参 host
    @RequestHeader("Host") String host,
    // 将所有请求头的 name 和 value 封装到 Map 集合 headsMap 中
    @RequestHeader Map<String,String> headsMap) {


        Map map = new HashMap<String, Object>();
        map.put("username",username);
        map.put("Accept-Encoding",encoding);
        map.put("Host",host);
        map.put("headsMap",headsMap);

        return map;
}
由于请求头中不存在 name=zking 这个信息,所以如果只用 value=zking 会抛出异常。
解决方案:
1、required 的默认值为 true ,也就是请求头中没有 name=zking 会报错,将其值改为 false,即没有该头信息也不报错
@RequestHeader(value = "zking",required = "false") String username
2、不修改 required=true 这个默认值,当头信息中不包含 name=zking ,给它一个默认值 hello zking
@RequestHeader(value = "zking",defaultValue = "hello zking") String username
1.7.@PathVariable
该注解请求URI中的模板变量部分到处理器功能处理方法的方法参数上的绑定。
即当使用@RequestMapping URI template 样式映射时, 即 someUrl/{paramId}, 这时的paramId可通过 @Pathvariable注解绑定它传过来的值到方法的参数上。
//@PathVariable可以用来映射URL中的占位符到目标方法的参数中
    @RequestMapping("/hello4/{bid}")
    public String rjcc(@PathVariable("bid")Integer bid) {


        log.info("PathVariable bid:{}",bid);
        return "index";
    }
Rest
即 Representational State Transfer。(资源)表现层状态转化。是目前最流行的一种互联网软件架构。它结构清晰、符合标准、易于理解、扩展方便,所以正得到越来越多网站的采用。
- 资源(Resources):网络上的一个实体,或者说是网络上的一个具体信息。它可以是一段文本、一张图片、一首歌曲、一种服务,总之就是一个具体的存在。可以用一个URI(统一资源定位符)指向它,每种资源对应一个特定的 URI 。要获取这个资源,访问它的URI就可以,因此 URI 即为每一个资源的独一无二的识别符。
- 表现层(Representation):把资源具体呈现出来的形式,叫做它的表现层(Representation)。比如,文本可以用 txt 格式表现,也可以用 HTML 格式、XML 格式、JSON 格式表现,甚至可以采用二进制格式。
- 状态转化(State Transfer):每发出一个请求,就代表了客户端和服务器的一次交互过程。HTTP协议,是一个无状态协议,即所有的状态都保存在服务器端。因此,如果客户端想要操作服务器,必须通过某种手段,让服务器端发生**“状态转化”**(State Transfer)。而这种转化是建立在表现层之上的,所以就是 “表现层状态转化”。具体说,就是 HTTP 协议里面,四个表示操作方式的动词:GET、POST、PUT、DELETE。它们分别对应四种基本操作:GET 用来获取资源,POST 用来新建资源,PUT 用来更新资源,DELETE 用来删除资源。
示例:
- /order/1 HTTP GET    :得到 id = 1 的 order
- /order/1 HTTP DELETE :删除 id = 1 的 order
- /order/1 HTTP PUT    :更新 id = 1 的 order
- /order   HTTP POST   :新增 order
1.8.@CookieValue
@CookieValue注解主要是将请求的Cookie数据,映射到功能处理方法的参数上。
参数列表
| 参数 | 说明 |
|---|---|
| value | 绑定的参数名称,String类型。 |
| required | 是否必须包含value,boolean类型,默认为 true,表示请求参数中必须包含对应的参数;若不存在,将抛出异常。 |
| defaultValue | 默认值,String类型。当没有传参时将使用此值赋值。 |
示例:
@RequestMapping("/testCookieValue")
public Map<String, Object> testCookieValue(
	@CookieValue("JSESSIONID") String cookie) {


    response.put("cookie", cookie);
    return response;
}
2.参数传递
pom.xml
注:导入注意嵌套关系
<log4j2.version>2.9.1</log4j2.version>
<log4j2.disruptor.version>3.2.0</log4j2.disruptor.version>
<slf4j.version>1.7.13</slf4j.version>

<!--4.log日志相关依赖-->

<!-- log4j2日志相关依赖 -->
<!-- log配置:Log4j2 + Slf4j -->
<!-- slf4j核心包-->
<dependency>
	<groupId>org.slf4j</groupId>
	<artifactId>slf4j-api</artifactId>
	<version>${slf4j.version}</version>
</dependency>
<dependency>
	<groupId>org.slf4j</groupId>
	<artifactId>jcl-over-slf4j</artifactId>
	<version>${slf4j.version}</version>
	<scope>runtime</scope>
</dependency>

<!--核心log4j2jar包-->
<dependency>
	<groupId>org.apache.logging.log4j</groupId>
	<artifactId>log4j-api</artifactId>
	<version>${log4j2.version}</version>
</dependency>
<dependency>
	<groupId>org.apache.logging.log4j</groupId>
	<artifactId>log4j-core</artifactId>
	<version>${log4j2.version}</version>
</dependency>
<!--用于与slf4j保持桥接-->
<dependency>
	<groupId>org.apache.logging.log4j</groupId>
	<artifactId>log4j-slf4j-impl</artifactId>
	<version>${log4j2.version}</version>
</dependency>
<!--web工程需要包含log4j-web,非web工程不需要-->
<dependency>
	<groupId>org.apache.logging.log4j</groupId>
	<artifactId>log4j-web</artifactId>
	<version>${log4j2.version}</version>
	<scope>runtime</scope>
</dependency>

<!--需要使用log4j2的AsyncLogger需要包含disruptor-->
<dependency>
	<groupId>com.lmax</groupId>
	<artifactId>disruptor</artifactId>
	<version>${log4j2.disruptor.version}</version>
</dependency>
2.1.基础类型+String
@Slf4j
@Controller
@RequestMapping("/param")
public class ParamController {


    @RequestMapping("/hello1")
    public String jslx(String bname, Integer bid) {


        log.info("参数类型参数 bname:{},bid:{}", bname, bid);
        return "index";
    }
运行结果:
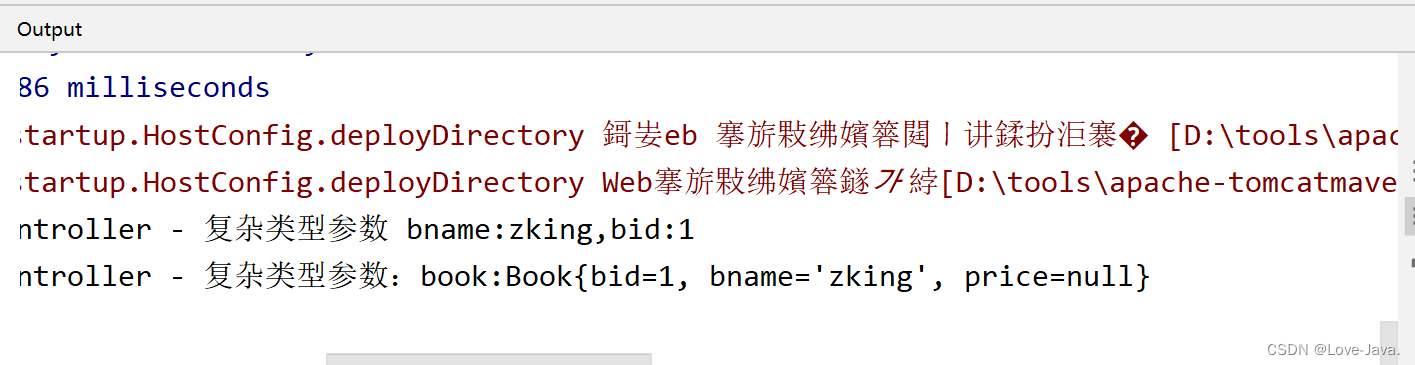
2.2.复杂类型
@RequestMapping("/hello2")
    public String fzlx(Book book, HttpServletRequest request) {


       //servlet参数的获取方式
        log.info("复杂类型参数 bname:{},bid:{}",
                          request.getParameter("bname"),
                          request.getParameter ("bid"));
         //复杂参数获取方式
        log.info("复杂类型参数:book:{}",book.toString());
        return "index";
    }
运行结果:
2.3.@RequestParam
    @RequestMapping("/hello3")
    public String requestParam(
            @RequestParam String bname,
            @RequestParam(required = false)  Integer bid) {


        log.info("requestParam类型参数 bname:{},bid:{}", bname, bid);
        return "index";
    }
运行结果:
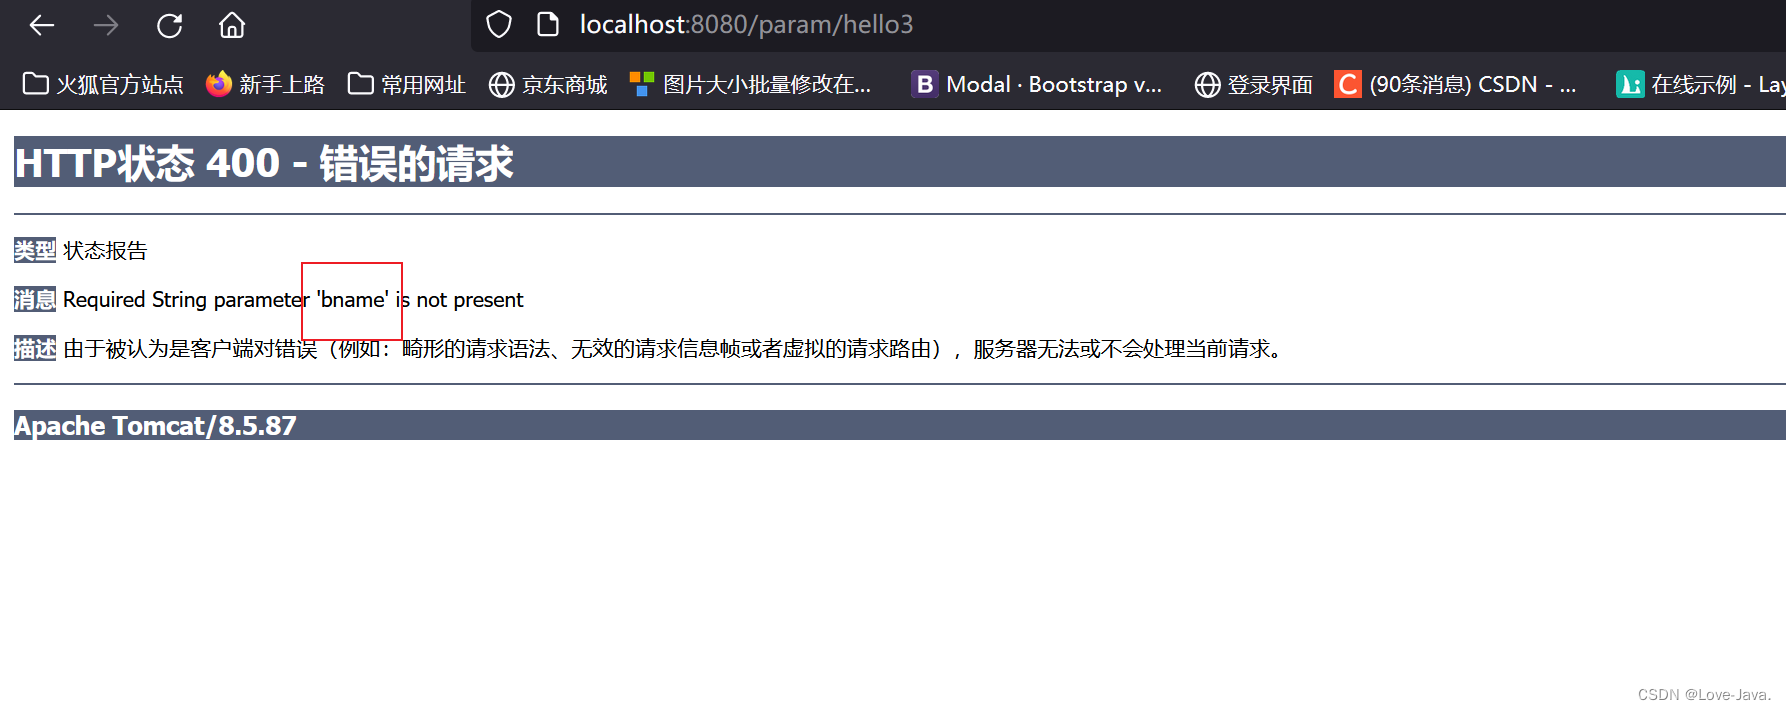
结论:被@RequestParam注解的参数required默认为true表示请求中一定要传入对应的参数,否则会报404错误如果设置为false时,当请求中没有此参数,将会默认为null,而对于基本数据类型的变量,则必须有值,这时会抛出空指针异常。如果允许空值,则接口中变量需要使用包装类来声明。
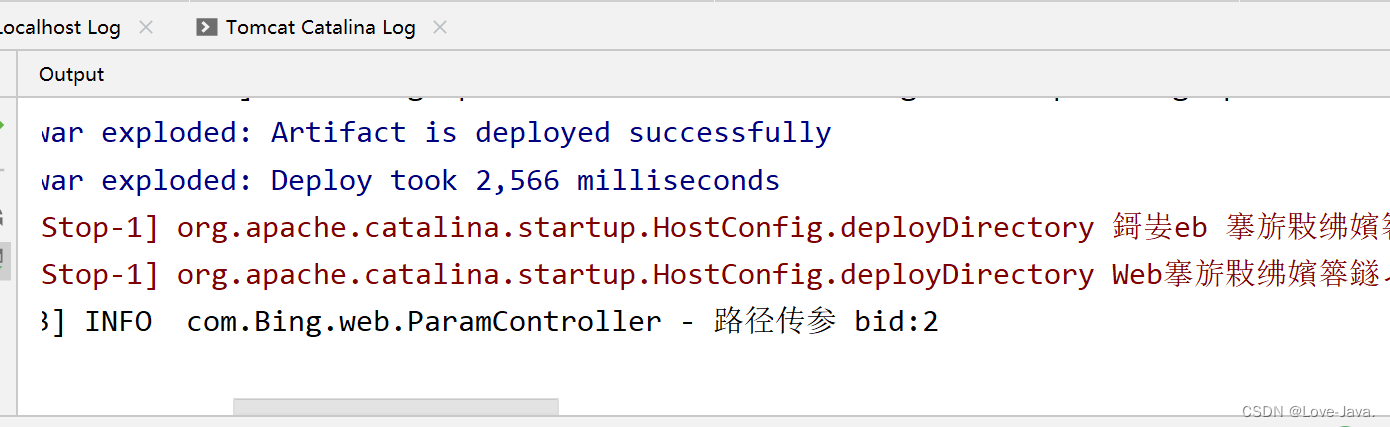
2.4.@PathVariable
    @RequestMapping("/hello4/{bid}")
    public String rjcc(@PathVariable("bid")Integer bid) {


        log.info("PathVariable bid:{}",bid);
        return "index";
    }
运行结果:
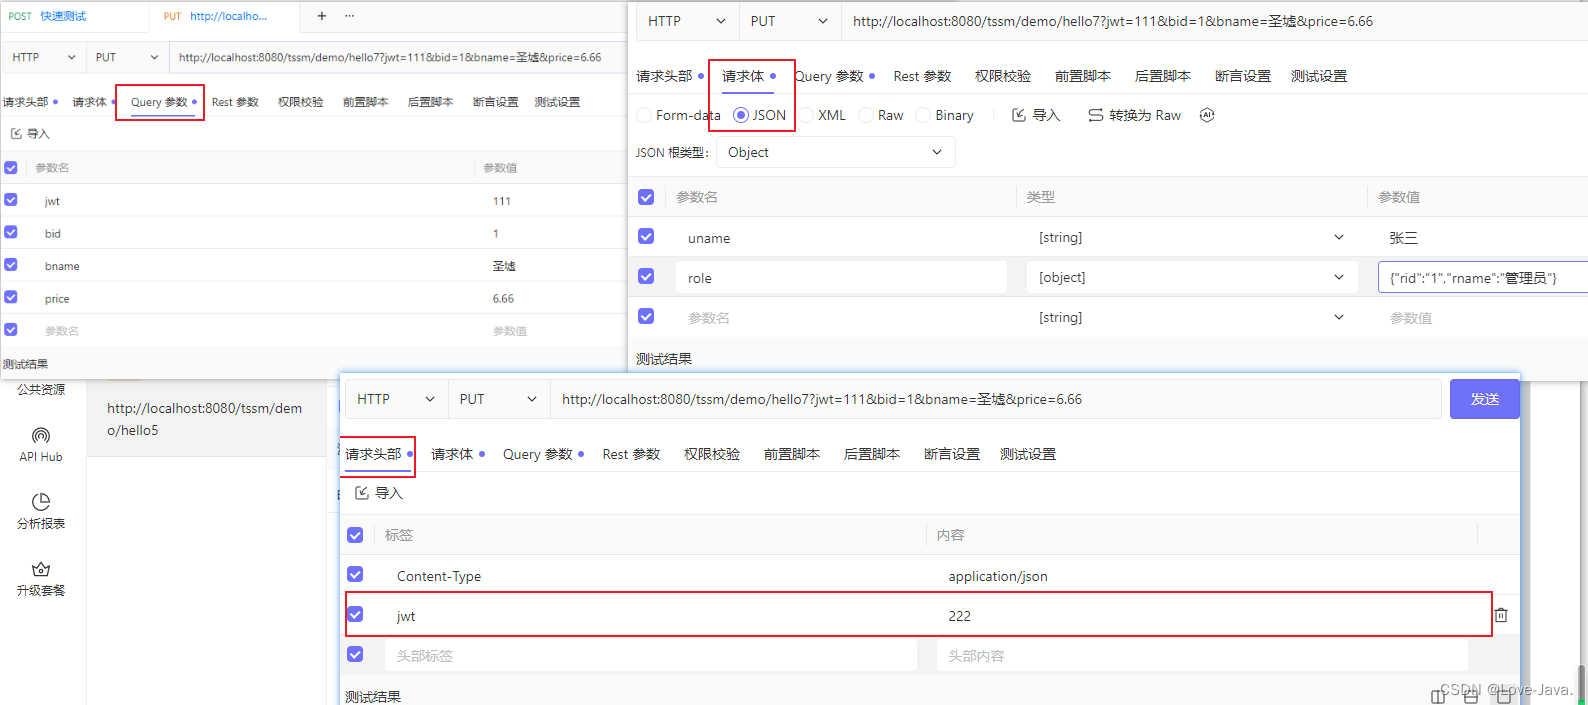
2.5.@RequestBody
讲解@RequestBody之前,将大家推荐postman或者apipost/eolink等工具发送请求数据。
这些工具可以帮助您模拟发送请求和接收响应,以便更好地理解@RequestBody参数的含义和使用方法。
在用**@RequestBody**我们需要导入依赖
 <jackson.version>2.9.3</jackson.version>

 <dependency>
      <groupId>com.fasterxml.jackson.core</groupId>
      <artifactId>jackson-databind</artifactId>
      <version>${jackson.version}</version>
    </dependency>
    <dependency>
      <groupId>com.fasterxml.jackson.core</groupId>
      <artifactId>jackson-core</artifactId>
      <version>${jackson.version}</version>
    </dependency>
    <dependency>
      <groupId>com.fasterxml.jackson.core</groupId>
      <artifactId>jackson-annotations</artifactId>
      <version>${jackson.version}</version>
    </dependency>
//    能接受json数据,前提导入了Jackson依赖,没有导入Jackson依赖的话那进不了这个方法
    @RequestMapping("/hello6")
    public String RequestBody2(@RequestBody Map map) {


        log.info("RequestBody map:{}",map);
        return "index";
    }

//  不能接受json数据
    @RequestMapping("/hello5")
    public String RequestBody1(Map map) {


        log.info("RequestBody map:{}",map);
        return "index";
    }
请使用postman或者apipost/eolink等工具发送请求数据。
2.6.@RequestHeader
```java
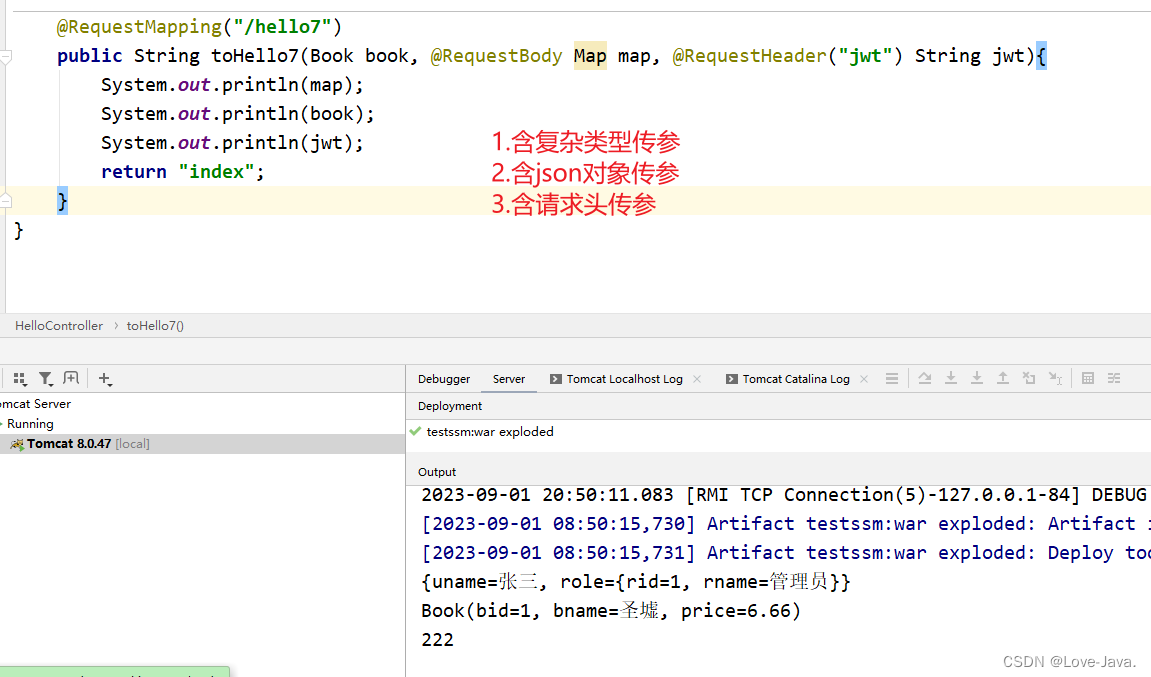
@RequestMapping("/hello7")
public String RequestHeader(@RequestHeader("jwt") String jwt) {
log.info("RequestHeader jwt:{}",jwt);
return "index";
}
3.返回值
为了方便模拟效果,借助ResponseUtil工具类,ResponseUtil类提供了一种方便的方式来将对象以文本或JSON格式写入HTTP响应流中,以便在Web应用程序中向客户端返回数据。
ResponseUtil:
package com.Bing.util;

import com.fasterxml.jackson.databind.ObjectMapper;

import javax.servlet.http.HttpServletResponse;
import java.io.PrintWriter;

public class ResponseUtil {


	public static void write(HttpServletResponse response,Object o)throws Exception{


		response.setContentType("text/html;charset=utf-8");
		PrintWriter out=response.getWriter();
		out.println(o.toString());
		out.flush();
		out.close();
	}

	public static void writeJson(HttpServletResponse response,Object o)throws Exception{


		ObjectMapper om = new ObjectMapper();
//		om.writeValueAsString(o)代表了json串
		write(response, om.writeValueAsString(o));
	}
}
pom.xml依赖
<dependency>
      <groupId>com.fasterxml.jackson.core</groupId>
      <artifactId>jackson-databind</artifactId>
      <version>2.12.4</version> <!-- 请根据您的需求选择合适的版本 -->
    </dependency>
3.1.void
处理器对请求处理后,无需跳转到其它任何资源,此时可以让处理器方法返回 void。
Controller编写:
@Controller
@RequestMapping("/rs")
public class ReturnController {


    @RequestMapping("/hello")
    public void hello(HttpServletResponse response) {


        Map<String, Object> map = new HashMap<>();
        map.put("code", 200);
        map.put("msg", "成功添加");
        try {


            ResponseUtil.writeJson(response, map);
        } catch (Exception e) {


            e.printStackTrace();
        }
    }

}
运行结果:

```java
@RequestMapping("/queryStudents")
    public void queryStudents(HttpServletResponse response) throws IOException {

        //处理Ajax,使用json做数据格式
        Student student = new Student();
        student.setName("张三");
        student.setAge(18);

        try {
            ResponseUtil.writeJson(response,student);
        } catch (Exception e) {
            e.printStackTrace();
        }
    }

@Data
class Student{
    private String name;
    private Integer age;
}
3.2.String
通过http://localhost:8080/springmvc01/toHello访问请求方法,并经过视图解析器跳转指定页面。
@RequestMapping("/toHello")
public String toHello(){


    //逻辑视图名
    return "hello";
}
返回类型为String,默认被作为视图名,指定逻辑视图名,经过视图解析器解析为jsp物理路径:/WEB-INF/page/success.jsp
3.3.String+Model
通过http://localhost:8080/springmvc01/toHello访问请求方法,并经过视图解析器跳转指定页面,最后完成视图模型数据渲染操作。
@RequestMapping("/toHello1")
    public String toHello1(Model model,HttpServletRequest request){


        //填充模型数据
        model.addAttribute("name","张三");
        request.setAttribute("role","管理员");
        //逻辑视图名
        return "hello";
    }
3.4.ModelAndView
通过http://localhost:8080/springmvc01/toHello访问请求方法。
@RequestMapping("/toHello2")
    public ModelAndView toHello2(){


        ModelAndView mv = new ModelAndView();
        //填充模型数据
        mv.addObject("name","张三");
        mv.addObject("role","管理员");
        mv.setViewName("hello");
        //逻辑视图名
        return mv;
    }
4.页面跳转
转发(forward:path)和重定向(redirect:path)这两种跳转方式将会绕开视图解析器的前缀和后缀;还有就是如果是在同一controller中则不用使用"/"从根目录开始,而如果是在不同的controller则一定要从根目录开始。
path为请求处理方法名,而非逻辑视图名。
- 转发(地址栏不变)
@RequestMapping("/helloPage1")
    public String toHelloPage1(){


        System.out.println("helloPage1");
        return "forward:toHello2";
    }
它相当于“request.getRequestDispatcher(“url”).forward(request,response)”。使用转发,既可以转发到jsp, 也可以转发到其他的控制器方法。
- 重定向(地址栏改变)
@RequestMapping("/helloPage2")
    public String toHelloPage2(){


        System.out.println("helloPage2");
        return "redirect:toHello2";
    }
它相当于“response.sendRedirect(url)”。需要注意的是,如果重定向到jsp页面,则jsp页面不能写在WEB-INF目录中,否则无法找到。
跳其它的controller
@RequestMapping("/helloPage3")
    public String toHelloPage3(){
        System.out.println("helloPage3");
        return "forward:/demo/hello";
    }

    @RequestMapping("/helloPage4")
    public String toHelloPage4(){
        System.out.println("helloPage4");
        return "redirect:/demo/hello";
    }