前提条件:
1、Visual Studio 2022 社区版(免费版)
2、Qt-6.5.1版本
Qt Vistual Studio Tools下载
先打开Visual Studio 2022 社区版 :

点击扩展-》管理拓展按钮后,在搜索框中输入Qt,点击这里第一个扩展安装。

Qt Visual Studio Tools 拓展插件安装成功后,在拓展菜单项多出一个菜单选项"Qt VS Tools"

Vistual Studio 2022 社区版配置Qt 6
进入Vistual Studio 2022 点击扩展->Qt VS Tool->Qt Versions

进入Qt Versions后, 点击Qt -> Versions。

配置Qt 6 地址:D:\Qt\6.5.1\msvc2019_64\bin\Vistual Studio 2022 创建Qt 6 项目
创建一个Qt项目。

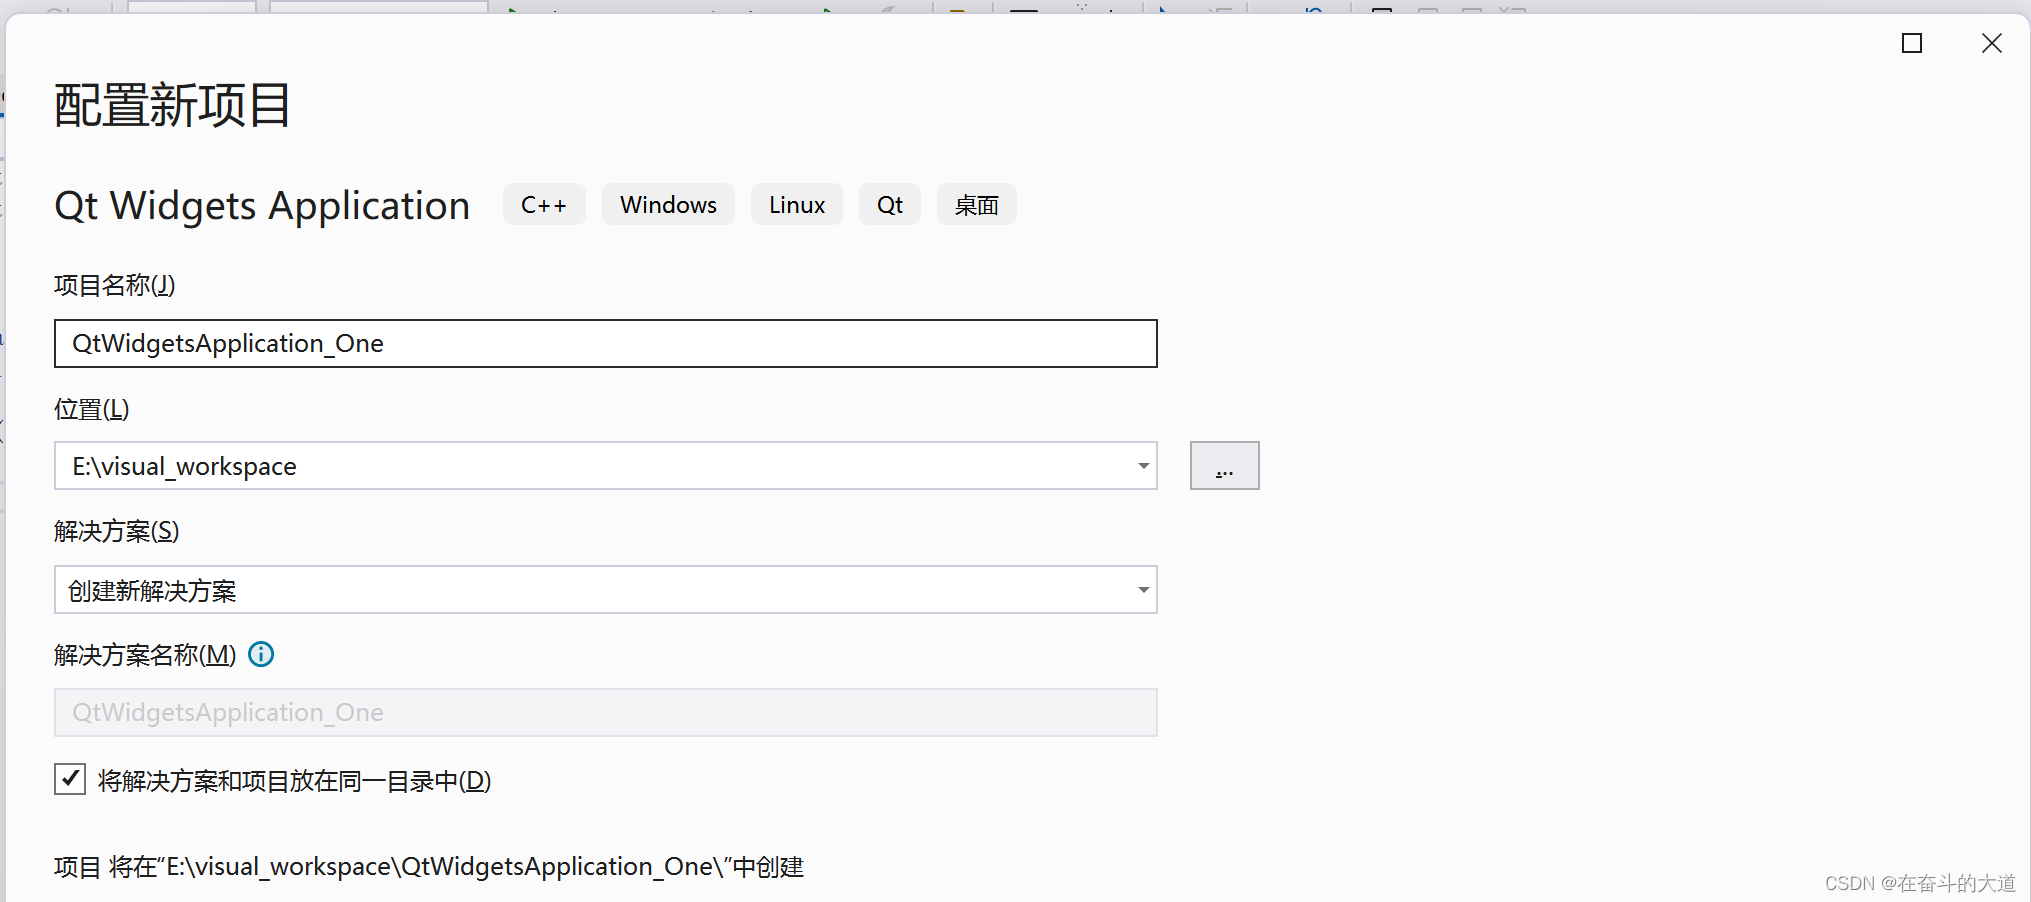
点击下一步:
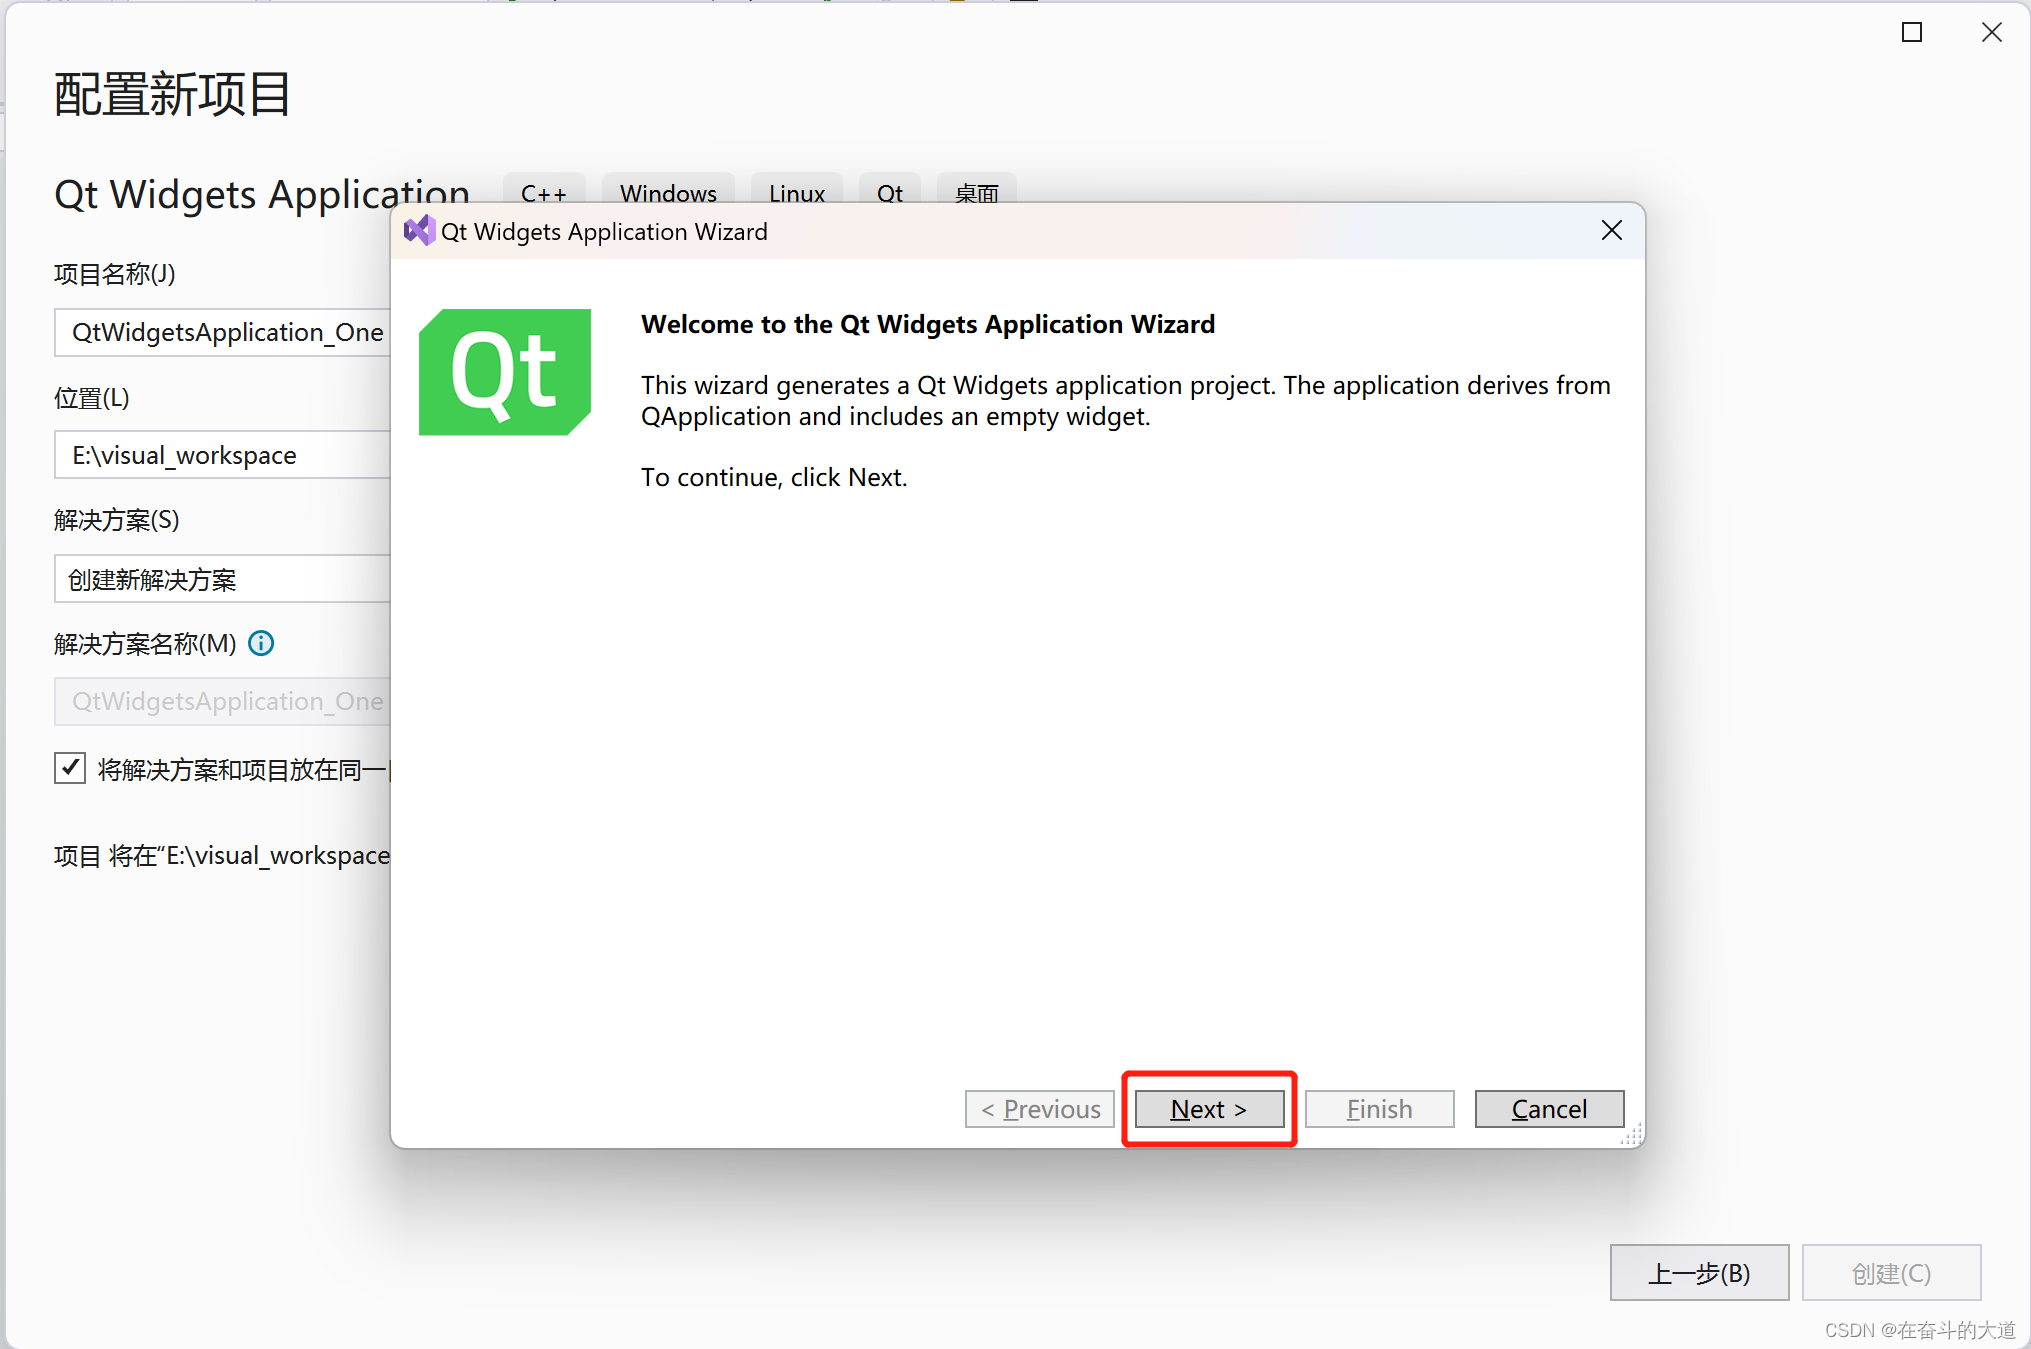

点击下一步:

Qt 应用程序入口: main.cpp
Qt 应用UI设计文件:QtWidgetsApplication_One.ui
Qt 应用组件对应头文件:QtWidgetsApplication_One.h
Qt 应用组件对应Class 文件:QtWidgetsApplication_One.cpp
Qt 应用继承基础类:QMainWindows
Qt 应用资源文件:QtWidgetsApplication_One.qrc
点击Finsh 按钮:

运行效果展示:

Vistual Studio 2022 无法正常打开Qt 项目 中的*.UI文件
当我们双击*.UI文件,会出现下面这样的弹窗。

如何解决此类问题?
请按照如下步骤进行:
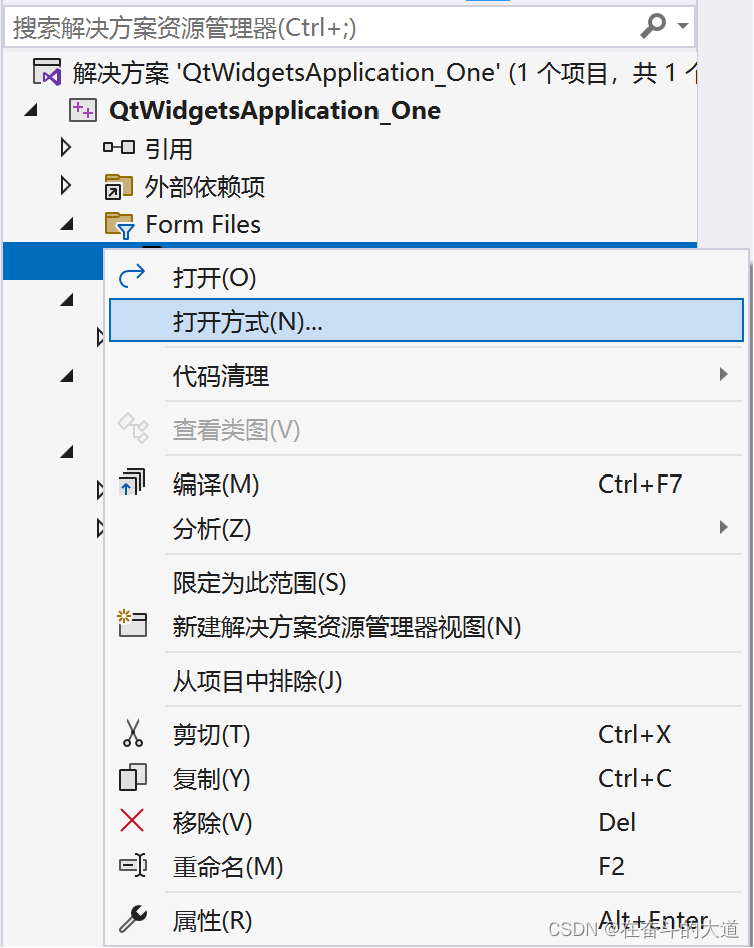

右键.ui文件 ===> 打开方式 ===> 添加 ===> 找到对应文件下的.exe文件 ===> 随便取名
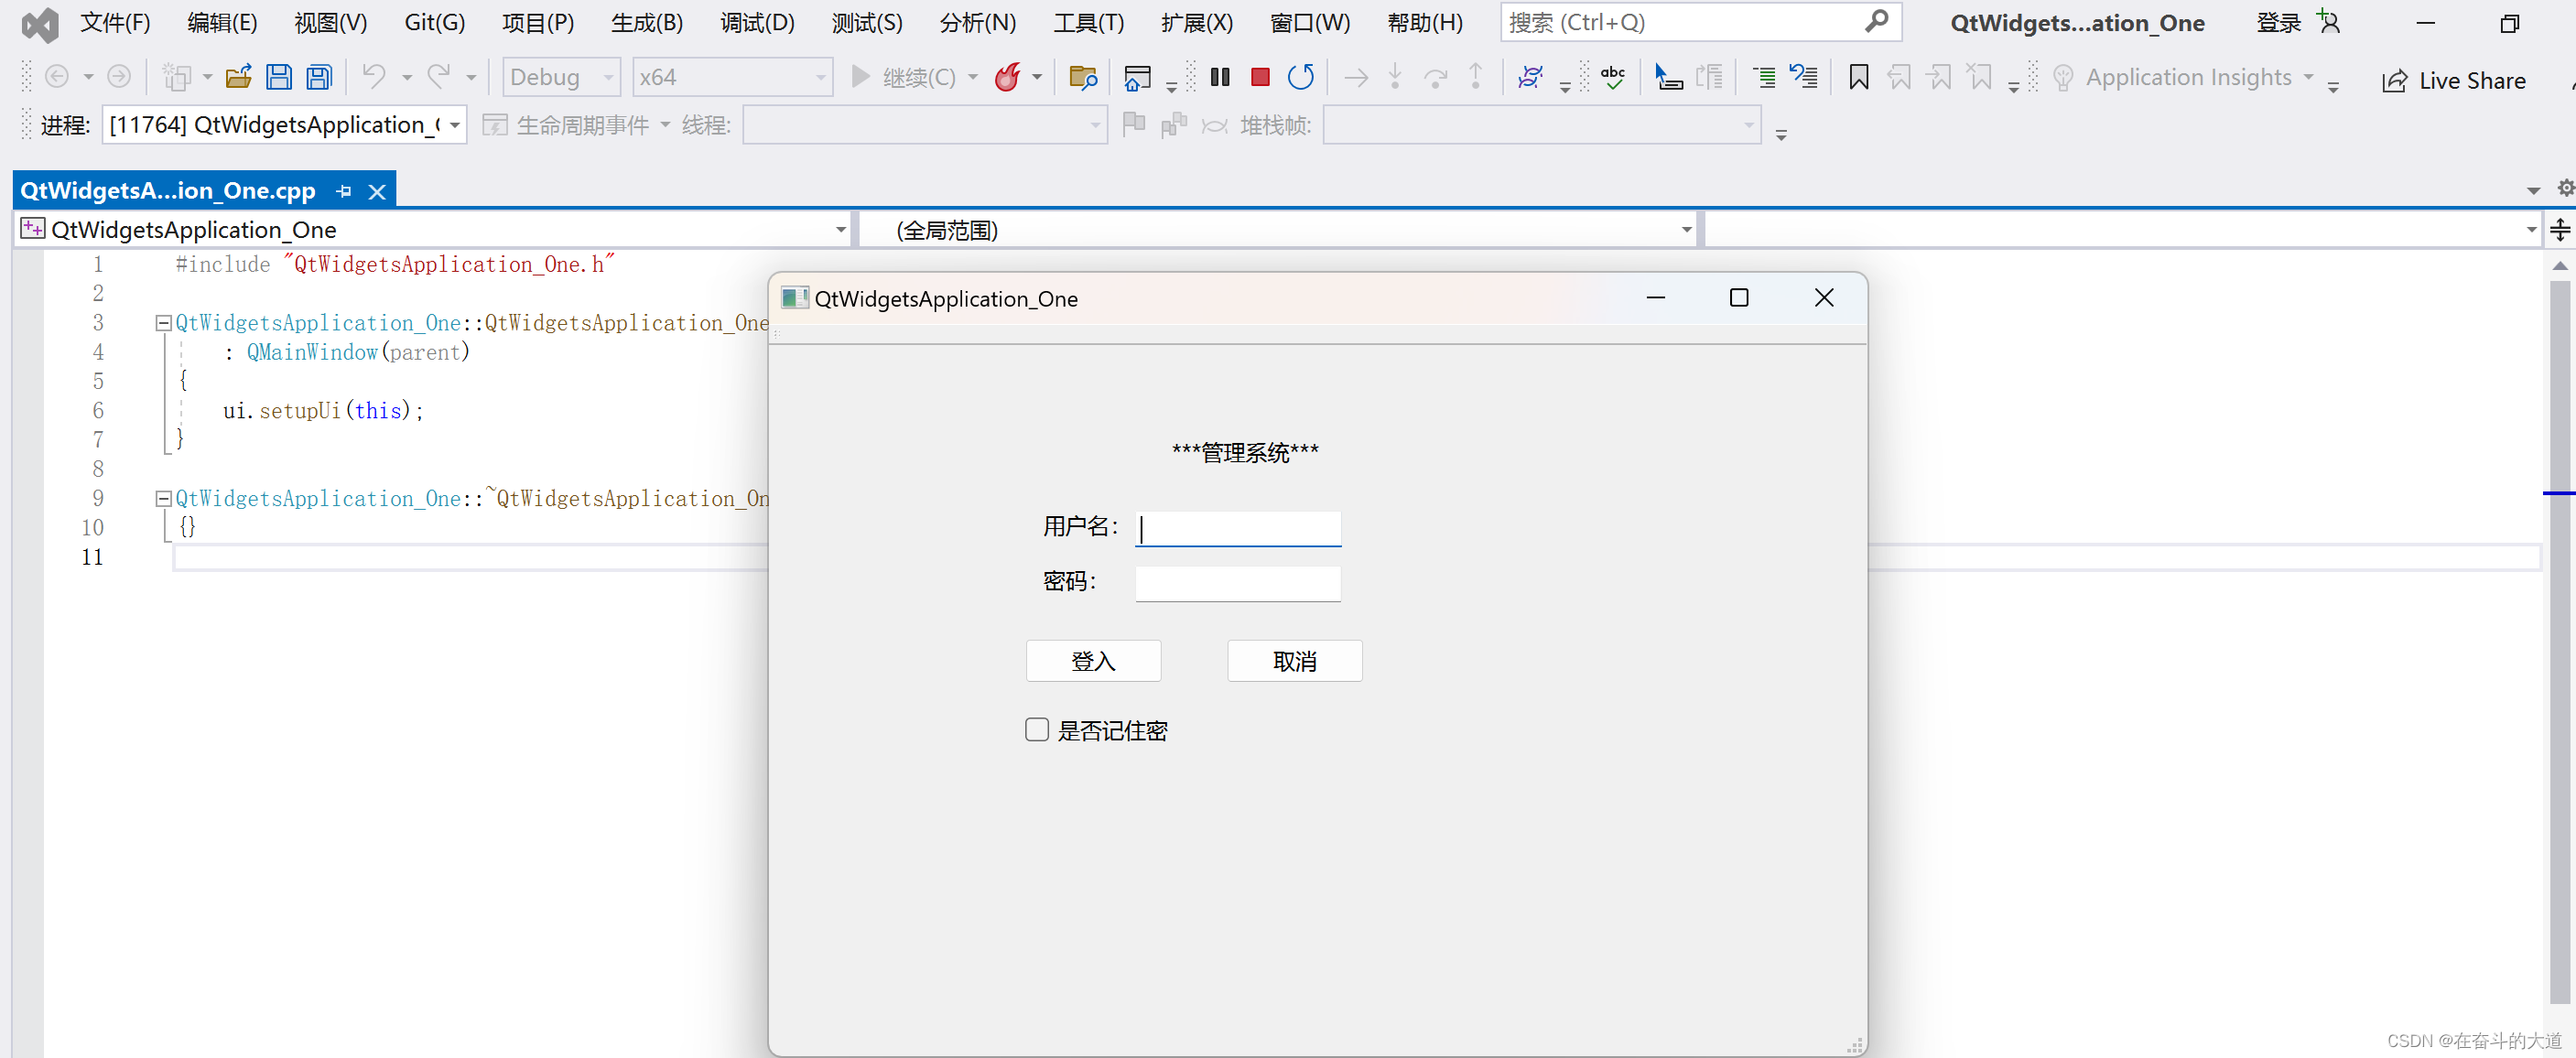
UI 效果展示:

Vistual Studio 2022 社区版 Qt 项目 涉及简单登入页面
在QtWidgetsApplication_One.ui 文件中添加如下组件清单:
3 个Label 标签
2 个Line Edit 输入文本框
2 个Push Button 按钮
1 个CheckBox Button 按钮
QtWidgetsApplication_One.ui 在设计器中的展示:

点击Ctral + S 保存快捷键,再次运行QtWidgetsApplication_One 项目的main.cpp 方法。
Vistual Studio 2022 社区版 Qt 项目 涉及多个UI 页面
在实际Qt 项目开发中,需要使用多个UI 页面以及对应的头文件和Class 文件。
Qt 项目-》Form Files 右击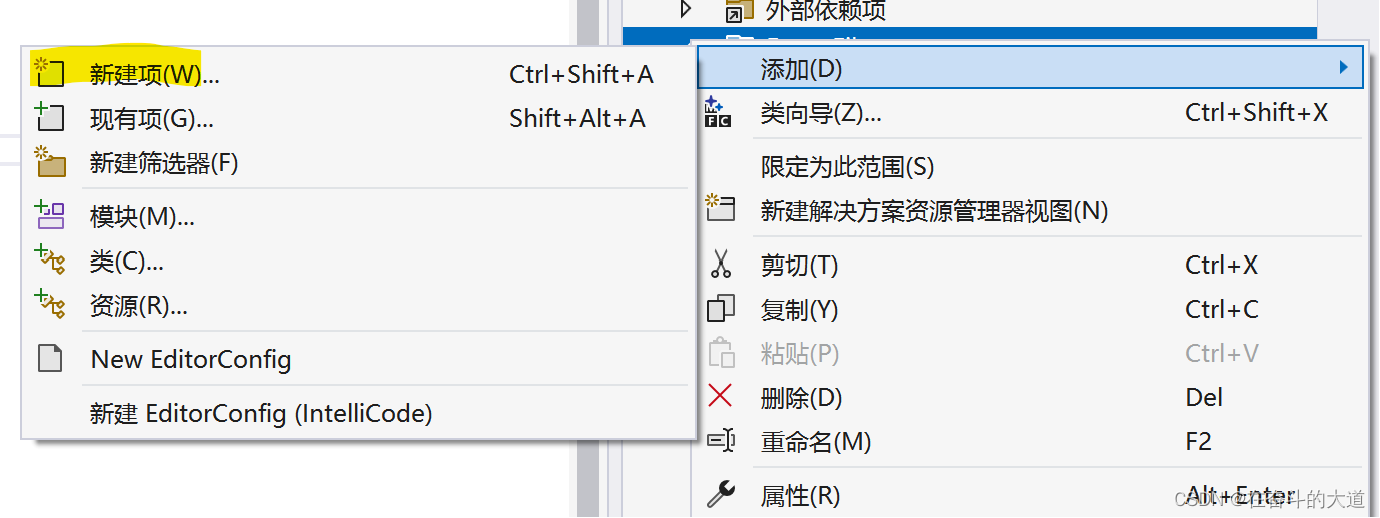

我在这里新增addFrom.ui 文件,且原型设计如下图所示:

如何解决基于*.UI 文件生成头文件和Class文件?
请按照如下步骤进行:
第一步:在Qt 6 项目中选择需要进行编译的UI 文件并点击编译,我这里选择的是自定义addFrom.ui 文件。

编译的结果:将在Qt 项目 所占目录中 ->X64-》Debug ->uic 文件夹目录中生成一个名为:ui_addFrom.h 的头文件。
查看文件内容(ui_addFrom.h)
/********************************************************************************
** Form generated from reading UI file 'addFrom.ui'
**
** Created by: Qt User Interface Compiler version 6.5.1
**
** WARNING! All changes made in this file will be lost when recompiling UI file!
********************************************************************************/

#ifndef UI_ADDFROM_H
#define UI_ADDFROM_H

#include <QtCore/QVariant>
#include <QtWidgets/QApplication>
#include <QtWidgets/QLabel>
#include <QtWidgets/QLineEdit>
#include <QtWidgets/QPushButton>
#include <QtWidgets/QRadioButton>
#include <QtWidgets/QTextEdit>
#include <QtWidgets/QWidget>

QT_BEGIN_NAMESPACE

class Ui_Form
{
public:
    QLabel *label;
    QLabel *label_2;
    QLineEdit *lineEdit;
    QLabel *label_3;
    QLineEdit *lineEdit_2;
    QLabel *label_4;
    QLineEdit *lineEdit_3;
    QLabel *label_5;
    QRadioButton *radioButton;
    QRadioButton *radioButton_2;
    QLabel *label_6;
    QTextEdit *textEdit;
    QPushButton *pushButton;

    void setupUi(QWidget *Form)
    {
        if (Form->objectName().isEmpty())
            Form->setObjectName("Form");
        Form->resize(650, 455);
        label = new QLabel(Form);
        label->setObjectName("label");
        label->setGeometry(QRect(210, 50, 54, 16));
        label_2 = new QLabel(Form);
        label_2->setObjectName("label_2");
        label_2->setGeometry(QRect(140, 90, 54, 16));
        lineEdit = new QLineEdit(Form);
        lineEdit->setObjectName("lineEdit");
        lineEdit->setGeometry(QRect(210, 90, 113, 20));
        label_3 = new QLabel(Form);
        label_3->setObjectName("label_3");
        label_3->setGeometry(QRect(140, 130, 54, 16));
        lineEdit_2 = new QLineEdit(Form);
        lineEdit_2->setObjectName("lineEdit_2");
        lineEdit_2->setGeometry(QRect(210, 130, 113, 20));
        label_4 = new QLabel(Form);
        label_4->setObjectName("label_4");
        label_4->setGeometry(QRect(140, 170, 54, 16));
        lineEdit_3 = new QLineEdit(Form);
        lineEdit_3->setObjectName("lineEdit_3");
        lineEdit_3->setGeometry(QRect(210, 170, 113, 20));
        label_5 = new QLabel(Form);
        label_5->setObjectName("label_5");
        label_5->setGeometry(QRect(140, 210, 54, 16));
        radioButton = new QRadioButton(Form);
        radioButton->setObjectName("radioButton");
        radioButton->setGeometry(QRect(210, 210, 95, 20));
        radioButton_2 = new QRadioButton(Form);
        radioButton_2->setObjectName("radioButton_2");
        radioButton_2->setGeometry(QRect(290, 210, 95, 20));
        label_6 = new QLabel(Form);
        label_6->setObjectName("label_6");
        label_6->setGeometry(QRect(140, 250, 54, 16));
        textEdit = new QTextEdit(Form);
        textEdit->setObjectName("textEdit");
        textEdit->setGeometry(QRect(140, 270, 191, 81));
        pushButton = new QPushButton(Form);
        pushButton->setObjectName("pushButton");
        pushButton->setGeometry(QRect(210, 380, 75, 24));

        retranslateUi(Form);

        QMetaObject::connectSlotsByName(Form);
    } // setupUi

    void retranslateUi(QWidget *Form)
    {
        Form->setWindowTitle(QCoreApplication::translate("Form", "Form", nullptr));
        label->setText(QCoreApplication::translate("Form", "\347\224\250\346\210\267\346\226\260\345\242\236", nullptr));
        label_2->setText(QCoreApplication::translate("Form", "\345\247\223\345\220\215", nullptr));
        label_3->setText(QCoreApplication::translate("Form", "\345\271\264\351\276\204", nullptr));
        label_4->setText(QCoreApplication::translate("Form", "\345\256\266\345\272\255\344\275\217\345\235\200", nullptr));
        label_5->setText(QCoreApplication::translate("Form", "\346\200\247\345\210\253:", nullptr));
        radioButton->setText(QCoreApplication::translate("Form", "\347\224\267", nullptr));
        radioButton_2->setText(QCoreApplication::translate("Form", "\345\245\263", nullptr));
        label_6->setText(QCoreApplication::translate("Form", "\344\270\252\344\272\272\347\256\200\344\273\213\357\274\232", nullptr));
        pushButton->setText(QCoreApplication::translate("Form", "\344\277\235\345\255\230", nullptr));
    } // retranslateUi

};

namespace Ui {
    class Form: public Ui_Form {};
} // namespace Ui

QT_END_NAMESPACE

#endif // UI_ADDFROM_H
重点:
1、声明一个命名空间:namespae Ui。
2、定义自定义addFrom.ui 对应的实现类:Ui_From。
3、定义类Ui_From 在命名空间Ui 访问别名 From。
第二步:在Qt 项目->Header Files 添加addFrom.ui 对应的AddFrom.h 头文件。
主要用途:引用"ui_addFrom.h" 头文件中对addFrom.ui 实现类:Ui::Form ui
addFrom.h 头文件 源码:
#pragma once

#include <QtWidgets/QMainWindow>
#include "ui_addFrom.h"

class AddFrom : public QMainWindow
{
    Q_OBJECT

public:
    AddFrom(QWidget* parent = nullptr);
    ~AddFrom();

private:
    Ui::Form ui;
};
第三步:在Qt 项目->Source Files 添加addFrom.h 对应的实现类addFrom.cpp。
#include "addFrom.h"

AddFrom::AddFrom(QWidget* parent)
    : QMainWindow(parent)
{
    ui.setupUi(this);
}

AddFrom::~AddFrom()
{}
项目整体结构:

第四步:在程序入库main.cpp 文件替换为addFrom.h 文件
#include "QtWidgetsApplication_One.h"
#include "addFrom.h"
#include <QtWidgets/QApplication>

int main(int argc, char *argv[])
{
    QApplication a(argc, argv);
    AddFrom w;
    w.show();
    return a.exec();
}
效果截图 :

Vistual Studio 2022 社区版 Qt 项目 涉及多个UI 页面跳转
在上一个案列中,我们涉及了登入页面和注册页面,如何把两个页面串联, 我们将通过槽和函数实现 ,通过登入页面的登入按钮跳转至注册页面。
第一步:在QtWidgetsApplication_One.h 头文件中定义槽函数:
// 定义槽函数
public slots:
void gotoFrom();
QtWidgetsApplication_One.h 源文件:
#pragma once

#include <QtWidgets/QMainWindow>
#include "ui_QtWidgetsApplication_One.h"

class QtWidgetsApplication_One : public QMainWindow
{
    Q_OBJECT

public:
    QtWidgetsApplication_One(QWidget *parent = nullptr);
    ~QtWidgetsApplication_One();

 // 定义槽函数
public slots:
    void gotoFrom();

private:
    Ui::QtWidgetsApplication_OneClass ui;
};
第二步:在QtWidgetsApplication_One.h 头文件对应QtWidgetsApplication_One.cpp 文件,实现PushButton 信号事件与槽函数绑定。
核心代码片段:
在初始化构造函数中完成PushButton 信号事件与自定义槽函数绑定。
QtWidgetsApplication_One::QtWidgetsApplication_One(QWidget *parent)
    : QMainWindow(parent)
{
    ui.setupUi(this);
    //连接pushbutton的clicked()信号到自定义的gotoFrom()槽
    connect(ui.pushButton, SIGNAL(clicked()), this, SLOT(gotoFrom()));
}

实现在QtWidgetsApplication_One.h 自定义槽函数gotoFrom()
void QtWidgetsApplication_One::gotoFrom() {
    qDebug() << "pushButton 按钮点击事件触发 ";
}

//  自定义槽函数gotoFrom():仅仅涉及控制台字符串输出,暂时不涉及页面跳转。
QtWidgetsApplication_One.cpp 控制台输出字符串源码。
#include "QtWidgetsApplication_One.h"
#include <QDebug>

QtWidgetsApplication_One::QtWidgetsApplication_One(QWidget *parent)
    : QMainWindow(parent)
{
    ui.setupUi(this);
    //连接pushbutton的clicked()信号到自定义的gotoFrom()槽
    connect(ui.pushButton, SIGNAL(clicked()), this, SLOT(gotoFrom()));
}

QtWidgetsApplication_One::~QtWidgetsApplication_One()
{}

void QtWidgetsApplication_One::gotoFrom() {
    qDebug() << "pushButton 按钮点击事件触发 ";
}
效果展示:
 美中不足:输出的汉子显示乱码。
第三步:在QtWidgetsApplication_One.cpp 文件中,添加对跳转页面头文件的依赖("addFrom.h")。并在槽函数gotoFrom()中实现页面跳转。
核心代码片段:
1、添加跳转页面的头文件
#include "addFrom.h"
2、在自定义槽函数实现页面跳转
void QtWidgetsApplication_One::gotoFrom() {
    qDebug() << "pushButton 按钮点击事件触发 ";
    // 当前页面关闭
    this->close();
    // 跳转页面显示
    AddFrom* from = new AddFrom();
    from->show();
}
QtWidgetsApplication_One.cpp 页面跳转。
#include "QtWidgetsApplication_One.h"
#include "addFrom.h"
#include <QDebug>

QtWidgetsApplication_One::QtWidgetsApplication_One(QWidget *parent)
    : QMainWindow(parent)
{
    ui.setupUi(this);
    //连接pushbutton的clicked()信号到自定义的gotoFrom()槽
    connect(ui.pushButton, SIGNAL(clicked()), this, SLOT(gotoFrom()));
}

QtWidgetsApplication_One::~QtWidgetsApplication_One()
{}

void QtWidgetsApplication_One::gotoFrom() {
    qDebug() << "pushButton 按钮点击事件触发 ";
    // 当前页面关闭
    this->close();
    // 跳转页面显示
    AddFrom* from = new AddFrom();
    from->show();
}
效果展示:


至此,Visual Studio 2022 + Qt 6 在Windows 开发环境注意细节就 讲这么多了。