CNN:Windows下编译使用Caffe和Caffe2
用于检测的CNN分为基于回归网络的方法和基于区域+CNN网络的方法,其中基于回归网络的方法典型为YOLO9000,可以兼容使用VGG-Net框架。其中基于区域+CNN网络方法,大量使用了Caffe作为基础CNN框架。
准备工作(python27环境,X64平台,使用Vs2013和Vs2015):
1. 安装 VcforPython27 9.0或者安装VS2010版本。此步骤涉及到Python库的安装是否成功。
2. 安装 Python27 X64;
3. 使用pip安装Python 包:numpy、matlpotlib、six、scipy、scikit-image、scikit-learn。
scipy 最好使用 下载版本的X64版本的 whl包。
一、使用FasterR-CNN
Windows下faster-rcnn的编译可以分为2个部分,caffe的编译和faster-rcnn的编译。由于原始的版本大多基于linux,感谢各位前辈的移植与分享,现在windows版本的在网上都可以找到。但对于初学者可能还是有一些坑要填。以下是我遇到的一些问题和解决方法,用以存档。
二、Vs2013安装使用MS-Caffe
C++版本编译过程:
原文链接:Windows+VS2013爆详细Caffe编译安装教程
3. 从Microsoft官方Github上下载Caffe的源码压缩包.
微软官方也移植了Caffe,在windows下面的配置会比较简单一点.https://github.com/Microsoft/caffe
建议使用Git 克隆整个工程到本地
4.编译工程文件
4.1打开caffe-master文件夹,然后看到一个windows文件夹,然后继续打开windows文件夹,看到里面一个CommonSettings.props.example文件,复制出来一份,并改名字为CommonSettings.props

注意:
1. 编辑模式打开 CommonSettings.props 文件,找到CUDA version一栏,修改7.5 为8.0 。
否则会出现libCaffe打不开/载入不了的情况。
2.编译boost时出现错误,忽视掉错误,把文件保存,即可编译boost通过。
3.此外找到:<cuDnnPath></cuDnnPath>这一行,在中间添加cudnn目录,我的是C:\Tools\cdunn;
同步修改接下来第11、12行的 <LibraryPath>和<IncludePath>
但是这样做,会导致出现错误:
- 错误 1 error MSB3073: 命令“"D:\caffe-windows\windows\\scripts\BinplaceCudaDependencies.cmd" "C:\Program Files\NVIDIA GPU Computing Toolkit\CUDA\v7.5\bin" "" false true "D:\caffe-windows\windows\..\Build\x64\Debug\"
- :VCEnd”已退出,代码为 1。 C:\Program Files (x86)\MSBuild\Microsoft.Cpp\v4.0\V120\Microsoft.CppCommon.targets 132 5 libcaffe
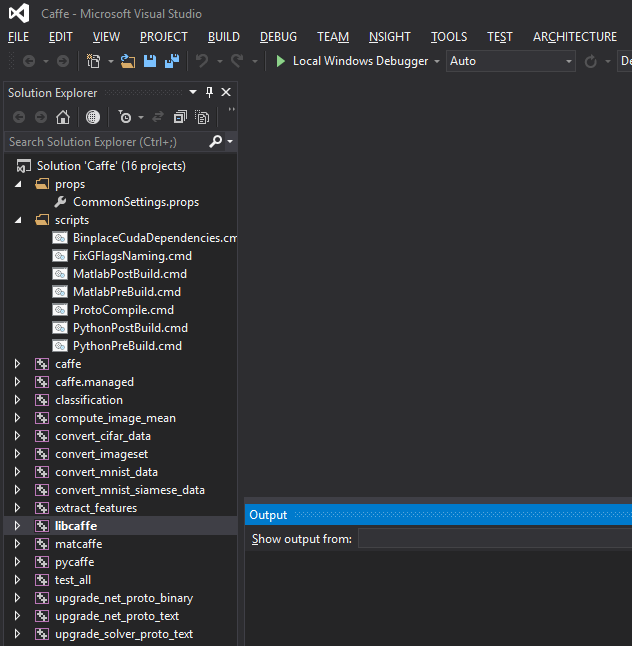
4.2 用VS2013打开Caffe.sln(就到刚刚那个文件夹里面),打开效果如下
4.3. 使用Vs2013打开,可以进行编译。
使用Ms-Caffe需要在线下载一些依赖库,需要消耗较多的时间,要慢慢地等一会.......
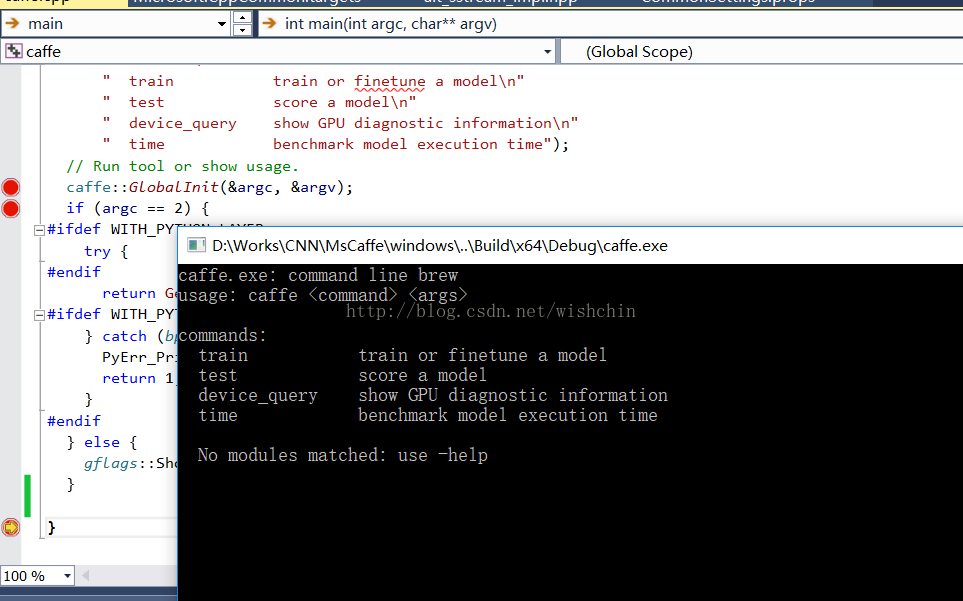
C++版本测试运行:
编译测试成功
................................
Python版本编译测试运行:
文章链接: 微软官方caffe之 Python接口配置及图片生成实例 仔细看,不要遗漏细节.
修改配置文件CommonSettings.props,
修改Python支持为true
- <PythonSupport>true</PythonSupport>
添加自身机子的Python安装目录
- <PythonDir>C:\Python2\</PythonDir>
编译pycaffe工程,在X64/realease 文件夹下面生成 pycaffe的文件夹。
使用:
把文件夹里面的caffe文件夹 复制到 Python的文件夹 lib/site-packages 下面,可以在eclipse中直接使用。
import时候出现ImportError: No module named google.protobuf.internal 错误
解决方法:到安装目录 scripts下面 使用pip 或者conda 安装protobuf,默认安装libprotobuf、protobuf、vc9.0.
安装完成,可以使用

三、Vs2015平台Caffe2的安装
按照官网的指示安装Caffe2: https://caffe2.ai/docs/getting-started.html?platform=windows&configuration=compil
预编译阶段cmd、Cmake:
1.编译protobuf
- Install Cmake
- Run
Developer Command Prompt for VS 2017. - Install
protobuf. Go tocaffe2\scripts\and runbuild_host_protoc.bat. This should build protobuf from source for your system. - build protobuf
编译protobuf完成后,出现错误
在cmd窗口,运行caffe2\scripts\build_windows.bat,会出现错误
再次使用Cmake生成配置方案:
原路径:D:/git/DeepLearning/caffe2
目标路径:D:/git/DeepLearning/caffe2/build
Configure出现此种问题
CMake Error at cmake/ProtoBuf.cmake:21 (message):
  To build protobufs locally (required for Android/iOS/Windows), you will
  need to manually specify a PROTOBUF_PROTOC_EXECUTABLE.  See
  scripts/build_host_protoc.{sh,bat} for more details.
Call Stack (most recent call first):
  cmake/ProtoBuf.cmake:32 (custom_protobuf_find)
  cmake/Dependencies.cmake:6 (include)
  CMakeLists.txt:85 (include)
修改:
//删除掉 protobuf那一行
添加PROTOBUF_PROTOC_EXECUTABLE变量到cmake-gui配置中。做法: -----------Add Entry 条目添加。
PROTOBUF_PROTOC_EXECUTABLE=D:\git\DeepLearning\caffe2\build_host_protoc\Release\protoc.exe
此时配置生成成功!
若不执行此步骤,则出现:error MSB6006: “cmd.exe”已退出,代码为 1。
编译阶段2:可以使用VS2015打开编译。
编译遇到问题:
2.1 error C2398: 元素“1”: 从“google::protobuf::int64”转换到“int”需要收缩转
解决方法:暂时没有解决
代码修改为:
- //int x = b_dim1;//wishchin
- int x = in[0].dims(0);//wishchin
- return vector<TensorShape> {
- CreateTensorShape(
- vector<int> { x , a_dim0, b_dim1 },//wishchin //vector<int> { in[0].dims(0), a_dim0, b_dim1 },
- in[0].data_type()
- )
- };//(int)b_dim1},//b_dim1 修改为(int)b_dim1//wishchin
强制转换,已解决。
2.2 error C2059: 语法错误:“volatile” (编译源文件 D:\Works\CNN\Caffe\Caffe2\caffe2\utils\threadpool\ThreadPool.cc)
代码段:
- inline int Do256NOPs() {
- asm volatile(GEMMLOWP_NOP64);
- return 64;
- }
- GCC在C语言中内嵌汇编 asm __volatile__
解决方法:尝试去掉asm volatile(GEMMLOWP_NOP64); 这一句
2.3 错误在 Caffe2_CPU工程 conv_op.cc文件
- 1>D:\Works\CNN\Caffe\Caffe2\caffe2\operators\conv_op.cc(76): error C2664: “caffe2::OpSchema &caffe2::OpSchema::CostInferenceFunction(caffe2::OpSchema::CostInferenceFunctionType &&)”:
- 无法将参数 1 从“caffe2::OpSchema::Cost (__cdecl *)(const caffe2::OperatorDef &,const std::vector<caffe2::TensorShape,std::allocator<_Ty>> &)”转换为“caffe2::OpSchema::CostInferenceFunctionType &&”
原始代码:
- OPERATOR_SCHEMA(Conv2D)
- .NumInputs(2, 3)
- .NumOutputs(1)
- .CostInferenceFunction(ConvPoolOpBase<CPUContext>::CostInferenceForConv)//76行
- .TensorInferenceFunction(ConvPoolOpBase<CPUContext>::TensorInferenceForConv)
- .FillUsing(ConvDocGenerator("2D "));
注销点尝试一下
分析:为什么windows版本的OPERATOR_SCHEMA()比Linux版本要多好几个???
2.4.找不到定义:posix_memalign(
- ThreadPool文件,包含#include "WorkersPool.h" 头文件里面,使用到
- #if !defined(__ANDROID__)
- posix_memalign((void**)&p, kGEMMLOWPCacheLineSize, sizeof(T));
- 在Windows <stdlib.h>下面找不到 函数定义!!!
添加定义
#define posix_memalign(p, a, s) (((*(p)) = _aligned_malloc((s), (a))), *(p) ?0 :errno)//wishchin
到"WorkersPool.h" 头文件
编译成功
2.5. 编译 convert_caffe_image_db,出现
- 1>Caffe2_CPU.lib(caffe2.pb.obj) : error LNK2019: 无法解析的外部符号 "class google::protobuf::internal::ExplicitlyConstructed<class std::basic_string<char,struct std::char_traits<char>,class std::allocator<char> > > google::protobuf::internal::fixed_address_empty_string" (?fixed_address_empty_string@internal@protobuf@google@@3V?$ExplicitlyConstructed@V?$basic_string@DU?$char_traits@D@std@@V?$allocator@D@2@@std@@@123@A),该符号在函数 "public: __cdecl caffe2::Argument::Argument(class caffe2::Argument const &)" (??0Argument@caffe2@@QEAA@AEBV01@@Z) 中被引用
- 1>Caffe2_CPU.lib(caffe.pb.obj) : error LNK2001: 无法解析的外部符号 "class google::protobuf::internal::ExplicitlyConstructed<class std::basic_string<char,struct std::char_traits<char>,class std::allocator<char> > > google::protobuf::internal::fixed_address_empty_string" (?fixed_address_empty_string@internal@protobuf@google@@3V?$ExplicitlyConstructed@V?$basic_string@DU?$char_traits@D@std@@V?$allocator@D@2@@std@@@123@A)
- 1>Caffe2_CPU.lib(caffe2.pb.obj) : error LNK2019: 无法解析的外部符号 "__int64 google::protobuf::internal::empty_string_once_init_" (?empty_string_once_init_@internal@protobuf@google@@3_JA),该符号在函数 "void __cdecl caffe2::protobuf_InitDefaults_caffe2_2fproto_2fcaffe2_2eproto_impl(void)" (?protobuf_InitDefaults_caffe2_2fproto_2fcaffe2_2eproto_impl@caffe2@@YAXXZ) 中被引用
- 1>Caffe2_CPU.lib(caffe.pb.obj) : error LNK2001: 无法解析的外部符号 "__int64 google::protobuf::internal::empty_string_once_init_" (?empty_string_once_init_@internal@protobuf@google@@3_JA)
问题:在libprotobuf 添加
分析:caffe2::GlobalInit(&argc, &argv);
使用了函数,待调试....
解决方法:尝试编译libprotobuf为静态库!!!
解决了大部分问题
2.6. 在protobuf仍然出现 链接错误 protobuf/compile/main.cc
- 8>main.obj : error LNK2019: 无法解析的外部符号 "__declspec(dllimport) public: __cdecl google::protobuf::compiler::CommandLineInterface::CommandLineInterface(void)" (__imp_??0CommandLineInterface@compiler@protobuf@google@@QEAA@XZ),该符号在函数 main 中被引用
- 8>main.obj : error LNK2019: 无法解析的外部符号 "__declspec(dllimport) public: __cdecl google::protobuf::compiler::CommandLineInterface::~CommandLineInterface(void)" (__imp_??1CommandLineInterface@compiler@protobuf@google@@QEAA@XZ),该符号在函数 main 中被引用
- .....................
- .error LNK2019: 无法解析的外部符号 "__declspec(dllimport) public: virtual __cdecl google::protobuf::compiler::objectivec::ObjectiveCGenerator::~ObjectiveCGenerator(void)" (__imp_??1ObjectiveCGenerator@objectivec@compiler@protobuf@google@@UEAA@XZ),该符号在函数 main 中被引用
- 8>main.obj : error LNK2019: 无法解析的外部符号 "__declspec(dllimport) public: __cdecl google::protobuf::compiler::js::Generator::Generator(void)" (__imp_??0Generator@js@compiler@protobuf@google@@QEAA@XZ),该符号在函数 main 中被引用
- 8>main.obj : error LNK2019: 无法解析的外部符号 "__declspec(dllimport) public: virtual __cdecl google::protobuf::compiler::js::Generator::~Generator(void)" (__imp_??1Generator@js@compiler@protobuf@google@@UEAA@XZ),该符号在函数 main 中被引用
- 8>D:\Works\CNN\Caffe\Caffe2\build\third_party\protobuf\cmake\Release\protoc.exe : fatal error LNK1120: 24 个无法解析的外部命令
解决方法:
尝试去掉main()函数里面的代码,应该用不着!
3. 运行阶段:
X:终于成功了!
测试可以运行................