首先给大家介绍下我使用的版本是7.17.3这个版本,关于之前6.x的版本还是有些区别的。
elasticSearch
Elasticsearch 是一个分布式文档存储。Elasticsearch 不是将信息存储为列式数据行,而是存储已序列化为 JSON 文档的复杂数据结构。存储文档时,会在1 秒内近乎实时地为其建立索引并完全可搜索。Elasticsearch 使用称为倒排索引的数据结构,支持非常快速的全文搜索。关于具体详细的大家可以查看官方文档来了解下
安装使用
因为elasticSearch是java语言开发的,关于java环境的安装这里就不介绍了,大家可自行搜索解决
为了方便学习和联系,这里我直接使用的是window安装的版本
下载elasticSearch
https://www.elastic.co/cn/downloads/past-releases#elasticsearch
解压后,我们可以看下elasticsearch.bat 启动文件引用调用了elasticsearch-env.bat这个文件。我么可以大概看下elasticsearch-env的文件内容
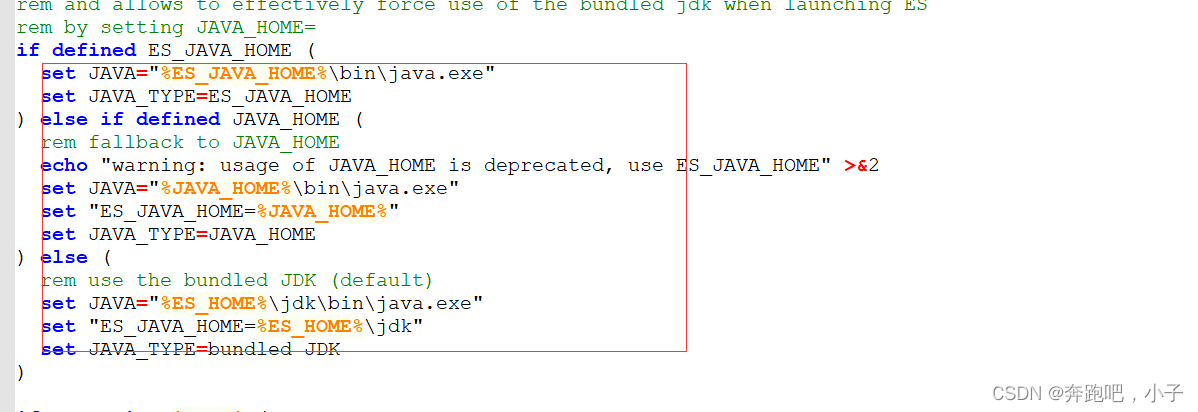
所以我们可以配置下es的系统环境变量

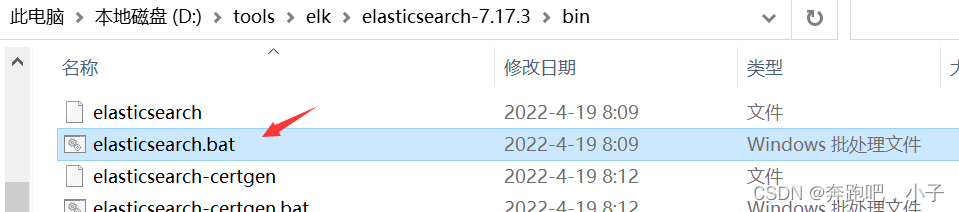
直接双击点击elasticsearch.bat文件启动,简直不能太easy
如果你的控制台没有什么异常问题的话,可以访问http://localhost:9200 默认端口9200验证下,出现下面的显示就代表启动没有什么问题

访问看下我们本地节点监控 http://localhost:9200/_cat/nodes?v

客户端kibana安装
Kibana是一个开源分析和可视化平台,旨在与Elasticsearch协同工作。使用这个工具可以方便我们使用Rest API来操作我们的elasticSearch
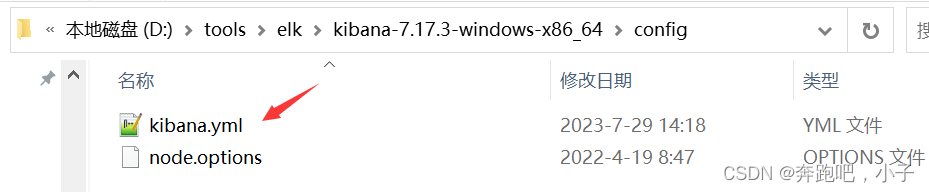
这里注意我们最好使用和es相同的版本号
Past Releases of Elastic Stack Software | Elastic
修改对应的配置yml 国际化为zh_CN
i18n.locale: "zh-CN"
# Kibana is served by a back end server. This setting specifies the port to use.
server.port: 5601

# Specifies the address to which the Kibana server will bind. IP addresses and host names are both valid values.
# The default is 'localhost', which usually means remote machines will not be able to connect.
# To allow connections from remote users, set this parameter to a non-loopback address.
server.host: "localhost"

# Enables you to specify a path to mount Kibana at if you are running behind a proxy.
# Use the `server.rewriteBasePath` setting to tell Kibana if it should remove the basePath
# from requests it receives, and to prevent a deprecation warning at startup.
# This setting cannot end in a slash.
#server.basePath: ""

# Specifies whether Kibana should rewrite requests that are prefixed with
# `server.basePath` or require that they are rewritten by your reverse proxy.
# This setting was effectively always `false` before Kibana 6.3 and will
# default to `true` starting in Kibana 7.0.
#server.rewriteBasePath: false

# Specifies the public URL at which Kibana is available for end users. If
# `server.basePath` is configured this URL should end with the same basePath.
#server.publicBaseUrl: ""

# The maximum payload size in bytes for incoming server requests.
#server.maxPayload: 1048576

# The Kibana server's name.  This is used for display purposes.
#server.name: "your-hostname"

# The URLs of the Elasticsearch instances to use for all your queries.
elasticsearch.hosts: ["http://localhost:9200"]

# Kibana uses an index in Elasticsearch to store saved searches, visualizations and
# dashboards. Kibana creates a new index if the index doesn't already exist.
#kibana.index: ".kibana"

# The default application to load.
#kibana.defaultAppId: "home"

# If your Elasticsearch is protected with basic authentication, these settings provide
# the username and password that the Kibana server uses to perform maintenance on the Kibana
# index at startup. Your Kibana users still need to authenticate with Elasticsearch, which
# is proxied through the Kibana server.
#elasticsearch.username: "kibana_system"
#elasticsearch.password: "pass"

# Kibana can also authenticate to Elasticsearch via "service account tokens".
# If may use this token instead of a username/password.
# elasticsearch.serviceAccountToken: "my_token"

# Enables SSL and paths to the PEM-format SSL certificate and SSL key files, respectively.
# These settings enable SSL for outgoing requests from the Kibana server to the browser.
#server.ssl.enabled: false
#server.ssl.certificate: /path/to/your/server.crt
#server.ssl.key: /path/to/your/server.key

# Optional settings that provide the paths to the PEM-format SSL certificate and key files.
# These files are used to verify the identity of Kibana to Elasticsearch and are required when
# xpack.security.http.ssl.client_authentication in Elasticsearch is set to required.
#elasticsearch.ssl.certificate: /path/to/your/client.crt
#elasticsearch.ssl.key: /path/to/your/client.key

# Optional setting that enables you to specify a path to the PEM file for the certificate
# authority for your Elasticsearch instance.
#elasticsearch.ssl.certificateAuthorities: [ "/path/to/your/CA.pem" ]

# To disregard the validity of SSL certificates, change this setting's value to 'none'.
#elasticsearch.ssl.verificationMode: full

# Time in milliseconds to wait for Elasticsearch to respond to pings. Defaults to the value of
# the elasticsearch.requestTimeout setting.
#elasticsearch.pingTimeout: 1500

# Time in milliseconds to wait for responses from the back end or Elasticsearch. This value
# must be a positive integer.
#elasticsearch.requestTimeout: 30000

# List of Kibana client-side headers to send to Elasticsearch. To send *no* client-side
# headers, set this value to [] (an empty list).
#elasticsearch.requestHeadersWhitelist: [ authorization ]

# Header names and values that are sent to Elasticsearch. Any custom headers cannot be overwritten
# by client-side headers, regardless of the elasticsearch.requestHeadersWhitelist configuration.
#elasticsearch.customHeaders: {}

# Time in milliseconds for Elasticsearch to wait for responses from shards. Set to 0 to disable.
#elasticsearch.shardTimeout: 30000

# Logs queries sent to Elasticsearch. Requires logging.verbose set to true.
#elasticsearch.logQueries: false

# Specifies the path where Kibana creates the process ID file.
#pid.file: /run/kibana/kibana.pid

# Enables you to specify a file where Kibana stores log output.
#logging.dest: stdout

# Set the value of this setting to true to suppress all logging output.
#logging.silent: false

# Set the value of this setting to true to suppress all logging output other than error messages.
#logging.quiet: false

# Set the value of this setting to true to log all events, including system usage information
# and all requests.
#logging.verbose: false

# Set the interval in milliseconds to sample system and process performance
# metrics. Minimum is 100ms. Defaults to 5000.
#ops.interval: 5000

# Specifies locale to be used for all localizable strings, dates and number formats.
# Supported languages are the following: English - en , by default , Chinese - zh-CN .
i18n.locale: "zh-CN"
双击启动kibana.bat文件即可

浏览器打开访问 http://localhost:5601/

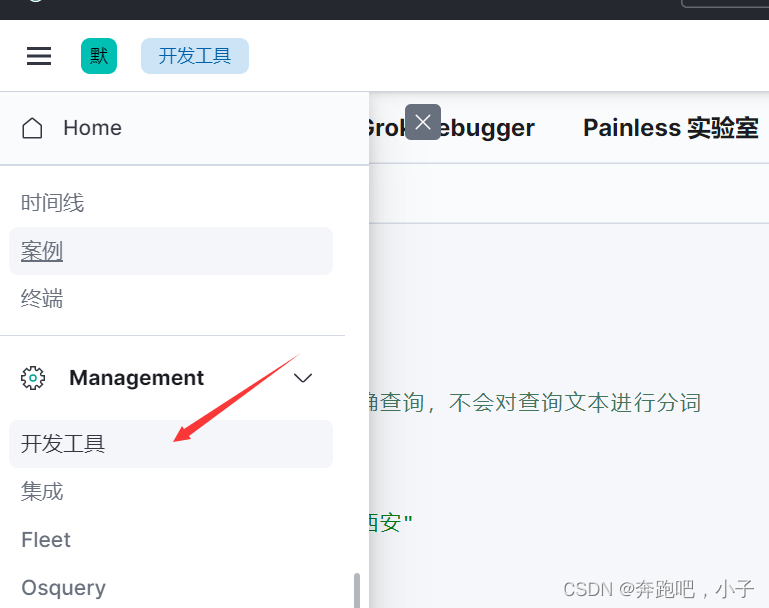
找到主页面菜单-》开发者工具 我们就可以使用练习操作es的api了
安装es分词插件
在线安装analysis-icu分词插件
# 查看已安装插件
.\elasticsearch-plugin.bat list

# 安装插件
.\elasticsearch-plugin.bat install analysis-icu

# 删除插件
.\elasticsearch-plugin.bat remove analysis-icu
离线安装ik中文分词插件
本地下载elasticsearch-analysis-ik-7.17.3.zip插件,解压,然后手动上传到elasticsearch的plugins目录,然后重启ES实例就可以了。
操作es索引脚本
以下就是练习操作es索引的一些请求,大家可以直接在kibana 开发者工具操作执行练习
GET _search
{
"query": {
"match_all": {}
}
}
#查看索引列表
GET /_cat/indices
#默认分词器
POST _analyze
{
"analyzer": "standard",
"text":"中华人民共和国"
}
# icu分词器 粗粒度的拆
POST _analyze
{
"analyzer": "icu_analyzer",
"text":"中华人民共和国"
}
# ik分词器 粗粒度的拆
POST _analyze
{
"analyzer": "ik_smart",
"text":"中华人民共和国"
}
# ik分词器 细粒度
POST _analyze
{
"analyzer": "ik_max_word",
"text":"中华人民共和国"
}
#创建索引
PUT /user
#删除索引
DELETE /user
# 字段属性type为keyword代表不分词
GET /user
# 当我们添加数据的时候,默认会动态映射帮我们创建字段的类型
# 但是我们还是需要自己做静态映射来创建对应字段的类型
PUT /user
{
"settings": {
"number_of_shards": 1,
"number_of_replicas": 1
},
"mappings": {
"properties": {
"id":{
"type": "long"
},
"name":{
"type": "keyword"
},
"age":{
"type": "long"
},
"address":{
"type": "text"
}
}
}
}
# 创建/修改一条数据
# 这种方式做修改的话,注意下是全量做的修改,如果使用下面这种方式,直
# 会把我们的age字段干掉
# PUT /user/_doc/1
# {
# "name":"john2",
# "address":"陕西西安"
# }
#
PUT /user/_doc/1
{
"id":1,
"name":"john",
"age":32,
"address":"陕西西安"
}
PUT /user/_doc/2
{
"id":2,
"name":"mark",
"age":18,
"address":"陕西渭南"
}
GET /user/_doc/2
#查询数据
GET /user/_search
{
"query":{
"match": {
"address": "西"
}
}
}
#term不分词查询
GET /user/_search
{
"query": {
"term": {
"name.keyword": "john"
}
}
}
#重建索引 比如我现在想把name类型设置为text,address字段使用ik分词器
# 步骤:先创建一个新的索引user2
# _reindx给新建的索引起个别名为原来的索引名称user
# 删除旧的索引
# _alias给新的索引起别名为user /user2/_alias/user
## 下面是重建索引的详细步骤 开始 ##
PUT /user2
{
"mappings": {
"properties": {
"id":{
"type": "long"
},
"name":{
"type": "text"
},
"age":{
"type": "long"
},
"address":{
"type": "text",
"analyzer": "ik_max_word"
}
}
}
}
POST _reindex
{
"source": {
"index": "user"
},
"dest": {
"index": "user2"
}
}
#删除索引
DELETE /user
#给user2索引起别名为user
PUT /user2/_alias/user
#查看user索引
GET /user
#查询数据
GET /user/_search
{
"query":{
"match": {
"address": "西安"
}
}
}
## 重建索引的详细步骤 结束 ##
# 修改索引默认的分词器
DELETE /user2
PUT /user
{
"settings": {
"index":{
"analysis.analyzer.default.type":"ik_max_word"
}
}
}
GET /user
#URI query查询(了解即可)
GET /user/_doc/_search?q=age:>30
#DSL query查询(重点平常工作中)
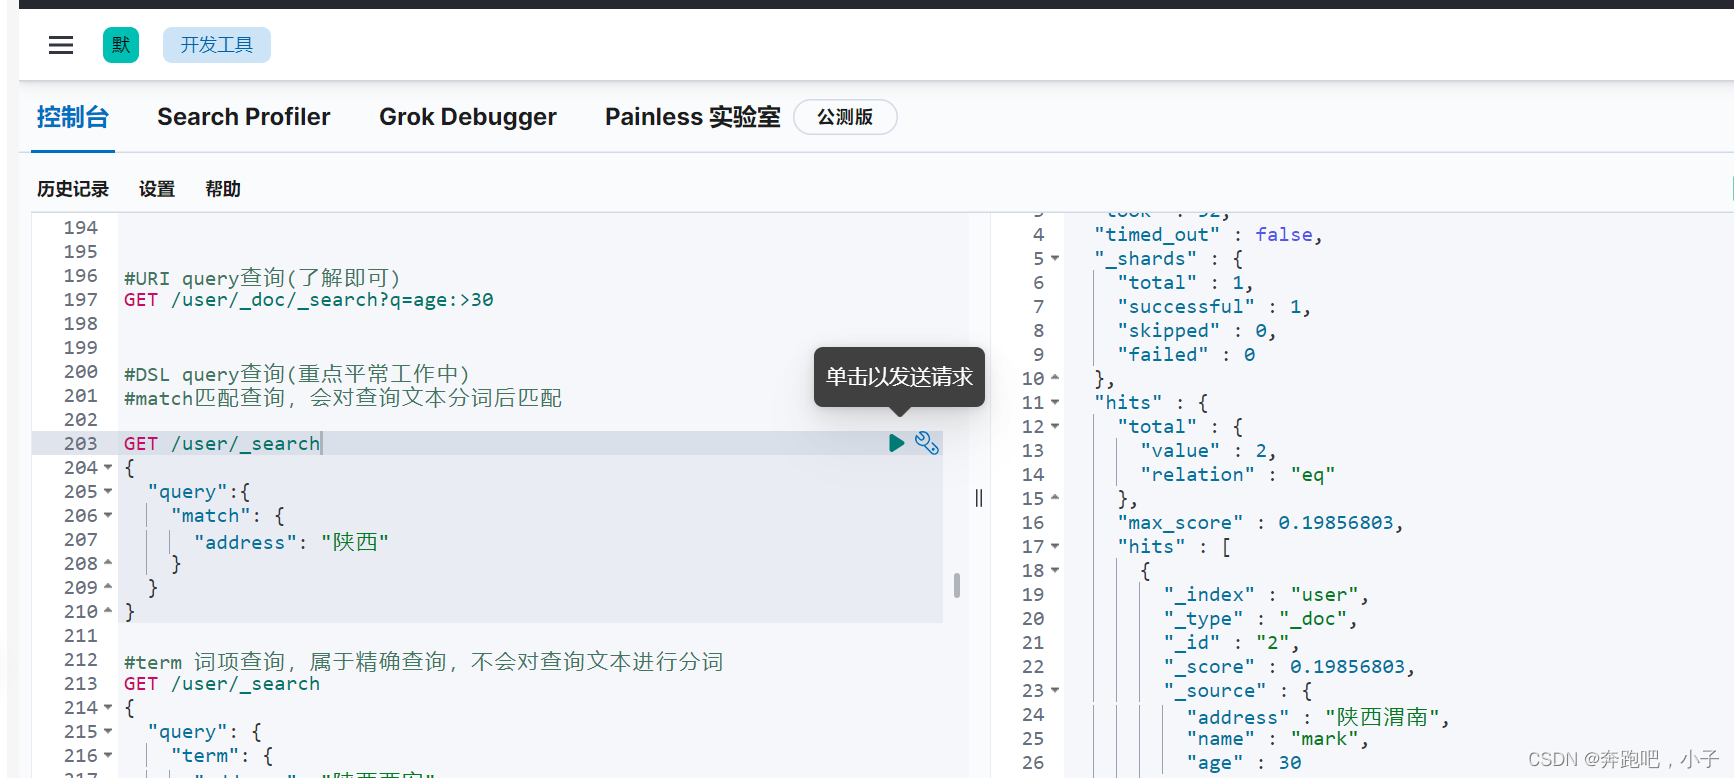
#match匹配查询,会对查询文本分词后匹配
GET /user/_search
{
"query":{
"match": {
"address": "陕西"
}
}
}
#term 词项查询,属于精确查询,不会对查询文本进行分词
GET /user/_search
{
"query": {
"term": {
"address": "陕西西安"
}
}
}
#查看ik分词器对于"陕西西安"这个文本是怎么分词的
POST _analyze
{
"analyzer": "ik_max_word",
"text":"陕西西安"
}
#使用脚本语句来更新
GET /user/_doc/2
POST /user/_update_by_query
{
"query": {
"match": {
"_id": "2"
}
},
"script": {
"source": "ctx._source.age=28"
}
}
# 使用_update部分更新
# _update不会删除原来的文档,而是实现真正的数据更新
POST /user/_update/2
{
"doc":{
"age":30
}
}
# 批量操作可以减少网络连接所产生的开销,提升性能
# 批量创建文档create
POST _bulk
{"create":{"_index":"article","_type":"_doc","_id":1}}
{"id":1,"title":"策略设计模式","content":"策略设计模式content","tags":["设计模式","代码设计"],"create_time":1554015482530}
{"create":{"_index":"article","_type":"_doc","_id":2}}
{"id":1,"title":"工厂设计模式","content":"工厂设计模式content","tags":["设计模式","代码设计"],"create_time":1554015482530}
# 批量普通创建或全量替换索引index
# 如果原文档不存在,则是创建
# 如果原文档存在,则是替换(全量修改原文档)
POST _bulk
{"index":{"_index":"article","_type":"_doc","_id":1}}
{"id":1,"title":"策略设计模式","content":"策略设计模式解决if-else繁琐问题","tags":["设计模式","代码设计"],"create_time":1554015482530}
{"index":{"_index":"article","_type":"_doc","_id":2}}
{"id":1,"title":"工厂设计模式","content":"工厂设计模式封装对象创建使用","tags":["设计模式","代码设计"],"create_time":1554015482530}
# 批量修改update不会全量覆盖
POST _bulk
{"update":{"_index":"article", "_type":"_doc", "_id":1}}
{"doc":{"title":"策略模式"}}
{"update":{"_index":"article", "_type":"_doc", "_id":2}}
{"doc":{"create_time":1554018421008}}
GET /article/_search
# 批量删除
POST _bulk
{"delete":{"_index":"article", "_type":"_doc", "_id":1}}
{"delete":{"_index":"article", "_type":"_doc", "_id":2}}
GET /article/_search
springboot集成elasticSearch
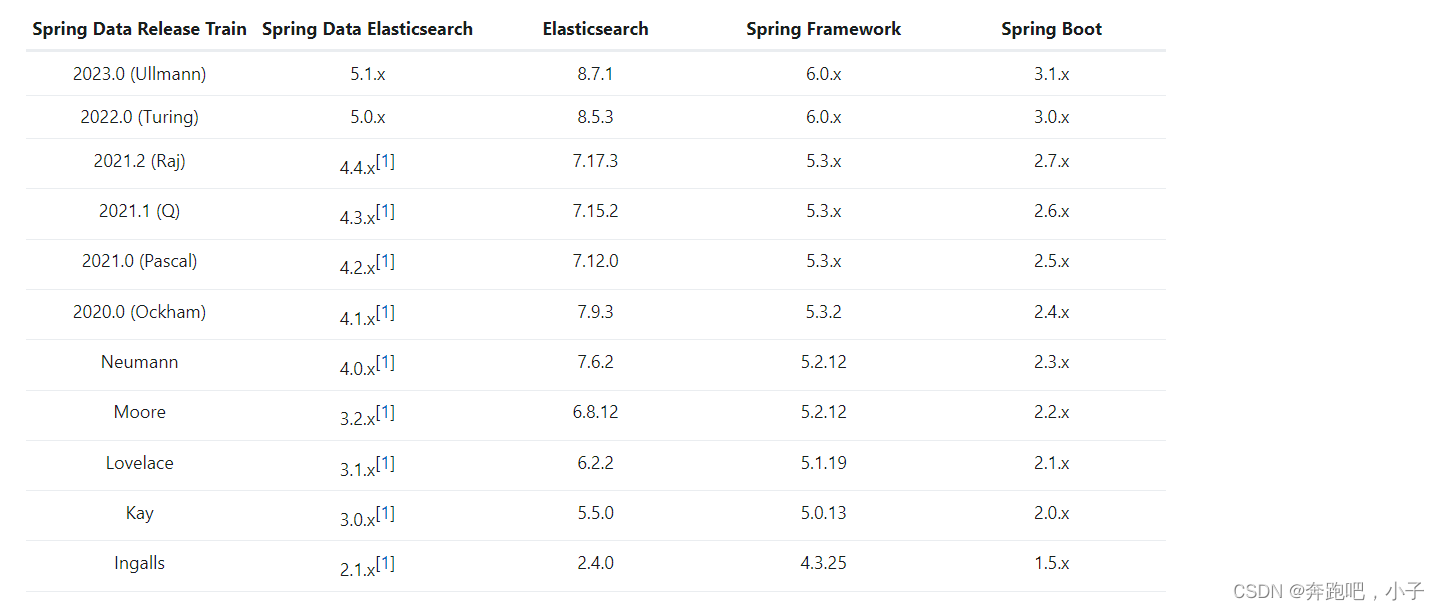
版本选择
这里是springboot官方文档的推荐版本 ,看下图需要我们的springboot版本使用2.7.x版本即可
pom文件引入依赖
 <dependency>
    <groupId>org.projectlombok</groupId>
    <artifactId>lombok</artifactId>
</dependency>

<dependency>
    <groupId>org.springframework.boot</groupId>
    <artifactId>spring-boot-starter-data-elasticsearch</artifactId>
</dependency>
application.yml配置
spring:
  elasticsearch:
    uris: http://localhost:9200
    connection-timeout: 3s
创建索引对象实体
@Data
@AllArgsConstructor
@Document(indexName = "user")
public class EsUserModel {
    @Id
    private Long id;
    @Field(type= FieldType.Keyword)
    private String name;
    private int age;
    @Field(type= FieldType.Text,analyzer="ik_max_word")
    private String address;

}
操作测试代码
package com.es.example;

import com.es.example.model.EsUserModel;
import lombok.extern.slf4j.Slf4j;
import net.minidev.json.JSONValue;
import org.elasticsearch.index.query.QueryBuilders;
import org.elasticsearch.search.sort.SortBuilders;
import org.elasticsearch.search.sort.SortOrder;
import org.junit.jupiter.api.Test;
import org.springframework.beans.factory.annotation.Autowired;
import org.springframework.boot.test.context.SpringBootTest;
import org.springframework.data.domain.PageRequest;
import org.springframework.data.elasticsearch.core.ElasticsearchRestTemplate;
import org.springframework.data.elasticsearch.core.IndexOperations;
import org.springframework.data.elasticsearch.core.SearchHit;
import org.springframework.data.elasticsearch.core.SearchHits;
import org.springframework.data.elasticsearch.core.mapping.IndexCoordinates;
import org.springframework.data.elasticsearch.core.query.IndexQuery;
import org.springframework.data.elasticsearch.core.query.NativeSearchQueryBuilder;

import java.util.ArrayList;
import java.util.List;


@SpringBootTest
@Slf4j
public class ElasticsearchRestTemplateTest {

    @Autowired
    ElasticsearchRestTemplate elasticsearchRestTemplate;

    private final String index_name = "user";


    /**
     * 删除索引
     */
    @Test
    public void testDeleteIndex() {
        //删除索引
        IndexOperations indexOperations = elasticsearchRestTemplate.indexOps(IndexCoordinates.of(index_name));
        indexOperations.delete();
    }

    /**
     * 创建索引
     */
    @Test
    public void testCreateIndex() {
        //创建索引
        IndexOperations indexOperations = elasticsearchRestTemplate.indexOps(IndexCoordinates.of(index_name));
        if (indexOperations.exists()) {
            log.info("索引已经存在");
        } else {
            //创建索引
            indexOperations.create();
        }
    }

    /**
     * 批量添加文档数据
     */
    @Test
    public void testInsertBatch() {
        List<EsUserModel> esUserModels = new ArrayList<>();
        esUserModels.add(new EsUserModel(1L, "张三", 16, "陕西渭南"));
        esUserModels.add(new EsUserModel(2L, "李四", 18, "陕西西安"));
        esUserModels.add(new EsUserModel(3L, "王五", 19, "广州天河"));

        List<IndexQuery> queries = new ArrayList<>();
        for (EsUserModel esUserModel : esUserModels) {
            IndexQuery indexQuery = new IndexQuery();
            indexQuery.setId(esUserModel.getId().toString());
            String json = JSONValue.toJSONString(esUserModel);
            indexQuery.setSource(json);
            queries.add(indexQuery);
        }
        //bulk批量插入
        elasticsearchRestTemplate.bulkIndex(queries, EsUserModel.class);

    }

    @Test
    public void testQueryDocument() {
        NativeSearchQueryBuilder builder = new NativeSearchQueryBuilder();
        //查询
        builder.withQuery(QueryBuilders.matchQuery("address", "陕西"));
        // 设置分页信息
        builder.withPageable(PageRequest.of(0, 5));
        // 设置排序
        builder.withSort(SortBuilders.fieldSort("age").order(SortOrder.DESC));
        SearchHits<EsUserModel> search = elasticsearchRestTemplate.search(builder.build(), EsUserModel.class);
        List<SearchHit<EsUserModel>> searchHits = search.getSearchHits();
        for (SearchHit hit : searchHits) {
            log.info("返回结果:" + hit.toString());
        }
    }


}
控制台输出
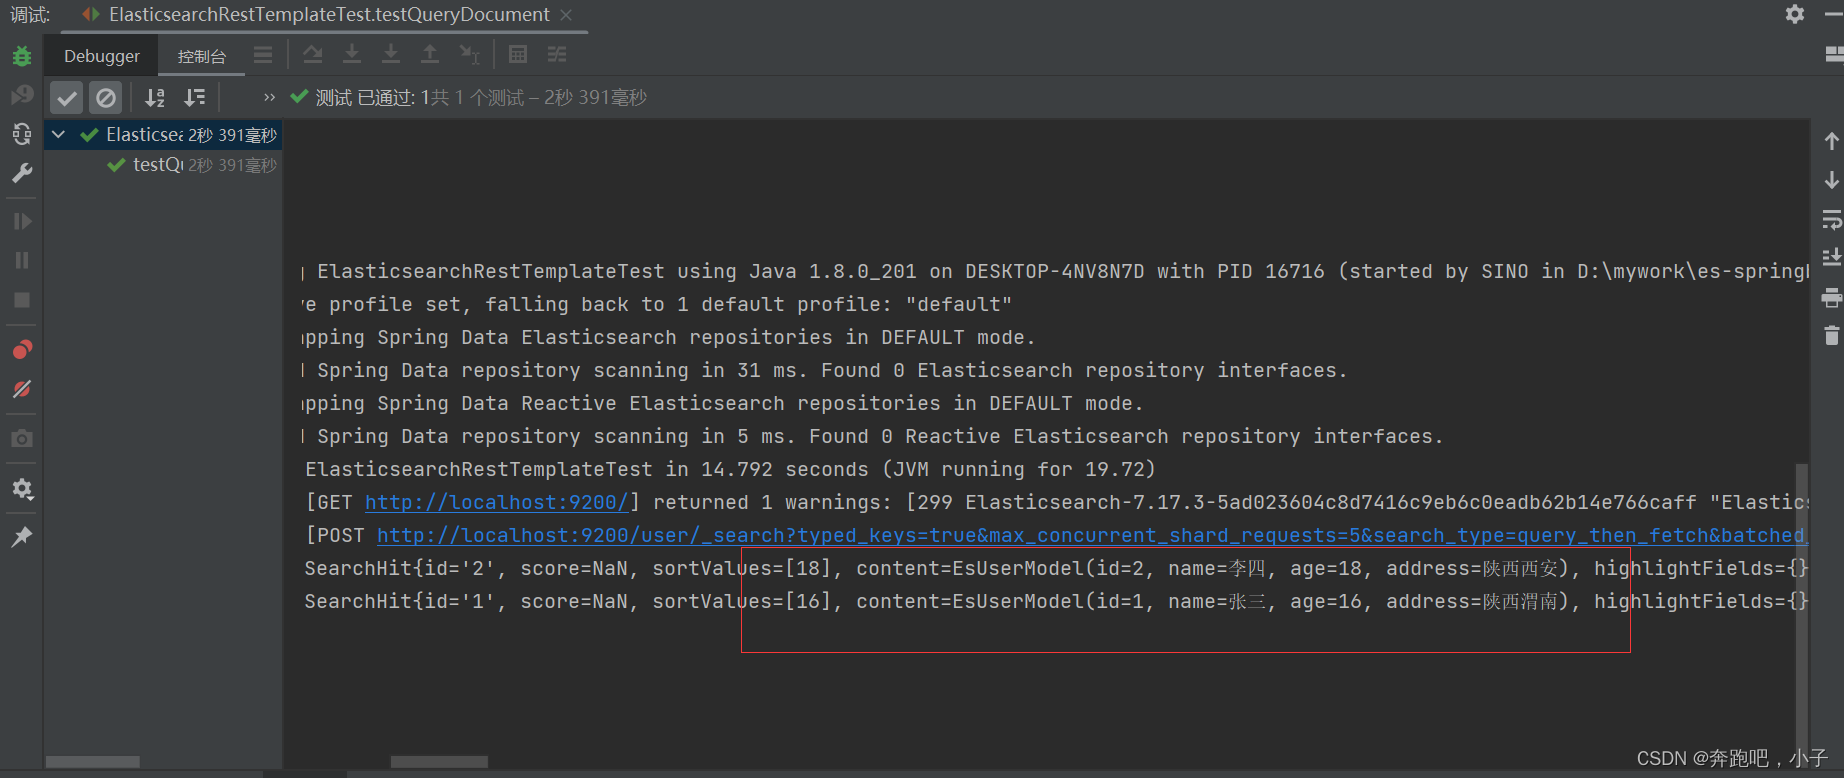
我们使用kibana开发者工具请求验证是否和控制台输出一样
