在使用Hibernate添加数据时,如果需要自定义主键生成策略,可以使用@GenericGenerator注解,在此之前需要创建一个IdentifierGenerator接口的实现类,并且重写public Serializable generate(SharedSessionContractImplementor sharedSessionContractImplementor, Object o)方法。该方法的返回值将作为数据库表的主键值。
1、首先导入雪花算法的工具类
	package com.kaikai.hibernateJPA.util;

import java.util.concurrent.TimeUnit;
import java.util.concurrent.locks.LockSupport;

/**
 * Twrite雪花算法,生成不重复的UUID
 * by
 */
public class SnowFlakeIdWorker {


        // ==============================Fields===========================================
    /**
     * 开始时间截 (2021-01-19)
     */
    private final long twepoch = 1611043703161L;

    /**
     * 机器id所占的位数
     */
    private final long workerIdBits = 5L;

    /**
     * 数据标识id所占的位数
     */
    private final long dataCenterIdBits = 5L;

    /**
     * 支持的最大机器id,结果是31 (这个移位算法可以很快的计算出几位二进制数所能表示的最大十进制数)
     */
    private final long maxWorkerId = -1L ^ (-1L << workerIdBits);

    /**
     * 支持的最大数据标识id,结果是31
     */
    private final long maxDataCenterId = -1L ^ (-1L << dataCenterIdBits);

    /**
     * 序列在id中占的位数
     */
    private final long sequenceBits = 12L;

    /**
     * 机器ID向左移12位
     */
    private final long workerIdShift = sequenceBits;

    /**
     * 数据标识id向左移17位(12+5)
     */
    private final long dataCenterIdShift = sequenceBits + workerIdBits;

    /**
     * 时间截向左移22位(5+5+12)
     */
    private final long timestampLeftShift = sequenceBits + workerIdBits + dataCenterIdBits;

    /**
     * 生成序列的掩码,这里为4095 (0b111111111111=0xfff=4095)
     */
    private final long sequenceMask = -1L ^ (-1L << sequenceBits);

    /**
     * 工作机器ID(0~31)
     */
    private long workerId;

    /**
     * 数据中心ID(0~31)
     */
    private long dataCenterId;

    /**
     * 备用的数据中心ID(0~31),当时钟回拨时,为了不抛异常,启用备用ID
     */
    private long standbyDatacenterId;

    /**
     * 毫秒内序列(0~4095)
     */
    private long sequence = 0L;

    /**
     * 上次生成ID的时间截
     */
    private long lastTimestamp = -1L;

    /**
     * 是否时钟回拨
     */
    private boolean isTimestampBack = false;

    // ==============================Constructors=====================================
    /**
     * 最大容忍时间, 单位毫秒, 即如果时钟只是回拨了该变量指定的时间, 那么等待相应的时间即可;
     * 考虑到sequence服务的高性能, 这个值不易过大
     */
    private static final long MAX_BACKWARD_MS = 3;

    /**
     * 构造函数
     *
     * @param workerId     工作ID (0~31)
     * @param datacenterId 数据中心ID (0~31)
     */
    SnowFlakeIdWorker(long workerId, long datacenterId, long standbyDatacenterId) {


        if (workerId > maxWorkerId || workerId < 0) {


            throw new IllegalArgumentException(String.format("worker Id can't be greater than %d or less than 0", maxWorkerId));
        }
        if (datacenterId > maxDataCenterId || datacenterId < 0) {


            throw new IllegalArgumentException(String.format("datacenter Id can't be greater than %d or less than 0", maxDataCenterId));
        }
        if (standbyDatacenterId > maxDataCenterId || standbyDatacenterId < 0) {


            throw new IllegalArgumentException(String.format("standby datacenter Id can't be greater than %d or less than 0", maxDataCenterId));
        }
        if (datacenterId == standbyDatacenterId) {


            throw new IllegalArgumentException("datacenter Id can't equal to standby datacenter Id.");
        }
        this.workerId = workerId;
        this.dataCenterId = datacenterId;
        this.standbyDatacenterId = standbyDatacenterId;
    }

    // ==============================Methods==========================================

    /**
     * 获得下一个ID (该方法是线程安全的)
     *
     * @return SnowflakeId
     */
    synchronized long nextId() {


        long timestamp = timeGen();

        // 如果当前时间小于上一次ID生成的时间戳,说明系统时钟回退过
        if (timestamp < lastTimestamp) {


            // 如果时钟回拨在可接受范围内, 等待即可
            long offset = lastTimestamp - timestamp;
            if (offset <= MAX_BACKWARD_MS) {


                try {


                    //睡(lastTimestamp - currentTimestamp)ms让其追上
                    LockSupport.parkNanos(TimeUnit.MILLISECONDS.toNanos(offset));

                    timestamp = timeGen();
                    //如果当前时间还是小于上一次ID生成的时间戳,这时启用备用的datacenterId
                    if (timestamp < lastTimestamp) {


                        isTimestampBack = true;
                        //服务器时钟被调整了
                        //log.error(String.format("Clock moved backwards.  Refusing to generate id for %d milliseconds", lastTimestamp - timestamp));
                        //throw new RuntimeException(String.format("Clock moved backwards.  Refusing to generate id for %d milliseconds", lastTimestamp - timestamp));
                    } else {


                        isTimestampBack = false;
                    }
                } catch (Exception e) {


                    //log.error(e);
                }
            }
        }

        // 如果是同一时间生成的,则进行毫秒内序列
        if (lastTimestamp == timestamp) {


            sequence = (sequence + 1) & sequenceMask;
            // 毫秒内序列溢出
            if (sequence == 0) {


                // 阻塞到下一个毫秒,获得新的时间戳
                timestamp = tilNextMillis(lastTimestamp);
            }
        }
        // 时间戳改变,毫秒内序列重置
        else {


            sequence = 0L;
        }

        // 上次生成ID的时间截
        lastTimestamp = timestamp;

        //要使用的datacenterId
        long datacenterIdToUse = isTimestampBack ? standbyDatacenterId : dataCenterId;

        // 移位并通过或运算拼到一起组成64位的ID
        return ((timestamp - twepoch) << timestampLeftShift) //
                | (datacenterIdToUse << dataCenterIdShift) //
                | (workerId << workerIdShift) //
                | sequence;
    }

    /**
     * 阻塞到下一个毫秒,直到获得新的时间戳
     *
     * @param lastTimestamp 上次生成ID的时间截
     * @return 当前时间戳
     */
    private long tilNextMillis(long lastTimestamp) {


        long timestamp = timeGen();
        while (timestamp <= lastTimestamp) {


            timestamp = timeGen();
        }
        return timestamp;
    }

    /**
     * 返回以毫秒为单位的当前时间
     *
     * @return 当前时间(毫秒)
     */
    protected long timeGen() {


        return System.currentTimeMillis();
    }

    private volatile static SnowFlakeIdWorker snowflakeIdWorker;

    public static SnowFlakeIdWorker getInstance() {


        if (snowflakeIdWorker == null) {


            synchronized (SnowFlakeIdWorker.class) {


                if (snowflakeIdWorker == null) {


                    snowflakeIdWorker = new SnowFlakeIdWorker(1, 0,11);
                }
            }
        }
        return snowflakeIdWorker;
    }

    /**
     * 获得下一个ID (该方法是线程安全的)
     *
     * @return SnowflakeId
     */
    public static Long getNextId() {


        long l = getInstance().nextId();
        return l;
    }
}
2、创建自定义主键生成配置类
public class GeneratorConfig implements IdentifierGenerator {


    @Override
    public Serializable generate(SharedSessionContractImplementor sharedSessionContractImplementor, Object o) throws HibernateException {


        return SnowFlakeIdWorker.getNextId();
    }
}
3、创建数据库对应的实体
@Data
@Entity
@Table(name = "info")
@Accessors(chain = true)
public class Info implements Serializable {


    /**
     * id
     */
    @Id
    @Column(name = "id")
    @GeneratedValue(generator = "generatorConfig",strategy = GenerationType.SEQUENCE)
    @GenericGenerator(name = "generatorConfig",strategy = "com.kaikai.hibernateJPA.config.GeneratorConfig")
    private Long id;
    /**
     * 姓名
     */
    @Column(name = "name")
    private String name;
    /**
     *年龄
     */
    @Column(name = "age")
    private Integer age;
    /**
     * 生日
     */
    @Column(name = "birth")
    private Date birth;
    /**
     * 性别
     */
    @Column(name = "gender")
    private String gender;

}
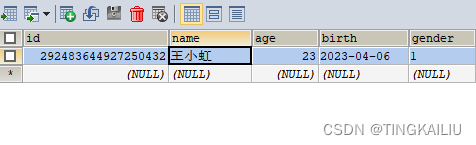
4、在测试类里测试一下添加
@Test
    void saveTest(){


        Info info = new Info();
        info.setAge(23)
            .setBirth(new Date())
            .setGender("1")
            .setName("王小虹");
        Info save = infoRepository.save(info);
        log.info("保存的信息为:{}",save.toString());

    }
5、查看数据库的数据