文章目录
写在前面
一、Playwright介绍
1.1 简单介绍
Playwright是微软推出来的一款自动化测试工具,是专门为满足端到端测试需求而创建的。Playwright 支持所有现代渲染引擎,包括 Chromium、WebKit 和 Firefox。可以在 Windows、Linux 和 macOS 上进行本地或持续集成的测试,可以无头(headless)或有头(headed),还可以使用 Google Chrome 对 Android 和 Mobile Safari 进行本地模拟测试。
当今常用的三个自动化测试(或者爬虫)库:
| 库 | Selenium | Puppeteer | Playwright |
|---|---|---|---|
| JavaScript 支持 | 官方支持 | 官方支持 | 官方支持 |
| Python 异步支持 | 无 | 第三方,而且 bug 不少 | 官方支持 |
| Python 同步支持 | 官方支持 | 无 | 官方支持 |
| 维护者 | 社区 | 微软 | |
| 可操作性浏览器 | Chrome/Firefox/Safari/Edge | Chrome/Firefox | Chrome/Firefox/Safari/Edge |
| 模拟操作丰富度 | 一般 | 极好 | 很好 |
| Cookie 支持 | 一般 | 一般 | API 非常友好 |
| 代理切换支持 | 一般 | 一般 | 极好 |
1.2 支持的平台
| Linux | macOS | Windows | |
|---|---|---|---|
| Chromium 89.0.4344.0 | 支持 | 支持 | 支持 |
| WebKit 14.1 | 支持 | 支持 | 支持 |
| Firefox 84.0b9 | 支持 | 支持 | 支持 |
1.3 支持语言
JavaScript and TypeScript: https://github.com/microsoft/playwright
Java: https://github.com/microsoft/playwright-java
Python: https://github.com/microsoft/playwright-python
C#: https://github.com/microsoft/playwright-sharp
1.4 官方文档(python)
文档:https://playwright.dev/python/docs/intro
API: https://playwright.dev/python/docs/api/class-playwright
二、开始
2.1 安装要求
- Python 3.8 or higher.
- Windows 10+, Windows Server 2016+ or Windows Subsystem for Linux (WSL).
- MacOS 12 Monterey or MacOS 13 Ventura.
- Debian 11, Debian 12, Ubuntu 20.04 or Ubuntu 22.04.
2.2 安装
安装playwright及Chromium、Firefox和WebKit的浏览器二进制文件
- pip安装
pip install playwright  # 安装playwright
playwright install  # 安装浏览器驱动
- conda安装
conda install playwright  # 安装playwright
playwright install   # 安装浏览器驱动
2.3 代码示例
当前安装版本:
python=3.9.5
playwright=1.37.0
# -*- coding: utf-8 -*-
# @Time    : 2023/9/1 10:52
# @Author  : chenyinhua
# @File    : test_demo.py
# @Software: PyCharm
# @Desc:

import re
from playwright.sync_api import sync_playwright, expect

# 同步API (初学者建议先使用同步API)
with sync_playwright() as playwright:
    """
    在使用 with sync_playwright() as playwright: 时,Playwright 会创建一个 Playwright 实例,并将其作为 playwright 变量绑定到 with 代码块中。
    在代码块结束时,会自动调用 playwright.close() 方法来关闭所有已创建的页面和浏览器实例。
    这样可以确保资源的正常释放和关闭,避免资源泄漏和浪费。因此,使用 with sync_playwright() as playwright: 是一个推荐的方式来管理 Playwright 的实例。
    """
    # 默认是无头模式
    # browser = playwright.chromium.launch()
    # 使用有头模式
    browser = playwright.chromium.launch(headless=False, channel="chrome")
    """
    通过调用 browser.new_context() 方法,我们可以在当前浏览器实例中创建一个新的上下文。
    这个新的上下文将与原始上下文相互隔离,它们不会共享 cookies、缓存等数据。
    您可以在同一个浏览器实例中创建多个上下文,每个上下文可以具有自己的页面和状态。
    可以理解为浏览器的无痕模式
    """
    context = browser.new_context()

    """
     一般来说,一个page对应一个浏览器选项卡。而Page对象的作用在于和页面的内容进行交互,以及导航和加载新的页面。
    在上下文中创建一个新的页面时,该页面会继承上下文的各种属性和设置,例如 cookies、请求拦截器、代理等。
    此外,在同一上下文中创建的页面之间共享网络连接,因此加载速度更快。
    """
    page = context.new_page()

    # 访问地址
    page.goto("https://www.gitlink.org.cn/")
    # 断言网页标题=GitLink
    expect(page).to_have_title(re.compile("GitLink"))

    # 点击按钮,会新开窗口打开页面
    page.locator("//a[text()='开源项目']").click()
    # 此处需要更新页面的值
    page = page.wait_for_event("popup")
    # 断言网页标题=开源项目
    expect(page).to_have_title(re.compile("开源项目"))
2.4 断言Assertions
Playwright 提供了 expect 函数,它会等待直到满足预期条件。
import re
from playwright.sync_api import expect

expect(page).to_have_title(re.compile("GitLink"))
官方详细说明:https://playwright.dev/python/docs/test-assertions

后续会详细说明断言的具体用法。
2.5 定位Locators
定位器是 Playwright 的自动等待和重试能力的核心组成部分。定位器用于在任何时刻找到页面上的元素,并用于对元素执行操作,例如 .click、.fill 等。
import re
from playwright.sync_api import expect

page.goto("https://www.gitlink.org.cn/")
expect(page).to_have_title(re.compile("GitLink"))
page.locator("//a[text()='开源项目']").click()
官方详细说明:https://playwright.dev/python/docs/locators

后续会详细说明定位的具体用法。
2.6 测试隔离Test Isolation
Playwright Pytest 插件基于测试固件(test fixtures)的概念,其中内置的页面固件(page fixture)被传递到您的测试中。由于浏览器上下文(Browser Context)的存在,页面在测试之间是隔离的。浏览器上下文相当于一个全新的浏览器配置文件,在这个环境中,每个测试都获得了一个全新的环境,即使多个测试在同一个浏览器中运行也是如此。
import re
from playwright.sync_api import Page, expect


def test_gitlink_demo(page: Page):
    # 访问地址
    page.goto("https://www.gitlink.org.cn/")
    # 断言网页标题=GitLink
    expect(page).to_have_title(re.compile("GitLink"))

    # 点击按钮,会新开窗口打开页面
    page.locator("//a[text()='开源项目']").click()
    # 此处需要更新页面的值
    page = page.wait_for_event("popup")
    # 断言网页标题=开源项目
    expect(page).to_have_title(re.compile("开源项目"))
该部分与【pytest插件支持】一节相关。可以跳到该章节详细理解。
2.7 使用Test Hooks
我们可以使用各种固件(fixtures)在测试之前或之后执行代码,并在它们之间共享对象。例如,具有 autouse 的函数范围的固件行为类似于 beforeEach/afterEach,而具有 autouse 的模块范围的固件行为类似于 beforeAll/afterAll,在所有测试之前和之后运行。
import pytest
from playwright.sync_api import Page


@pytest.fixture(scope="function", autouse=True)
def before_each_after_each(page: Page):
    print("beforeEach")
    # Go to the starting url before each test.
    page.goto("https://playwright.dev/")
    yield
    print("afterEach")

def test_main_navigation(page: Page):
    # Assertions use the expect API.
    expect(page).to_have_url("https://playwright.dev/")
三、运行测试
我们可以运行单个测试、一组测试或所有测试。测试可以在一个浏览器或多个浏览器上运行。默认情况下,测试会以无头方式运行,这意味着在运行测试时不会打开浏览器窗口,并且结果将在终端中显示。如果您愿意,可以使用 --headed 标志以有头模式运行您的测试。
- 使用Chromium运行测试
pytest
- 运行单个测试文件
pytest test_login.py
- 运行一组测试
pytest tests/todo-page/ tests/landing-page/
- 运行指定测试方法
pytest -k "test_add_a_todo_item"
- 使用有头模式运行测试
pytest --headed test_login.py
- 指定浏览器运行测试
pytest test_login.py --browser webkit
- 指定多个浏览器运行测试
pytest test_login.py --browser webkit --browser firefox
- 并行测试(通常情况下浏览器会逐个测试)
注意:需要安装pytest-xdist
pytest --numprocesses auto
四、Debug调试
由于 Playwright 是在 Python 中运行的,我们可以使用您选择的调试器来调试它,例如在 Visual Studio Code 中使用 Python 插件。Playwright 提供了 Playwright Inspector 工具,它允许您逐步执行 Playwright API 调用,查看它们的调试日志并探索定位器(locators)。通过 Playwright Inspector,您可以更方便地进行调试和排查问题。
- Bash
# 开启调试
PWDEBUG=1
# 关闭调试
PWDEBUG=0
# 运行测试
pytest -s
- PowerShell
# Window可以使用这个
# 开启调试
$env:PWDEBUG=1
# 关闭调试
$env:PWDEBUG=0
# 运行测试
pytest -s
- Batch
# Window可以使用这个
# 开启调试
set PWDEBUG=1
# 关闭调试
set PWDEBUG=0
# 运行测试
pytest -s
五、脚本录制Test generator
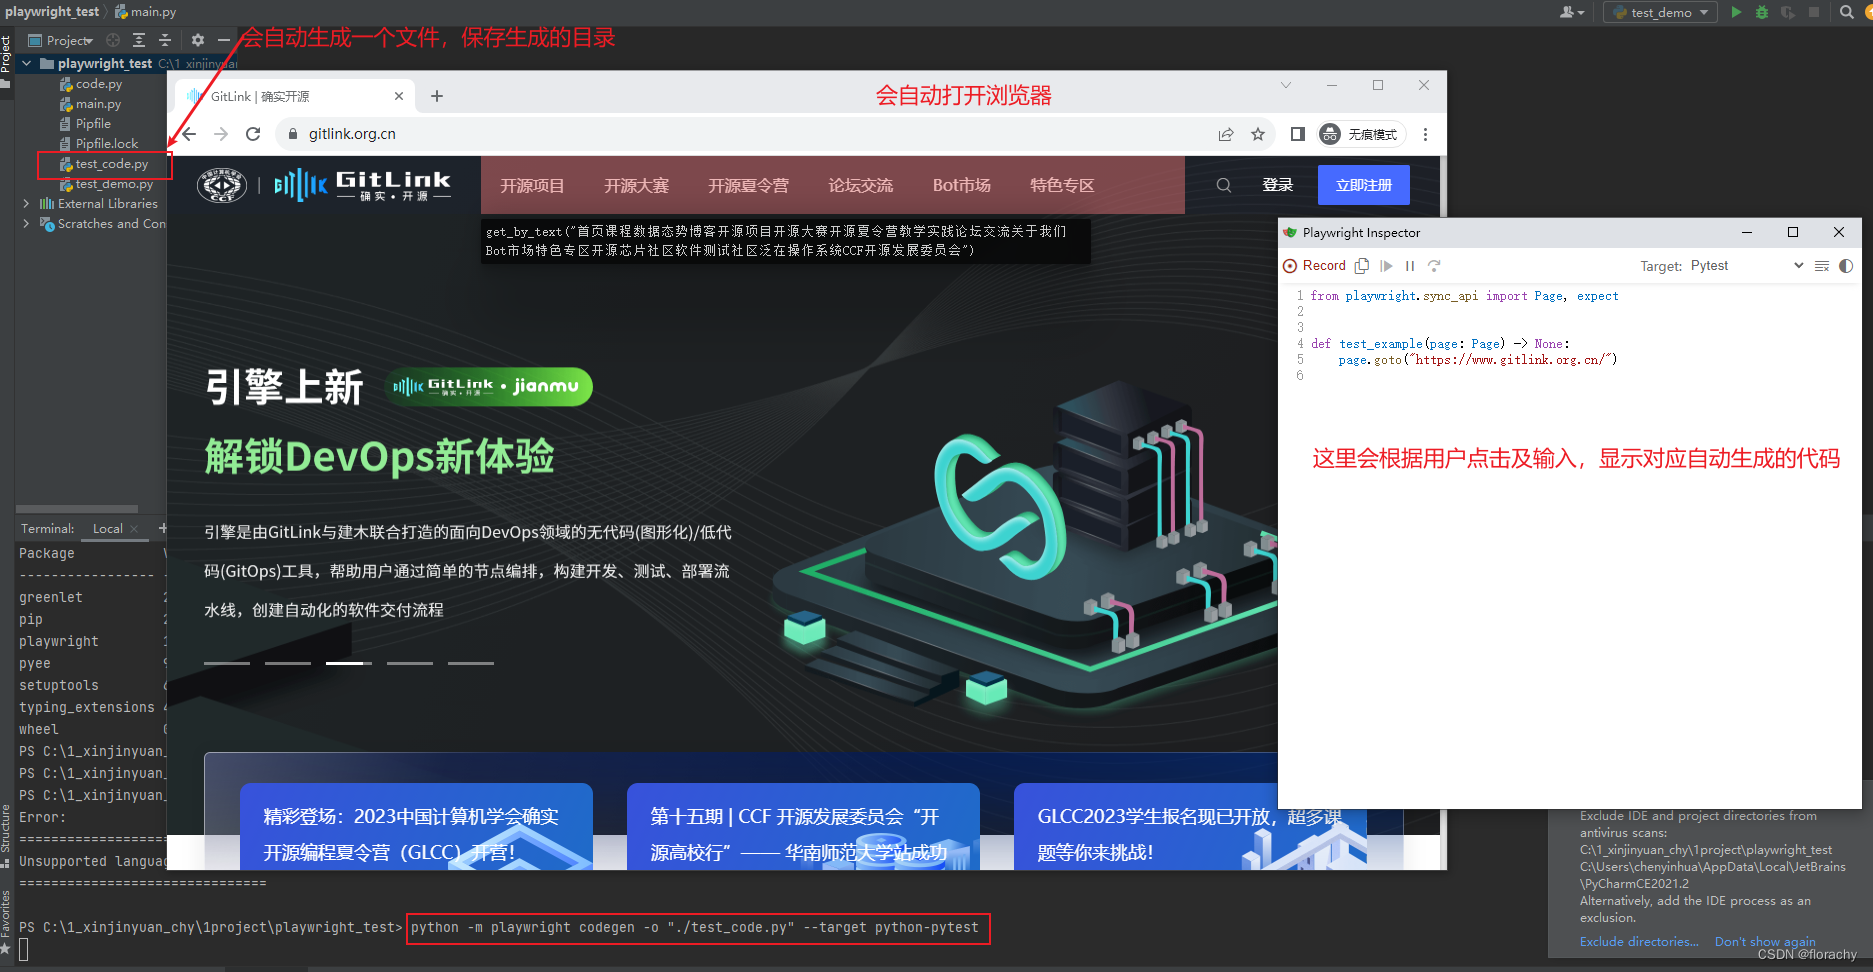
Playwright带有开箱即用的测试生成功能,是快速开始测试的绝佳方式。它会打开两个窗口,一个是浏览器窗口,可以在其中与希望测试的网站进行交互;另一个是Playwright Inspector窗口,可以在其中录制测试、复制测试、清除测试以及更改测试语言。通过Playwright Inspector,可以方便地记录测试并进行相关操作,使能够快速生成和管理测试代码。
我们可以先来体验一下脚本录制功能。
python -m playwright codegen 录制脚本
 –help 帮助文档
 -o 生成自动化脚本的目录(文件默认生成的地址为你cmd运行命令的地址,也可以在命令中输入需要保存的地址)
 –target 脚本语言,包含 JS 和 Python,分别对应值为:python 和 javascript
 -b 指定浏览器驱动
在cmd中执行命令: python -m playwright codegen -o "./test_code.py" --target python-pytest
参考其他命令:python -m playwright codegen --target python -o test.py -b chromium https://www.baidu.com
注意:如果需要停止脚本录制,只需要关闭浏览器即可。
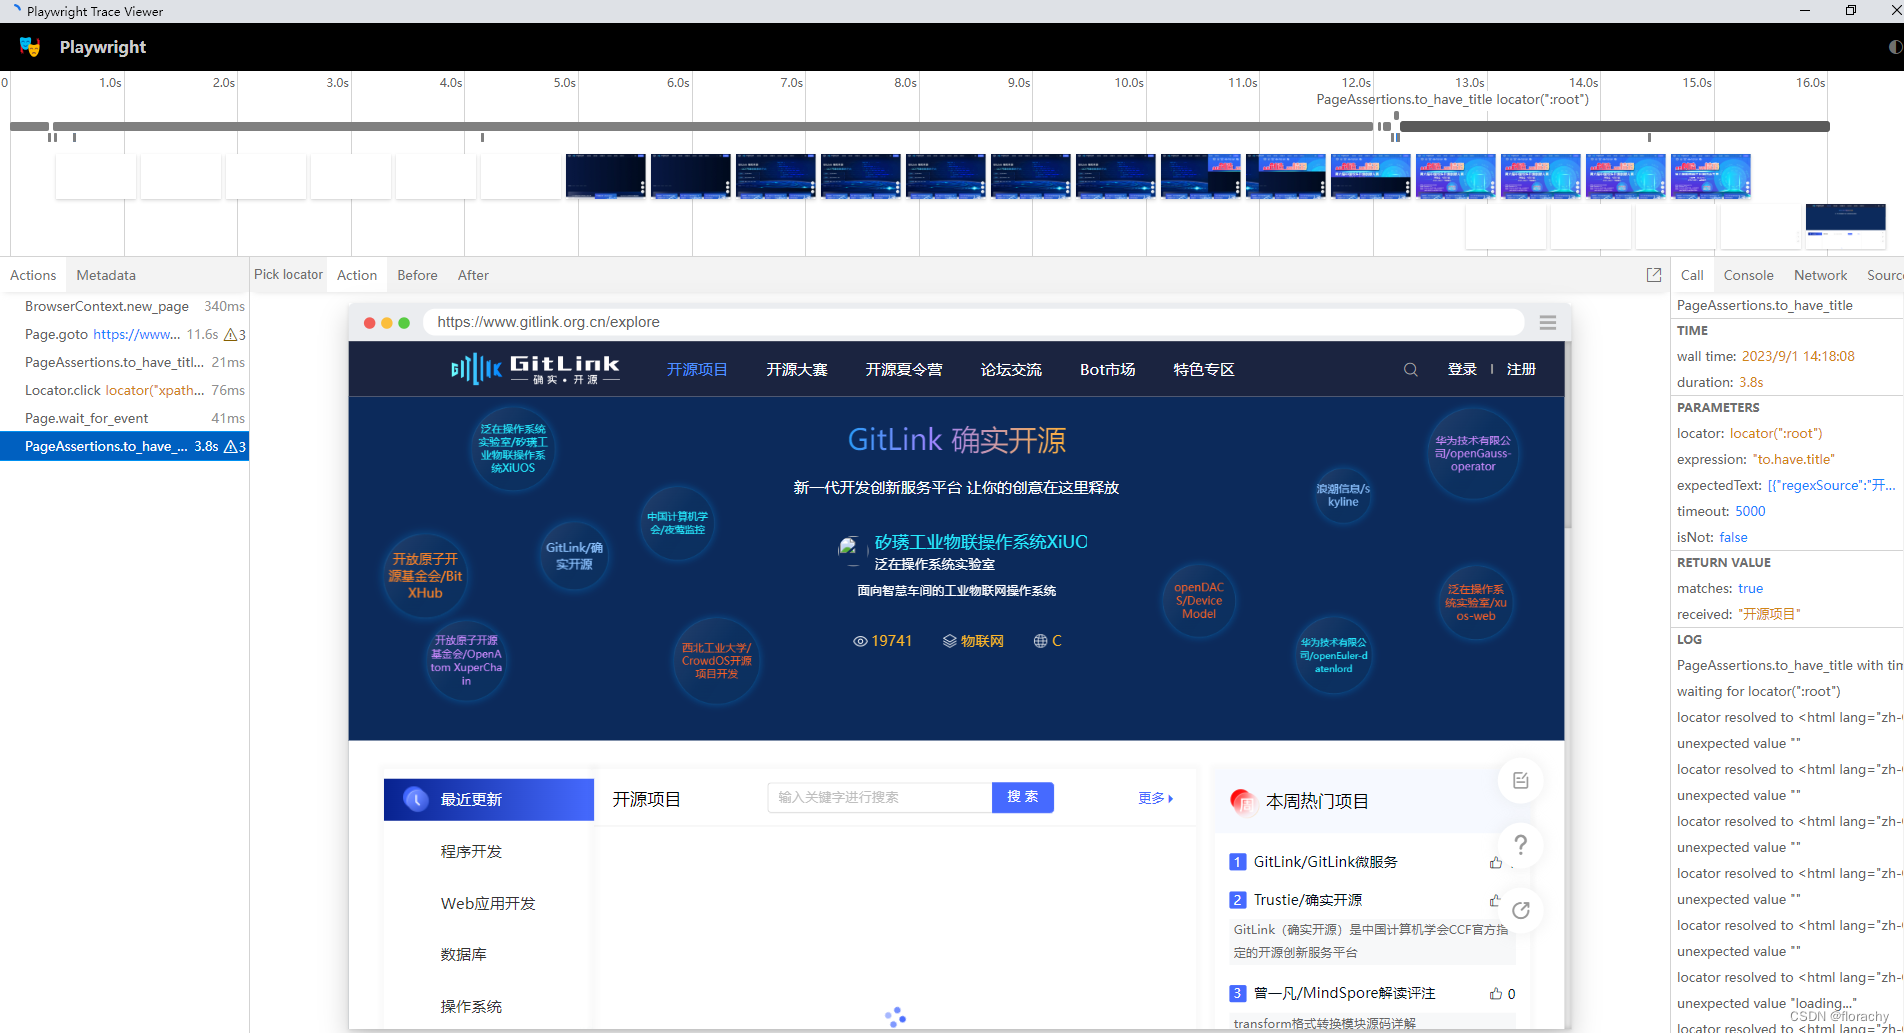
六、跟踪查看器Trace viewer
Playwright Trace Viewer 是一个 GUI 工具,可以 Playwright 测试进行跟踪,这意味着我们可以回溯和前进每个测试操作,并在每个操作期间可视化查看正在发生的情况。
6.1 开始跟踪
可以使用browser_context.tracing进行跟踪记录。代码参考如下:
import re
from playwright.sync_api import sync_playwright, expect


with sync_playwright() as playwright:
    browser = playwright.chromium.launch()
    context = browser.new_context()
    # 在新开页面之前,开始跟踪记录
    context.tracing.start(screenshots=True, snapshots=True, sources=True)
    page = context.new_page()

    page.goto("https://www.gitlink.org.cn/")
    expect(page).to_have_title(re.compile("GitLink"))

    page.locator("//a[text()='开源项目']").click()
    page = page.wait_for_event("popup")
    expect(page).to_have_title(re.compile("开源项目"))

    # 停止跟踪记录,并将记录保存到trace.zip(zip文件名可自定义)
    context.tracing.stop(path="trace.zip")
6.1 查看跟踪记录
在cmd中执行命令:playwright show-trace trace.zip。
我们执行命令后,打开查看的页面如下:
七、pytest插件支持
Playwright 提供了一个 Pytest 插件pytest-playwright来支持端到端测试。
安装pytest插件:pip install pytest-playwright。
注意:本章节所有内容都必须在已安装pytest-playwright的前提下才能生效。
7.1 使用
使用pytest运行测试:pytest --browser webkit --headed
--headed表示使用有头模式运行。
我们也可以在pytest的配置文件pytest.ini 中对运行命令行参数进行配置,如下所示:
# content of pytest.ini
[pytest]
# Run firefox with UI
addopts = --headed --browser firefox
7.2 命令行参数CLI arguments
- –headed: 运行测试是以有头模式还是无头模式运行,默认是无头模式;
- –browser: 在不同浏览器运行测试,可以指定多次;默认是chromium;
- –browser-channel:要使用的浏览器通道。浏览器通道代表特定版本和发布渠道的浏览器。例如,可以指定特定的 Chrome 浏览器版本或发布渠道,比如beta或dev;
- –slowmo:将 Playwright 操作减慢指定的毫秒数。可用于查看操作进行情况(默认为 0);
- –device:要模拟的设备;
- –output:用于存储测试生成的工件的目录(默认为 test-results);
- –tracing:是否为每个测试记录跟踪信息。可选值:on、off 或 retain-on-failure(默认为 off);
- –video:是否为每个测试记录视频。可选值:on、off 或 retain-on-failure(默认为 off);
- –screenshot:是否在每个测试后自动捕获屏幕截图。可选值:on、off 或 only-on-failure(默认为 off);
- –full-page-screenshot:是否在失败时进行完整页面屏幕截图。默认情况下,只捕获视口部分。需要启用 --screenshot 选项(默认为 off);
7.3 Fixture
pytest 配置了特定于 Playwright 的 fixtures。要使用这些 fixtures,请将 fixture 名称作为测试函数的参数传递。
在下面的例子中,我们将page作为Fixture测试函数的参数传递。
import re
from playwright.sync_api import Page, expect


def test_gitlink_demo(page: Page):
    # 访问地址
    page.goto("https://www.gitlink.org.cn/")
    # 断言网页标题=GitLink
    expect(page).to_have_title(re.compile("GitLink"))

    # 点击按钮,会新开窗口打开页面
    page.locator("//a[text()='开源项目']").click()
    # 此处需要更新页面的值
    page = page.wait_for_event("popup")
    # 断言网页标题=开源项目
    expect(page).to_have_title(re.compile("开源项目"))
7.3.1 Function scope
这些 fixtures 在测试函数中被请求时创建,并在测试结束时销毁。
- context:用于测试的新浏览器上下文。
- page:用于测试的新浏览器页面。
7.3.2 Session scope
这些 fixtures 在测试函数中被请求时创建,并在所有测试结束时销毁。
- playwright: Playwright 实例。
- browser_type: 当前浏览器的 BrowserType 实例。
- browser: 由 Playwright 启动的浏览器实例。
- browser_name: 浏览器名称,字符串类型。
- browser_channel: 浏览器通道,字符串类型。
- is_chromium, is_webkit, is_firefox: 分别对应浏览器类型的布尔型值。
7.3.3 自定义的fixture 选项
对于浏览器和上下文 fixtures,请使用以下 fixtures 来定义自定义的启动选项。
- browser_type_launch_args:覆盖 browser_type.launch() 的启动参数。它应该返回一个字典。
- browser_context_args:覆盖 browser.new_context() 的选项。它应该返回一个字典。
还可以通过使用 browser_context_args 标记,为单个测试覆盖上下文选项(browser.new_context())。
import pytest

@pytest.mark.browser_context_args(timezone_id="Europe/Berlin", locale="en-GB")
def test_browser_context_args(page):
    assert page.evaluate("window.navigator.userAgent") == "Europe/Berlin"
    assert page.evaluate("window.navigator.languages") == ["de-DE"]
7.4 并行测试
如果电脑的CPU足够高,我们可以使用pytest-xdist,并行运行多个测试,以加快整个测试套件的执行时间。
# install dependency
pip install pytest-xdist
# use the --numprocesses flag
# 根据硬件和测试的性质,可以将 numprocesses 设置为从 2 到机器上的 CPU 数量的任意值。
# 如果设置得过高,可能会出现意外行为。
pytest --numprocesses auto
7.5 示例
7.5.1 配置慢速模式
我们可以使用参数--slowmo配置慢速模式。
比如:pytest --slowmo 100
或者也可以如下实现代码:
# run.py
import pytest

pytest.main( ['--headed', '--browser=chromium', "--browser-channel=chrome", "--slowmo=10"])
7.5.2 跳过X浏览器测试
我们可以使用装饰器@pytest.mark.skip_browser来跳过该测试用例跳过执行X浏览器。
# test_demo.py
import re
from playwright.sync_api import Page, expect
import pytest


@pytest.mark.skip_browser("webkit")
def test_gitlink_demo(page: Page):
    # 访问地址
    page.goto("https://www.gitlink.org.cn/")
    # 断言网页标题=GitLink
    expect(page).to_have_title(re.compile("GitLink"))
7.5.3 指定测试用例运行的浏览器
我们可以使用装饰器@pytest.mark.only_browser来指定测试用例执行的浏览器。
# test_demo.py
import re
from playwright.sync_api import Page, expect
import pytest


@pytest.mark.only_browser("webkit")
def test_gitlink_demo(page: Page):
    # 访问地址
    page.goto("https://www.gitlink.org.cn/")
    # 断言网页标题=GitLink
    expect(page).to_have_title(re.compile("GitLink"))
7.5.4 指定测试用例运行的浏览器通道
我们可以使用命令行参数--browser-channel指定运行的浏览器参数。
比如:pytest --browser-channel chrome
或者也可以如下实现代码:
# run.py
import pytest

pytest.main( ['--headed', '--browser=chromium', "--browser-channel=chrome"])
7.5.5 配置base-url/host
我们可以使用命令函数base-url配置运行的base-url/host。
比如:pytest --base-url https://www.gitlink.org.cn/
# run.py
import pytest

pytest.main( ['--headed', '--browser=chromium', "--browser-channel=chrome", "--base-url=https://www.gitlink.org.cn"])
之后在我们的测试函数中,我们就只需要写相对路径即可。参考如下:
# test_demo.py
def test_gitlink_demo(page: Page):
    # 访问地址,这里写的相对地址
    page.goto("/expore")
    # 断言网页标题=GitLink
    expect(page).to_have_title(re.compile("开源项目"))
7.5.6 忽略HTTPS 错误
# conftest.py
import pytest

@pytest.fixture(scope="session")
def browser_context_args(browser_context_args):
    return {


        **browser_context_args,
        "ignore_https_errors": True
    }
7.5.7 自定义窗口大小
# conftest.py
import pytest

@pytest.fixture(scope="session")
def browser_context_args(browser_context_args):
    return {


        **browser_context_args,
        "viewport": {


            "width": 1920,
            "height": 1080,
        }
    }
7.5.8 设备模拟
# conftest.py
import pytest

@pytest.fixture(scope="session")
def browser_context_args(browser_context_args, playwright):
    iphone_11 = playwright.devices['iPhone 11 Pro']
    return {


        **browser_context_args,
        **iphone_11,
    }
7.5.9 Persistent context
当使用persistent context时,测试中的所有页面都是从persistent context创建的。
# conftest.py
import pytest
from playwright.sync_api import BrowserType
from typing import Dict

@pytest.fixture(scope="session")
def context(
    browser_type: BrowserType,
    browser_type_launch_args: Dict,
    browser_context_args: Dict
):
    context = browser_type.launch_persistent_context("./foobar", **{


        **browser_type_launch_args,
        **browser_context_args,
        "locale": "de-DE",
    })
    yield context
    context.close()
然后我们在测试方法中,需要使用返回的context来新建一个page,参考如下:
# test_demo.py
import re
from playwright.sync_api import Page, expect
import pytest

def test_gitlink_demo2(context):
	# 新建一个页面
	page = context.new_page()
    # 访问地址
    page.goto("/explore")
    # 断言网页标题=GitLink
    expect(page).to_have_title(re.compile("开源项目"))
7.5.10 兼容unittest.TestCase
下面是兼容unittest.TestCase的例子,需要注意的是,该方法有一个限制:只能指定一个浏览器,并且无法在指定多个浏览器时生成浏览器矩阵。
import pytest
import unittest

from playwright.sync_api import Page


class MyTest(unittest.TestCase):
    @pytest.fixture(autouse=True)
    def setup(self, page: Page):
        self.page = page

    def test_foobar(self):
        self.page.goto("https://microsoft.com")
        self.page.locator("#foobar").click()
        assert self.page.evaluate("1 + 1") == 2
7.5.11 Use with pdb
在测试代码中使用 breakpoint() 语句来暂停执行并获取 pdb REPL(Python 调试器)交互界面。
def test_bing_is_working(page):
    page.goto("https://bing.com")
    breakpoint()
    # ...