前言
- 本文学自黑马程序员2023版Hadoop课程,环境使用VMware虚拟化软件、Centos系统
一 学习环境简介
Linux环境
- 学习大数据需要使用多台Linux服务器(本次学习使用3台)
- 本地虚拟环境:基于VMware构建Linux虚拟机
二 VMware准备Linuc虚拟机
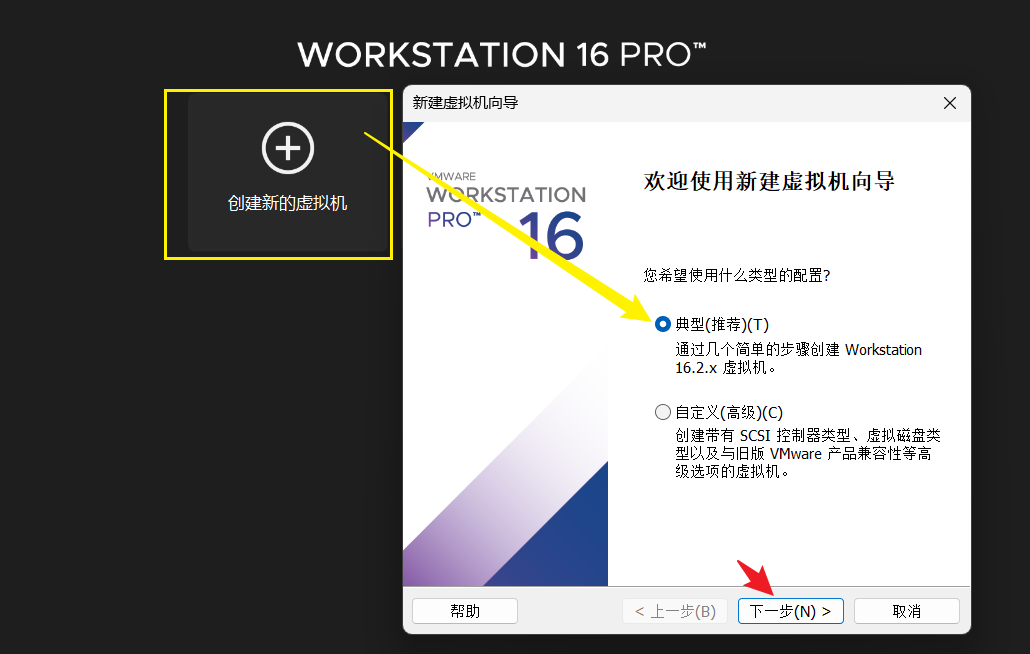
2.1 安装VMware虚拟机
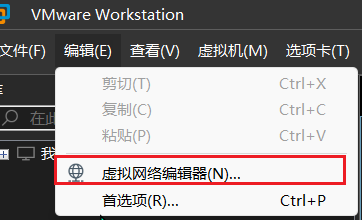
2.2 设置VMware网段
- 在VMware的虚拟网络编辑器中,将VMnet8虚拟网卡的:
- 网段设置为:
192.168.28.0 - 网关设置为:
192.168.28.2

- 网段设置为:
2.3 下载Centos操作系统
- [Centos7.6下载地址] (https://vault.centos.org/7.6.1810/isos/x86_64/)
- 推荐下载方案:使用Free Manager Download工具,填入下载网址:
https://vault.centos.org/7.6.1810/isos/x86_64/CentOS-7-x86_64-DVD-1810.iso进行下载
2.4 VMware安装Centos


- 点击完成后,即开启了CentOS系统的安装,耐心等待安装完成即可,后续都是自动化的
- 然后等待Centos启动,使用设置的密码登录Linux系统即可
2.5 配置多台Linux虚拟机
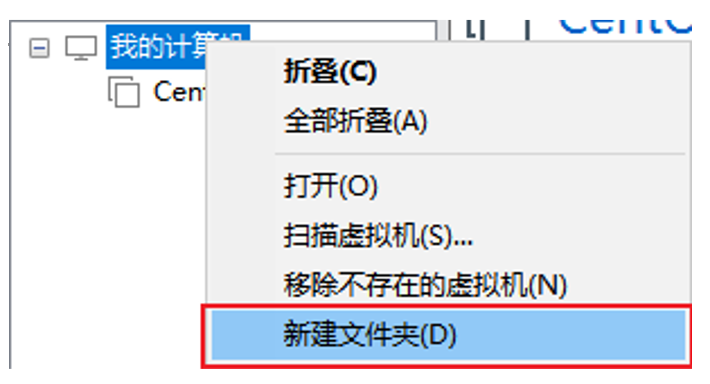
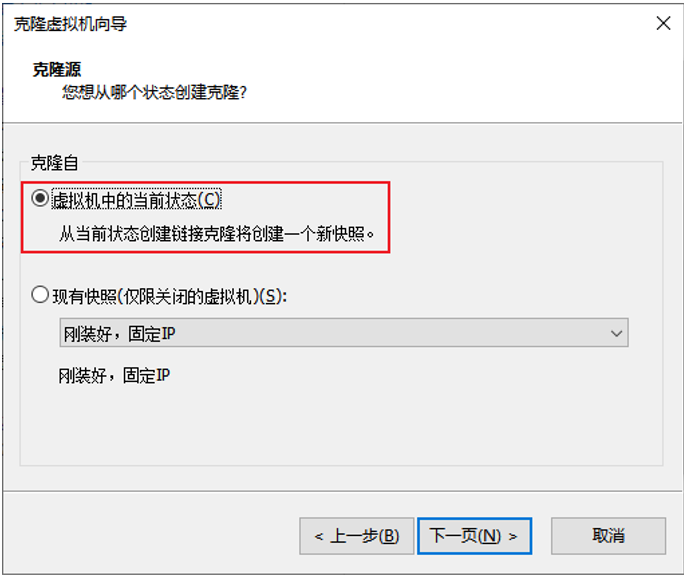
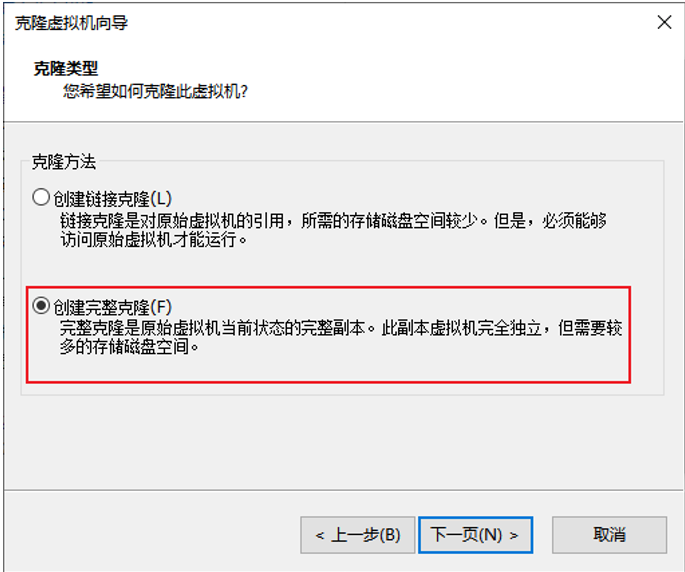
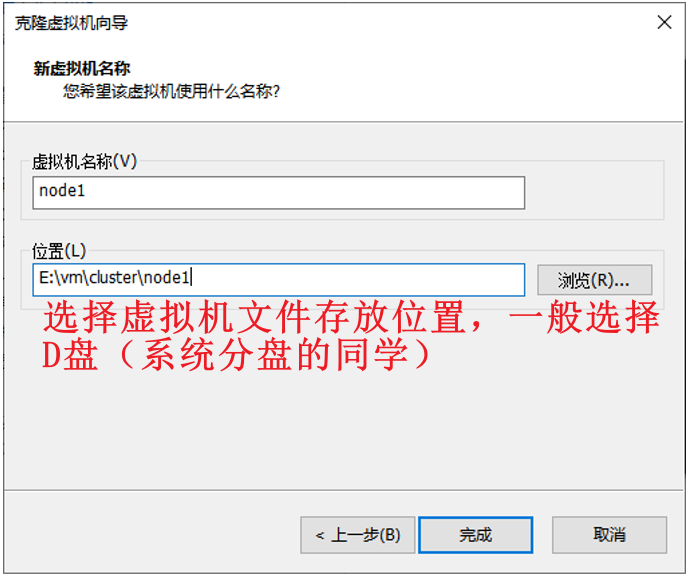
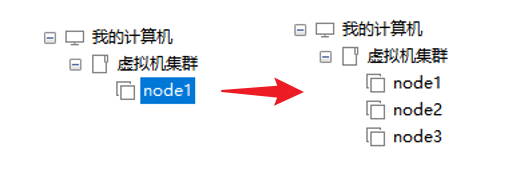
- 使用VMware提供的克隆功能,基于一台虚拟机去克隆创建多台虚拟机
- 首先,在VMware中,创建一个文件夹,起名为大数据集群
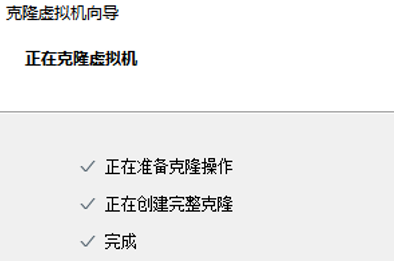
- 使用克隆功能进行Centos虚拟机克隆
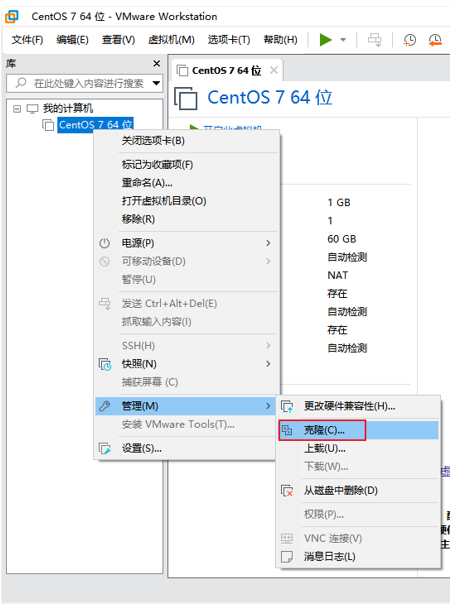

- 同样的操作克隆出:node2和node3
- 对虚拟机的内存进行配置:
- node1配置为4G内存
- node2、node3配置为2G内存
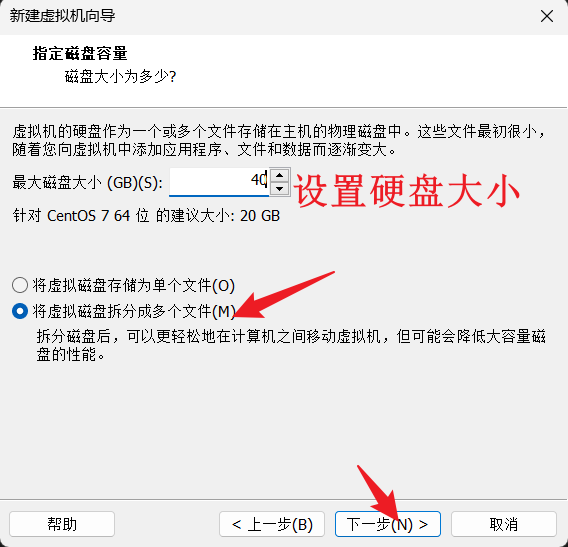
- 硬盘可以根据设置为20GB,土豪任意
- 对虚拟机的内存进行配置:
三 VMware虚拟机系统设置
3.1 修改主机名、设置固定IP
- 开启node1虚拟机,修改主机名为node1,并修改固定ip为:
192.168.28.131
- 打开Linux终端执行如下命令
# 修改主机名称 hostnamectl set-hostname node1 # 修改IP地址 vim /etc/sysconfig/network-scripts/ifcfg-ens33 - 打开
ifcfg-ens33后,修改文件以下内容
# 1.修改第四行内容设置为static
BOOTPROTO="static"
# 2.在文件末尾添加以下内容
IPADDR="192.168.28.131"
NETMASK="255.255.255.0"
GATEWAY="192.168.28.2"
DNS1="192.168.28.2"
- 同样的操作启动node2,node3
- 修改node2主机名为node2,设置ip为
192.168.28.132 - 修改node2主机名为node3,设置ip为
192.168.88.133
- 修改node2主机名为node2,设置ip为
3.2 配置主机名映射
- 在Windows系统中修改
C:\Windows\System32\drivers\etc\hosts文件,填入如下内容192.168.28.131 node1 192.168.28.132 node2 192.168.28.133 node3 - 在3台Linux的/etc/hosts文件中,填入如下内容(3台都要添加)
192.168.28.131 node1
192.168.28.132 node2
192.168.28.133 node3
3.3 配置SSH免密登录
3.3.1 root用户操作步骤
- 后续安装的集群化软件,多数需要远程登录以及远程执行命令,为方便操作,配置三台Linux服务器之间的免密码互相SSH登陆
- 在每一台机器都执行以下命令,一路回车到底即可
# 生成RSA类型的SSH密钥对 ssh-keygen -t rsa -b 4096 - 在每一台机器都执行:
ssh-copy-id node1 ssh-copy-id node2 ssh-copy-id node3 - 执行完毕后,node1、node2、node3之间将完成root用户之间的免密互通
- 结果验证:使用ssh 尝试ssh免密登录,使用exit退出ssh登录
ssh nodeX # X=1,2,3
3.3.2 实际操作代码演示
- node1操作演示
[root@node1 ~]# ssh-keygen -t rsa -b 4096
Generating public/private rsa key pair.
Enter file in which to save the key (/root/.ssh/id_rsa):
Created directory '/root/.ssh'.
Enter passphrase (empty for no passphrase):
Enter same passphrase again:
Your identification has been saved in /root/.ssh/id_rsa.
Your public key has been saved in /root/.ssh/id_rsa.pub.
The key fingerprint is:
SHA256:4TDo7BBnEV5mElAYIaisiAPHNWJop53JqV/fV5M9SJg root@node1
The key's randomart image is:
+---[RSA 4096]----+
|o.+**o+          |
|oo+ooB           |
|+o*oO.o .   o    |
|ooo%   + . E .   |
|=.o o   S   . +  |
|=. o .       = o |
| .. o . .   . . .|
|   .   . . .     |
|          .      |
+----[SHA256]-----+
[root@node1 ~]# cd .ssh/
[root@node1 .ssh]# ll
total 8
-rw-------. 1 root root 3243 Aug 17 02:04 id_rsa
-rw-r--r--. 1 root root  736 Aug 17 02:04 id_rsa.pub
[root@node1 .ssh]# ssh-copy-id node1
/usr/bin/ssh-copy-id: INFO: Source of key(s) to be installed: "/root/.ssh/id_rsa.pub"
The authenticity of host 'node1 (192.168.28.131)' can't be established.
ECDSA key fingerprint is SHA256:3NA7v7hCoa8BvOZIadiAgyg9PQDmh7FwFzmcmBVPeu4.
ECDSA key fingerprint is MD5:03:b5:a7:d6:d6:b1:39:19:fa:ce:1b:71:1b:c5:fb:2d.
Are you sure you want to continue connecting (yes/no)? yes
/usr/bin/ssh-copy-id: INFO: attempting to log in with the new key(s), to filter out any that are already installed
/usr/bin/ssh-copy-id: INFO: 1 key(s) remain to be installed -- if you are prompted now it is to install the new keys
root@node1's password:

Number of key(s) added: 1

Now try logging into the machine, with:   "ssh 'node1'"
and check to make sure that only the key(s) you wanted were added.

[root@node1 .ssh]# cd ~
[root@node1 ~]# ssh-copy-id node2
/usr/bin/ssh-copy-id: INFO: Source of key(s) to be installed: "/root/.ssh/id_rsa.pub"
The authenticity of host 'node2 (192.168.28.132)' can't be established.
ECDSA key fingerprint is SHA256:3NA7v7hCoa8BvOZIadiAgyg9PQDmh7FwFzmcmBVPeu4.
ECDSA key fingerprint is MD5:03:b5:a7:d6:d6:b1:39:19:fa:ce:1b:71:1b:c5:fb:2d.
Are you sure you want to continue connecting (yes/no)? yes
/usr/bin/ssh-copy-id: INFO: attempting to log in with the new key(s), to filter out any that are already installed
/usr/bin/ssh-copy-id: INFO: 1 key(s) remain to be installed -- if you are prompted now it is to install the new keys
root@node2's password:

Number of key(s) added: 1

Now try logging into the machine, with:   "ssh 'node2'"
and check to make sure that only the key(s) you wanted were added.

[root@node1 ~]# ssh-copy-id node3
/usr/bin/ssh-copy-id: INFO: Source of key(s) to be installed: "/root/.ssh/id_rsa.pub"
The authenticity of host 'node3 (192.168.28.133)' can't be established.
ECDSA key fingerprint is SHA256:3NA7v7hCoa8BvOZIadiAgyg9PQDmh7FwFzmcmBVPeu4.
ECDSA key fingerprint is MD5:03:b5:a7:d6:d6:b1:39:19:fa:ce:1b:71:1b:c5:fb:2d.
Are you sure you want to continue connecting (yes/no)? yes
/usr/bin/ssh-copy-id: INFO: attempting to log in with the new key(s), to filter out any that are already installed
/usr/bin/ssh-copy-id: INFO: 1 key(s) remain to be installed -- if you are prompted now it is to install the new keys
root@node3's password:

Number of key(s) added: 1

Now try logging into the machine, with:   "ssh 'node3'"
and check to make sure that only the key(s) you wanted were added.
- 结果验证
[root@node1 ~]# ssh node1
Last login: Thu Aug 17 01:06:49 2023 from 192.168.28.1
[root@node1 ~]# exit
logout
Connection to node1 closed.
[root@node1 ~]# ssh node2
Last login: Thu Aug 17 01:07:12 2023 from 192.168.28.1
[root@node2 ~]# exit
logout
Connection to node2 closed.
[root@node1 ~]# ssh node3
Last login: Thu Aug 17 01:07:38 2023 from 192.168.28.1
[root@node3 ~]# exit
logout
Connection to node3 closed.
3.3.3 知识补充:ssh-keygen
- SSH密钥对由两个密钥组成:私钥(private key)和公钥(public key)。私钥应该保持机密,而公钥可以被传递给其他人,用于加密数据。
ssh-keygen -t rsa -b 4096
- 该命令是用于生成RSA类型的SSH密钥对。
-t rsa:指定生成RSA密钥对。-b 4096:指定密钥的位数为4096位。较长的密钥位数提供了更高的安全性,但也增加了生成和加密解密的计算负担。
- 运行该命令后,提示选择一个文件名和位置来保存生成的私钥和公钥。默认情况下,私钥存储在
~/.ssh/id_rsa,而公钥存储在~/.ssh/id_rsa.pub。 - 一旦生成了密钥对,私钥将用于与远程主机建立安全的SSH连接,而公钥则用于验证身份。常见的用例是将公钥添加到远程主机的
~/.ssh/authorized_keys文件中,允许使用私钥的主机登录到该远程主机上,而无需输入密码。
注意:生成的SSH密钥对是非对称密钥对,私钥和公钥是相关联的,但是无法从公钥推导出私钥。因此,私钥必须高度保密,只有合适的人员才能访问。
3.3.4 创建hadoop用户并配置免密登录
- 实际环境中,大数据的软件,将不会以root用户启动(确保安全,养成良好的习惯)
- 我们为大数据的软件创建一个单独的用户hadoop,并为三台服务器同样配置hadoop用户的免密互通
- 在每一台机器执行:
useradd hadoop,创建hadoop用户 - 在每一台机器执行:
passwd hadoop,设置hadoop用户密码为123456 - 在每一台机器均切换到
hadoop用户:su - hadoop,并执行ssh-keygen -t rsa -b 4096,创建ssh密钥 - 在每一台机器均执行
ssh-copy-id node1
ssh-copy-id node2
ssh-copy-id node3
- 操作演示
[root@node3 ~]# useradd hadoop
[root@node3 ~]# passwd hadoop
Changing password for user hadoop.
New password:
Retype new password:
passwd: all authentication tokens updated successfully.
[root@node3 ~]# su - hadoop
[hadoop@node3 ~]$ ssh-keygen -t rsa -b 4096
Generating public/private rsa key pair.

Enter file in which to save the key (/home/hadoop/.ssh/id_rsa): Created directory '/home/hadoop/.ssh'.
Enter passphrase (empty for no passphrase):
Enter same passphrase again:
Your identification has been saved in /home/hadoop/.ssh/id_rsa.
Your public key has been saved in /home/hadoop/.ssh/id_rsa.pub.
The key fingerprint is:
SHA256:5gh9saZKQ6ysTEo6O1bz0Dej54bQ5oEREyxTW/3yezc hadoop@node3
The key's randomart image is:
+---[RSA 4096]----+
|  oo...          |
| o +o  .         |
|  o.o   o        |
|   o . . +       |
|    O . S        |
| . O * @ .       |
| o+ X B + .      |
|Oo . B o . . E   |
|*=  . +.  . . .  |
[hadoop@node1 .ssh]$ ssh-copy-id node1
/bin/ssh-copy-id: INFO: Source of key(s) to be installed: "/home/hadoop/.ssh/id_rsa.pub"
The authenticity of host 'node1 (192.168.28.131)' can't be established.
ECDSA key fingerprint is SHA256:3NA7v7hCoa8BvOZIadiAgyg9PQDmh7FwFzmcmBVPeu4.
ECDSA key fingerprint is MD5:03:b5:a7:d6:d6:b1:39:19:fa:ce:1b:71:1b:c5:fb:2d.
Are you sure you want to continue connecting (yes/no)? yes
/bin/ssh-copy-id: INFO: attempting to log in with the new key(s), to filter out any that are already installed
/bin/ssh-copy-id: INFO: 1 key(s) remain to be installed -- if you are prompted now it is to install the new keys
hadoop@node1's password:

Number of key(s) added: 1

Now try logging into the machine, with:   "ssh 'node1'"
and check to make sure that only the key(s) you wanted were added.

[hadoop@node1 .ssh]$ ssh-copy-id node2
/bin/ssh-copy-id: INFO: Source of key(s) to be installed: "/home/hadoop/.ssh/id_rsa.pub"
The authenticity of host 'node2 (192.168.28.132)' can't be established.
ECDSA key fingerprint is SHA256:3NA7v7hCoa8BvOZIadiAgyg9PQDmh7FwFzmcmBVPeu4.
ECDSA key fingerprint is MD5:03:b5:a7:d6:d6:b1:39:19:fa:ce:1b:71:1b:c5:fb:2d.
Are you sure you want to continue connecting (yes/no)? yes
/bin/ssh-copy-id: INFO: attempting to log in with the new key(s), to filter out any that are already installed
/bin/ssh-copy-id: INFO: 1 key(s) remain to be installed -- if you are prompted now it is to install the new keys
hadoop@node2's password:

Number of key(s) added: 1

Now try logging into the machine, with:   "ssh 'node2'"
and check to make sure that only the key(s) you wanted were added.

[hadoop@node1 .ssh]$ ssh-copy-id node3
/bin/ssh-copy-id: INFO: Source of key(s) to be installed: "/home/hadoop/.ssh/id_rsa.pub"
The authenticity of host 'node3 (192.168.28.133)' can't be established.
ECDSA key fingerprint is SHA256:3NA7v7hCoa8BvOZIadiAgyg9PQDmh7FwFzmcmBVPeu4.
ECDSA key fingerprint is MD5:03:b5:a7:d6:d6:b1:39:19:fa:ce:1b:71:1b:c5:fb:2d.
Are you sure you want to continue connecting (yes/no)? yes
^[[A/bin/ssh-copy-id: INFO: attempting to log in with the new key(s), to filter out any that are already installed
/bin/ssh-copy-id: INFO: 1 key(s) remain to be installed -- if you are prompted now it is to install the new keys
hadoop@node3's password:

Number of key(s) added: 1

Now try logging into the machine, with:   "ssh 'node3'"
and check to make sure that only the key(s) you wanted were added.

[hadoop@node1 .ssh]$ ssh node1
Last login: Thu Aug 17 02:22:01 2023 from node2
[hadoop@node1 ~]$ exit
logout
Connection to node1 closed.
[hadoop@node1 .ssh]$ ssh node2
Last login: Thu Aug 17 02:22:10 2023 from node2
[hadoop@node2 ~]$ exit
logout
Connection to node2 closed.
[hadoop@node1 .ssh]$ ssh node3
Last login: Thu Aug 17 02:22:13 2023 from node2
[hadoop@node3 ~]$ exit
logout
Connection to node3 closed.
3.4 JDK环境部署
- JDK: Java Development Kit,是用于Java语言开发的环境。
- 大数据的很多软件的运行都需要有Java运行环境的支持,所以需要在三台服务器上,预先都部署好JDK环境。
- 部署JDK不需要懂得Java语言,只需要掌握Linux相关命令即可。
- 课程中使用JDK1.8版本
- 下载JDK软件
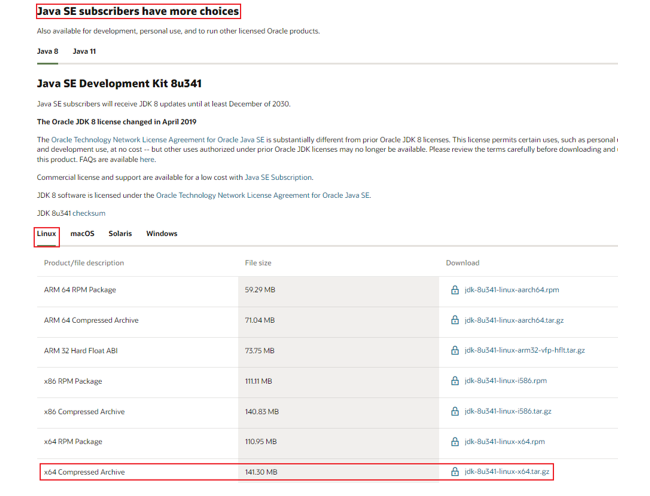
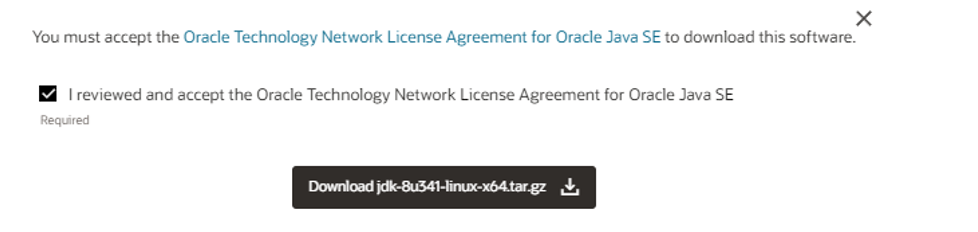
- 在弹出的页面中输入Oracle的账户密码即可下载(如无账户,请自行注册,注册是免费的)
- 创建文件夹,用来部署JDK,将JDK和Tomcat都安装部署到:
/export/server内,将压缩包上传到linux解压缩JDK安装文件
mkdir /export/server
tar -zvxf jdk-8u361-linux-x64.tar.gz -C /export/server/
- 进入
/export/server目录,配置JDK的软链接
[root@node1 server]# ln -s /export/server/jdk1.8.0_361 jdk8
[root@node1 server]# ll
total 4
drwxr-xr-x. 8 root root 4096 Aug 17 02:35 jdk1.8.0_361
lrwxrwxrwx. 1 root root   27 Aug 17 02:37 jdk8 -> /export/server/jdk1.8.0_361
- 配置
JAVA_HOME环境变量,以及将$AVA_HOME/bin文件夹加入PATH环境变量中vim /etc/profile- 编辑
/etc/profile文件,添加以下内容
export JAVA_HOME=/export/server/jdk8 export PATH=$PATH:$JAVA_HOME/bin - 编辑
- 生效环境变量
source /etc/profile - 配置java执行程序的软连接
[root@node1 server]# rm -f /usr/bin/java [root@node1 server]# ln -s /export/server/jdk8/bin/java /usr/bin/java - 执行验证
java -version
javac -version
3.5 防火墙、SELinux
- 集群化软件之间需要通过端口互相通讯,为了避免出现网络不通的问题,可以关闭防火墙。[在每一台机器都执行,执行以下命令]
systemctl stop firewalld
systemctl disable firewalld
- Linux有一个安全模块:SELinux,用以限制用户和程序的相关权限,来确保系统的安全稳定。在当前,我们只需要关闭SELinux功能,避免导致后面的软件运行出现问题即可**[在每一台机器都执行]**
vim /etc/sysconfig/selinux
- 将第七行,
SELINUX=enforcing改为
SELINUX=disabled
- 保存退出后,重启虚拟机即可,千万要注意disabled单词不要写错,不然无法启动系统
3.6 修改时区并配置自动时间同步
- 请使用root身份执行命令
# 1. 安装ntp软件按
yum install -y ntp
# 2. 更新时区
rm -f /etc/localtime;sudo ln -s /usr/share/zoneinfo/Asia/Shanghai /etc/localtime
# 3. 同步时间
ntpdate -u ntp.aliyun.com
# 4. 开启ntp服务并设置开机自启
systemctl start ntpd
systemctl enable ntpd
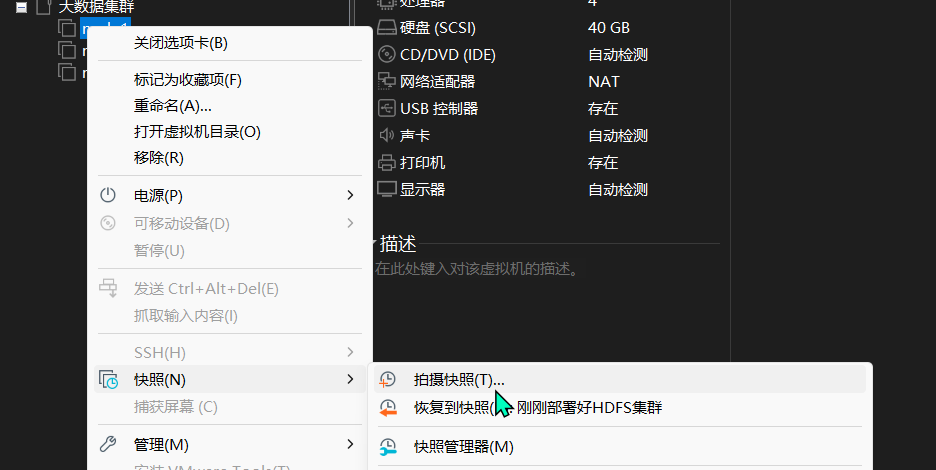
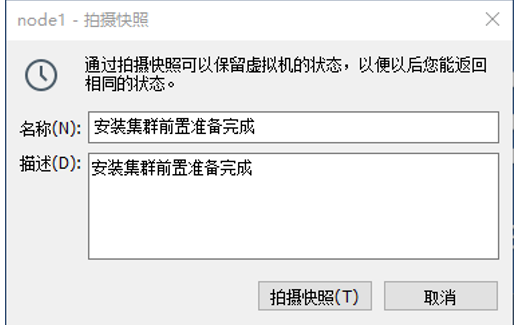
3.7 设置快照
- 目前Linux虚拟机的状态基本准备就绪,可以对当前状态进行快照保存,以备后续恢复。对三台虚拟机均执行拍摄快照。