Ubuntu16系统安装及初始化设置(SSH服务、网络配置)
1.Ubuntu16.04系统安装(物理机)
1.1 镜像下载
官方镜像下载地址:https://releases.ubuntu.com/
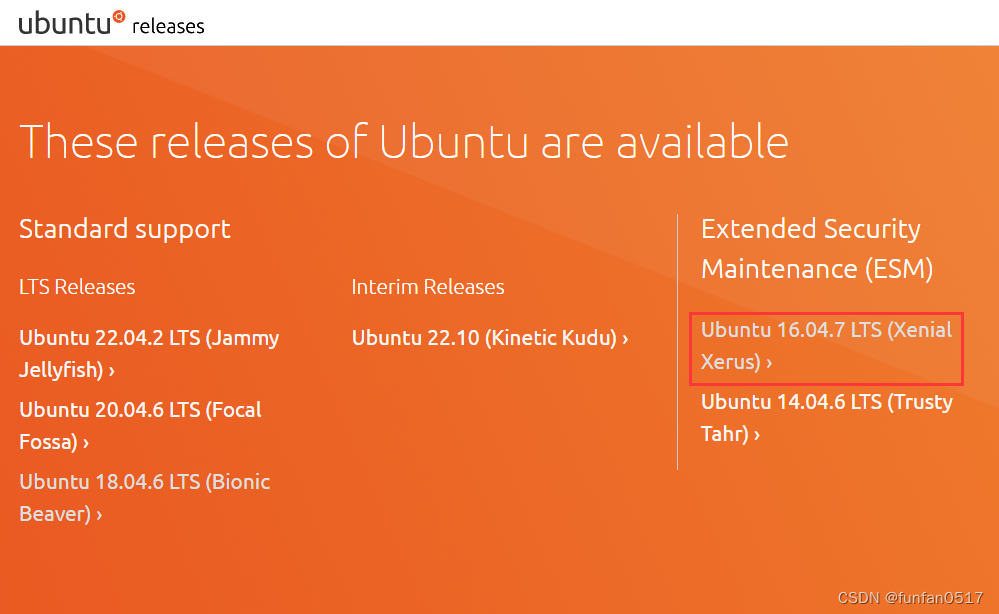
本次安装采用操作系统镜像为:Ubuntu 16.04.7 LTS

1.2 系统启动盘制作
U盘:8G以上U盘,格式为NTFS(FAT32文件系统能够保存的文件最大不能超过4GB)
U盘启动盘制作工具:deepin-boot-maker
deepin-boot-maker下载地址为:https://www.onlinedown.net/soft/10036325.htm
傻瓜式制作过程就省略了…
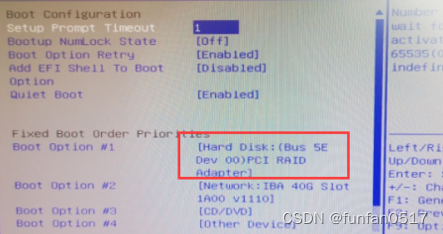
1.3 BIOS设置
进入BIOS设置主要按键有:DEL, ESC, F1, F2, F8, F9, F10, F12,不同品牌的主机进入BIOS的按键不同,可以自行百度。
将第一启动项改成U盘,保存退出
1.4 常见问题及解决方式
引导方式错误(ERROR: BIOS/LEGACY BOOT OF UEFI-ONLY MEDIA)
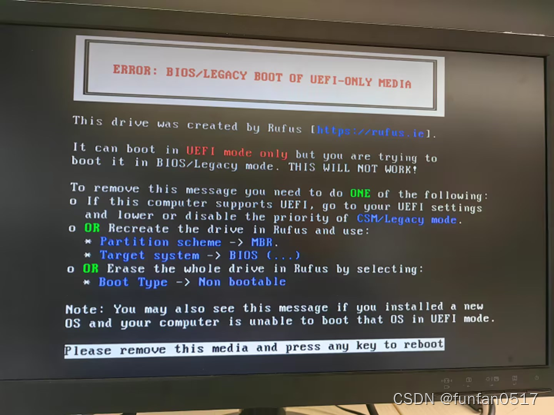
解决方式其实已经在界面上标明了:
方式一:在BIOS设置中,将legacy引导切换为UEFI引导。在BIOS中,UEFI和legacy support是两种不同的引导方式,UEFI是新式的BIOS,legacy是传统BIOS,二者可以切换。
方式二:将U盘分区方式改成MBR。
2.Ubuntu16系统初始化设置
1.初始化root用户密码并切换root用户
输入命令sudo passwd即可设置密码。
设置完成后,输入su root输入密码,即可切换用户。
2.修复vi编辑器错乱问题
有时新装的Ubuntu系统会出现vi编辑器方向键变字母的问题,只要依次执行以下两个命令即可解决:
1.卸载当前vi编辑器: sudo apt-get remove vim-common
2.重新安装vi编辑器: sudo apt-get install vim
3.安装并配置SSH服务
1.安装SSH服务:sudo apt-get install -y ssh
2.修改配置文件的权限:sudo chmod 777 /etc/ssh/sshd_config
3.配置ssh允许其他主机可以用root 账号远程登录:vi /etc/ssh/sshd_config
将PermitRootLogin字段修改为yes即可
PermitRootLogin yes
4.重启ssh服务:sudo service ssh restart
5.检测ssh服务是否启动:ps -e | grep ssh
6.去其他主机远程登录即可
4.网络配置
4.1网络源配置
1.备份配置文件:cp /etc/apt/sources.list /etc/apt/sources.list.bak
2.修改权限:chmod 777 /etc/apt/sources.list
3.修改内容:vi /etc/apt/sources.list
将文件中内容清空,再添加新的软件源地址,常用国内源地址如下:
#阿里源地址
deb http://mirrors.aliyun.com/ubuntu/ bionic main restricted universe multiverse
deb http://mirrors.aliyun.com/ubuntu/ bionic-security main restricted universe multiverse
deb http://mirrors.aliyun.com/ubuntu/ bionic-updates main restricted universe multiverse
deb http://mirrors.aliyun.com/ubuntu/ bionic-proposed main restricted universe multiverse
deb http://mirrors.aliyun.com/ubuntu/ bionic-backports main restricted universe multiverse
deb-src http://mirrors.aliyun.com/ubuntu/ bionic main restricted universe multiverse
deb-src http://mirrors.aliyun.com/ubuntu/ bionic-security main restricted universe multiverse
deb-src http://mirrors.aliyun.com/ubuntu/ bionic-updates main restricted universe multiverse
deb-src http://mirrors.aliyun.com/ubuntu/ bionic-proposed main restricted universe multiverse
deb-src http://mirrors.aliyun.com/ubuntu/ bionic-backports main restricted universe multiverse
#华为源地址
deb https://repo.huaweicloud.com/ubuntu/ focal main restricted
deb https://repo.huaweicloud.com/ubuntu/ focal-updates main restricted
deb https://repo.huaweicloud.com/ubuntu/ focal universe
deb https://repo.huaweicloud.com/ubuntu/ focal-updates universe
deb https://repo.huaweicloud.com/ubuntu/ focal-backports main restricted universe
deb https://repo.huaweicloud.com/ubuntu/ focal-security main restricted
deb https://repo.huaweicloud.com/ubuntu/ focal-security universe
#中科大源地址
deb https://mirrors.ustc.edu.cn/ubuntu/ bionic main restricted universe multiverse
deb-src https://mirrors.ustc.edu.cn/ubuntu/ bionic main restricted universe multiverse
deb https://mirrors.ustc.edu.cn/ubuntu/ bionic-updates main restricted universe multiverse
deb-src https://mirrors.ustc.edu.cn/ubuntu/ bionic-updates main restricted universe multiverse
deb https://mirrors.ustc.edu.cn/ubuntu/ bionic-backports main restricted universe multiverse
deb-src https://mirrors.ustc.edu.cn/ubuntu/ bionic-backports main restricted universe multiverse
deb https://mirrors.ustc.edu.cn/ubuntu/ bionic-security main restricted universe multiverse
deb-src https://mirrors.ustc.edu.cn/ubuntu/ bionic-security main restricted universe multiverse
deb https://mirrors.ustc.edu.cn/ubuntu/ bionic-proposed main restricted universe multiverse
deb-src https://mirrors.ustc.edu.cn/ubuntu/ bionic-proposed main restricted universe multiverse
#清华源地址
deb https://mirrors.tuna.tsinghua.edu.cn/ubuntu/ bionic main restricted universe multiverse
deb-src https://mirrors.tuna.tsinghua.edu.cn/ubuntu/ bionic main restricted universe multiverse
deb https://mirrors.tuna.tsinghua.edu.cn/ubuntu/ bionic-updates main restricted universe multiverse
deb-src https://mirrors.tuna.tsinghua.edu.cn/ubuntu/ bionic-updates main restricted universe multiverse
deb https://mirrors.tuna.tsinghua.edu.cn/ubuntu/ bionic-backports main restricted universe multiverse
deb-src https://mirrors.tuna.tsinghua.edu.cn/ubuntu/ bionic-backports main restricted universe ultiverse
deb https://mirrors.tuna.tsinghua.edu.cn/ubuntu/ bionic-security main restricted universe multiverse
deb-src https://mirrors.tuna.tsinghua.edu.cn/ubuntu/ bionic-security main restricted universe multiverse
deb https://mirrors.tuna.tsinghua.edu.cn/ubuntu/ bionic-proposed main restricted universe multiverse
deb-src https://mirrors.tuna.tsinghua.edu.cn/ubuntu/ bionic-proposed main restricted universe ultiverse
4.更新系统软件源地址:apt-get update
5.使用aptitude安装代替apt-get,aptitude 在处理依赖问题上更加智能:apt-get install aptitude
| apt-get命令 | 作用 |
|---|---|
| sudo apt-get update | 更新源 |
| sudo apt-get upgrade | 更新已安装的包 |
| sudo apt-get dist-upgrade | 升级系统 |
| sudo apt-get install package | 安装包 |
| sudo apt-get remove package | 删除包 |
| sudo apt-get remove package --purge | 删除包,包括配置文件等 |
| apt-cache rdepends package | 查看该包被哪些包依赖 |
| apt-cache depends package | 了解使用该包依赖那些包 |
| sudo apt-get install package --reinstall | 重新安装包 |
| apt-cache search package | 搜索软件包 |
| apt-cache show package | 获取包的相关信息,如说明、大小、版本等 |
| aptitude命令 | 作用 |
|---|---|
| sudo aptitude update | 更新可用的包列表 |
| sudo aptitude upgrade | 升级可用的包 |
| sudo aptitude dist-upgrade | 将系统升级到新的发行版 |
| sudo aptitude install pkgname | 安装包 |
| sudo aptitude remove pkgname | 删除包 |
| sudo aptitude purge pkgname | 删除包及其配置文件 |
| sudo aptitude search string | 搜索包 |
| sudo aptitude show pkgname | 显示包的详细信息 |
| sudo aptitude clean | 删除下载的包文件 |
| sudo aptitude autoclean | 仅删除过期的包文件 |
6.常见问题
如果遇到“apt安装包报错解决办法:下列软件包有未满足的依赖关系,依赖。。。但是。。。正要被安装”问题
参考https://blog.csdn.net/qq_19300283/article/details/125252808
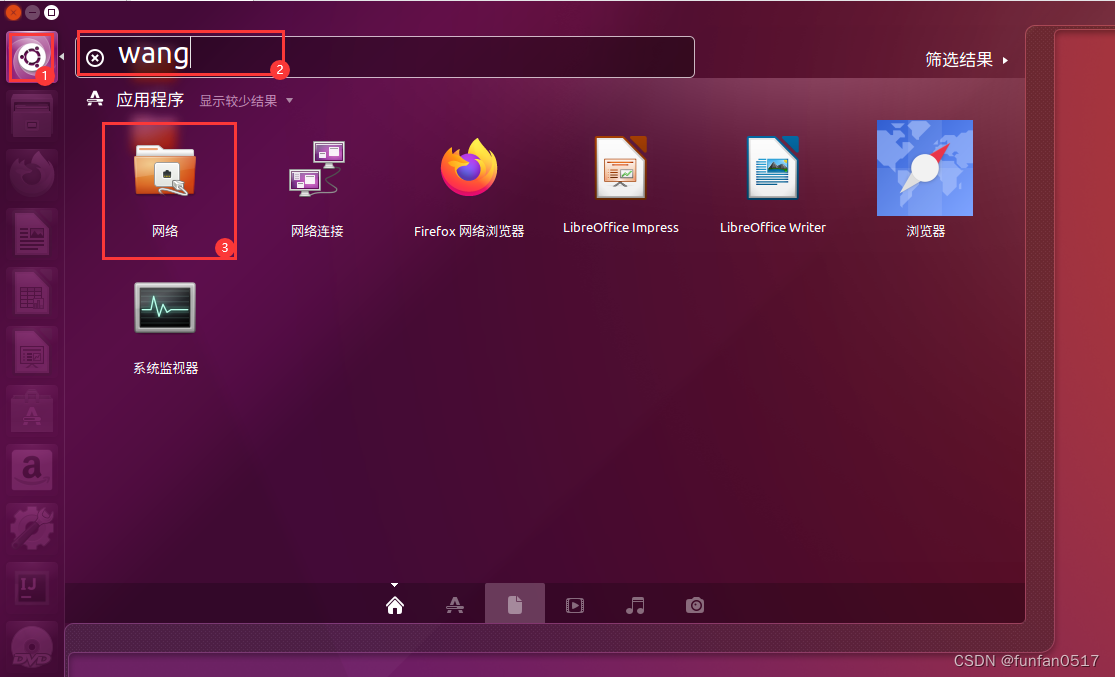
4.2 静态ip设置(通过图形界面配置)
1.搜索网络选项
2.配置静态网络
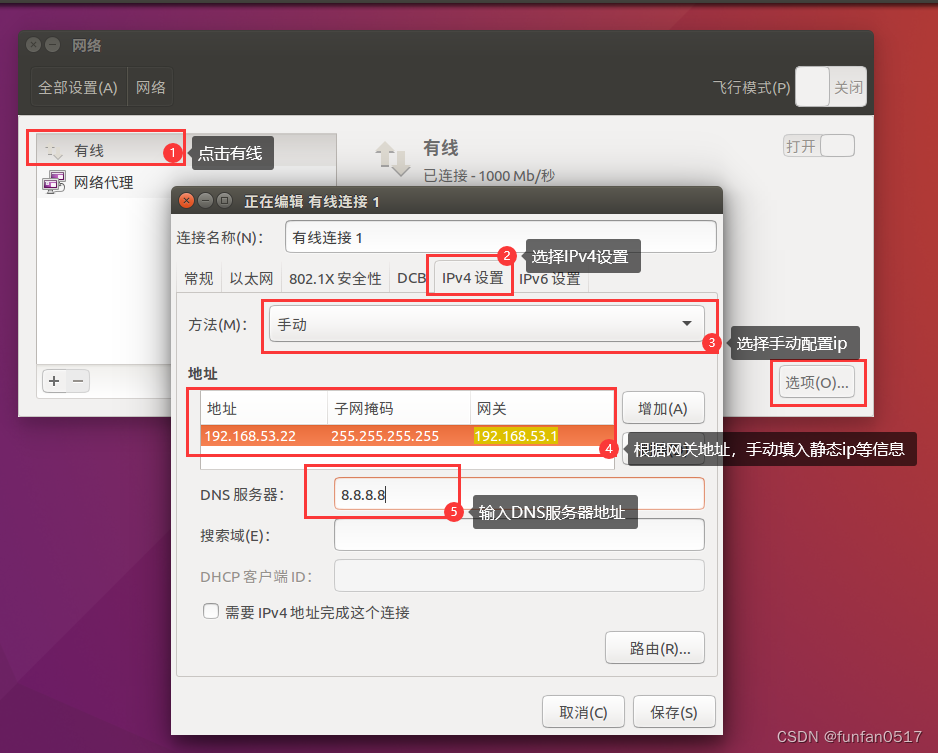
配置完成后,点击保存即可
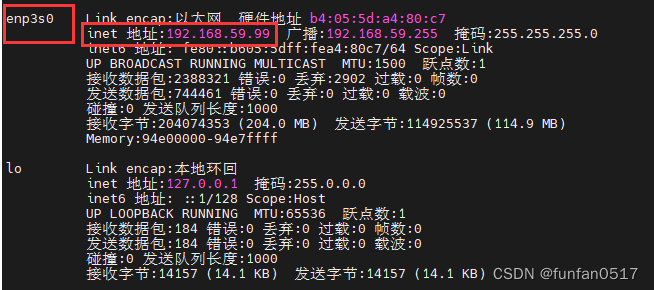
4.3 静态ip设置(通过命令行配置)
1.输入ifconfig命令查看有ip地址的那个网卡的名称
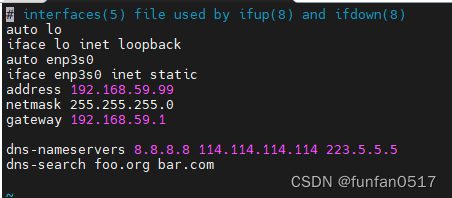
2.修改ip配置信息:sudo vi /etc/network/interfaces
输入以下内容:
auto enp3s0
iface enp3s0 inet static
address 192.168.59.99
netmask 255.255.255.0
gateway 192.168.59.1
3.dns设置
1.临时设置dns
打开配置文件进行修改sudo vi /etc/resolv.conf,输入以下内容:
nameserver 114.114.114.144
2.永久设置dns
/etc/resolv.conf 其实是一个Link ,它其实指向的是 /run/resolvconf/resolv.conf。Ubuntu 有一个 resolvconf 服务,如果重启它,那么 /etc/resolv.conf 的内容会被修改成默认的样子,所以不能直接修改 /etc/resolv.conf。
可以通过下面方式永久设置dns:sudo vim /etc/network/interfaces
追加填写内容:
dns-nameservers 8.8.8.8 114.114.114.114 223.5.5.5
dns-search foo.org bar.com
3.重启网络或主机,检查网络状态
重启网络:sudo /etc/init.d/networking restart
有时候重启网络生效比较慢或者无效,这时需要重启主机:sudo reboot
检查ip是否是想要的静态ip:ifconfig
检查dns配置是否可用:ping www.baidu.com
至此,Ubuntu16.04基本配置完成。