一、功能介绍
先上效果图:
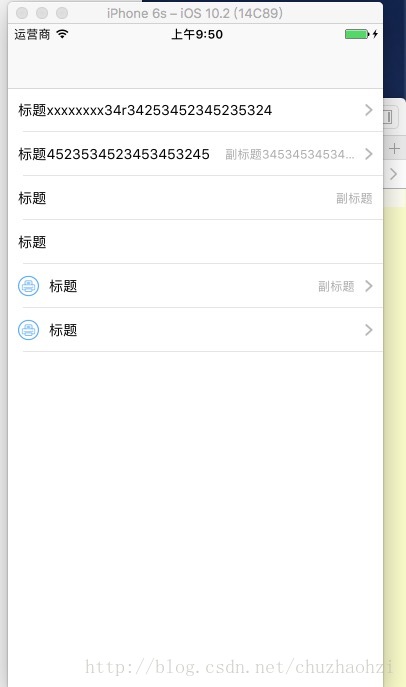
实现样式有:
- 标题+Arrow;
- 标题+副标题+Arrow
- 标题+副标题
- 标题
- 图片+标题+Arrow
- 图片+标题
接下来开始说明如何实现这样的一个多功能、可复用、更灵活的自定义UITableViewCell是怎么通过Masonry自动适配来实现的:
1、首先看下项目结构:
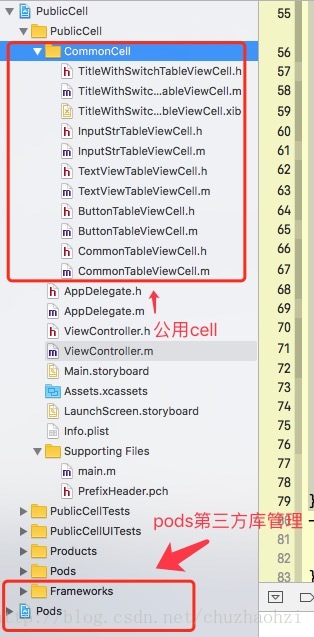
使用CocoaPods进行第三方库管理(之后会对如何安装CocoaPods和安装出现的问题单独写一篇博客,敬请关注!),在这个工程中我只导入了Masonry第三方库,其他的库如有需要可自行导入。
2、看下pch文件中定义的这些宏
#ifndef PrefixHeader_pch
#define PrefixHeader_pch
//以下是自动适配相关宏定义 不用自动适配可以无视
#define WS(weakSelf)  __weak __typeof(&*self)weakSelf = self;
//define this constant if you want to use Masonry without the 'mas_' prefix
#define MAS_SHORTHAND
//define this constant if you want to enable auto-boxing for default syntax
#define MAS_SHORTHAND_GLOBALS
/**
 *  RGB值方式
 */
#define RGBA(r,g,b,a)     [UIColor colorWithRed:(r)/255.0f green:(g)/255.0f blue:(b)/255.0f alpha:a]
#define RGB(r,g,b)          RGBA(r,g,b,1)
#define COLOR_DETAIL        RGB(109, 116, 121)  //CELL 描述颜色
/**
 *  字号设置
 */
#define FONT(RatioFont)     [UIFont systemFontOfSize:RatioFont]
#define COLOR_TITLE         RGB(41, 46, 49)  //CELL title颜色
// Include any system framework and library headers here that should be included in all compilation units.
// You will also need to set the Prefix Header build setting of one or more of your targets to reference this file.
#ifdef __OBJC__
#import "Masonry.h"

#endif
#endif /* PrefixHeader_pch */- 对Masonry适配方法做了一定的规范,这样一来在适配的时候更加顺手,当然这只是个人喜好,如果你不习惯你也可以使用你自己的方法进行适配;
- 定义RGB颜色,输入RGB对应的参数即可自定义各种颜色,相比 [UIColor redColor];更加灵活,更加随心所欲;
- Font是设置字体大小的一个宏,设置字体大小直接传入字号即可;
3、Cell实现部分
<1>.在我们的CommonTableViewCell.h文件中对外暴露一个设置cell的方法,使得在调用的时候传入不同的参数,代码如下(注释已经很清楚了,就不一一解释了O(∩_∩)O):
/**
 对外暴露设置cell方法
 @param imageName 传入图片名字
 @param title 标题
 @param subTitle 副标题
 @param isHas 是否有arrow
 */
-(void)setCellInfoWithHeaderImage:(NSString *)imageName withTitle:(NSString *)title withSubTitle:(NSString *)subTitle withArrow:(BOOL )isHas;
<2>.在我们的CommonTableViewCell.m文件中进行UI界面布局以及实现设置方法:
- 添加所需控件
@property (nonatomic, strong)UIImageView *headerImageView;  //  标题图片
@property (nonatomic, strong)UILabel *titleLabel;  //  标题
@property (nonatomic, strong)UILabel *subTitleLabel; //  副标题
@property (nonatomic, strong)UIImageView *arrowImageView; // arrow图片- 初始化我们的自定义cell:
//  这里我们把搭建UI和适配的方法抽离出来,使得代码可读性更高,不至于太多冗杂
 - (instancetype)initWithStyle:(UITableViewCellStyle)style reuseIdentifier:(NSString *)reuseIdentifier {
    if (self = [super initWithStyle:style reuseIdentifier:reuseIdentifier]){
        [self bulidUI]; //  搭建UI
        [self autoLayout]; //  UI界面控件自适应
    }
    return self;
}- bulidUI(这里你也可以选择懒加载)
-(void)bulidUI{
    //  添加图片 headerImage
    self.headerImageView = [[UIImageView alloc] init];
    [self.contentView addSubview:self.headerImageView];
    //  添加标题 titleLabel
    self.titleLabel = [[UILabel alloc] init];
    self.titleLabel.font = [UIFont systemFontOfSize:14];
    self.titleLabel.textColor = [UIColor blackColor];
    [self.contentView addSubview:self.titleLabel];
    //  添加副标题 subTitleLabel
    self.subTitleLabel = [[UILabel alloc] init];
    self.subTitleLabel.textColor = [UIColor lightGrayColor];
    self.subTitleLabel.textAlignment = NSTextAlignmentRight;
    self.subTitleLabel.font = [UIFont systemFontOfSize:12];
    [self.contentView addSubview:self.subTitleLabel];
    //  添加arrow
    self.arrowImageView = [[UIImageView alloc] init];
    [self.contentView addSubview:self.arrowImageView];
}- autoLayout自动适配
-(void)autoLayout{
        //  对头部图片进行约束
    [self.headerImageView mas_makeConstraints:^(MASConstraintMaker *make) {
        make.leading.offset(10);
        make.centerY.equalTo(self.contentView.mas_centerY);
        make.height.equalTo(21);
        make.width.equalTo(21);
    }];
    //  对标题进行约束
    [self.titleLabel mas_makeConstraints:^(MASConstraintMaker *make) {
        make.leading.equalTo(self.headerImageView.mas_trailing).offset(10);
        make.height.equalTo(21);
        make.centerY.equalTo(self.contentView.mas_centerY);
        make.trailing.equalTo(self.subTitleLabel.mas_leading).offset(-10);
    }];
    //  对副标题进行约束
    [self.subTitleLabel mas_makeConstraints:^(MASConstraintMaker *make) {
        make.leading.equalTo(self.titleLabel.mas_trailing).offset(10);
        make.height.equalTo(21);
        make.centerY.equalTo(self.contentView.mas_centerY);
        make.trailing.equalTo(self.arrowImageView.mas_leading).offset(-10);
    }];
    //  对arrow进行约束
    [self.arrowImageView mas_makeConstraints:^(MASConstraintMaker *make) {
        make.trailing.equalTo(self.contentView.mas_trailing).offset(-10);
        make.width.equalTo(8);
        make.height.equalTo(13);
        make.centerY.equalTo(self.contentView.mas_centerY);
    }];
}- 实现设置cell显示的方法
- (void)setCellInfoWithHeaderImage:(NSString *)imageName withTitle:(NSString *)title withSubTitle:(NSString *)subTitle withArrow:(BOOL)isHas {
    if (imageName.length<=0){ //  判断头部照片是否存在
        [self.titleLabel mas_updateConstraints:^(MASConstraintMaker *make) {
           make.leading.offset(10); //  没有头部照片,更新约束,此时标题靠左边
        }];
    }
    if (subTitle.length>0) { //  判断副标题是否有,有则更新约束
        [self.titleLabel mas_updateConstraints:^(MASConstraintMaker *make) {
            make.width.mas_greaterThanOrEqualTo(80);  //  设置标题宽度
        }];
        [self.subTitleLabel mas_updateConstraints:^(MASConstraintMaker *make) {
            make.width.mas_greaterThanOrEqualTo(80); //  设置副标题宽度
        }];
    }
    if (!isHas){  //  判断如果是否有arrow
        [self.subTitleLabel mas_updateConstraints:^(MASConstraintMaker *make) {
           make.trailing.equalTo(self.contentView.mas_trailing).offset(-10);
        }];
    }
    self.headerImageView.image = [UIImage imageNamed:imageName];
    self.titleLabel.text = title;
    self.subTitleLabel.text = subTitle;
    //  这里我们arrow的图片可以放在本地,直接读取就好,当然也可以在外面传入进来,只需要对暴露方法添加参数即可,可以参照头部图片一样的判断
    self.arrowImageView.image = [UIImage imageNamed:@"ic_arrow right"];
}
4、 实现方法:
-(UITableViewCell *)tableView:(UITableView *)tableView cellForRowAtIndexPath:(NSIndexPath *)indexPath {
    // 创建对象
    CommonTableViewCell *commonTableViewCell = [tableView dequeueReusableCellWithIdentifier:@"commonTableViewCellIdentifier"];
    if (!commonTableViewCell){
        commonTableViewCell = [[CommonTableViewCell alloc] initWithStyle:UITableViewCellStyleDefault reuseIdentifier:@"commonTableViewCellIdentifier"];
    }
    switch (indexPath.row) {
            case 0:{
               [commonTableViewCell setCellInfoWithHeaderImage:@"" withTitle:@"标题xxxxxxxx34r34253452345235324" withSubTitle:@"" withArrow:YES];
            }
            break;
        case 1:{
            [commonTableViewCell setCellInfoWithHeaderImage:@"" withTitle:@"标题4523534523453453245" withSubTitle:@"副标题3453453453453452fgfghffjjjfghjfghjfgjfghjfghj3452345234523" withArrow:YES];
        }
            break;
        case 2:{
            [commonTableViewCell setCellInfoWithHeaderImage:@"" withTitle:@"标题" withSubTitle:@"副标题" withArrow:NO];
        }
            break;
        case 3:{
            [commonTableViewCell setCellInfoWithHeaderImage:@"" withTitle:@"标题" withSubTitle:@"" withArrow:NO];
        }
            break;
        case 4:{
            [commonTableViewCell setCellInfoWithHeaderImage:@"per_printer" withTitle:@"标题" withSubTitle:@"副标题" withArrow:YES];
        }
            break;
        case 5:{
            [commonTableViewCell setCellInfoWithHeaderImage:@"per_printer" withTitle:@"标题" withSubTitle:@"" withArrow:YES];
        }
            break;
        default:
            break;
    }
    return commonTableViewCell;

}
至此我们已经讲完了这个公共cell的布局以及实现,接下来在我们工程里面还有几个其他类型的自定义cell,有兴趣可以自己看看,小白在这就不多赘述了。