前面三个章节给大家介绍了pytest的用例编写、前后置方式、用例标记等方法。这个章节主要给大家介绍pytest如何集成测试报告。pytest本身是没有生成测试报告的功能,但是pytest中有很多插件,我们可以通过插件来生成测试报告。下面会给大家介绍两个生成报告的方式。一个是生成html报告,一个是集成allure报告平台来展示测试报告。
一、生成HTML报告
pytest生成html的插件有很多,比如pytest-html,pytest-testreport等等,下面就给大家介绍如何使用pytest-testreport这个插件来生成HTML测试报告。
1.1、安装插件
pip install pytest-testreport
注意点:如果安装了pytest-html这个插件请先卸载,不然有可能会有冲突
1.2、插件的使用介绍
在使用pytest运行测试时,如果要使用pytest-testreport生成测试报告, 运行测试时加上参数--report 指定报告文件名,即可实现。
其他运行参数:
--title :指定报告标题
--tester :指定报告中的测试者
--desc :指定报告中的项目描述
--template :指定报告模板样式(1 or 2)
- 命令行执行:
pytest --report=musen.html --title=测试报告 --tester=月下 --desc=项目描述 --template=2
- 代码中使用pytest.main执行
import pytest

pytest.main(['--report=musen.html',
             '--title=上课报告',
             '--tester=测试员',
             '--desc=报告描述信息',
             '--template=2'])
生成的报告样式如下
样式一

样式二

关于HTML格式的报告生成就给大家介绍到这里,接下来和大家讲讲怎么集成allure报告
二、集成Allure报告
如果要在pytest中集成allure报告,首先得下载allure,并配置好环境
2.1、allure环境配置
一、下载allure: 地址:
https://github.com/allure-framework/allure2/releases
下载之后并解压
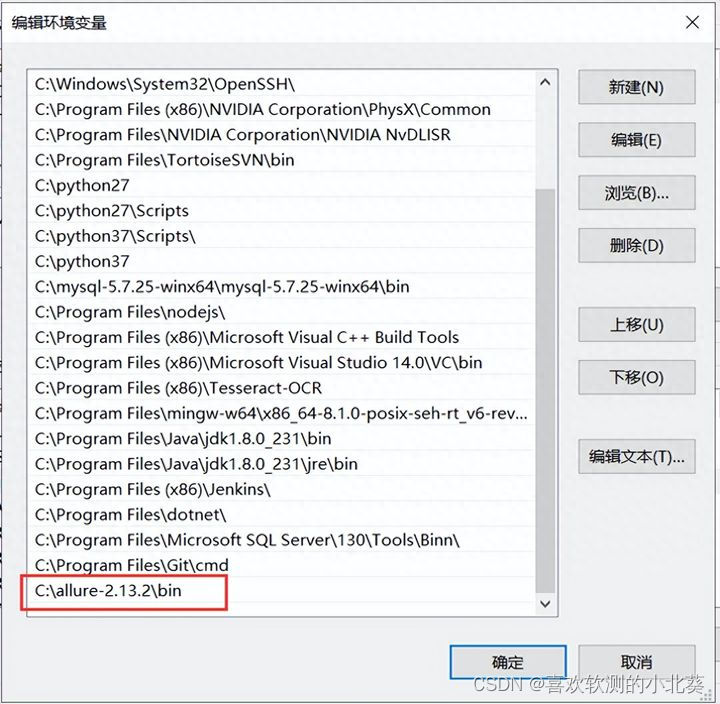
二、环境变量配置
将allure解压之后的allure路径的bin目录路径放到环境变量当中

三、安装allure的pytest插件
pip install allure-pytest
2.2、生成allure报告
安装配置好allure环境之后,在使用pytest执行用例时,就可以通过allure插件的参数来指定生成allure来报告了。
运行参数:
--alluredir :指定allure报告保存的路径
- 命令行运行
pytest --alluredir=reports
- 代码中使用pytest.main执行
import pytest

pytest.main(['--alluredir=reports'])
2.3、启动allure服务
在命令终端输入如下命令,启动allure服务
# 命令:allure serve  生成的报告路径
allure serve reports
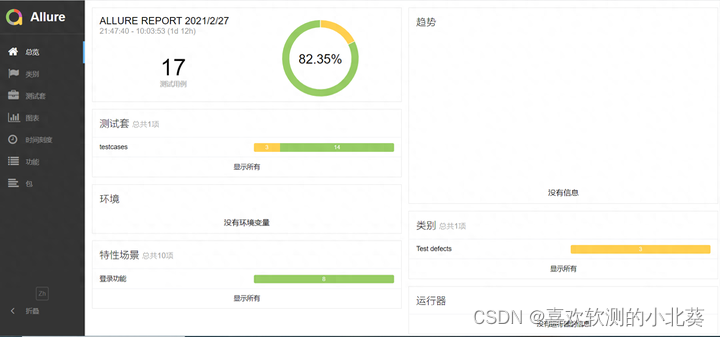
执行上述命令,allure服务启动之后会自动在打开浏览器,显示allure的服务页面

2.4、allure内置常用的方法
添加错误截图
- allure.title
 def error_save_screenshot(driver,file_path, desc):
        # 对当前页web页面进行截图
        driver.save_screenshot(file_path)
        # 将截图保存到allure报告中
        with open(file_path, "rb") as f:
            file = f.read()
            allure.attach(file, "失败截图", allure.attachment_type.PNG)
添加报告中的用例名称
- allure.title import allure class TestLogin: @allure.title('登录用例') def test_login(self): pass
参数化的用例中动态设置用例名称
- allure.dynamic.title # 用例数据 casedatas = [ {'title': '反向用例1','data':"xxx"}, {'title': '反向用例2','data':"xxx"}, {'title': '反向用例3','data':"xxx"} ] class TestLogin: @pytest.mark.parametrize('item',casedatas ) def test_demo(self, item): # 动态设置报告中的用例名称 allure.dynamic.title(item['title'])
添加报告中的功能描述
- allure.story
@allure.story('登录功能')
class TestLogin:

    @allure.title('登录用例')
    def test_login(self):
        pass
添加报告中套件名称
- allure.suite
@allure.suite('登录测试套件')
class TestLogin:
    @allure.title('登录用例')
    def test_login(self):
        pass
关于pytest生成测试报告的功能就给大家扩展到这里了!


