介绍
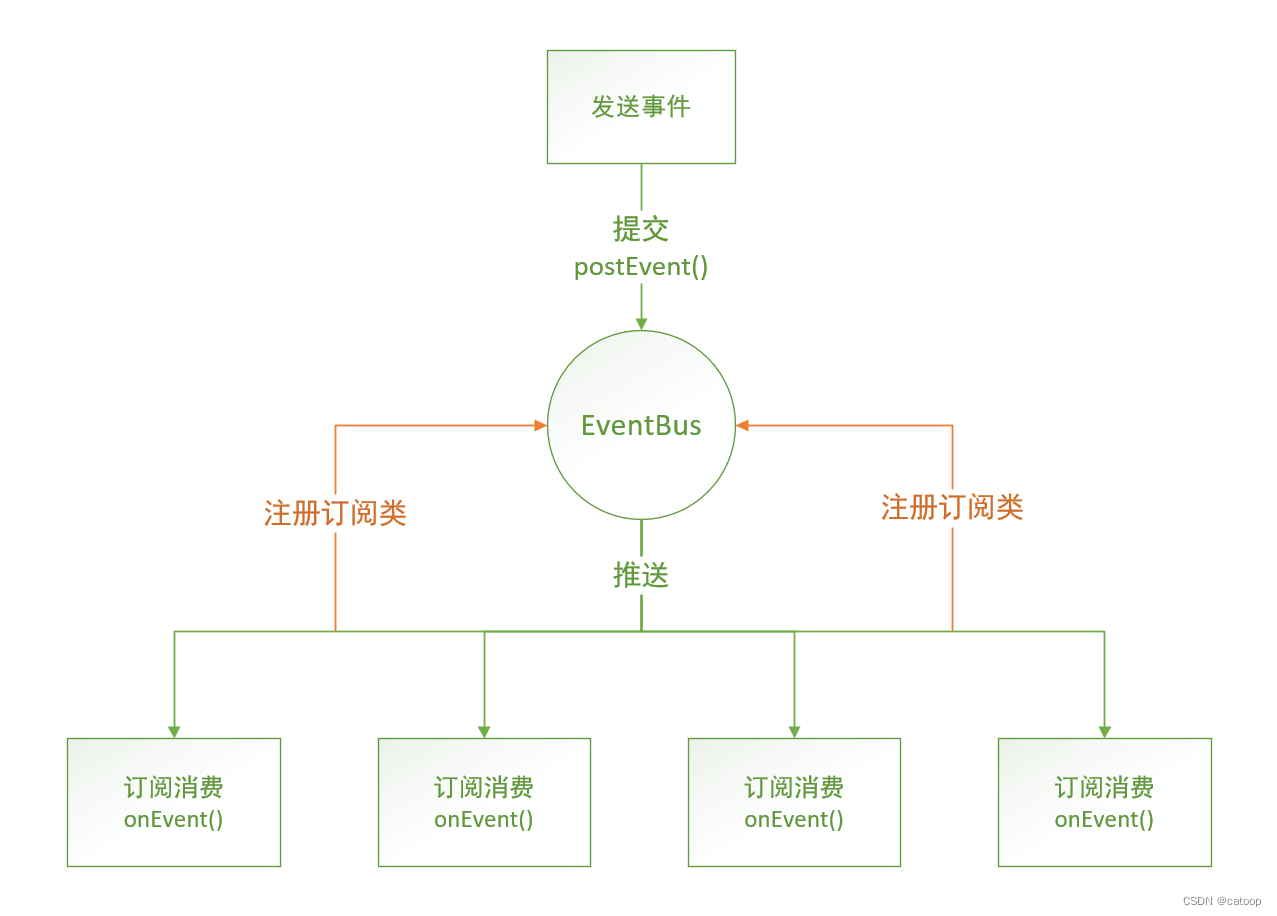
EventBus 顾名思义,事件总线,是一个轻量级的发布/订阅模式的应用模式,最初设计及应用源与 google guava 库。
相比于各种 MQ 中间件更加简洁、轻量,它可以在单体非分布式的小型应用模块内部使用(即同一个JVM范围)。
我们也可以把它和 MQ 中间件结合起来使用,使用 EventBus 作为当前应用程序接收中间件 MQ 消息的统一入口,然后应用内部基于 EventBus 进行分发订阅,以达到高内聚低耦合的目的(当应用内部需要消费多种不同 MQ 中间件消息时,不需要在当前应用的好多不同代码位置都编写 MQ 消费代码)。
EventBus 整体设计和流程比较简单,由注册、发布和订阅三个要点组成,如下:
注意事项
本文对 google guava 库中的 EventBus 进行实例说明,注意事项要先进行特别说明。
- EventBus 默认为同步调用,同一个 EventBus 中注册的多个订阅处理,再事件下发后是被总线串行逐个调用的,如果其中一个方法占用事件较长,则同一个 EventBus 中的其他事件处于等待状态,且发送消息事件的代码调用处也是同步调用等待的状态。
- 同一个 EventBus 对象,不仅仅在同一个 post 调用中串行执行,在多次并发 post 调用时,多个 post 调用之间也是串行等待执行的关系,这个要特别注意,应用不当会导致严重的消息消费处理性能瓶颈问题!
所以推荐使用异步的方式处理,异步处理主要包括 “EventBus 使用线程池统一异步” 和 “订阅消费处理代码自己使用线程异步” 两种方式。这里我更推荐使用前者,因为后者对开发者有一定的要求,加入开发者某个耗时的业务订阅实现没有自行使用线程异步处理,则会影响其他处的订阅处理。
代码示例
1、添加 pom 依赖
        <!-- google EvengBus 在 guava 包中 -->
        <dependency>
            <groupId>com.google.guava</groupId>
            <artifactId>guava</artifactId>
            <version>32.1.2-jre</version>
        </dependency>
        <!-- lombok 非必须,其作用你懂得 -->
        <dependency>
            <groupId>org.projectlombok</groupId>
            <artifactId>lombok</artifactId>
            <version>1.18.28</version>
            <scope>provided</scope>
        </dependency>
2、创建一个Java接口用于自动注册
package com.example.demospringbean.eventbus;

/**
 * 用于自动注册事件订阅类的接口
 *
 * @author shanhy
 * @date 2023-08-30 12:06
 */
public interface EventBusListener {


}
3、编写总配置类
package com.example.demospringbean.eventbus;

import com.google.common.eventbus.EventBus;
import org.springframework.context.annotation.Bean;
import org.springframework.context.annotation.Configuration;

import java.util.List;

/**
 * EventBus 配置类
 *
 * @author shanhy
 * @date 2023-08-30 11:11
 */
@Configuration
public class EventBusConfiguration {


    /**
     * 实例化 EventBus 对象,并自动注册所有订阅类对象
     *
     * @param eventListenerList 所有实现了 EventBusListener 接口的实现类
     * @return
     */
    @Bean
    public EventBus eventBus(List<EventBusListener> eventListenerList){


        // 异步处理,按照自己需要,实现自己的 Executor 逻辑,例如为了防止线程长期占用需要增加超时机制等
//      EventBus eventBus = new AsyncEventBus(new Executor() {


//            public void execute(Runnable command) {


//                new Thread(command).start();
//            }
//        });
        EventBus eventBus = new EventBus();
        if(eventListenerList != null && !eventListenerList.isEmpty()) {


            eventListenerList.iterator().forEachRemaining(eventListener -> eventBus.register(eventListener));
        }
        return eventBus;
    }

}
4、编写订阅测试类
package com.example.demospringbean.eventbus;

import com.google.common.eventbus.Subscribe;
import org.springframework.stereotype.Component;

import java.util.concurrent.TimeUnit;

/**
 * @author shanhy
 * @date 2023-08-30 11:19
 */
@Component
public class EventSub1 implements EventBusListener {


    @Subscribe
    public void handlerEvent(String test) {


        System.out.println("11111>>>>>" + test);
    }

    @Subscribe
    public void handlerEvent2(String test) throws InterruptedException {


        TimeUnit.SECONDS.sleep(5);
        System.out.println("22222>>>>>" + test);
    }

}
package com.example.demospringbean.eventbus;

import lombok.Builder;
import lombok.Data;

/**
 * @author shanhy
 * @date 2023-08-30 13:19
 */
@Data
@Builder
public class User {


    private String name;
    private int age;

}
package com.example.demospringbean.eventbus;

import com.google.common.eventbus.Subscribe;
import org.springframework.stereotype.Component;

/**
 * @author shanhy
 * @date 2023-08-30 11:19
 */
@Component
public class EventSub2 implements EventBusListener {


    @Subscribe
    public void handlerEvent(String test){


        System.out.println("33333>>>>>" + test);
    }

    @Subscribe
    public void handlerEvent2(User user){


        System.out.println("44444>>>>>" + user.getName());
    }

}
5、编写消息事件发送测试
package com.example.demospringbean;

import com.example.demospringbean.eventbus.User;
import com.google.common.eventbus.EventBus;
import org.springframework.beans.factory.annotation.Autowired;
import org.springframework.web.bind.annotation.GetMapping;
import org.springframework.web.bind.annotation.RequestMapping;
import org.springframework.web.bind.annotation.RestController;

/**
 * 接口示例
 *
 * @author shanhy
 * @date 2023-03-20 15:49
 */
@RestController
@RequestMapping("/test")
public class TestController {


    @Autowired
    private EventBus eventBus;

    @GetMapping("/testEvent1")
    public String testEvent1(){


        eventBus.post("Hello");
        return "OK";
    }

    @GetMapping("/testEvent2")
    public String testEvent2(){


        eventBus.post(User.builder().name("Tome").age(22).build());
        return "OK";
    }
}
代码说明:
1、以上代码使用的 EventBus、未使用 AsyncEventBus,并加入了线程 sleep,是为了运行代码可以观察其串行处理效果(浏览器开2个Tab同时调用 /testEvent1 观察输出),让你能更明显的感受到这种处理会给程序带来多大的性能问题(推荐实际业务生产中使用 AsyncEventBus)。
2、@Subscribe 注解修饰的事件处理方法,其参数和发送事件时的消息体会自动按类型关联对应。只有相同类型的消息体才会被消费处理。例如示例中 /testEvent1 接口发送的 “Hello” 字符串,不会触发 handlerEvent2(User user) 方法的执行,同理执行示例中 /testEvent2 接口发送 User 对象时,只会触发 handlerEvent2(User user) 方法。
(END)