最近学习了新的网络框架——Rxtrofit
附上官方的GitHub地址 点击打开链接
关于retrofit的介绍不在多说,网上一搜一大片,是现在的主流网络框架,下面是一些总结和记录一下我自己使用过程与心得
一 添加依赖:
compile 'com.squareup.retrofit2:retrofit:2.4.0'  // retrofit
compile 'com.squareup.retrofit2:converter-gson:2.4.0' // retrofit Gson
二 使用:
创建定义一个接口类:
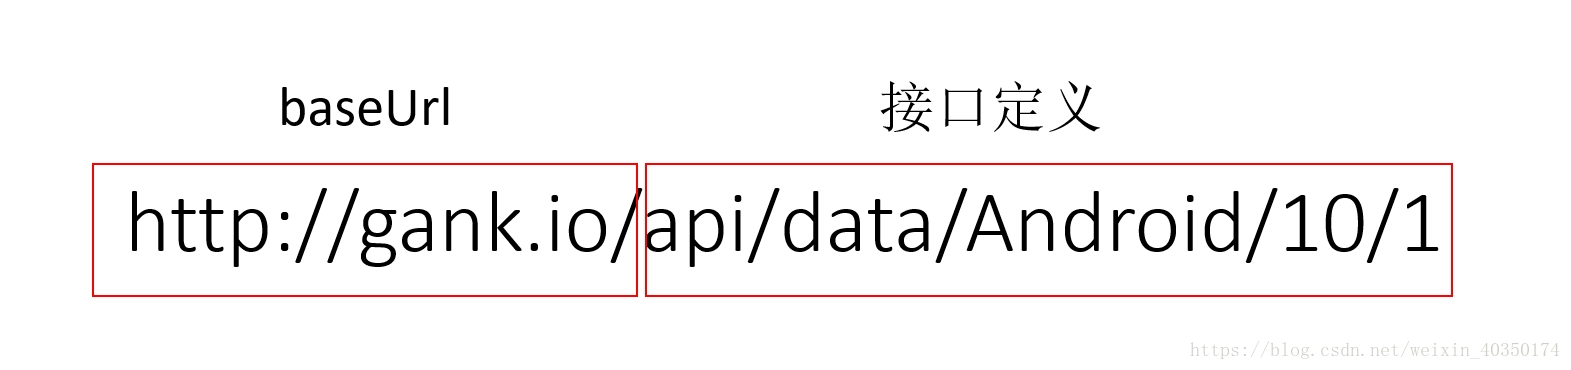
在retrofit中所有的Url都要进行组装 既:
创建bean类用来进行数据存储 ,
http://gank.io/api/data/Android/10/1
此接口是我在网上看到一个比较好的接口直接拿来用的
在这里我直接用的GsonFormat进行的生成Bean类
public class News {


    /**
     * error : false
     * results : [{"_id":"5a967b41421aa91071b838f7","createdAt":"2018-02-28T17:49:53.265Z","desc":"MusicLibrary-一个丰富的音频播放SDK","publishedAt":"2018-03-12T08:44:50.326Z","source":"web","type":"Android","url":"https://github.com/lizixian18/MusicLibrary","used":true,"who":"lizixian"},{"_id":"5a9cf1f5421aa9103fff20b1","createdAt":"2018-03-05T15:29:57.435Z","desc":"DirectSelect Dropdown is a selection widget with an ethereal, full-screen modal popup displaying the available choices when the widget is interact with.","images":["http://img.gank.io/90db2f35-2e9d-4d75-b5a9-53ee1719b57b"],"publishedAt":"2018-03-12T08:44:50.326Z","source":"web","type":"Android","url":"https://github.com/Ramotion/direct-select-android","used":true,"who":"Alex Mikhnev"},{"_id":"5a9f4968421aa910426a1890","createdAt":"2018-03-07T10:07:36.87Z","desc":"TextPathView是一个把文字转化为路径动画然后展现出来的自定义控件","images":["http://img.gank.io/bc3987dc-eb33-451f-a901-3e65bd7b666b"],"publishedAt":"2018-03-12T08:44:50.326Z","source":"chrome","type":"Android","url":"https://github.com/totond/TextPathView","used":true,"who":"Jason"},{"_id":"5aa24192421aa9103fff20c3","createdAt":"2018-03-09T16:10:58.75Z","desc":"VirtualXposed:不用 Root,不解锁 BootLoader 也不用刷机就使用 Xposed 模块的APP","publishedAt":"2018-03-12T08:44:50.326Z","source":"web","type":"Android","url":"https://github.com/android-hacker/VirtualXposed","used":true,"who":"weishu"},{"_id":"5a7c42c8421aa90d24a065d4","createdAt":"2018-02-08T20:30:00.798Z","desc":"一个动画效果的播放控件,播放,暂停,停止之间的动画切换","images":["http://img.gank.io/c1ee3231-648d-4449-a455-04a13731b2e1"],"publishedAt":"2018-02-22T08:24:35.209Z","source":"web","type":"Android","url":"https://github.com/SwiftyWang/AnimatePlayButton","used":true,"who":null},{"_id":"5a7c6094421aa90d21aa114a","createdAt":"2018-02-08T22:37:08.833Z","desc":"漂亮的本地多媒体选择器","publishedAt":"2018-02-22T08:24:35.209Z","source":"web","type":"Android","url":"https://github.com/TonnyL/Charles","used":true,"who":"黎赵太郎"},{"_id":"5a7cf9e7421aa90d21aa114b","createdAt":"2018-02-09T09:31:19.687Z","desc":"开源的 markdown 编辑器","images":["http://img.gank.io/760970ea-daae-4b98-9f87-deecdd3fe1f7","http://img.gank.io/ea49dc41-3435-4126-ab5b-d7b3357ab517"],"publishedAt":"2018-02-22T08:24:35.209Z","source":"chrome","type":"Android","url":"https://github.com/zeleven/mua","used":true,"who":"蒋朋"},{"_id":"5a81333c421aa90d264d0eba","createdAt":"2018-02-12T14:25:00.318Z","desc":"A slider widget with a popup bubble displaying the precise value selected.","images":["http://img.gank.io/fe3c723f-643d-4466-91d5-86d9ed4ca88e"],"publishedAt":"2018-02-22T08:24:35.209Z","source":"web","type":"Android","url":"https://github.com/Ramotion/fluid-slider-android","used":true,"who":"Alex Mikhnev"},{"_id":"5a685120421aa911548992ab","createdAt":"2018-01-24T17:25:52.341Z","desc":"Android 下的音乐可视化","images":["http://img.gank.io/e0d29181-282e-4465-9965-1da81e0557d9"],"publishedAt":"2018-01-29T07:53:57.676Z","source":"web","type":"Android","url":"https://github.com/nekocode/MusicVisualization","used":true,"who":"nekocode"},{"_id":"5a69608a421aa9115b9306a2","createdAt":"2018-01-25T12:43:54.642Z","desc":"插件化理解与实现 \u2014\u2014 加载 Activity「类加载篇」","images":["http://img.gank.io/a861c69f-02d2-46e8-b120-58ba4b3d97bf"],"publishedAt":"2018-01-29T07:53:57.676Z","source":"web","type":"Android","url":"https://fashare2015.github.io/2018/01/24/dynamic-load-learning-load-activity/","used":true,"who":"梁山boy"}]
     */

    private boolean error;
    private List<ResultsBean> results;

    public boolean isError() {
        return error;
    }

    public void setError(boolean error) {
        this.error = error;
    }

    public List<ResultsBean> getResults() {
        return results;
    }

    public void setResults(List<ResultsBean> results) {
        this.results = results;
    }

    public static class ResultsBean {
        /**
         * _id : 5a967b41421aa91071b838f7
         * createdAt : 2018-02-28T17:49:53.265Z
         * desc : MusicLibrary-一个丰富的音频播放SDK
         * publishedAt : 2018-03-12T08:44:50.326Z
         * source : web
         * type : Android
         * url : https://github.com/lizixian18/MusicLibrary
         * used : true
         * who : lizixian
         * images : ["http://img.gank.io/90db2f35-2e9d-4d75-b5a9-53ee1719b57b"]
         */

        private String _id;
        private String createdAt;
        private String desc;
        private String publishedAt;
        private String source;
        private String type;
        private String url;
        private boolean used;
        private String who;
        private List<String> images;

        public String get_id() {
            return _id;
        }

        public void set_id(String _id) {
            this._id = _id;
        }

        public String getCreatedAt() {
            return createdAt;
        }

        public void setCreatedAt(String createdAt) {
            this.createdAt = createdAt;
        }

        public String getDesc() {
            return desc;
        }

        public void setDesc(String desc) {
            this.desc = desc;
        }

        public String getPublishedAt() {
            return publishedAt;
        }

        public void setPublishedAt(String publishedAt) {
            this.publishedAt = publishedAt;
        }

        public String getSource() {
            return source;
        }

        public void setSource(String source) {
            this.source = source;
        }

        public String getType() {
            return type;
        }

        public void setType(String type) {
            this.type = type;
        }

        public String getUrl() {
            return url;
        }

        public void setUrl(String url) {
            this.url = url;
        }

        public boolean isUsed() {
            return used;
        }

        public void setUsed(boolean used) {
            this.used = used;
        }

        public String getWho() {
            return who;
        }

        public void setWho(String who) {
            this.who = who;
        }

        public List<String> getImages() {
            return images;
        }

        public void setImages(List<String> images) {
            this.images = images;
        }
    }
}
ok数据存储类有了,那么就可以来实现Retrifit具体操作
retrofit 具体的使用我觉得可以分为三步:
1: 在接口类中我们可以如下写
public interface Api {
  @GET("api/data/Android/10/1")
    Call<News> getnews();
}
2:在调用类中创建Retrofit
Retrofit retrofit = new Retrofit.Builder()
        .baseUrl("http://gank.io/")//接入BaseUrl
        .addConverterFactory(GsonConverterFactory.create())//使用之前我们引入的RetrofitGson进行添加一个转换器
        .build();
Api api = retrofit.create(Api.class);
Call<News> call = api.getnews();
3:异步
  call.enqueue(new Callback<News>() {
            @Override
            public void onResponse(Call<News> call, Response<News> response) {

//                News.ResultsBean resultsBean = response.body().getResults().get(0);
                List<News.ResultsBean> resultsBeans=response.body().getResults();

                Log.e("Tag", resultsBeans.get(1).getCreatedAt() + "");
            }

            @Override
            public void onFailure(Call<News> call, Throwable t) {

            }
        });
看下打印结果:
E/Tag: 2018-03-05T15:29:57.435Z
ok 能得出结果,说明我们第一次使用retrofit惊醒网络请求成功了! 尝到甜头!,
具体介绍:
retrofit的其他使用情况:
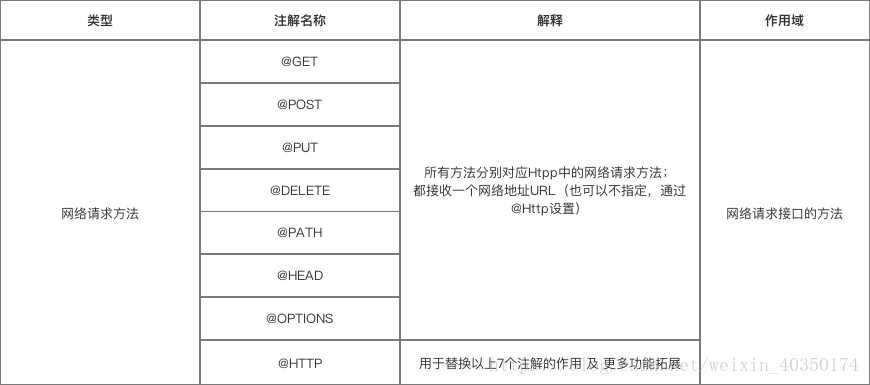
网络请求方法:
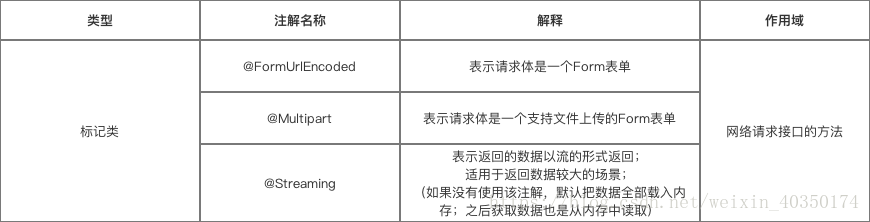
二:标记
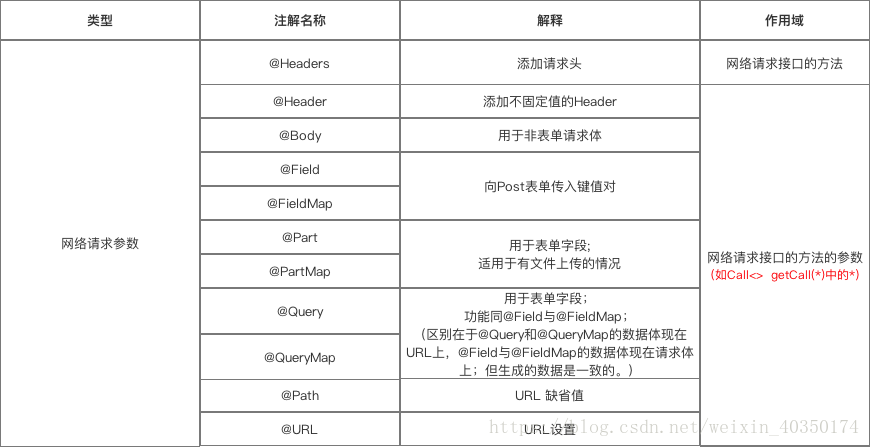
三:网络请求参数
一 .进行一个动态的Post表单请求 我使用和风天气的Api进行天气查询
修改代码我们使用post请求方式,, 并且添加网络请求参数
我同样使用了GsonFormat自动生成Bean类
bean类代码就不贴了 和上边的一样
看下接口类和具体使用:
1:接口
public interface Api {
  @POST("s6/weather/now?parameters")
    Call<News> getnews(@Query("key") String key,@Query("location")String location);
}
2:创建
Retrofit retrofit = new Retrofit.Builder()
        .baseUrl("https://free-api.heweather.com/")//接入BaseUrl
        .addConverterFactory(GsonConverterFactory.create())//使用之前我们引入的RetrofitGson进行添加一个转换器
        .build();
Api api = retrofit.create(Api.class);
Call<News> call = api.getnews("fad6d6b2cda14ef69d260ea9a4415e31","北京");
3:异步
call.enqueue(new Callback<News>() {
            @Override
            public void onResponse(Call<News> call, Response<News> response) {
                News.HeWeather6Bean bean=response.body().getHeWeather6().get(0);
                Log.e("TAG",bean.getNow().getCond_txt());
//
            }

            @Override
            public void onFailure(Call<News> call, Throwable t) {

            }
        });
打印结果:
E/TAG: 晴
二 .进行一个动态的Post Map<> 表单字段请求 使用和风天气的Api进行天气查询
修改代码:
1.
public interface Api {
  @POST("s6/weather/now?parameters")
    Call<News> getnews(@QueryMap Map<String,String> params);
}
2.
Retrofit retrofit = new Retrofit.Builder()
        .baseUrl("https://free-api.heweather.com/")//接入BaseUrl
        .addConverterFactory(GsonConverterFactory.create())//使用之前我们引入的RetrofitGson进行添加一个转换器
        .build();
Api api = retrofit.create(Api.class);
Map<String,String> params=new HashMap<>();
params.put("location","青岛");
params.put("key","fad6d6b2cda14ef69d260ea9a4415e31");
Call<News> call = api.getnews(params);
3.
  call.enqueue(new Callback<News>() {
            @Override
            public void onResponse(Call<News> call, Response<News> response) {
                News.HeWeather6Bean bean=response.body().getHeWeather6().get(0);
                Log.e("TAG",bean.getNow().getCond_txt());
//
            }

            @Override
            public void onFailure(Call<News> call, Throwable t) {

            }
        });
4:打印
E/TAG: 晴
post方式写完了,Get方式也基本明白如何写了。 其他请求方式和标注的网络请求参数也用的不多,大同小异。
好了,以上基本是现在我做项目正好能用到的东西,记录下来,忘记了常回来看看,也希望看到的朋友多多提出宝贵意见。
下个周结束之前写一篇Rxcache的心得, 路漫漫其修远兮。