MySQL是一个关系型数据库管理系统,常用于LAMP和LNMP等网站场景中。本教程介绍如何在Linux系统ECS实例上安装、配置以及远程访问MySQL数据库。
背景信息
本教程中的MySQL版本仅为示例,您在实际操作时,MySQL的版本可能因软件源的更新而有所不同。关于MySQL相关安装路径说明如下:
-
配置文件:/etc/my.cnf
-
数据存储:/var/lib/mysql
-
命令文件:/usr/bin和/usr/sbin
准备工作
快速部署时选择已有实例或手动部署MySQL时,已有ECS实例必须满足以下条件:
-
实例已分配公网IP地址或绑定弹性公网IP(EIP)。
公网ip用于shell工具来连接这个服务器 -
操作系统:CentOS 7.x、CentOS 8.x、Alibaba Cloud Linux 2、Alibaba Cloud Linux 3。
-
实例安全组的入方向规则已放行22、80、443、3306端口。
入方向规则放行用于工具可以进行访问
在ECS工作台可以查看到对应的入方向规则
如果没有开放对应的端口,可以手动添加对应的端口即可

连接ECS(服务器)
常用的windows环境连接Linux或UNIX的工具有xshell、secureCRT等,当然还有阿里云自带的workbench远程连接。这里我使用的是xshell,这个可以直接去官方下载,有免费版本的。
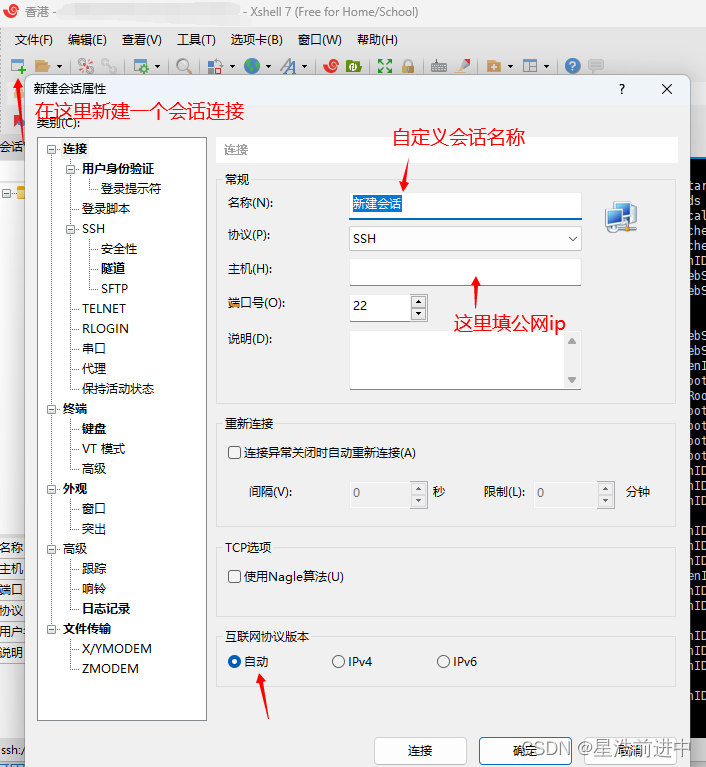
随后跟着提示填写你的ECS服务器的账号和密码即可。当连接成功时,在命令行中会出现这类信息,即表明连接成功

开始部署
安装数据库
-
运行以下命令,更新YUM源。
sudo rpm -Uvh https://dev.mysql.com/get/mysql80-community-release-el7-7.noarch.rpm运行结果:

-
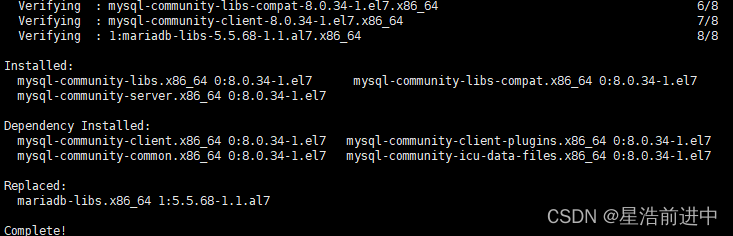
运行以下命令,安装MySQL。
sudo yum -y install mysql-community-server --enablerepo=mysql80-community --nogpgcheck运行结果:
-
运行以下命令,查看MySQL版本号。
mysql -V出现以下运行结果,代表安装成功

配置MySQL
-
启动并设置开机自启动MySQL服务。
sudo systemctl start mysqld sudo systemctl enable mysqld -
获取并记录root用户的初始密码。
sudo grep 'temporary password' /var/log/mysqld.log运行结果:

其中E>4jhoorf(j5为初始密码(复制的时候注意前面有个空格,每个人的初始密码不一样),后续在对MySQL进行安全性配置时,需要使用该初始密码。
-
对MySQL进行安全性配置。
sudo mysql_secure_installation1)重置MySQL数据库root用户的密码。
在输入密码时,系统为了最大限度的保证数据安全,命令行将不做任何回显。您只需要输入正确的密码信息,然后按Enter键即可。
Enter password for user root: #输入已获取的root用户初始密码

The existing password for the user account root has expired. Please set a new password.

New password: #输入新的MySQL密码(这里只能输入强密码(类似于Abc123.))

Re-enter new password: #重复输入新的MySQL密码
The 'validate_password' component is installed on the server.
The subsequent steps will run with the existing configuration
of the component.
Using existing password for root.

Estimated strength of the password: 100
Change the password for root ? ((Press y|Y for Yes, any other key for No) :Y #输入Y选择更新MySQL密码。您也可以输入N不再更新MySQL密码。

New password: #输入新的MySQL密码

Re-enter new password: #重复输入新的MySQL密码

Estimated strength of the password: 100
Do you wish to continue with the password provided?(Press y|Y for Yes, any other key for No) :Y #输入Y确认使用已设置的密码。
2)删除匿名用户。By default, a MySQL installation has an anonymous user, allowing anyone to log into MySQL without having to have a user account created for them. This is intended only for testing, and to make the installation go a bit smoother. You should remove them before moving into a production environment. Remove anonymous users? (Press y|Y for Yes, any other key for No) :Y #输入Y删除MySQL默认的匿名用户。 Success.3)禁止root账号远程登录。
Normally, root should only be allowed to connect from
'localhost'. This ensures that someone cannot guess at
the root password from the network.

Disallow root login remotely? (Press y|Y for Yes, any other key for No) :N #输入N不禁止root远程登录。
4)删除test库以及对test库的访问权限。By default, MySQL comes with a database named 'test' that anyone can access. This is also intended only for testing, and should be removed before moving into a production environment. Remove test database and access to it? (Press y|Y for Yes, any other key for No) :Y #输入Y删除test库以及对test库的访问权限。 - Dropping test database... Success. - Removing privileges on test database... Success.
5)重新加载授权表。Reloading the privilege tables will ensure that all changes made so far will take effect immediately. Reload privilege tables now? (Press y|Y for Yes, any other key for No) :Y #输入Y重新加载授权表。 Success. All done!
到此,数据库的安装与配置已完成。这时可以使用连接数据库的工具进行连接了。
连接数据库
常用的连接MySQL数据库的可视化工具有很多。有mysql官方的mysql workbench,有DataGrip,还有navicat等等。
这里我选用的是navicat,这是市面上比较常用的工具。
这个工具官方下载是会收费的,免费版本可以关注 V公众号 星浩工具站,输入navicat进行领取
下载之后找到对应目录,找到对应exe可执行文件

双击exe可执行文件

然后点击连接,再选择Mysql。接着输入对应的参数即可
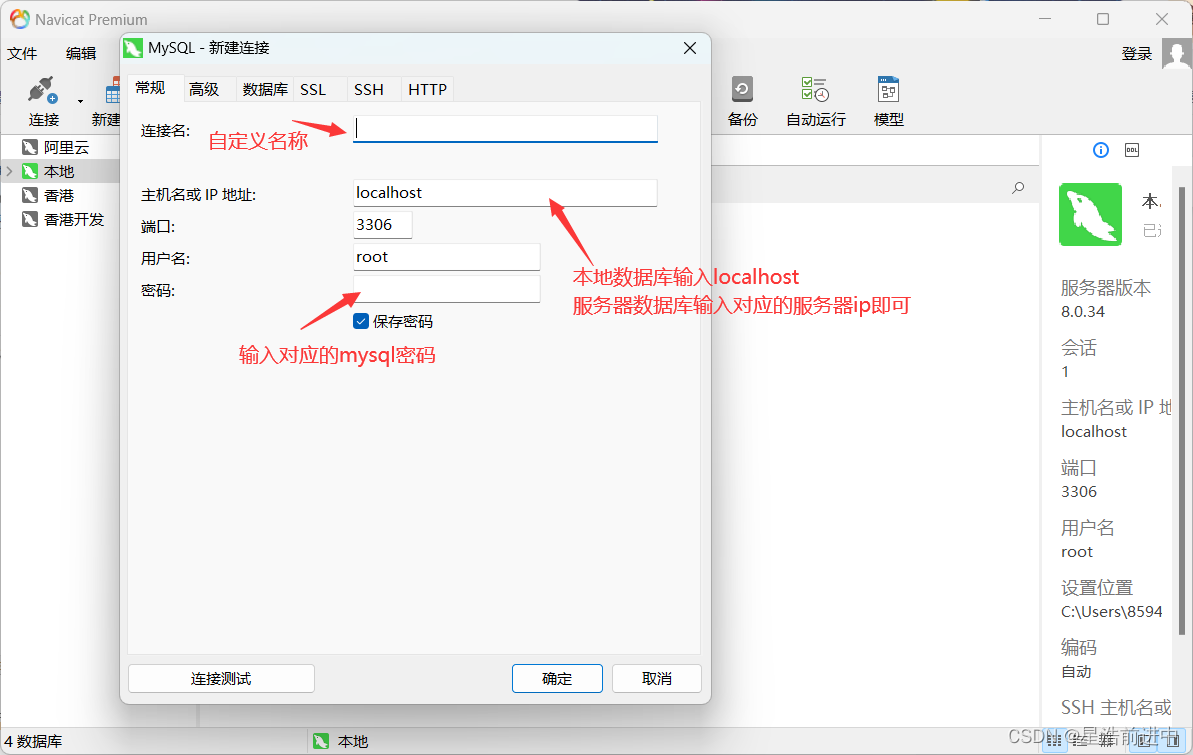
然后点击确定。如果说不记得密码,可以点击连接测试进行测试密码正确与否。
接着我们就成功连接上数据库了

这里的mysql之类的数据库文件不要随便删除。
如果要新建数据库,可以右键对应的连接,然后点击新建数据库即可。
部分疑难问题
1、2058代码错误
报错内容:2058(Plugin caching_sha2_password could not be loaded:)

【可能原因】Mysql新版默认使用 caching_sha2_pasword 作为 身份验证插件。而旧版是使用 mysql_native_password,当连接MySQL时报错 plugin caching_sha2_password could not be loaded 时,可换回旧版插件。
【处理办法】使用命令行进入MySQL,然后更改下身份验证插件即可
1、进入mysql
mysql -u 用户名 -p 例如:mysql -u root -p2、然后执行下面语句
ALTER USER 'root'@'localhost' IDENTIFIED WITH mysql_native_password BY '123456';
(其中123456是你预设置的root密码,我的密码是:123456 )
3、然后刷新配置
flush privileges;2、1054代码错误
当修改密码出现以下错误
ERROR 1054 (42S22): Unknown column 'password' in 'field list'错误原因:mysql数据库下已经没有password这个字段了,password字段改成了authentication_string。
解决:
update user set authentication_string="123456" where user="root";
当然,这些操作都是通过命令行进入MySQL进行操作的