Jetty
以前使用的tomcat,没接触过jetty,最近使用到jetty。jetty相对Tomcat,给我第一个使用感觉,那就是加载速度比tomcat快多了。而jetty还有一个最大的优点是tomcat不能达到的优势。
jetty倡导嵌入式开发,什么叫嵌入式开发呢?
与tomcat作个比较,tomcat相当于一个容器,我们需要把自己的web项目放入到tomcat指定目录中,在启动tomcat,这个时候我们的项目才能发布完成。而jetty,则不同,它相当于一个插件,我只要导入它所需要的依赖,调用他的api,我们的项目就能像tomcat那样支持http访问了。从这一点来说,他运行非常轻量级,也支持资源文件的管理。如果你想具体了解jetty,我建议应该去看看官方文档了。
使用Websocket
jetty使用的nio的技术,并且支持webSocket,而webSocket是基于tcp的一种最新的双工通信协议,用在IM领域比较多。具体写个demo,来看看怎么使用吧。
POM
<dependency>
        <groupId>org.eclipse.jetty</groupId>
        <artifactId>jetty-server</artifactId>
        <version>9.2.23.v20171218</version>
    </dependency>

    <!-- jetty的客户端依赖,支持httpClient -->
    <dependency>
        <groupId>org.eclipse.jetty</groupId>
        <artifactId>jetty-client</artifactId>
        <version>9.2.23.v20171218</version>
    </dependency>

    <dependency>
        <groupId>org.eclipse.jetty</groupId>
        <artifactId>jetty-servlets</artifactId>
        <version>9.2.23.v20171218</version>
    </dependency>

<dependency>
        <groupId>org.eclipse.jetty.websocket</groupId>
        <artifactId>websocket-server</artifactId>
        <version>9.2.23.v20171218</version>
    </dependency>

    <dependency>
        <groupId>org.eclipse.jetty</groupId>
        <artifactId>jetty-webapp</artifactId>
        <version>9.2.23.v20171218</version>
    </dependency>

    <dependency>
        <groupId>org.eclipse.jetty</groupId>
        <artifactId>jetty-annotations</artifactId>
        <version>9.2.23.v20171218</version>
    </dependency>
我使用的是maven构建的项目,当然你可以到官方去下载,导入相应的依赖便可
WebSocketCreator实现webSocket
jetty的handler
public class WebSocketHandlerTest extends WebSocketHandler{
    @Override
    public void configure(WebSocketServletFactory webSocketServletFactory) {
        webSocketServletFactory.getPolicy().setIdleTimeout(10L * 60L * 1000L);
        webSocketServletFactory.getPolicy().setAsyncWriteTimeout(10L * 1000L);
        /* 设置自定义的WebSocket组合 */
        webSocketServletFactory.setCreator(new MyAdvancedEchoCreator());

    }
}
WebSocketCreator
public class MyAdvancedEchoCreator  implements org.eclipse.jetty.websocket.servlet.WebSocketCreator{


    AnnotatedEchoSocket annotatedEchoSocket;

    public MyAdvancedEchoCreator() {
        annotatedEchoSocket = new AnnotatedEchoSocket();

    }

    @Override
    public Object createWebSocket(ServletUpgradeRequest req, ServletUpgradeResponse resp) {
        for (String sub : req.getSubProtocols())
        {
            /**
             *   官方的Demo,这里可以根据相应的参数做判断,使用什么样的websocket
             */

        }

        // 没有有效的请求,忽略它
        return annotatedEchoSocket;

    }
}
具体的webSocket
@WebSocket(maxTextMessageSize = 128 * 1024, maxBinaryMessageSize = 128 * 1024)
public class AnnotatedEchoSocket {

    @OnWebSocketConnect
    public void onText(Session session)throws  Exception{
        if(session.isOpen()){
            //System.out.printf("返回消息 [%s]%n","ss");
            session.getRemote().sendString("服务器发送数据: 测试001");
            System.out.println("============================================");
            Future<Void> fut;
            fut = session.getRemote().sendStringByFuture("Hello");
            try
            {
                fut.get(2, TimeUnit.SECONDS);

                SimpleDateFormat df = new SimpleDateFormat("yyyy-MM-dd hh:mm:ss");

                fut = session.getRemote().sendStringByFuture(df.format(new Date()));
                fut.get(2, TimeUnit.SECONDS);
            }
            catch (InterruptedException | ExecutionException | TimeoutException e)
            {
                e.printStackTrace();
            }
        }

    }
    @OnWebSocketClose
    public void onWebSocketBinary(int i,String string)
    {
        System.out.println("关闭");


    }

    @OnWebSocketMessage
    public void onMessage(String msg)
    {
        System.out.println("服务器已经收到消息 " + msg);
        System.out.printf("Got msg: %s%n",msg);
        System.out.println();

    }
    public void onWebSocketBinary( org.eclipse.jetty.websocket.api.Session session, int a, java.lang.String s){


    }


}
Server端
public static void main(String args[])
    {
        Server server = new Server(7778);

        /* webSocket的handler */
        WebSocketHandlerTest test = new WebSocketHandlerTest();


        ContextHandler context = new ContextHandler();
        /* 路径 */
        context.setContextPath("/test");
        context.setHandler(test);

        server.setHandler(context);
        try
        {
            /* 启动服务端 */
            server.start();
            server.join();
        }
        catch (Exception e)
        {

            e.printStackTrace();
        }

    }
WebClient测试
相应的服务端已经启动了,下面开始来客户端昨个测试,看看ok了没
public static void main(String args[])
    {
        String destUri = "ws://127.0.0.1:7778/test/";
        if (args.length > 0)
        {
            destUri = args[0];
        }
        WebSocketClient client = new WebSocketClient();
        SimpleEchoSocket socket = new SimpleEchoSocket();
        try
        {
            client.start();
            URI echoUri = new URI(destUri);
            ClientUpgradeRequest request = new ClientUpgradeRequest();
            request.setSubProtocols("c");
            request.setHeader("index", "3");
            /* 使用相应的webSocket进行连接 */
            client.connect(socket, echoUri, request);

            System.out.printf("Connecting to : %s%n", echoUri);
            socket.awaitClose(1000, TimeUnit.SECONDS);
        }
        catch (Throwable t)
        {
            t.printStackTrace();
        }
        finally
        {
            try
            {
                client.stop();
            }
            catch (Exception e)
            {
                e.printStackTrace();
            }
        }
    }
@WebSocket(maxTextMessageSize = 64 * 1024)
public class SimpleEchoSocket {
private final CountDownLatch closeLatch;
@SuppressWarnings("unused")
private Session session;
public SimpleEchoSocket()
{
this.closeLatch = new CountDownLatch(1);
}
public boolean awaitClose(int duration, TimeUnit unit) throws InterruptedException
{
return this.closeLatch.await(duration,unit);
}
@OnWebSocketClose
public void onClose(int statusCode, String reason)
{
System.out.printf("客户端关闭: %d - %s%n",statusCode,reason);
this.session = null;
this.closeLatch.countDown(); // 触发位置
}
@OnWebSocketConnect
public void onConnect(Session session)
{
System.out.printf("客户端连接: %s%n",session);
this.session = session;
try
{
Future<Void> fut;
System.out.println("客户端已经发送");
fut = session.getRemote().sendStringByFuture("11111Hello");
fut.get(2,TimeUnit.SECONDS); // 等待发送完成
fut = session.getRemote().sendStringByFuture("222222Thanks for the conversation.");
fut.get(2, TimeUnit.SECONDS); // 等待发送完成
System.out.println("客户端已经发送完成");
session.close(StatusCode.NORMAL,"I'm done");
}
catch (Throwable t)
{
t.printStackTrace();
}
}
@OnWebSocketMessage
public void onMessage(String msg)
{
System.out.printf("接收到服务器消息: %s%n",msg);
}
}
运行

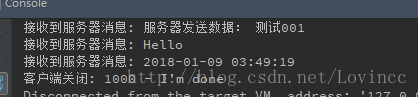
总结
相应的webSocket一个测试小demo就完成了,虽然相应的例子比较少,官方文档又只有个别代码片段,新手入门比较难,但总算搭建完成,具体啊有其他的扩展还得去官方api查看了