1、Uploading a project上传项目
This artcle provides a step-by-step guide showing how to create an Overleaf project
by uploading a
.zipfile containing LaTeX files stored on your local computer1、Create a
.zipfile containing your local files (images, bibliography, fonts,.texsources, etc.).If your local LaTeX project uses folders, these can be preserved in the.zipfile and will be reconstructed when the.zipfile is unpacked on Overleaf.2、In the Project Management page, select New Project then choose Upload Project from within the drop-down menu.
3、You cannot upload individual files which exceed 50MB.
如何通过上传本地latex项目文件(.zip文件)来创建一个Overlea文件:
1.上传的是包含本地latex项目文件(图像、参考书目、字体、.tex源文件等)的.zip文件
2.在“项目管理”页面中,选择“新建项目”,然后在下拉菜单中选择“上传项目”。
3.上传的单个文件不能超过50MB。
| if your LaTeX code needs LuaLaTeX or XeLaTeX you may need to set the project's LaTeX compiler . |
2、New project from a template 创建模版项目
To create a document from a template,in the Project Management page click New Project, a drop-down menu will display, below Templates click on the document type you are about to write.
.在“项目管理”页面中,选择“新建项目”,然后在下拉菜单中选择“样例项目”。
3、Main document main文件
Sets the .tex file to be compiled as the main document of the project, each time when
you visit your project. The "Word count" feature will always operate on this designated file.
Note 1: Any file that contains a
\documentclasscommand, even if it's notdesignated the "main document", will be compiled if it's opened in the editor when you press the Recompile button.
Note 2: The main file must be an editable plain text file. Therefore if a .tex file is larger than 2MB, it's categorised as non-editable on Overleaf, and you won't be able to set such a file as your project's main document. You can break it up into smaller .tex files, and use
\inputor\includeon them.Note 3: Word count, go to location in /PDF, makeglossaries, makeindex, minted etc will only work robustly if the main document is on the project's root level; that is, it is not within any folder.
设置要编译的.tex文件作为项目的主文档。“字数统计”功能将始终在指定的文件上运行。
任何包含\documentclass命令的文件,即使它不是指定为“主文档”,如果在编辑器中打开它,当你按下Recompile按钮时,它将被编译。
主文件必须是可编辑的纯文本文件。因此,如果.tex文件大于2MB,它在Overleaf上被归类为不可编辑,并且您将无法将此类文件设置为项目的主文档。您可以将它分解为更小的.tex文件,并对它们使用\input或\include。
4、Spell-check拼写检查
This is a user-specific setting. You can change the spell-check language dictionary (as provided by Aspell) to use, or turn off spell-checking.
可以选择打开或关闭拼写检查
5、Auto-complete自动补全
This is a user-specific setting. Enables/disables the auto-completion suggestion list
when you type a LaTeX command. If you're interested in how this works, see our blog post on how we used a data-driven approach to order the suggestions.
可以选择启用或禁用自动补全功能
6、Code Check代码核对
This is a user-specific setting. Enables/disables the syntax-checker to check your LATEX code and catch common syntax errors, even before the LATEX compiler runs.
Note that the Code Check utility is not a full LATEX parser, andmay not support certain syntax. In such cases, you can choose to disable Code Check in your project completely using this menu setting, or to disable Code Check for only one particular file, or for only some particular lines of code.
启用/禁用语法检查器来检查你的LATEX代码,并捕获常见的语法错误,甚至在LATEX编译器运行之前完成这项工作。但不是对所有语法有效。
7、Keybindings 快捷键
This is a user-specific setting. There are three keybinding modes: None (the default); Vim; Emacs.
Note 1: If you tried to type something but nothing shows up in the editor, until you hit the "I" key: chances are that you've accidentally enabled the Vim keybinding mode. Change this setting to "None", to return to the default mode.
Note 2: Our Vim and Emacs keybindings are provided by an open-source code editor component. They are emulations, so not all Vim/Emacs bindings are fully supported, especially pre-existing browser shortcuts.
In particular, when in Emacs mode, use Shift-Alt-5 instead of Ctrl-F (or Cmd-F) to bring up the search-and-replace dialog.有三种模式:默认模式、vim模式、Emacs模式
如果尝试键入一些内容,但在编辑器中没有显示任何内容,直到您按下“I”键: 很可能您不小心启用了Vim键绑定模式。将此设置更改为“None”,既可以返回默认模式。
我们的Vim和Emacs键绑定是由开源代码编辑器组件提供的。它们是模拟的,因此并不是所有的Vim/Emacs绑定都得到完全支持,尤其是预先存在的浏览器快捷方式。
特别是,在Emacs模式下,使用Shift-Alt-5而不是Ctrl-F(或Cmd-F)来弹出搜索和替换对话框。
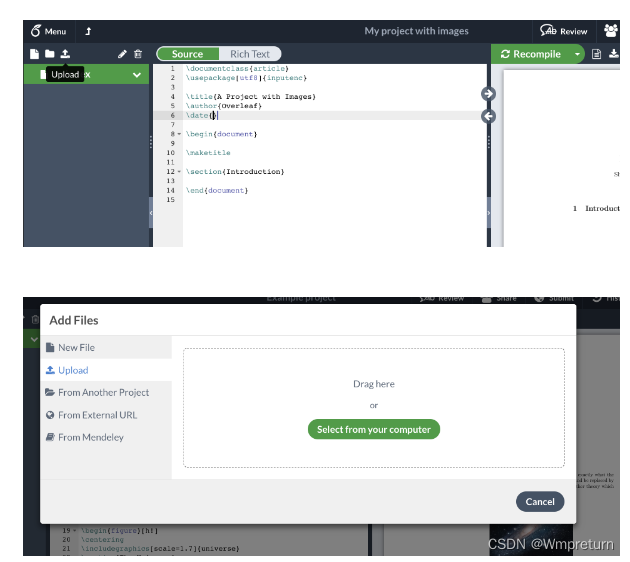
8、Including images on Overleaf插入图片
To upload an image, in the editor go to the upper left corner and click the upload icon
a dialogue box will pop up for you to upload your files.
要上传图像,请在编辑器中转到左上角并单击上传图标将弹出一个对话框供您上传文件。
当然也可以将大量文件上传的一个文件夹里,每次使用图片时都去这个文件夹里寻找。
For more information about picture manipulation in LATEX see the further reading for links to other documentation pages.有关图像的更多信息,请阅读"futher reading"文件。
9、编写文件的代码
注释使用%
1、一个最简单的示例:
\documentclass{article} %这一行定义了文档的类型为
article,表示我们将创建一篇文章。\begin{document}
正文
\end{document}
2、插入图片示例
\documentclass{article} % 这一行定义了文档的类型为
article,表示我们将创建一篇文章。\usepackage[utf8]{inputenc}
% 这行代码使用了
inputenc宏包,并设置了utf8编码,以便支持输入的文本中包含的Unicode字符。\usepackage{graphicx}
% 这行代码使用了
graphicx宏包,允许在文档中插入和操作图像。\title{A project with images}
\author{Overleaf}
\date{}
% 这几行代码设置了文档的标题、作者和日期。你可以根据自己的需要修改其中的内容。
\begin{document} % 这行代码表示文档的内容从这里开始。
\maketitle % 这行代码生成标题、作者和日期,并在文档的开头显示出来。
\section{Introduction} % 这行代码创建了一个名为"Introduction"的章节,用于引言部分。
\begin{figure}[htp]
\centering
\includegraphics[width=4cm]{InsertingImagesEx5}
\caption{An image of a galaxy}
\label{fig:galaxy}
\end{figure}
% 这部分代码创建了一个带有图片的figure环境。
[htp]是可选参数,用于指定图片的位置(这里是"here", "top"和"page"的意思)。\centering命令使得图片居中显示。\includegraphics命令用于插入名为"InsertingImagesEx5"的图片文件,宽度设置为4cm。\caption命令添加了图片的标题。\label命令给图片添加了一个标签,在文本中可以使用该标签引用这个图片。\end{document} % 这行代码表示文档的内容到此结束。
这段代码的主要作用是生成一个带有标题、作者和图片的文档,并将图片居中显示在文章中。 注释使用的是%

3、添加标题页
(是标题页,不是普通的标题)
\documentclass{article}
\usepackage[utf8]{inputenc}
\usepackage{graphicx}%这三行可以照抄
\title{标题名} %这行代码设置文档的标题
\author{文档作者名} % 这行代码设置文档的作者为 "Overleaf"。
\date{日期} % 这行代显示日期。 {}里面写\today,会显示今天的日期
\begin{document} %正文开始
%添加标题
\begin{titlepage}
\maketitle
\end{titlepage}
%添加摘要
\begin{abstract}
这里是摘要的内容。
\end{abstract}
% 注意要写在正文之前,因为是摘要
% 如果上面的标题页的\begin{}和\end{}行去掉,只留下\maketitle行,那么摘要会和标题在同一页。
正文章节,逐段编写正文:
段落形成的方式:一、通过空行分隔不同的段落。 二、通过\section{}语句
\section{段落1} % {}里的内容会是段落名
这是第一个段落的内容。\section{段落2}
这是第二个段落的内容。
这是第三个段落的内容。这是第四个段落的内容。
效果展现:
1 段落1
这是第一个段落的内容。
2 段落2
这是第二个段落的内容。这是第三个段落的内容。
这是第四个段落的内容。
可以使用
\section{段落2} 段落内容
\subsection{段落内容2.1} 段落2.1的详细内容
来进行段落嵌套\end{document} %正文结束
一个添加标题页的示例:
\documentclass{article}
\usepackage[utf8]{inputenc}
\usepackage{graphicx}\title{A project with images}
\author{Overleaf}
\date{}\graphicspath{ {Images/}}
\begin{document} %正文开始
\begin{titlepage}
\centering
\vspace*{2cm} % 垂直空白距离
\includegraphics[width=6cm]{logo} % 插入标题页上的图片
\vspace{1.5cm} % 垂直空白距离
\Huge\textbf{\thetitle} % 标题
\vspace{0.5cm} % 垂直空白距离
\Large\theauthor % 作者
\vfill % 垂直填充
\thedate % 日期(留空表示不显示日期)
\end{titlepage}\section{Introduction}
\begin{figure}[htp]
\centering
\includegraphics[width=4cm]{InsertingImagesEx5}
\caption{An image of a galaxy}
\label{fig:galaxy}
\end{figure}\end{document} %正文结束
上述代码中的 `\begin{titlepage}` 和 `\end{titlepage}` 创建了标题页的环境。在标题页中,可以使用 `\vspace` 命令来调整垂直空白距离,使用 `\includegraphics` 命令插入标题页上的图片,使用 `\Huge` 和 `\Large` 设置标题和作者的字体大小。最后使用 `\vfill` 可以将日期放在页面底部。
你可以根据需要修改样式和内容,比如调整图片大小、添加额外的文本等。