Spring Cloud Alibaba 微服务各组件整合项目:
版本说明:
- <spring-boot.version>2.6.3</spring-boot.version>
- <spring-cloud.version>2021.0.1</spring-cloud.version>
- <spring-cloud-alibaba.version>2021.0.1.0</spring-cloud-alibaba.version>
- <swagger.fox.version>3.0.0</swagger.fox.version>
- <knife4j.version>3.0.3</knife4j.version>
- <nacos.server>1.4.2</nacos.server>
- <seata.server>1.4.2</seata.server>
- <sentinel.dashboard>1.8.3</sentinel.dashboard>
- <skywalking.walking>9.0-8.10</skywalking.walking>
依赖前置:
<?xml version="1.0" encoding="UTF-8"?>
<project xmlns="http://maven.apache.org/POM/4.0.0"
         xmlns:xsi="http://www.w3.org/2001/XMLSchema-instance"
         xsi:schemaLocation="http://maven.apache.org/POM/4.0.0 http://maven.apache.org/xsd/maven-4.0.0.xsd">
    <modelVersion>4.0.0</modelVersion>

    <groupId>com.xiaoshu</groupId>
    <artifactId>alibaba-cloud-example</artifactId>
    <version>1.0-SNAPSHOT</version>

    <packaging>pom</packaging>

    <properties>
        <java.version>1.8</java.version>
        <project.build.sourceEncoding>UTF-8</project.build.sourceEncoding>
        <maven.compiler.source>1.8</maven.compiler.source>
        <maven.compiler.target>1.8</maven.compiler.target>
        <maven.compiler.version>3.8.1</maven.compiler.version>

        <spring-boot.version>2.6.3</spring-boot.version>
        <spring-cloud.version>2021.0.1</spring-cloud.version>
        <spring-cloud-alibaba.version>2021.0.1.0</spring-cloud-alibaba.version>

        <swagger.fox.version>3.0.0</swagger.fox.version>
        <knife4j.version>3.0.3</knife4j.version>
        <jasypt.version>3.0.3</jasypt.version>

    </properties>

    <modules>
        <module>cloud-gateway</module>
        <module>cloud-oss</module>
        <module>cloud-upms</module>
        <module>cloud-common</module>
        <module>cloud-auth</module>
    </modules>

    <dependencies>

        <!--bootstrap 启动器-->
        <dependency>
            <groupId>org.springframework.cloud</groupId>
            <artifactId>spring-cloud-starter-bootstrap</artifactId>
        </dependency>

        <!--配置文件处理器-->
        <dependency>
            <groupId>org.springframework.boot</groupId>
            <artifactId>spring-boot-configuration-processor</artifactId>
            <optional>true</optional>
        </dependency>

        <!--jasypt配置文件加解密-->
        <dependency>
            <groupId>com.github.ulisesbocchio</groupId>
            <artifactId>jasypt-spring-boot-starter</artifactId>
            <version>${jasypt.version}</version>
        </dependency>

        <!--Lombok-->
        <dependency>
            <groupId>org.projectlombok</groupId>
            <artifactId>lombok</artifactId>
            <scope>provided</scope>
        </dependency>

    </dependencies>

    <dependencyManagement>

        <dependencies>
            <!--spring boot 公共版本定义-->
            <dependency>
                <groupId>org.springframework.boot</groupId>
                <artifactId>spring-boot-dependencies</artifactId>
                <version>${spring-boot.version}</version>
                <type>pom</type>
                <scope>import</scope>
            </dependency>

            <!--spring cloud 公共版本定义 通过dependencies完成继承-->
            <dependency>
                <groupId>org.springframework.cloud</groupId>
                <artifactId>spring-cloud-dependencies</artifactId>
                <version>${spring-cloud.version}</version>
                <type>pom</type>
                <scope>import</scope>
            </dependency>

            <!--spring cloud alibaba-->
            <dependency>
                <groupId>com.alibaba.cloud</groupId>
                <artifactId>spring-cloud-alibaba-dependencies</artifactId>
                <version>${spring-cloud-alibaba.version}</version>
                <type>pom</type>
                <scope>import</scope>
            </dependency>
        </dependencies>

    </dependencyManagement>

    <build>
        <finalName>${project.name}</finalName>
        <resources>
            <resource>
                <directory>src/main/resources</directory>
                <filtering>true</filtering>
            </resource>
        </resources>
        <pluginManagement>
            <plugins>
                <!--spring boot 默认插件-->
                <plugin>
                    <groupId>org.springframework.boot</groupId>
                    <artifactId>spring-boot-maven-plugin</artifactId>
                    <version>${spring-boot.version}</version>
                    <executions>
                        <execution>
                            <goals>
                                <goal>repackage</goal>
                            </goals>
                        </execution>
                    </executions>
                </plugin>

            </plugins>
        </pluginManagement>
        <plugins>
            <!--代码编译指定版本插件-->
            <plugin>
                <groupId>org.apache.maven.plugins</groupId>
                <artifactId>maven-compiler-plugin</artifactId>
                <version>${maven.compiler.version}</version>
                <configuration>
                    <target>${maven.compiler.target}</target>
                    <source>${maven.compiler.source}</source>
                    <encoding>UTF-8</encoding>
                    <skip>true</skip>
                </configuration>
            </plugin>
        </plugins>
    </build>

    <profiles>
        <profile>
            <id>dev</id>
            <properties>
                <!-- 环境标识,需要与配置文件的名称相对应 -->
                <profiles.active>dev</profiles.active>
            </properties>
            <activation>
                <!-- 默认环境 -->
                <activeByDefault>true</activeByDefault>
            </activation>
        </profile>
    </profiles>

    <!-- 配置内网仓库地址
     <distributionManagement>
         <repository>
             <id>jiuding-releases</id>
             <name>jiuding nexus release repository</name>
             <url>http://ip:port/repository/maven-releases</url>
         </repository>

         <snapshotRepository>
             <id>jiuding-snapshots</id>
             <name>jiuding nexus snapshots repository</name>
             <url>http://ip:port/repository/maven-snapshots</url>
         </snapshotRepository>
     </distributionManagement>
     -->

</project>
nacos
- 中文官网: https://nacos.io/zh-cn/docs/v2/quickstart/quick-start.html
- 简介: 动态服务发现、配置管理和服务管理平台
- 启动: sh startup.sh -m standalone
- 关键特性:
- 配置中心、服务管理
- 动态配置服务; @RefreshScope 可以动态修改yml对应属性
- 动态 DNS 服务 ; 支持权重路由,让您更容易地实现中间层负载均衡、更灵活的路由策略、流量控制
- 注册表更新大量运用 copyonwrite思想防止读写冲突
- 使用:
- DataId 为 服务名称.yml + ${profiles.active}
- extension-configs属性 本应用额外配置
- shared-configs 属性表示共享配置
- 持久化:
- nacos运行体/config/nacos-mysql.sql 导入数据库,修改 application.properties 配置使用外部数据源
nacos 源码获取:
- gitlub 下载对应版本
- install 一下
- console 模块为启动模板;
- 其它模块pom引入,console保留源码启动,可以配合开发调试
// 编译install
cd nacos/
mvn -Prelease-nacos -Dmaven.test.skip=true clean install -U
ls -al distribution/target/
/**
 * Nacos starter.
 *
 * @author nacos
 */
@SpringBootApplication(scanBasePackages = "com.alibaba.nacos")
@ServletComponentScan
@EnableScheduling
public class Nacos {


    public static void main(String[] args) {


        if(initEnv()){


            SpringApplication.run(Nacos.class, args);
        }
    }

    /**
     * 单机启动
     */
    private static boolean initEnv() {


        System.setProperty("nacos.standalone", "true");
        return true;
    }

}
nacos 服务列表获取示例:
@Data
public class CatalogServiceVo implements Serializable {


	private Integer count;
	private List<NacosServiceVo> serviceList;
}

@Data
public class NacosServiceVo implements Serializable {


	private String name;
	private String groupName;
	private Integer clusterCount;
	private Integer ipCount;
	private Integer healthyInstanceCount;
	private String triggerFlag;
}

Object o = catalogServiceV2
		.pageListService(Constants.DEFAULT_NAMESPACE_ID,
				StringUtils.EMPTY,
				StringUtils.EMPTY,
				1, Integer.MAX_VALUE,
				StringUtils.EMPTY,
				false);

CatalogServiceVo catalogService = JSONUtil.toBean(o.toString(), CatalogServiceVo.class);
List<NacosServiceVo> serviceList = catalogService.getServiceList();
sentinel
-
启动:java -Dserver.port=8858 -Dcsp.sentinel.dashboard.server=localhost:8858 -Dproject.name=sentinel-dashboard -jar sentinel-dashboard-1.8.3.jar
-
使用:启动一个服务包,yml配置注册;以接口地址以服务资源,配置限流等规格
-
简介:分布式服务架构的流量控制组件,主要以流量为切入点,从限流,流量整形、熔断降级、系统负载保护、热点保护等多个维度保证服务稳定性
- 核心库(代码控制) @SentinelResource 、控制台
-
概念:
- 服务雪崩:微服务之间存在许多交叉调用,因某服务出现异常导致依赖服务异常,从而导致多服务不可用
- 服务降级:当服务熔断后,该服务不可调用,此时客户端返回一个缺省回调值,一般用于弱依赖服务如积分服务
-
流控:
- 规则:监控应用流量的QPS或并发线程数等指标,当达到指定阀值时对流量进行控制,避免被顺时高峰流量冲垮,保障应用可用性
- 针对项:QPS (每秒请求数)、 线程数(等待设置线程数的线程响应时,其它请求线程才会被处理 )
- 关联流控:设置关联资源,当关联资源达到阀值时,当前资源被限制
- 链路流控: A->B A->C ,针对A 设置规则,入口资源设置 C,当达到限制指标时,C会被流控 B没影响
- 热点流控:针对某热点数据进行流控; 热点商品、ip限制、防刷;(如针对商品id为1的商品进行限流)
- 流控效果
- 快速失败:直接拒绝
- warm up(预热):在预热时间断内,慢慢的增加放入的请求, 3个流量 - 5个流量 -10个流量;冷加载因子:3 ;适合激增流量
- 排队等待:阈值为5,来了10个流量则有5个流量等待,在超时时间里有处理完的请求,则进入一个等待流量。适合脉冲流量
- 规则:监控应用流量的QPS或并发线程数等指标,当达到指定阀值时对流量进行控制,避免被顺时高峰流量冲垮,保障应用可用性
-
服务降级:
- 熔断规则:
- 慢调用比例:接口响应时长,最小请求数,比例;在熔断时长结束后进入半开状态
- 异常比例
- 异常数
- 熔断规则:
-
fegin 整合:
- feign.sentinel.enabled=true 开启
-
系统规则:
- 针对全局设置的一个兜底方案,如 load、cpu使用率、平均RT、QPS,等达到设置比例时,出发系统防护,全结果返回系统防护异常
-
网关流控:
- 整合 pom 引入 spring-cloud-alibaba-sentinel-gateway、yml链接控制台
- 针对路由id进行规则设置,设置 Api分组进行匹配限流设置
-
sentinel-nacos持久化:
- 规则默认存储在内存中,服务重启后就会丢失;一般都生产环境都会配置规则持久化
- 步骤:
- 1.pom引入依赖
- 2.yml配置sentinel-datasource-nacos
- 3.nacos中配置对应规则json
spring:
profiles:
active: @profiles.active@
application:
name: @artifactId@
cloud:
nacos:
discovery:
server-addr: ${
NACOS_HOST:127.0.0.1}:${
NACOS_PORT:8848}
config:
server-addr: ${
spring.cloud.nacos.discovery.server-addr}
file-extension: yml
shared-configs:
- application-${
spring.profiles.active}.${
spring.cloud.nacos.config.file-extension}
sentinel:
transport:
dashboard: 127.0.0.1:8858
#clientIp: 127.0.0.1 #服务与sentinel 不在同一服务器时需:指定当前服务ip
#关闭链路收敛,链路限流
web-context-unify: false
#规则持久化
datasource:
flow-rule:
nacos:
server-addr: 127.0.0.1:8848
username: nacos
paswword: nacos
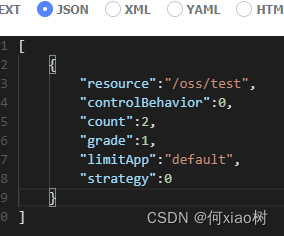
data-id: cloud-oss-flow-rlue #对应nacos dataId,且nacos要持久化
rule-type: flow
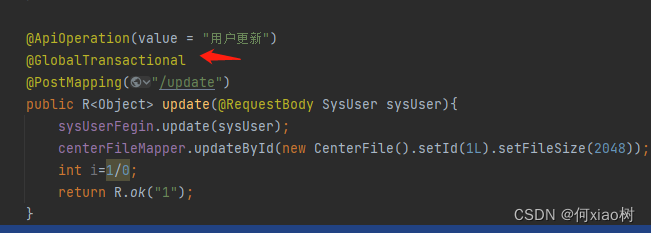
Seata(AT) 分布式事务组件
- 官网: https://seata.io/zh-cn/docs/overview/what-is-seata.html
- 使用:同样启动一个seta服务包配置好对应数据,yml配置连接seata;
@GlobalTransactional标注则可以 - 概念:
- 2PC:预处理、提交/回滚 (分布式事务完成分两阶段)
- 事务协调者发送事务请求-》(阻塞) 事务参与者(数据库、服务)是否可执行事务,参与者执行事务请求,成功执行事务操作并写入undo、redo 日志后返回确认应答,否返回NO
- 事务协调者向参与者发送commit请求,提交事务,完成后释放事务暂用资源
- 只能尽力保证事务,如响应中断等
- AT模式(无侵入,有锁):
- 拦截业务sql提前表元数据,保存原快照;执行业务SQL后保存新快照,并添加行锁
- 提交成功,删除快照数据以及行锁
- 提交失败,对比当前数据与更新后快照数据是否一致,一致则用更新前快照还原业务数据,不一致则出现脏毒,人为处理
- TCC模式(侵入,无锁):
- 根据自己的业务场景实现 Try(一阶段执行) 、 Confirm(二阶段提交) 、 Cancel(二阶段回滚),由用户自己控制具体逻辑;
- 2PC:预处理、提交/回滚 (分布式事务完成分两阶段)
<!-- seata -->
 <dependency>
      <groupId>com.alibaba.cloud</groupId>
      <artifactId>spring-cloud-starter-alibaba-seata</artifactId>
  </dependency>
#seata 配置
seata:
  registry:
    type: nacos
    nacos:
      server-addr: 127.0.0.1:8848
      application: seata-server
      username: nacos
      password: nacos
      group: SEATA_GROUP
  config:
    type: nacos
    nacos:
      server-addr: 127.0.0.1:8848
      username: nacos
      password: nacos
      group: SEATA_GROUP
  tx-service-group: my_test_tx_group
GateWay 统一网关
- 网关Swagger: 微服务网关文档,通过
nacos获取服务列表,根据文档注解获取对应接口信息 - 断言路由(predicates)
- 内置断言:
- 基于时间
- 请求头
- 域名
- 请求方式
- 请求参数
- ip匹配
- Cookie
- 自定义 xxxRoutePredicateFactory extends AbstractRoutePredicateFactory
- 内置断言:
- (过滤器)filters
- 内置过滤:
- AddRequestHeader=key, vlaue 添加请求头
- 自定义 xxxGateWayFilterFactory extends AbstractNameValueGatewayFilterFactory
- 全局过滤器 xxx implements GlobalFilter
- 内置过滤:
server:
  port: 9999

spring:

  application:
    name: @artifactId@
  profiles:
    active: @profiles.active@

  cloud:

    nacos:
      discovery:
        server-addr: ${

    NACOS_HOST:127.0.0.1}:${

    NACOS_PORT:8848}
      config:
        server-addr: ${

    spring.cloud.nacos.discovery.server-addr}
        file-extension: yml

    sentinel:
      transport:
        dashboard: 127.0.0.1:8858

    gateway:
      discovery:
        locator:
          enabled: true

      routes:
        - id: cloud-auth-route
          uri: lb://cloud-auth
          predicates:
            - Path=/auth/**
          filters:
            - StripPrefix=1

        - id: cloud-oss-biz-route
          uri: lb://cloud-oss-biz
          predicates:
            - Path=/oss/**
          filters:
            - StripPrefix=1

        - id: cloud-upms-biz-route
          uri: lb://cloud-upms-biz
          predicates:
            - Path=/upms/**
          filters:
            - StripPrefix=1
skywalking 链路跟踪
- 官网:https://skywalking.apache.org/
- 文档:https://skyapm.github.io/document-cn-translation-of-skywalking/
- 简介:国产开源框架,分布式系统应用程序性能监视工具;分布式链路跟踪,性能指标分析,应用服务依赖分析
- 组成:
- oapservice: skywalking服务端处理监控接收数据 端口:11800 12800
- wepapp-ui: 数据展示业务 端口: webapp.yml
- agent: 服务端绑定探针,收集数据
- 可选插件:
- optional-plugins/gateway
- 微服务集成:
本地集成
  -javaagent:D:\java_project\alibaba-cloud-example\environment\skywalking9.0-8.10\apache-skywalking-apm-bin\skywalking-agent\skywalking-agent.jar
  -Dskywalking.agent.service_name=cloud-gateway
  -Dskywalking.collector.backend_service=127.0.0.1:11800
- 持久化:
- config\application.yml ; storage.selector 配置数据库,默认是H2内存数据库
- 自定义链路追踪:对项目中的业务方法,实现链路跟踪,方便排查问题
- 在业务接口上标记 @Trace ,以及针对方法 @Tag(key = “标记名称”,value = “returnedObj”)
- 性能剖析:
- 针对慢接口,定位慢请求慢响应问题;
- 性能剖析项,新建任务
- 日志:
- 添加依赖,配置 logback-spring.xml ,注意配置 grpc-log上报日志
- skywalking未部署在本地时,注意修改 skywalking-agent\config\agent.config
<!-- 自定义链路追踪,与服务版本一致 -->
       <dependency>
           <groupId>org.apache.skywalking</groupId>
           <artifactId>apm-toolkit-trace</artifactId>
           <version>8.10.0</version>
       </dependency>

       <!-- 日志追踪 -->
       <dependency>
           <groupId>org.apache.skywalking</groupId>
           <artifactId>apm-toolkit-logback-1.x</artifactId>
           <version>8.10.0</version>
       </dependency>
- 告警:
- 针对接口响应时间、数据库访问平均时间等进行告警 alarm-settings.yml 规则配置包含基本默认告警规则
- 网络钩子,告警时会发送请求;推送到接口、微信、钉钉、邮件等…
Outh2 微服务授权
- 协议:关于授权的开发网络标准,使得第三方应用有权利去访问http服务,处理用户与资源之间的关系
- 流程:
- 在
通用security模块,讲yml配置的忽略路径、以及忽略鉴权注解标注的controller、接口,对应路径注册入security中registry.antMatchers(HttpMethod.valueOf(method), strings.get(0)).permitAll(); - 对应的
fegin调用,需要配置请求头,防止微服务内调用鉴权失败
- 在
@Configuration
public class FeignOauth2RequestInterceptor implements RequestInterceptor {


    private final String AUTHORIZATION_HEADER = "Authorization";
    private final String BEARER_TOKEN_TYPE = "Bearer";
    @Override
    public void apply(RequestTemplate requestTemplate) {


        SecurityContext securityContext = SecurityContextHolder.getContext();
        Authentication authentication = securityContext.getAuthentication();
        if (authentication != null && authentication.getDetails() instanceof OAuth2AuthenticationDetails) {


            OAuth2AuthenticationDetails details = (OAuth2AuthenticationDetails) authentication.getDetails();
            requestTemplate.header(AUTHORIZATION_HEADER, String.format("%s %s", BEARER_TOKEN_TYPE, details.getTokenValue()));
        }
    }
}
@Configuration
public class FeignRequestConfiguration {


    @Bean
    public RequestInterceptor requestInterceptor() {


        return new FeignOauth2RequestInterceptor();
    }
}
- 针对各个客户端认证,implements ClientDetailsService 配置对应的认证方式
@Component
public class CloudClientDetailsServiceImpl implements ClientDetailsService {


    @Resource
    private SysOauthClientDetailsFegin sysOauthClientDetailsFegin;

    @Resource
    protected PasswordEncoder passwordEncoder;

    @Override
    public ClientDetails loadClientByClientId(String s) throws ClientRegistrationException {


        BaseClientDetails target = new BaseClientDetails();
        SysOauthClientDetails param = new SysOauthClientDetails().setClientId(s);
        //fegin调用,获取对应 客户端信息
        SysOauthClientDetails oauthClientDetails = sysOauthClientDetailsFegin.getByClientId(param).getData();
        if (oauthClientDetails==null){


            throw new SecurityException("未找到应用信息!");
        }
        setClient(target, oauthClientDetails);
        return target;
    }

    /**
     * 赋值客户端信息
     * @param target  target
     * @param oauthClientDetails 客户端数据
     */
    private void setClient(BaseClientDetails target, SysOauthClientDetails oauthClientDetails) {


        target.setClientId(oauthClientDetails.getClientId());
        target.setClientSecret(passwordEncoder.encode(oauthClientDetails.getClientSecret()));

        if (ArrayUtil.isNotEmpty(oauthClientDetails.getAuthorizedGrantTypes())) {


            target.setAuthorizedGrantTypes(Arrays.asList(oauthClientDetails.getAuthorizedGrantTypes().split(",")));
        }
        if (StrUtil.isNotBlank(oauthClientDetails.getAuthorities())) {


            target.setAuthorities(AuthorityUtils.commaSeparatedStringToAuthorityList(oauthClientDetails.getAuthorities()));
        }

        if (StrUtil.isNotBlank(oauthClientDetails.getResourceIds())) {


            target.setResourceIds(StringUtils.commaDelimitedListToSet(oauthClientDetails.getResourceIds()));
        }

        if (StrUtil.isNotBlank(oauthClientDetails.getWebServerRedirectUri())) {


            target.setRegisteredRedirectUri(StringUtils.commaDelimitedListToSet(oauthClientDetails.getWebServerRedirectUri()));
        }

        if (StrUtil.isNotBlank(oauthClientDetails.getScope())) {


            target.setScope(StringUtils.commaDelimitedListToSet(oauthClientDetails.getScope()));
        }

        if (StrUtil.isNotBlank(oauthClientDetails.getAutoapprove())) {


            target.setAutoApproveScopes(StringUtils.commaDelimitedListToSet(oauthClientDetails.getAutoapprove()));
        }

        if (oauthClientDetails.getAccessTokenValidity() != null) {


            target.setAccessTokenValiditySeconds(oauthClientDetails.getAccessTokenValidity());
        }

        if (oauthClientDetails.getRefreshTokenValidity() != null) {


            target.setRefreshTokenValiditySeconds(oauthClientDetails.getRefreshTokenValidity());
        }
    }
}
认证服务器配置:
/**
 * @author xiaoshu
 * @description 认证服务器配置
 * 配置token存储
 * 配置第三方应用
 * @date 2022年11月13日 12:44
 */
@ConditionalOnProperty(prefix = "auth",name = "method",havingValue = "redis")
@Configuration
@EnableAuthorizationServer
//@EnableResourceServer //资源服务器,获取资源前不需要登录,携带token就可以了
@EnableGlobalMethodSecurity(prePostEnabled = true) //开启方法级别权限
public class AuthorizationServerConfig extends AuthorizationServerConfigurerAdapter {


    @Resource
    private RedisConnectionFactory redisConnection;

    @Resource
    protected PasswordEncoder passwordEncoder;

    /**
     * 注入认证管理器
     */
    @Resource
    private AuthenticationManager authenticationManager;

    @Bean
    public TokenStore tokenStore(){


        return new RedisTokenStore(redisConnection);
    }

    @Resource
    private ClientDetailsService cloudClientDetailsServiceImpl;

    @Override
    public void configure(ClientDetailsServiceConfigurer clients) throws Exception {


        clients.withClientDetails(cloudClientDetailsServiceImpl);
    }

    /**
     * 配置第三方应用 "authorization_code", "password", "client_credentials", "implicit", "refresh_token"
     * 1. code吗授权 authorization_code
     * 2. 静默授权   implicit
     * 3. 密码授权 (特别信任第三方应用)  password
     * 4. 客户端授权 (直接通过浏览器就能获取token) client_credentials
     * @param clients
     * @throws Exception
     */
    /*@Override
    public void configure(ClientDetailsServiceConfigurer clients) throws Exception {
       clients.inMemory()
               //code授权
               .withClient("web")
               .secret(passwordEncoder.encode("web-secret"))
               .scopes("all") //配置第三方应用的业务作用域
               .authorizedGrantTypes("authorization_code") //授权类型
               .accessTokenValiditySeconds(7200)
               .redirectUris("https://www.baidu.com")
               .and()
               //静默授权
               .withClient("wx")
               .secret(passwordEncoder.encode("wx"))
               .scopes("all")
               .authorizedGrantTypes("implicit")
               .accessTokenValiditySeconds(3600)
               .redirectUris("https://www.baidu.com")
               .and()
               //密码授权, 这里要查询数据库用户,密码
               .withClient("admin")
               .secret(passwordEncoder.encode("admin"))
               .scopes("all")
               .authorizedGrantTypes("password")
               .accessTokenValiditySeconds(3600)
               .redirectUris("https://www.baidu.com")
               .and()
               //客户端授权
               .withClient("client")
               .secret(passwordEncoder.encode("client-secert"))
               .scopes("all")
               .authorizedGrantTypes("client_credentials")
               .accessTokenValiditySeconds(500)
               .redirectUris("https://www.baidu.com");
    }*/

    /**
     * 需要暴露授权服务给token存储
     * 暴露授权服务器给认证管理器
     * @param endpoints
     * @throws Exception
     */
    @Override
    public void configure(AuthorizationServerEndpointsConfigurer endpoints) throws Exception {


        endpoints.tokenStore(tokenStore()).authenticationManager(authenticationManager);
    }
}
- 概念:
- 资源服务器:托管受保护资源的服务器(具体服务器),能够接受并使用访问令牌响应受保护的资源请求;各微服务为资源服务器,如提供接口
- 资源所有者:能够授予对受保护资源的访问权限的实体。当资源所有者是一个人时,它称为最终用户
- 授权服务器:请求授权成功后,服务器向客户端发布访问令牌认证资源所有者并获得授权
- 客户端:对我们的产品来说,QQ、微信登录是第三方登录系统。我们又需要第三方登录系统的资源
- 授权模式:
- 授权码(authorization-code)
- 授权码-隐藏式(implicit)纯前端应用
- 密码式(password):直接对应用提供用户名和密码
- 客户端凭证(client credentials):没有前端的命令行应用,即在命令行下请求令牌
- 默认端点 DefaultSecurityFilterChain:
- /oauth/token
- /oauth/token_key
- /oauth/check_token
- token携带方式:
- GET ?access_token=xxx
- POST header Authorization:bearer 99a996e4-5fde-42ea-b5fb-2cc47d926925
- 各微服务整合:
- 除auth服务外,其它服务也是资源服务器
- Jwt整合实现(对称加密):
- new JwtTokenStore(jwtAccessTokenConverter())
- AuthorizationServerEndpointsConfigurer 暴露 .accessTokenConverter(jwtAccessTokenConverter())
- common模块配置token解析:ResourceServerConfig extends ResourceServerConfigurerAdapter,配置统一扫描包
- 非对称加密: https://oomake.com/download/openssl 工具下载 openssl
- 生成私钥:
- keytool -genkeypair -alias xiaoshu-jwt -validity 3650 -keyalg RSA -dname “CN=jwt,OU=jtw,O=jwt,L=zurich,S=zurich,C=CH” -keypass 730730 -keystore xiaoshu-jwt.jks -storepass 730730
- 生成公钥:
- keytool -list -rfc --keystore xiaoshu-jwt.jks | openssl x509 -inform pem -pubkey
- 注意maven配置resource
- 生成私钥:
# token 校检
security:
  oauth2:
    resource:
      #相当于拿token换取用户信息
      user-info-uri: http://localhost:3000/getUserInfo
授权码模式
- 流程:
- 1.第三方应该,先在授权服务器登记,生成 clientId clientSecert
- 2.登录后,访问重定向链接; 比如:QQ扫码第三方平台,也是要先登录QQ后,才会确认授权
- 3.确认授权后,获取code,通过code获取token
- state:是状态值,不透明,防止跨站点请求伪造
- redirect_uri:重定向地址,必须是公网 https请求
- 授权是在登录之后。
localhost:3000/oauth/authorize?response_type=code&client_id=web&state=sxt&redirect_uri=https://www.baidu.com
post
localhost:3000/outh/token?grant_type=authorization_code&code=iXB5jU&redirect_uri=https://www.baidu.com
  head:
      Authorization: Basic d2ViOndlYi1zZWNyZXQ= (vaue:为三方应用的 cinetId和clientSecret组合的 base64编码)

{
"access_token": "xxx",
"token_type": "bearer",
"expires_in": 7199,
"scope": "all"
}
静默授权模式
- 流程:
- 1.先在授权服务器登记,生成 clientId clientSecert,配置认证模式为,静默授权
 localhost:3000/oauth/authorize?response_type=token&client_id=wx&state=sxt&redirect_uri=https://www.baidu.com
 确认授权后,直接返回token:
 https://www.baidu.com/#access_token=xxx&token_type=bearer&state=sxt&expires_in=3599&scope=all
密码授权模式
- 流程:
- 先在授权服务器登记,生成 clientId clientSecert
- 暴露 AuthenticationManager 认证管理器,配置授权方式为密码授权
 post
     localhost:3000/oauth/token?grant_type=password&username=name&password=pwd
 head:
     Authorization: Basic d2ViOndlYi1zZWNyZXQ= (vaue:为三方应用的 cinetId和clientSecret组合的 base64编码)
客户端授权模式
- 流程:
- 先在授权服务器登记,生成 clientId clientSecert
- 直接发起请求获取token
- 访问基本权限接口,不能访问特定权限接口!
 post
    localhost:3000/oauth/token?grant_type=client_credentials
 head:
     Authorization: Basic d2ViOndlYi1zZWNyZXQ= (vaue:为三方应用的 cinetId和clientSecret组合的 base64编码)
Swagger 微服务整合
- 文档:https://doc.xiaominfo.com/
- 微服务整合:https://gitee.com/xiaoym/swagger-bootstrap-ui-demo
- 网关整合:微服务整合swagger文档,涉及多个服务的切换, 所有进入文档首页,会请求resource接口,返回各服务对应文档资源
- implements SwaggerResourcesProvider 重写 get(),结合网关查询各微服务接口资源信息
- 添加 SwaggerHandler -> SwaggerResourcesProvider 获取接口资源
        <!-- knife4j-->
        <dependency>
            <groupId>com.github.xiaoymin</groupId>
            <artifactId>knife4j-spring-boot-starter</artifactId>
            <version>${knife4j.version}</version>
        </dependency>

        <dependency>
            <groupId>io.springfox</groupId>
            <artifactId>springfox-boot-starter</artifactId>
            <version>${swagger.fox.version}</version>
        </dependency>
- 各服务整合:
- 注:此demo项目spring boot 版本2.6.x
@Configuration
@EnableOpenApi //注解启动用Swagger的使用,同时在配置类中对Swagger的通用参数进行配置
public class Swagger3Config implements EnvironmentAware {


    private String applicationName;

    private String applicationDescription;

    @Bean
    public Docket createRestApi(){


        //返回文档概要信息
        return new Docket(DocumentationType.OAS_30)
                .apiInfo(apiInfo())
                .select()
                .apis(RequestHandlerSelectors.withMethodAnnotation(ApiOperation.class))
                .paths(PathSelectors.any())
                .build()
                .globalRequestParameters(getGlobalRequestParameters())
                .globalResponses(HttpMethod.GET,getGlobalResponseMessage())
                .globalResponses(HttpMethod.POST,getGlobalResponseMessage());
    }

    /**
     * 生成接口信息,包括标题,联系人等
     * @return ApiInfo
     */
    private ApiInfo apiInfo() {


        return new ApiInfoBuilder()
                .title(applicationName+"接口文档")
                .description(applicationDescription)
                .contact(new Contact("小树","http://www.baidu.com","[email protected]"))
                .version("1.0")
                .build();
    }


    /**
     * 封装全局通用参数
     * @return List<RequestParameter>
     */
    private List<RequestParameter> getGlobalRequestParameters() {


        List<RequestParameter> parameters=new ArrayList<>();
        RequestParameter headToken = new RequestParameterBuilder()
                .name("Authorization")
                .description("Bearer xxxx")
                .required(true)
                .in(ParameterType.HEADER)
                .query(q -> q.model(m -> m.scalarModel((ScalarType.STRING))))
                .required(Boolean.FALSE)
                .build();
        parameters.add(headToken);
        return parameters;
    }

    /**
     * 封装通用相应信息
     * @return List<Response>
     */
    private List<Response> getGlobalResponseMessage() {


        List<Response> responseList=new ArrayList<>();
        responseList.add(new ResponseBuilder().code("404").description("未找到资源").build());
        return responseList;
    }

    @Bean
    public WebMvcEndpointHandlerMapping webEndpointServletHandlerMapping(
            WebEndpointsSupplier webEndpointsSupplier, ServletEndpointsSupplier servletEndpointsSupplier,
            ControllerEndpointsSupplier controllerEndpointsSupplier, EndpointMediaTypes endpointMediaTypes,
            CorsEndpointProperties corsProperties, WebEndpointProperties webEndpointProperties, Environment environment) {


        List<ExposableEndpoint<?>> allEndpoints = new ArrayList<>();
        Collection<ExposableWebEndpoint> webEndpoints = webEndpointsSupplier.getEndpoints();
        allEndpoints.addAll(webEndpoints);
        allEndpoints.addAll(servletEndpointsSupplier.getEndpoints());
        allEndpoints.addAll(controllerEndpointsSupplier.getEndpoints());
        String basePath = webEndpointProperties.getBasePath();
        EndpointMapping endpointMapping = new EndpointMapping(basePath);
        boolean shouldRegisterLinksMapping = webEndpointProperties.getDiscovery().isEnabled() &&
                (org.springframework.util.StringUtils.hasText(basePath) || ManagementPortType.get(environment).equals(ManagementPortType.DIFFERENT));
        return new WebMvcEndpointHandlerMapping(endpointMapping, webEndpoints, endpointMediaTypes, corsProperties.toCorsConfiguration(), new EndpointLinksResolver(allEndpoints, basePath), shouldRegisterLinksMapping, null);
    }

    @Override
    public void setEnvironment(Environment environment) {


        this.applicationDescription = environment.getProperty("spring.application.description");
        this.applicationName = environment.getProperty("spring.application.name");
    }
}
公共 yml配置:
spring:
  mvc:
    pathmatch:
      matching-strategy: ANT_PATH_MATCHER #整合swagger时 springboot2.6.x如果不加该配置会报错

  redis:
    host: 127.0.0.1
    password:

# token 校检
security:
  oauth2:
    resource:
      #相当于拿token换取用户信息
      user-info-uri: http://localhost:3000/token/user
    client:
      ignore-urls:
        - /v2/api-docs

springfox:
  documentation:
    swagger-ui:
      enabled: true # false关闭swagger-ui界面 但不关闭openapi