一、注册中心编码
1.使用idea创建一个spring boot项目,pom如下:
<?xml version="1.0" encoding="UTF-8"?>
<project xmlns="http://maven.apache.org/POM/4.0.0" xmlns:xsi="http://www.w3.org/2001/XMLSchema-instance"
    xsi:schemaLocation="http://maven.apache.org/POM/4.0.0 http://maven.apache.org/xsd/maven-4.0.0.xsd">
    <modelVersion>4.0.0</modelVersion>

    <groupId>com.eureka</groupId>
    <artifactId>ser</artifactId>
    <version>0.0.1-SNAPSHOT</version>
    <packaging>jar</packaging>

    <name>ser</name>
    <description>Demo project for Spring Boot</description>

    <parent>
        <groupId>org.springframework.boot</groupId>
        <artifactId>spring-boot-starter-parent</artifactId>
        <version>2.0.3.RELEASE</version>
        <relativePath/> <!-- lookup parent from repository -->
    </parent>

    <properties>
        <project.build.sourceEncoding>UTF-8</project.build.sourceEncoding>
        <project.reporting.outputEncoding>UTF-8</project.reporting.outputEncoding>
        <java.version>1.8</java.version>
        <spring-cloud.version>Finchley.RELEASE</spring-cloud.version>
    </properties>

    <dependencies>
        <dependency>
            <groupId>org.springframework.cloud</groupId>
            <artifactId>spring-cloud-starter-netflix-eureka-server</artifactId>
        </dependency>

        <dependency>
            <groupId>org.springframework.boot</groupId>
            <artifactId>spring-boot-starter-test</artifactId>
            <scope>test</scope>
        </dependency>
    </dependencies>

    <dependencyManagement>
        <dependencies>
            <dependency>
                <groupId>org.springframework.cloud</groupId>
                <artifactId>spring-cloud-dependencies</artifactId>
                <version>${spring-cloud.version}</version>
                <type>pom</type>
                <scope>import</scope>
            </dependency>
        </dependencies>
    </dependencyManagement>

    <build>
        <plugins>
            <plugin>
                <groupId>org.springframework.boot</groupId>
                <artifactId>spring-boot-maven-plugin</artifactId>
            </plugin>
        </plugins>
    </build>
</project>
2.这里开发3个样例,组成集群。3个样例的pom不变,application.yml如下:
#样例1:
server:
  port: 8888

eureka:
  instance:
    hostname: centos7-01
  client:
    registerWithEureka: false
    fetchRegistry: false
    serviceUrl:
      defaultZone: http://centos7-02:8888/eureka/,http://centos7-03:8888/eureka/
#样例2:
server:
  port: 8888

eureka:
  instance:
    hostname: centos7-02
  client:
    registerWithEureka: false
    fetchRegistry: false
    serviceUrl:
      defaultZone: http://centos7-01:8888/eureka/,http://centos7-03:8888/eureka/
#样例3:
server:
  port: 8888

eureka:
  instance:
    hostname: centos7-03
  client:
    registerWithEureka: false
    fetchRegistry: false
    serviceUrl:
      defaultZone: http://centos7-01:8888/eureka/,http://centos7-02:8888/eureka/
3.这些样例的java代码一样:
package com.eureka.ser;

import org.springframework.boot.SpringApplication;
import org.springframework.boot.autoconfigure.SpringBootApplication;
import org.springframework.cloud.netflix.eureka.server.EnableEurekaServer;

@SpringBootApplication
@EnableEurekaServer
public class SerApplication {

    public static void main(String[] args) {
        SpringApplication.run(SerApplication.class, args);
    }
}
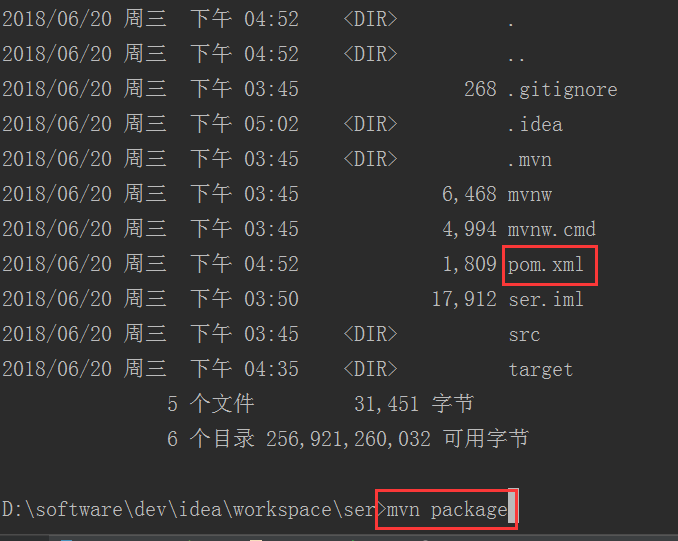
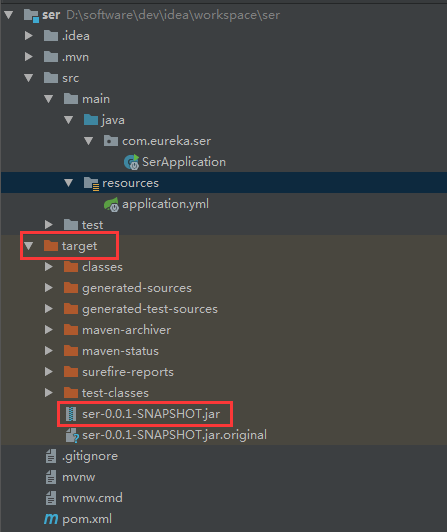
4.打包,要在项目的根路径
二、部署运行
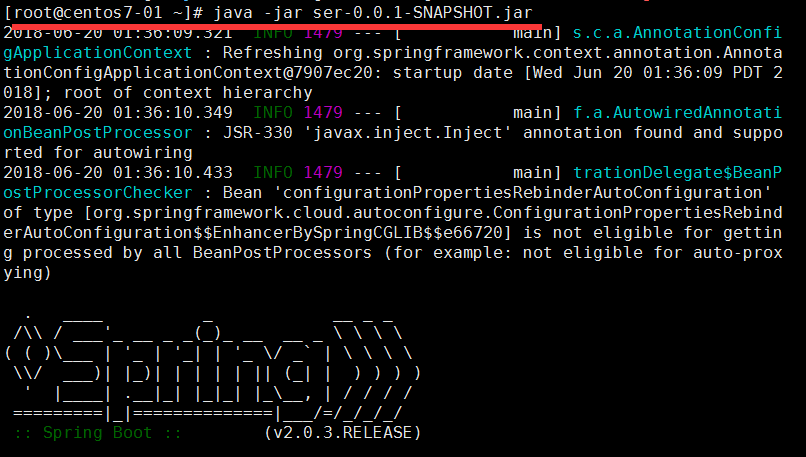
1.这里开启3台虚拟机,域名分布为centos7-01 centos7-02 centos7-03,上面的yml文件的hostname与之对应。将这3个jar文件分别运行
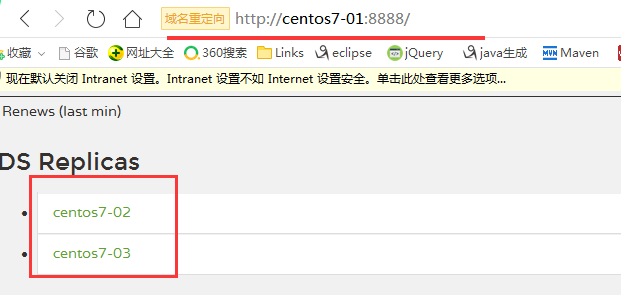
2.查看结果,把url换为centos7-02 centos7-03,会看到类似的结果,说明3台服务已经协调运行了
三、客户端注册
1. 新创建一个spring boot项目,其中pom文件如上,yml和java代码如下,然后按照上面的方式打包运行
eureka:
  client:
    serviceUrl:
      defaultZone: http://centos7-02:8888/eureka/    ###这里只向centos7-02注册,会向另外两台会同步过去
server:
  port: 80

spring:
  application:
    name: eureka-cli
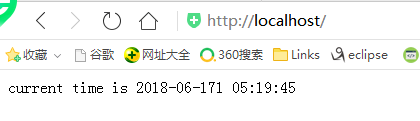
package com.cloud.eurekacli01;

import org.springframework.beans.factory.annotation.Value;
import org.springframework.boot.SpringApplication;
import org.springframework.boot.autoconfigure.SpringBootApplication;
import org.springframework.cloud.netflix.eureka.EnableEurekaClient;
import org.springframework.web.bind.annotation.RequestMapping;
import org.springframework.web.bind.annotation.RequestParam;
import org.springframework.web.bind.annotation.RestController;

import java.text.SimpleDateFormat;
import java.util.Date;


@SpringBootApplication
@EnableEurekaClient
@RestController
public class EurekaCli01Application {

    public static void main(String[] args) {
        SpringApplication.run(EurekaCli01Application.class, args);
    }

    @RequestMapping("/")
    public String index(){
        SimpleDateFormat sdf = new SimpleDateFormat("YYYY-MM-DD hh:mm:ss");
        String time = sdf.format(new Date());
        return "current time is "+time;
    }
}
2. 查看注册结果,打开3个中任意一个注册界面,都会有如下结果,说明客户端已经成功在集群上注册了

3.访问客户端 (客户端是在本地启动的)