具体的环境搭建,我就不阐述了。
一、基本配置准备
1.首先准备三个文件,在resource/目录下
message.properties(没有识别到语言时,使用此默认配置),内容:
message = just go! 。。
message_zh_CN.properties(识别到中文时,用该配置)
message = just go!哈哈
message_en_CN.properties(识别到美式英语时,用该配置)
message = just more!HA HA
2.这里使用Thymeleaf模板
需要加入相关依赖
<!-- https://mvnrepository.com/artifact/org.springframework.boot/spring-boot-starter-thymeleaf -->
<dependency>
    <groupId>org.springframework.boot</groupId>
    <artifactId>spring-boot-starter-thymeleaf</artifactId>
    <version>1.5.7.RELEASE</version>
</dependency>
3.相关yaml配置
spring:
  thymeleaf:
    encoding: utf-8 #默认
    enabled: true #默认开启
    mode: HTML5  #默认
    suffix: .html  #默认
    prefix: classpath:/templates/  #默认
    cache: false  #默认为true,在开发阶段通常设为false
你会发现基本上不配置,这是因为SpringBoot通通为我们配置好了,使用默认配置即可。
也可以在配置文件中使用bean进行配置
@Bean
public SpringResourceTemplateResolver htmlTemplateResolver(){
    SpringResourceTemplateResolver resourceTemplateResolver = new SpringResourceTemplateResolver();
    resourceTemplateResolver.setPrefix("/templates");
    resourceTemplateResolver.setSuffix(".html");
    resourceTemplateResolver.setCacheable(false);
    return resourceTemplateResolver;
}
二、代码演示
1.在resource/templates下创建一个hello.html页面。
<!DOCTYPE html>
<html xmlns:th="http://www.thymeleaf.org">
<head>
    <meta charset="UTF-8"/>
    <title>Title</title>
</head>
<body>
<p th:utext="#{message}">book info</p>
<p th:text="#{message}">book info</p>
</body>
</html>
代码解释:
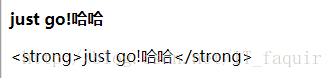
th:utext不对文本进行转义,因此正常输出的内容,即会被进行加粗;
th:text对文本进行转义,输入内容为”xxx“;
xmlns:th=”http://www.thymeleaf.org” 声明为thymeleaf模板
2.在yaml文件中配置messages
  spring:
      messages:
        encoding: UTF-8  #默认
        cache-seconds: 1  #默认为-1s
        basename: message #默认为messages,这里设置指向resource下的message配置文件
也可以在配置文件中使用bean进行配置
@Bean
public ResourceBundleMessageSource messageSource(){
    ResourceBundleMessageSource messageSource = new ResourceBundleMessageSource();
    messageSource.setBasenames("message","message");
    messageSource.setDefaultEncoding("UTF-8");
    messageSource.setCacheSeconds(1);
    return messageSource;
}
3.在控制器中写一个接口,我们来试一试。
@GetMapping(value = "/hello")
public String hello(){
    return "hello";
}
记得在配置文件类上 加入组件扫描注解
@ComponentScan("com.xxx")或者@SpringBootApplication(scanBasePackages = "com.xxx") 三、运行结果
运行看看
直接运行main方法或者mvn spring-boot:run
访问看看 http://localhost:8080/hello
我们在中文环境下:
在英文环境下:

四、拓展
1.浏览器设置语言环境
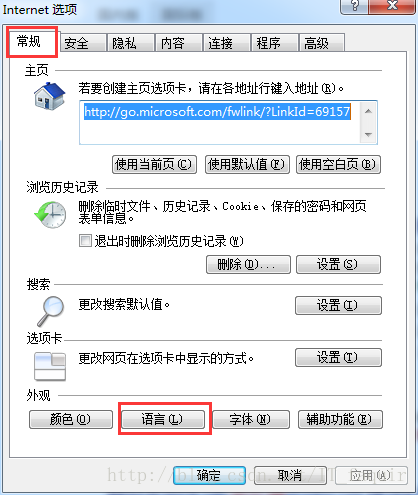
添加一个en_US的,上移为第一个即可
2.在spring中直接设置固定的语言环境
@Bean(name="localeResolver")
public LocaleResolver localeResolverBean() {
    return new SessionLocaleResolver();
}
控制器中
@Autowired
LocaleResolver localeResolver;

@GetMapping(value = "/hello")
public String hello(HttpServletRequest request, HttpServletResponse response){
HttpSession session=request.getSession();
localeResolver.setLocale(request,response, Locale.CHINA);
return "hello";
}
Locale中提供了多国语言,你可以自由更换,进行测试