springboot本质上就是一个spring脚手架,其实仍然是spring,只是springboot帮我们做了我们使用spring时需要进行的那些配置。本文就简单讨论一下sprigboot是如何帮我们配置spring的。
参考:https://www.bilibili.com/video/BV1eD4y1w7Rp?p=2&vd_source=e1ec5e4886fca4c5f06887c81aefd01a
1、springboot的基本思路
当添加了spring-boot-starter-web依赖后,我们定义一个controller,写一个接口如下,在浏览器中就可访问到,查看控制台看到启动了tomcat。
@RestController
public class UserController {


    @GetMapping("/test")
    public String test(){


        return  "rrrr";
    }
}
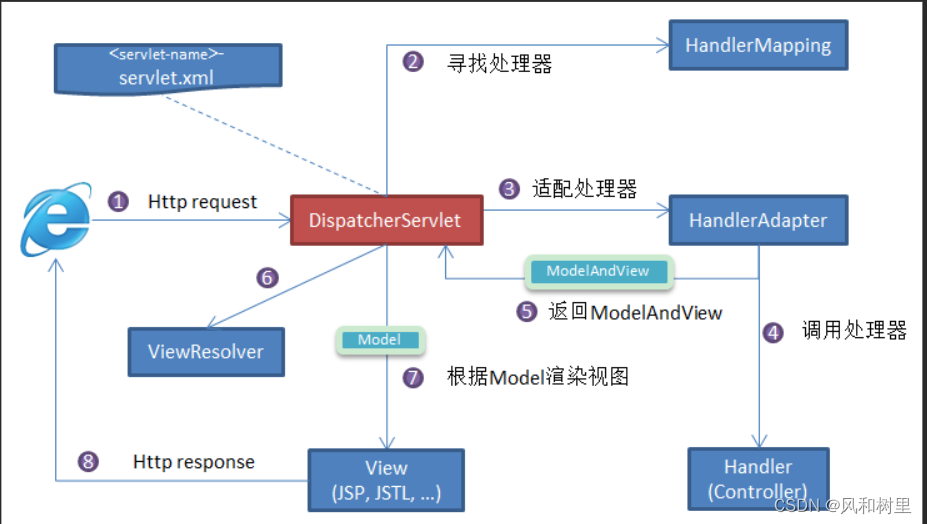
这其实是spring mvc的内容,spring mvc的流程如下图。springboot项目启动时要启动tomcat,在tomcat中需要知道DispatcherServlet,这样tomcat才能通过DispatcherServlet找到请求的方法。同时DispatcherServlet需要知道UserController类,如何知道呢?获取spring容器就行了,UserController加了@RestController注解,是一个Bean,在容器中。
那容器呢?容器初始化需要一个配置文件,类似下面这样,容器启动时需要扫描到上面的UserController类。
AnnotationConfigWebApplicationContext applicationContext = new AnnotationConfigWebApplicationContext();//使用注解配置的容器
applicationContext.register(c);//c是一个配置类,Class类型
1.1 tomcat的启动
启动springboot项目时,启动tomcat可以时这样的:有一个方法专门用来启动tomcat,这样在启动springboot项目时就可以调用startTomcat方法,传入一个spring容器对象用来启动tomcat。
	/**
     * 启动内嵌的tomcat,先引入pom,并进行相关的配置
     */
    public static void startTomcat(ApplicationContext context){


        //1。 进行必要的tomcat配置
        Tomcat t = new Tomcat();

        //2。输入地址想要访问到控制器,需要servlet,需要mvc的分发器(dispatcher),分发器需要容器才能找到controller
        //t.addServlet(context,"dispatcher",new DispatcherServlet(webContex));
    }
前提:要有tomcat的依赖
缺点:写死了,想要换个web容器,例如netty,没法搞
1.2 使用面向接口编程的思想
public interface WebServer {


    public void start();
}

public class JettyWebServer implements WebServer{


    @Override
    public void start() {


        //启动jetty就需要new一些jetty的恭喜,所以需要引入jetty的依赖(此时jetty和tomcat的依赖都有)
    }
}

public class TomcatWebServer implements WebServer{


    @Override
    public void start() {


		//1.1中startTomcat的代码
    }
}
假设有了上述的类,专门用来启动容器,在启动springboot项目就可以通过一下方式来启动tomcat或者jetty:用户手动自己向容器中添加tomcat或者jetty的Bean,这样springboot项目启动时getWebServer方法就会自动获取到用户添加的这个Bean,从而实现用户自定义的选择web服务容器的类型。
	//springboot项目启动时执行
	WebServer webServer = getWebServer(applicationContext);
    webServer.start();

    public static WebServer getWebServer(WebApplicationContext applicationContext){


        //从容器中拿到WebServer的Bean,可能会有多个(用户自己决定)
        Map<String, WebServer> webServers = applicationContext.getBeansOfType(WebServer.class);

        if(webServers.size() == 0){


        }
        if(webServers.size() > 1){


        }
        //返回唯一的webserver对象
        return  webServers.entrySet().stream().findFirst().get().getValue();
    }
前提:springboot父项目中需要有tomcat和jetty的依赖,因为上面的WebServer接口时定义在springboot父项目中的
缺点:还是需要用户自己写bean,springboot显然不是这么做的。
1.3 根据pom自己选择使用的web容器
在1.2的基础上定义如下的类,@Conditional的意思是,满足注解中类里的条件这个Bean才生效。此时在条件只需要判断是否存在Tomcat的依赖或者jetty的依赖就可以自动的向容器中添加Bean,省去了用户自定义Bean,其实现在就有些自动配置的味道了。
@Configuration//这个类需要确保生效,可以使用import
public class WebServerAutomaticConfiguration {


    @Bean
    @Conditional(TomcatCondition.class)//条件满足才创建bean
    public TomcatWebServer getTomcatServer(){


        return new TomcatWebServer();
    }

    @Bean
    @Conditional(JettyCondition.class)//条件满足才创建bean
    public JettyWebServer getJettyWebServer(){


        return new JettyWebServer();
    }
}
考虑注解中条件类的条件,肯定就是判断是否引入了某个依赖,如何判断是否引入了某个依赖呢?用类加载器加载依赖中某个类,如果加载成功则说明有这个依赖。
这样其实就比较好了,但是也有缺点:
缺点:WebServerAutomaticConfiguration需要加入到容器中,但是呢又不在配置类的包路径下,就需要用Import注解单独处理,自动配置的这种类很多,不能这样。
**注意:**像上面这样,springboot父项目中需要有tomcat和jetty的依赖,因为需要在springboot父项目执行启动他们的代码,继承springboot父项目后就也会有这两个依赖,这样在子项目始终会有tomcat和jetty的依赖,这怎么办?很简单,让子项目不要继承父项目的jetty依赖就行了
        <!--
                这里springboot是使用jetty依赖依赖,但是在user中,引入springboot后会有jetty和tomcat,
            这样就有问题了,所以要保证这个依赖不被user项目引用。这样user中使用jetty时需要自己重新加入依赖,同时要排除springboot中的tomcat依赖。
        -->
        <dependency>
            <groupId>org.eclipse.jetty</groupId>
            <artifactId>jetty-server</artifactId>
            <version>10.0.14</version>
            <optional>true</optional>
        </dependency>
2、springboot自动配置
2.1 容器配置类
@SpringBootApplication
public class DemoApplication {


    public static void main(String[] args) {


        SpringApplication.run(DemoApplication.class, args);
    }
}

@Target({

    ElementType.TYPE})
@Retention(RetentionPolicy.RUNTIME)
@Documented
@Inherited
@SpringBootConfiguration
@EnableAutoConfiguration
@ComponentScan(
    excludeFilters = {

    @Filter(
    type = FilterType.CUSTOM,
    classes = {

    TypeExcludeFilter.class}
), @Filter(
    type = FilterType.CUSTOM,
    classes = {

    AutoConfigurationExcludeFilter.class}
)}
)
public @interface SpringBootApplication {


//……………………
}
run方法传入了DemoApplication.class,看注解知道这是一个配置类,其实这个配置类就是用来创建容器的。同时 ComponentScan没有制定扫描的包路径,所以spring会默认扫描DemoApplication.class所在的路径为扫描路径(换个其他位置的配置类就不行了)。
2.2 自动配置项目
springboot父项目中spring-boot-starter有一个spring-boot-autoconfigure项目,里面记录众多第三方项目的自动配置类,springboot启动时就会将这些配置类加载到容器中,完成自动配置,就像上面的WebServerAutomaticConfiguration类。
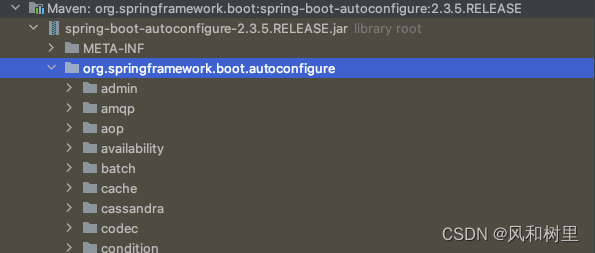
但是有一个问题,某个依赖例如mybatis,spring-boot-autoconfigure中是没有对应自动配置类的。所以mybatis的自动配置类是在mybatis自己的项目,这时候springboot怎么找到配置类呢?
这时候其实就要用到大名鼎鼎的spring.factorise文件了
2.3 spring.factorise
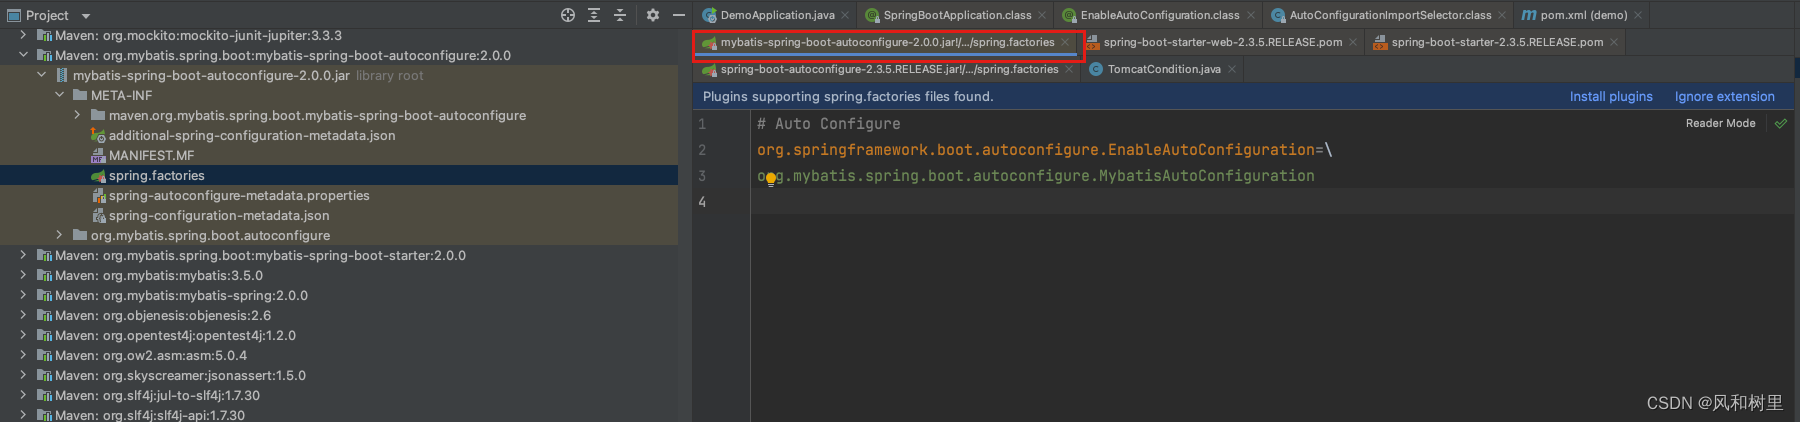
如图,mybatis的父项目中也有一个autoconfigure项目,中其实也有一个spring.factorise,里面就是自动配置类的路径。
所以spring.factorise文件的作用就是标识这是一个自动配置项目,同时里面给出了自动配置类的路径,这样就可以让容器加载这个类,和1.3中一样完成自动配置。
注意: 其实在spring-boot-autoconfigure项目也有这个文件。
这样就实现了自动配置类的批量扫描,同时可以根据是否有对应的类进行过滤,例如spring-boot-autoconfigure有es的自动配置类,但是我项目不一定用,这时候就是根据是否有依赖选择是否扫描es配置类。
补充:为什么我们引入了mysql的依赖就必须配置数据源,这就是原因。
2.4 dpringboot的实现
2.3中描述步骤都在,@EnableAutoConfiguration注解的@Import({AutoConfigurationImportSelector.class}),类中
@Target({

    ElementType.TYPE})
@Retention(RetentionPolicy.RUNTIME)
@Documented
@Inherited
@AutoConfigurationPackage
@Import({

    AutoConfigurationImportSelector.class})
public @interface EnableAutoConfiguration {


    String ENABLED_OVERRIDE_PROPERTY = "spring.boot.enableautoconfiguration";

    Class<?>[] exclude() default {

    };

    String[] excludeName() default {

    };
}
加载配置的逻辑都在AutoConfigurationImportSelector中的getAutoConfigurationEntry方法
    protected AutoConfigurationImportSelector.AutoConfigurationEntry getAutoConfigurationEntry(AnnotationMetadata annotationMetadata) {


        if (!this.isEnabled(annotationMetadata)) {


            return EMPTY_ENTRY;
        } else {


            AnnotationAttributes attributes = this.getAttributes(annotationMetadata);
            List<String> configurations = this.getCandidateConfigurations(annotationMetadata, attributes);//获取所有配置类,会扫描所有的spring.factories
            configurations = this.removeDuplicates(configurations);//去重
            Set<String> exclusions = this.getExclusions(annotationMetadata, attributes);
            this.checkExcludedClasses(configurations, exclusions);
            configurations.removeAll(exclusions);
            configurations = this.getConfigurationClassFilter().filter(configurations);//过滤掉没有引入依赖的配置类路径
            this.fireAutoConfigurationImportEvents(configurations, exclusions);
            return new AutoConfigurationImportSelector.AutoConfigurationEntry(configurations, exclusions);
        }
    }
如有错误欢迎批评指正!