进程创建
fork函数,它是从一个已存在的进程中创建一个新的进程。新的进程为子进程,而原进程为它的父进程。
fork函数的头文件为
#include <unistd.h>
它的返回值为pid_t为无符号整型
在Linux中,
pid_t是一个用于表示进程标识符(Process IDentifier)的数据类型。进程标识符是一个唯一标识一个正在运行的进程的整数值。
pid_t数据类型是一个有符号整数类型,它通常是signed int类型。它的值可以是正数、零或负数。
在Linux编程中,pid_t常用于获取当前进程的标识符、创建新进程和进程间通信等操作。每个进程都有一个唯一的进程标识符,它可以用来唯一标识和操作特定的进程。
进程 = 内核数据结构 + 进程代码和数据
- 分配新的内存块和内核数据结构给子进程
- 将父进程部分数据结构内容拷贝至子进程
- 添加子进程到系统进程列表当中
- fork返回,开始调度器调度
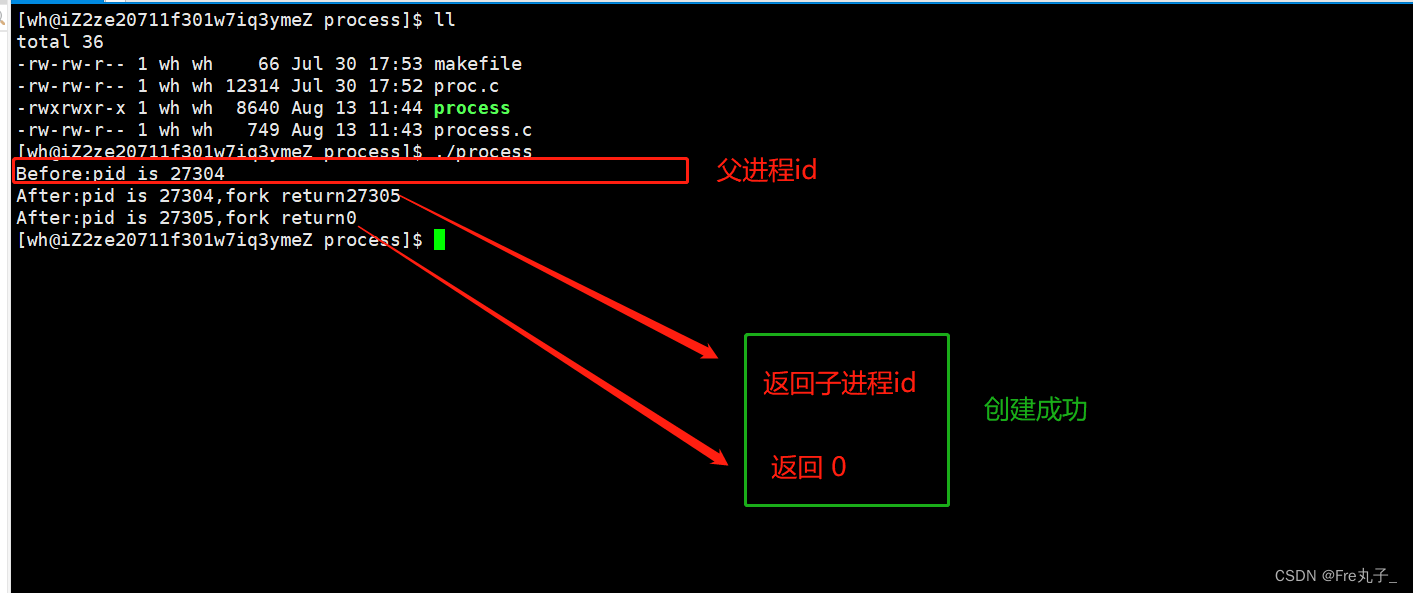
当一个进程调用fork之后,就有两个二进制代码相同的进程。而且他们都运行到相同的地方。但每个进程都以及开始自己的旅程
当fork成功后,子进程中返回0,父进程返回子进程id,出错返回-1
 int main()
 {


   pid_t pid;

   printf("Before: pid is %d\n", getpid());
   if ( (pid=fork()) == -1 ) return 0;
   printf("After:pid is %d, fork return %d\n", getpid(), pid);
   sleep(1);
   return 0;
 }
为什么子进程创建后,父子进程运行到那里,子进程就跟的运行到那里呢?
这是因为在我们的cpu中也有寄存器(EIP),每行代码加载到内存之后,都有对应的地址,都会记录在寄存器中,当我们程序发生意外终止时,再回来还可以通过cpu寄存器来重写找回地址接的运行。
每个进程都认为自己有一个寄存器,所以当fork之后,寄存器的起始位置就是fork之后的代码。
创建子进程,给子进程分配对应的内核结构,必须子进程自己独有,因为进程具有独立性。
因为子进程也要有自己的代码和数据,但是如果我们创建了子进程后,如果我们的子进程不立马运行并且不对父进程里的内容进行修改时,这两个进程是并用同一块数据空间的,当父进程或者子进程的数据进行修改后,就会发生写时拷贝
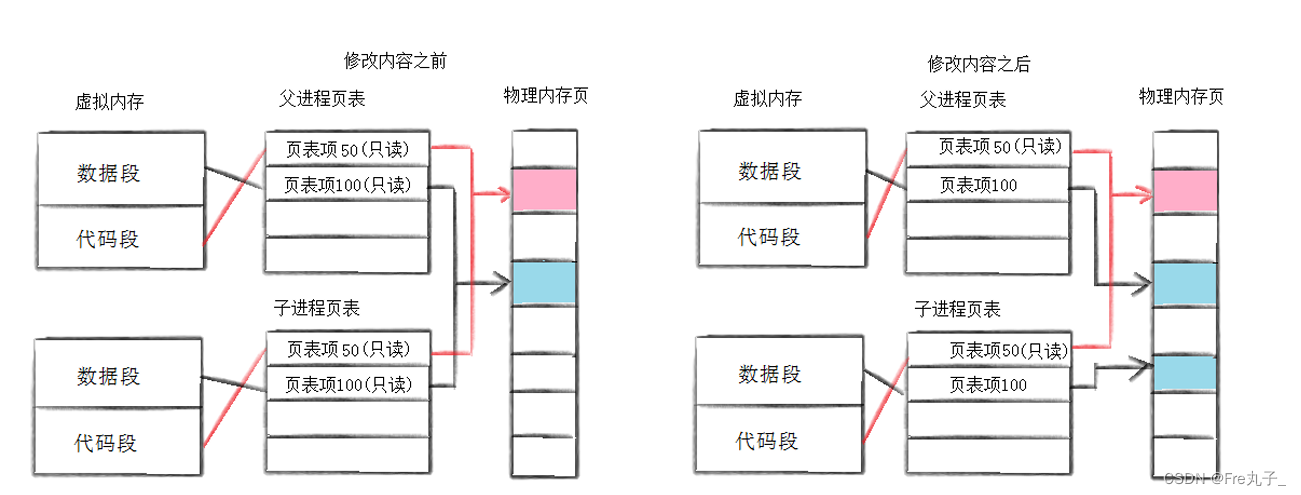
为社么要用写时拷贝呢
因为写时拷贝可以将自己进程彻底分离,完成了进程的独立性。
写时拷贝也是一种延时申请技术,可以提高整机内存的使用率。
进程终止
当进程终止的时候,系统会释放进程申请的相关内核数据机构和数据代码。
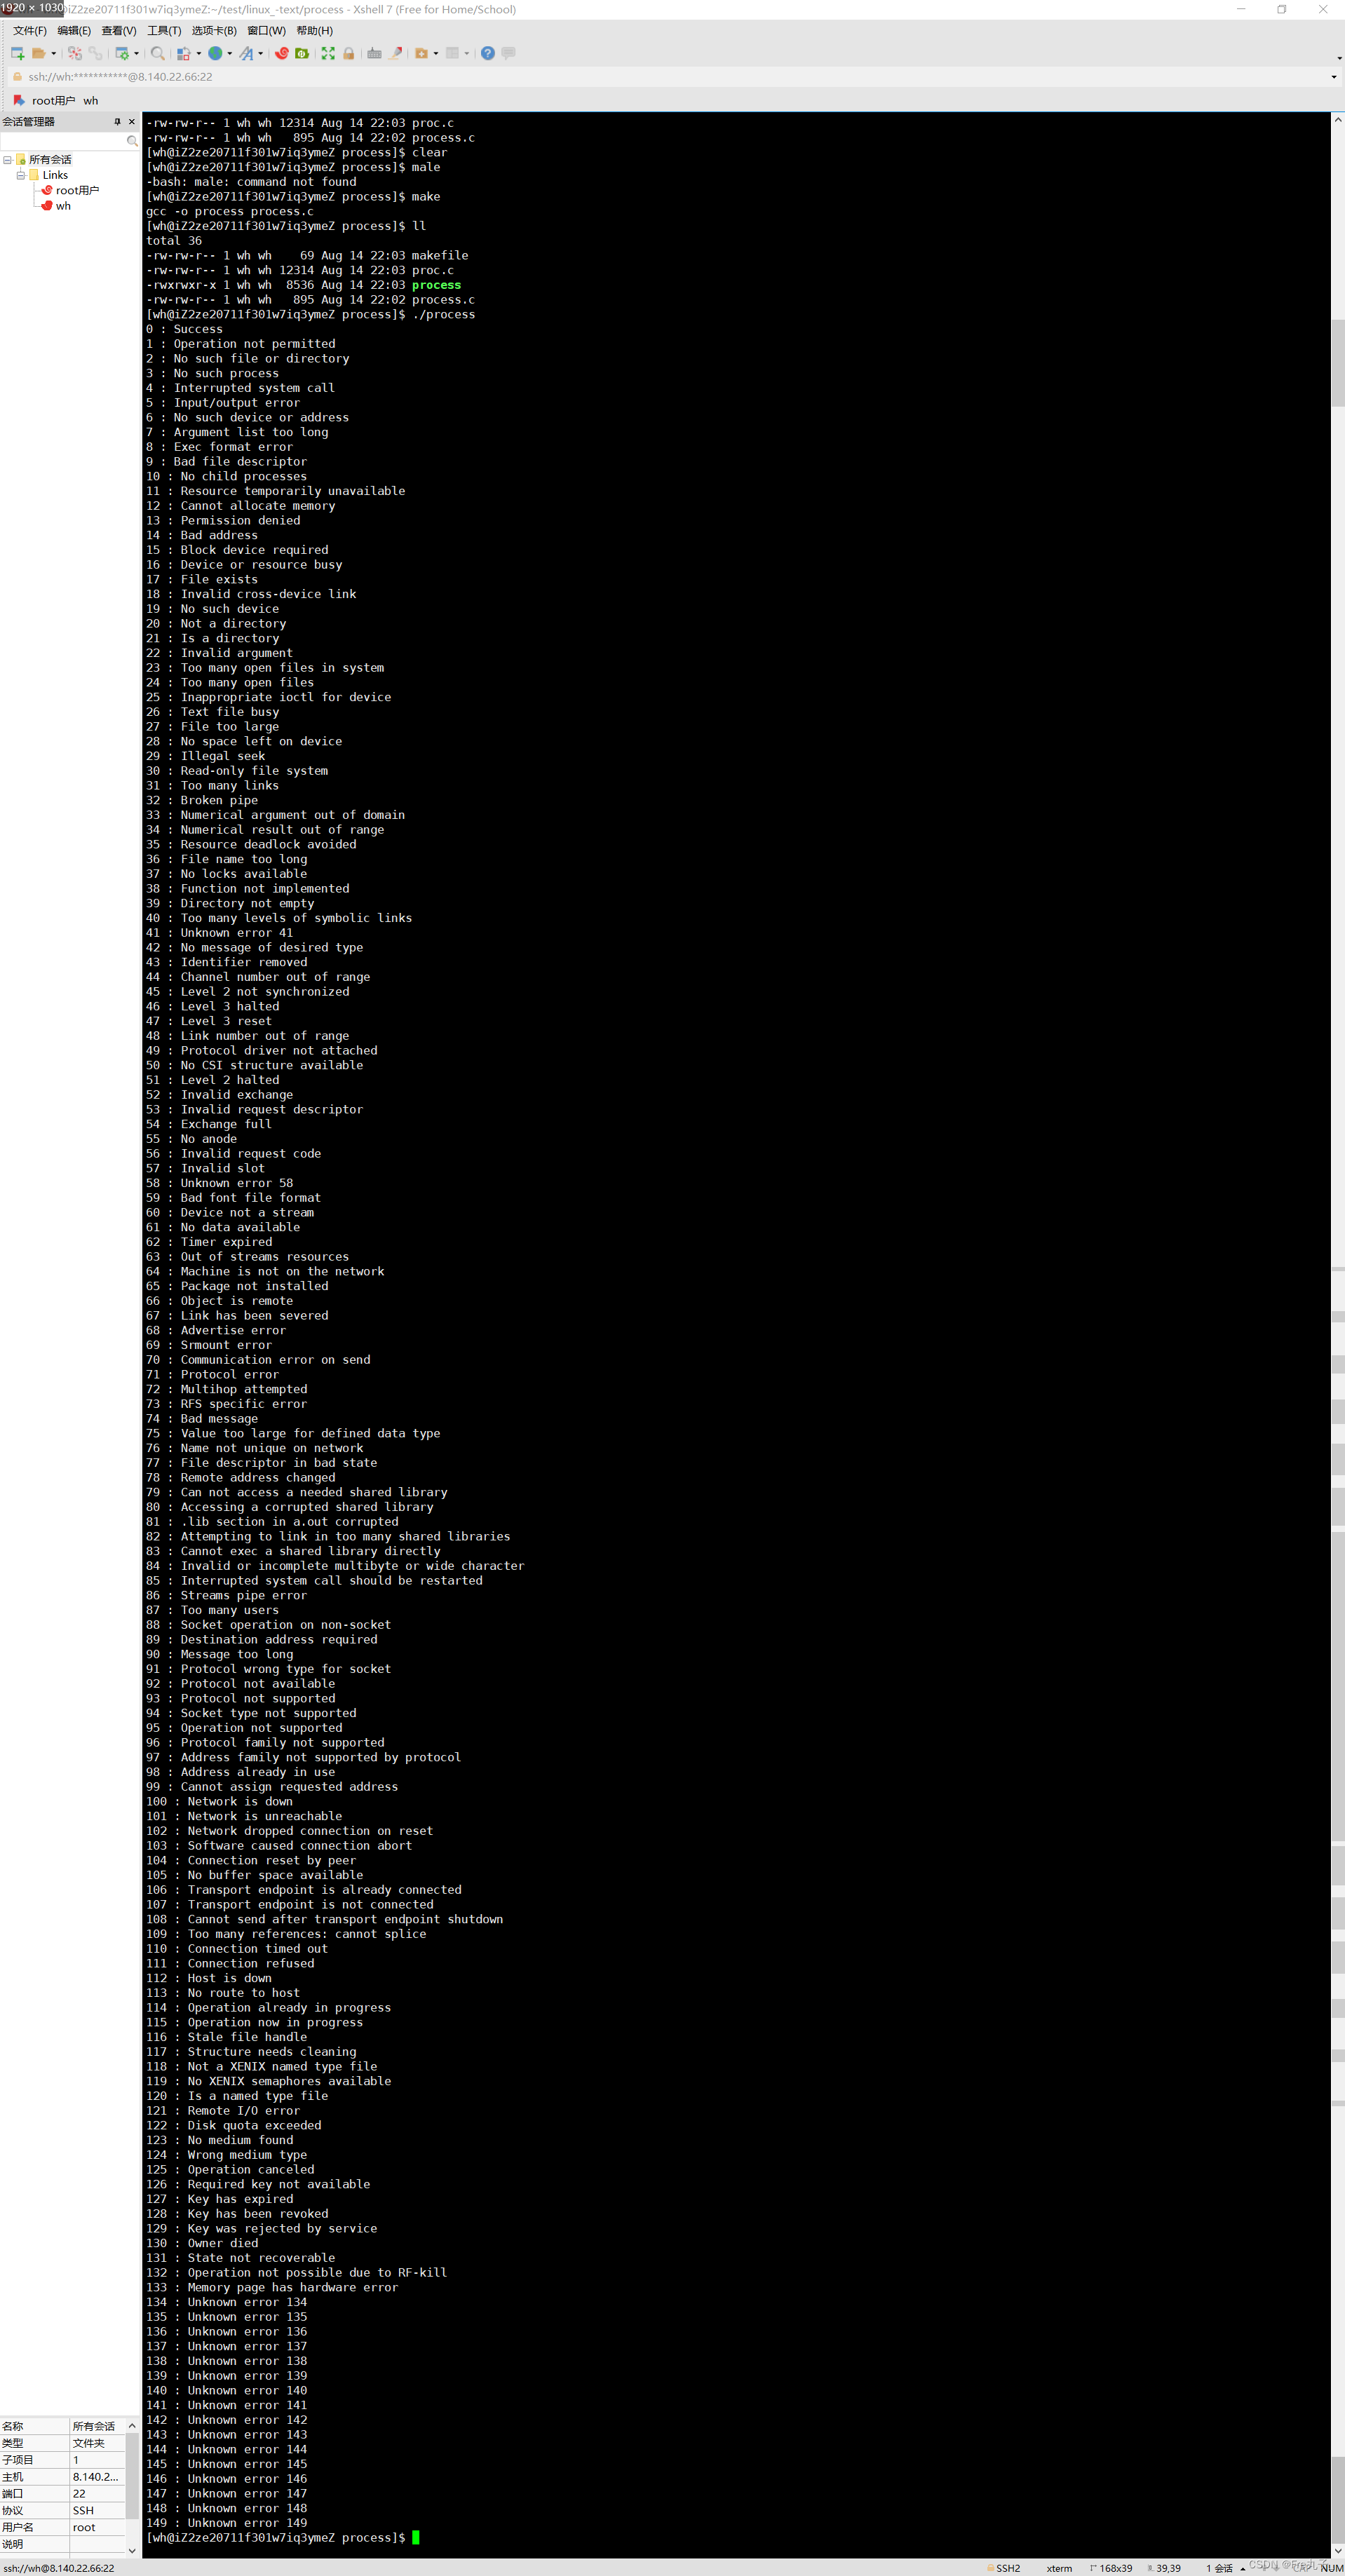
为什么main函数的return返回值为0
return返回的每个数字都有对应的退出错误原因,数字0为成功退出,接下来我们看一下main函数一共有多少种错误返回值。
进程退出码有利于我们快速的查找错误,解决错误
终止进程的方法
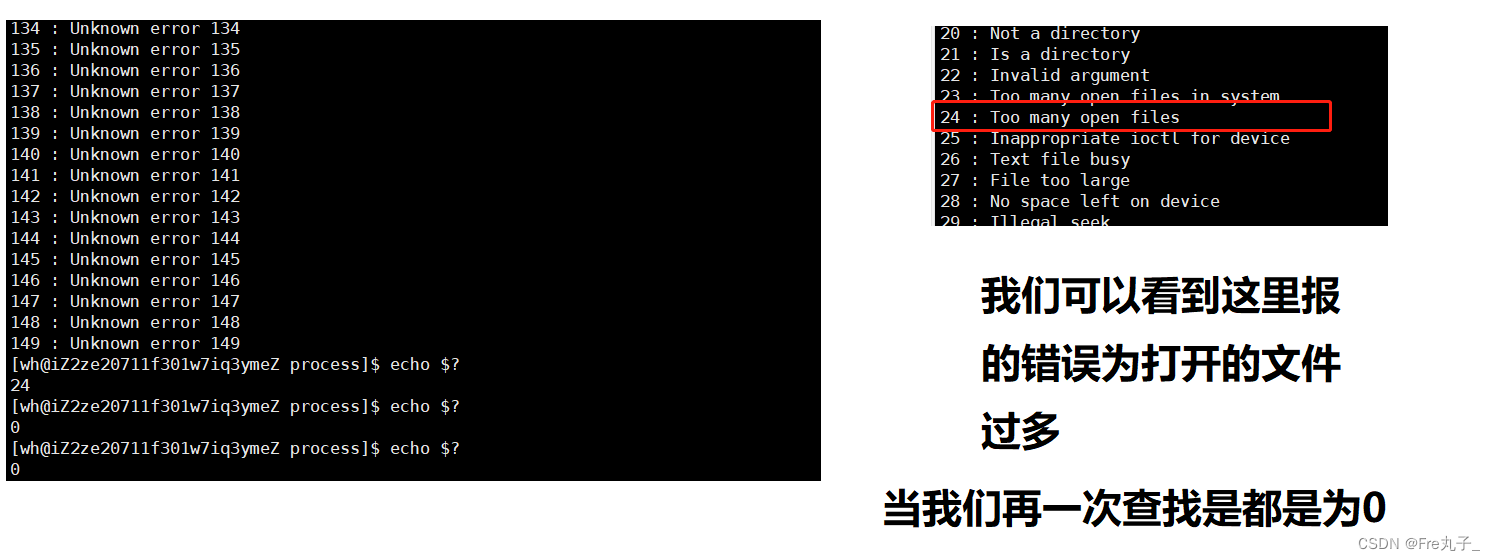
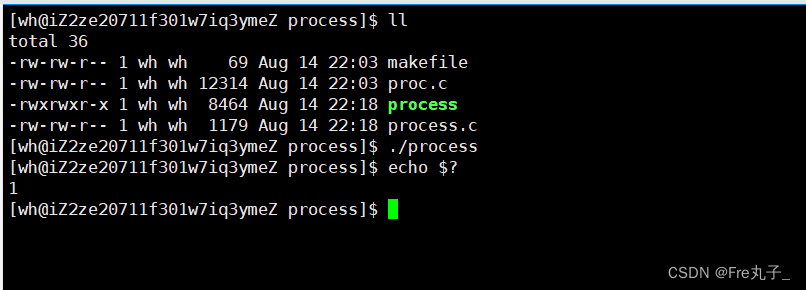
在谈如何终止进程的时候,我们要提取一个新的概念,那就是如何查找上一个进程的退出码为多少?
可以使用echo &?来访问上一个进程的退出码。
一般而言return对应的退出码。
return终止
main 函数里的终止才是真的进程终止
 1: process.c ? ?                                                                                                                                           ?? buffers
  1 #include <unistd.h>
  2 #include <sys/types.h>
  3 #include <stdio.h>
  4 #include <string.h>
  5
  6 int sum(int n)
  7 {


  8   int s = 0;
  9   int i = 0;
 10   for(i = 1;i<n;i++)
 11   {


 12     s+=i;
 13   }
 14   return s;
 15 }
 16
 17 int main()
 18 {


 19   int res = sum(10);
 20   if(res != 5050)
 21   {


 22     //函数运行结果不正确,直接退出
 23     return 1;//返回错误信息
 24   }
 25   return 0;
 26 }
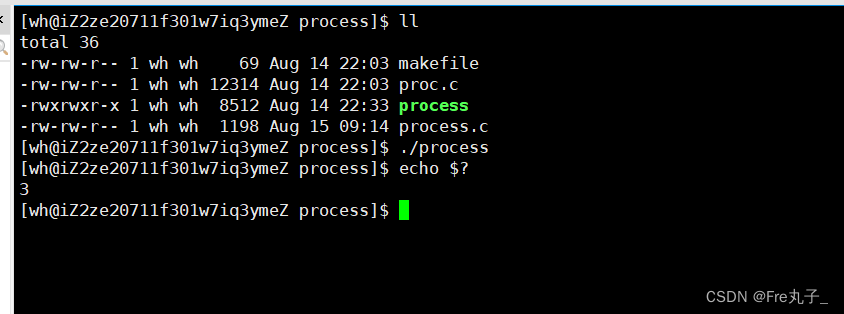
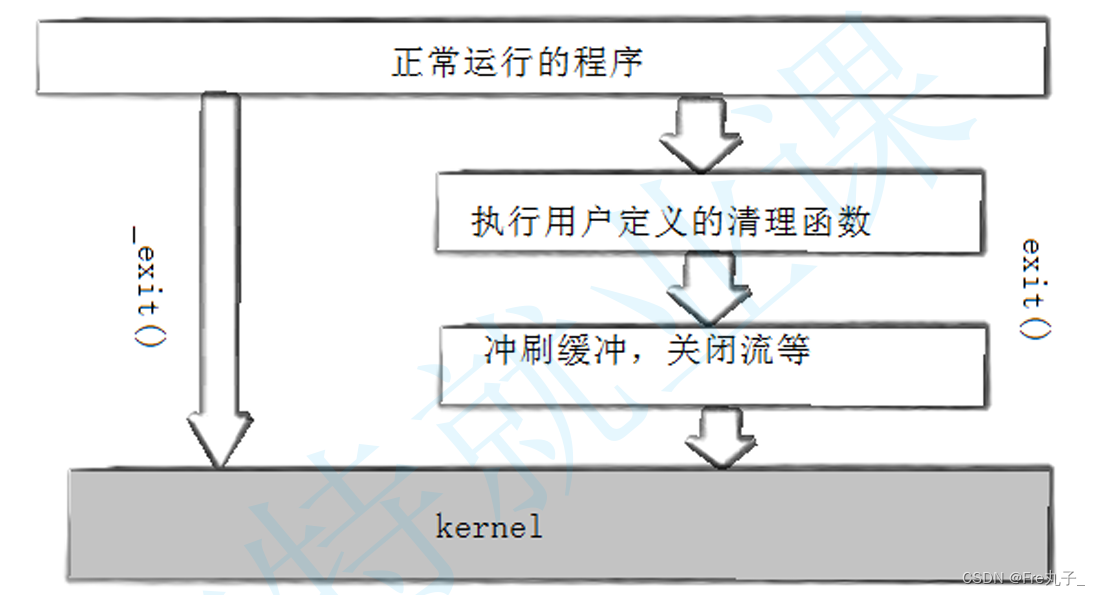
exit终止进程
exit终止进程和return终止进程不一样的,exit终止进程的时候会调用清理函数和冲刷缓冲区,关闭流等,这个我们会在跟下边_exit的区别里头会有讲解。

1: process.c ⮀ ⮂⮂ buffers
1 #include <unistd.h>
2 #include <sys/types.h>
3 #include <stdio.h>
4 #include <string.h>
5 #include <stdlib.h>
6 int sum(int n)
7 {
8 int s = 0;
9 int i = 0;
10 for(i = 1;i<n;i++)
11 {
12 s+=i;
13 }
14 exit(1);
15 }
16
17 int main()
18 {
19 int res = sum(10);
20 if(res != 5050)
21 {
22 //函数运行结果不正确,直接退出
23 exit(2) ;//返回错误信息
24 }
25 return 0;
26 }
_exit终止
只要进程碰到_exit就会立马终止进程,不在进行任何操作。
 1: process.c ? ?                                                                                                                                           ?? buffers
  1 #include <unistd.h>
  2 #include <sys/types.h>
  3 #include <stdio.h>
  4 #include <string.h>
  5 #include <stdlib.h>
  6 int sum(int n)
  7 {


  8   int s = 0;
  9   int i = 0;
 10   for(i = 1;i<n;i++)
 11   {


 12     s+=i;
 13   }
 14   _exit(3);
 15 }
 16
 17 int main()
 18 {


 19   int res = sum(10);
 20   if(res != 5050)
 21   {


 22     //函数运行结果不正确,直接退出
 23    _exit(2) ;//返回错误信息
 24   }
 25   return 0;
 26 }
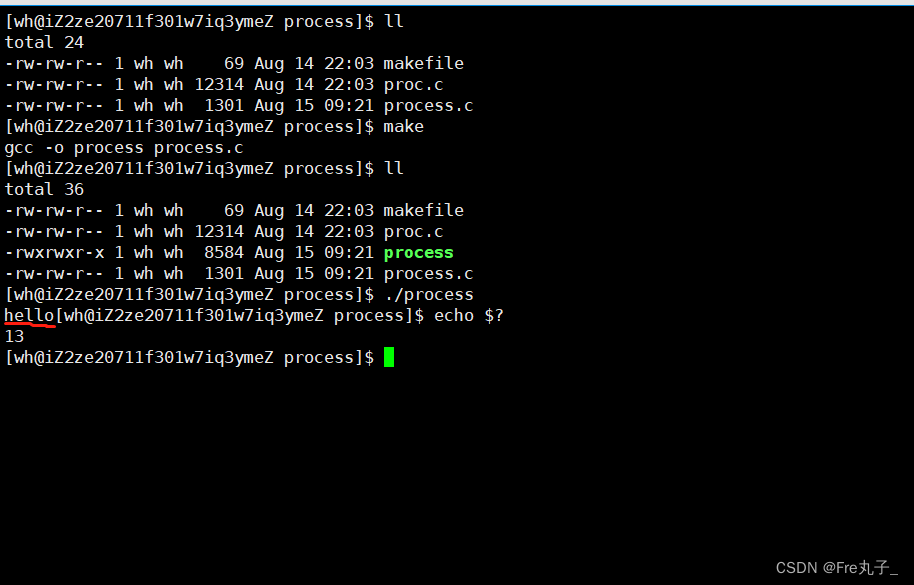
exit 和 _exit 的区别
   int main()
   {


     printf("hello");
    sleep(3);
    exit(13);
  }
   int main()
   {


     printf("hello");
    sleep(3);
    _exit(13);
  }
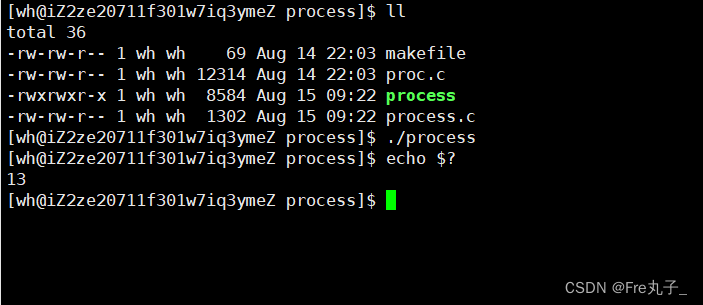
我们从案例上可以看出,当exit退出终止进程的时候,会冲刷缓冲区,但是_exit就不会
进程等待
为什么要进行进程等待呢?
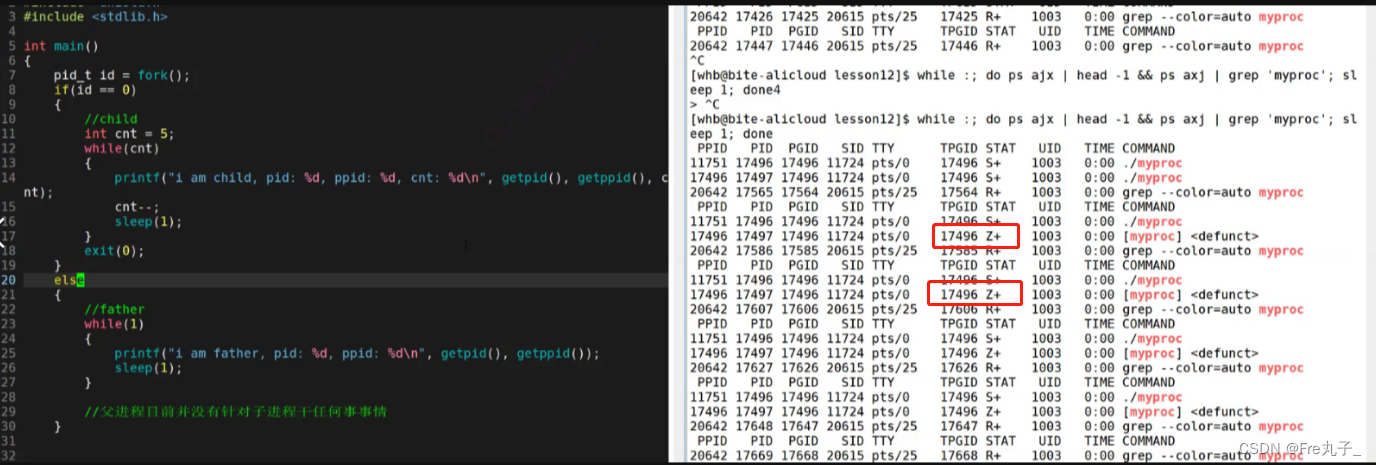
当子进程在父进程之前退出时,我们的子进程就会变为僵尸进程,这是我们就要运用等待来回收子进程。
等待也可以让父进程回收子进程的退出码,了解子进程的执行情况
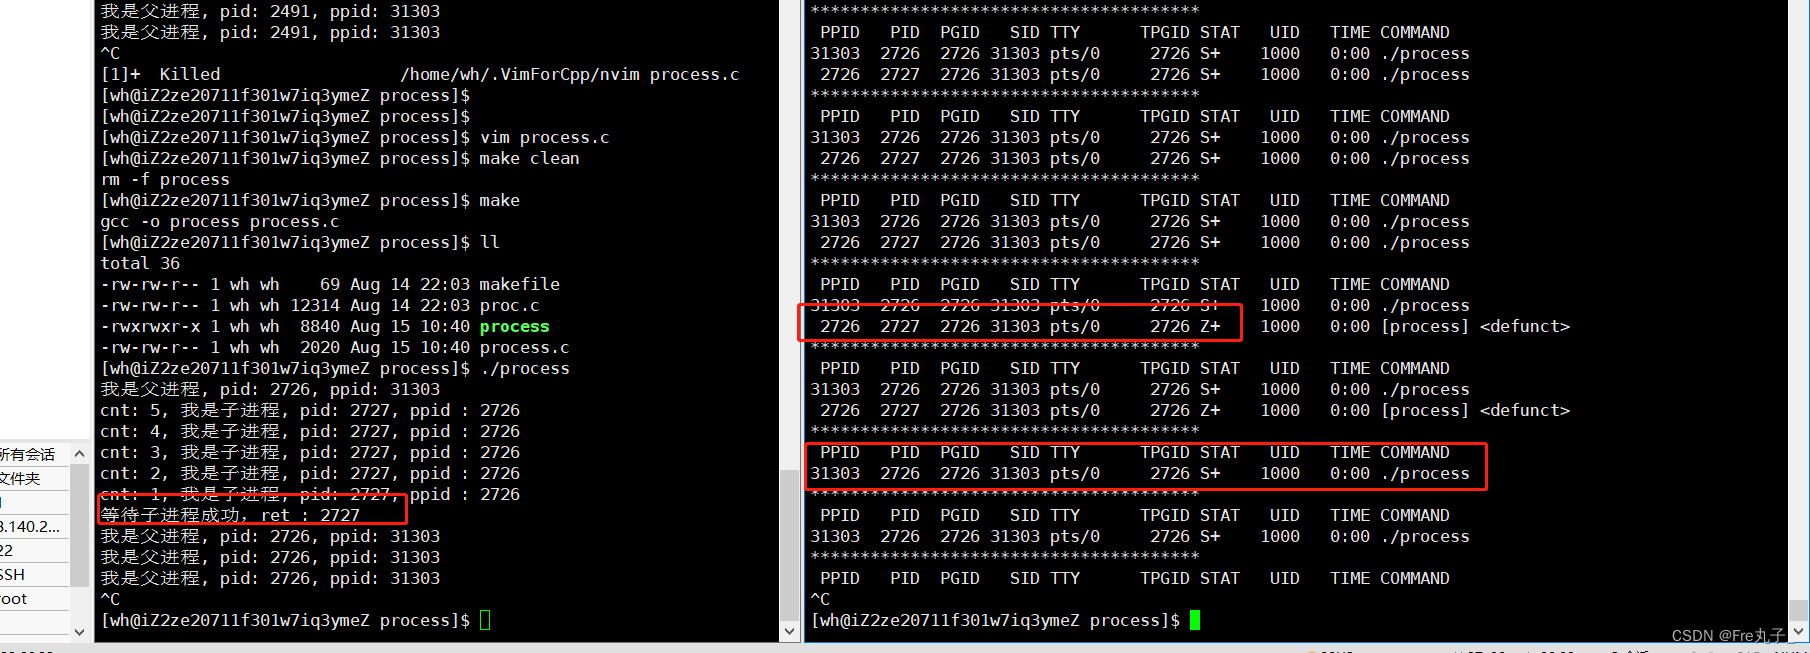
wait阻塞式等待
当子进程全部运行终止后,才会再次运行父进程wait后半部分内容。并且子进程也会被回收,不在是僵尸进程。
成功后返回等待子进程的pid,失败返回-1
 1 #include <unistd.h>
  2 #include <sys/types.h>
  3 #include <stdio.h>
  4 #include <string.h>
  5 #include <stdlib.h>
  6 #include <sys/wait.h>
  7 int main()
  8 {


  9   pid_t id = fork();
 10   if(id < 0)
 11   {


 12     perror("fork");
 13     exit(1);
 14   }
 15   else if(id == 0)
 16   {


 17     //子进程
 18     int cnt = 5;
 19     while(cnt)
 20     {


 21       printf("cnt: %d, 我是子进程, pid: %d, ppid : %d\n", cnt, getpid(), getppid());
 22       sleep(1);
 23       cnt--;
 24     }
 25     exit(0);
 26   }
 27   else
 28   {


 29     //父进程
 30     printf("我是父进程, pid: %d, ppid: %d\n", getpid(), getppid());
 		sleep(7);
 31     pid_t ret = wait(NULL);//阻塞式等待
 32     if(ret > 0)
 33     {


 34       printf("等待子进程成功,ret : %d\n",ret);
 35     }
 36     while(1)
 37     {


 38       printf("我是父进程, pid: %d, ppid: %d\n", getpid(), getppid());
 39       sleep(1);
 40     }
 41     :
 42   }
 43 }
进程查找方式:
while :; do ps ajx | head -1 && ps ajx | grep process | grep -v grep;sleep 1;echo "***************************************";done
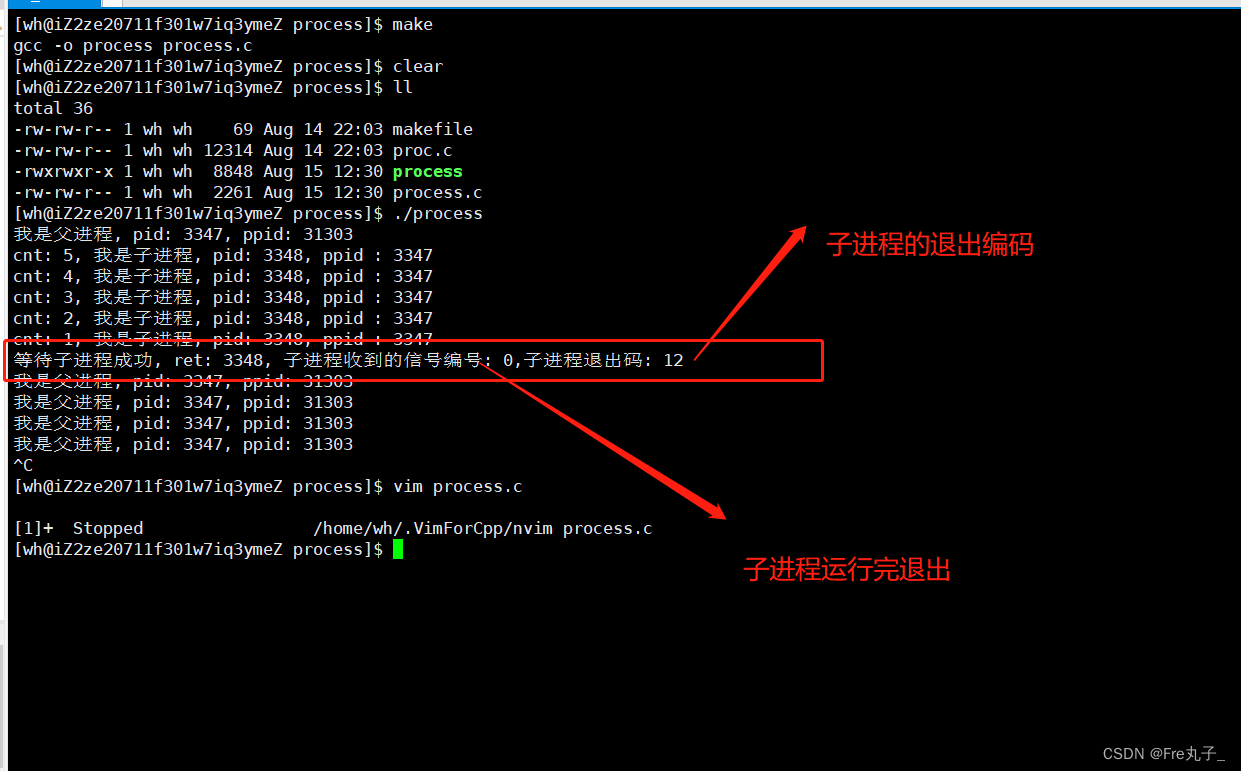
waitpid阻塞等待
pid:
pid = -1,等待任一个子进程,与wait等效。
pid > 0,等待其进程ID与pid相等的子进程。
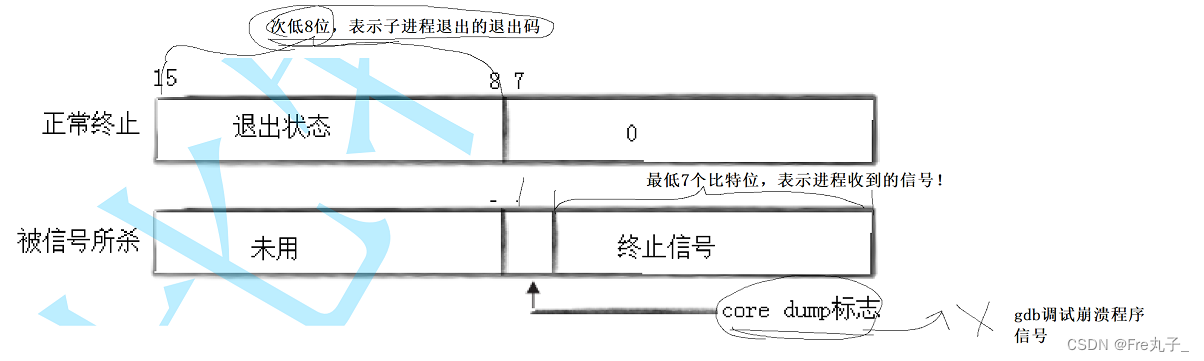
status:
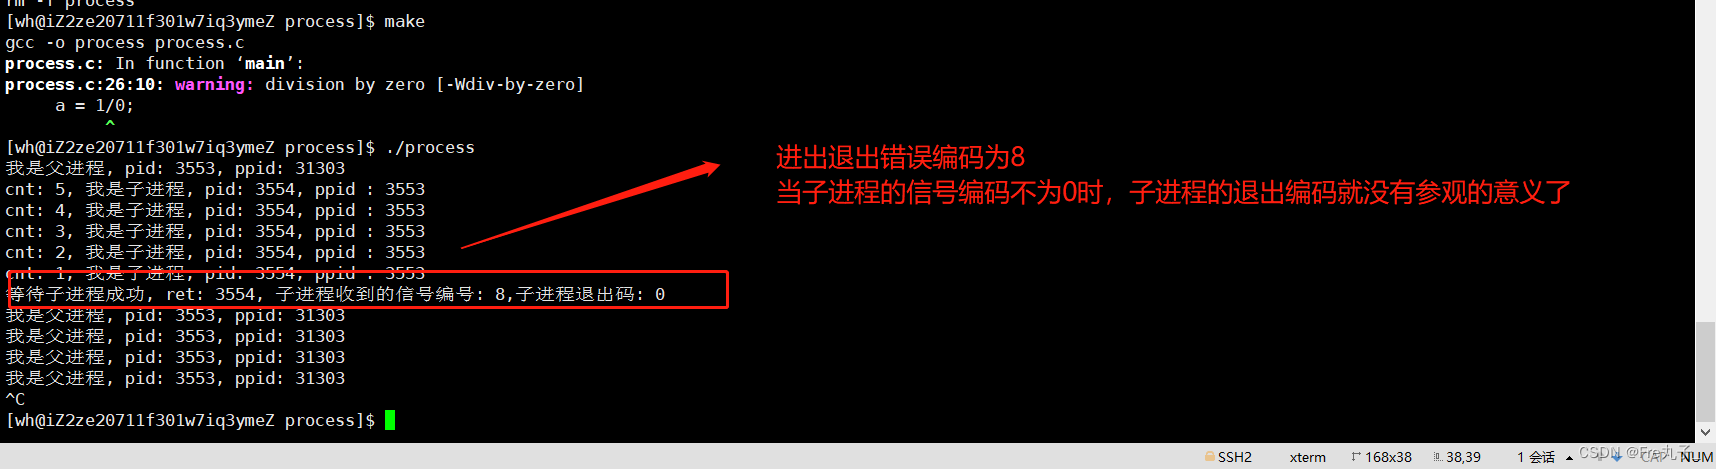
WIFEXITED(status):若为正常终止子进程返回的状态,则为真。(查看进程是否是正常退出)
WEXITSTATUS(status):若WIFEXITED非零,提取子进程退出码。(查看进程退出码)
status并不是按照整数整体使用的,而是按照比特位的方式,将32个
比特位进行划分,我们只学习低16位
options:
WNOHANG:若pid指定的子进程没有结束,则waitpid()函数返回0,不予以等待。若正常结束,则返回该子进程的ID。
0:一直处于阻塞状态,直到子进程终止。

1 #include <unistd.h>
2 #include <sys/types.h>
3 #include <stdio.h>
4 #include <string.h>
5 #include <stdlib.h>
6 #include <sys/wait.h>
7 int main()
8 {
9 pid_t id = fork();
10 if(id < 0)
11 {
12 perror("fork");
13 exit(1);
14 }
15 else if(id == 0)
16 {
17 //子进程
18 int cnt = 5;
19 while(cnt)
20 {
21 printf("cnt: %d, 我是子进程, pid: %d, ppid : %d\n", cnt, getpid(), getppid());
22 sleep(1);
23 cnt--;
24 }
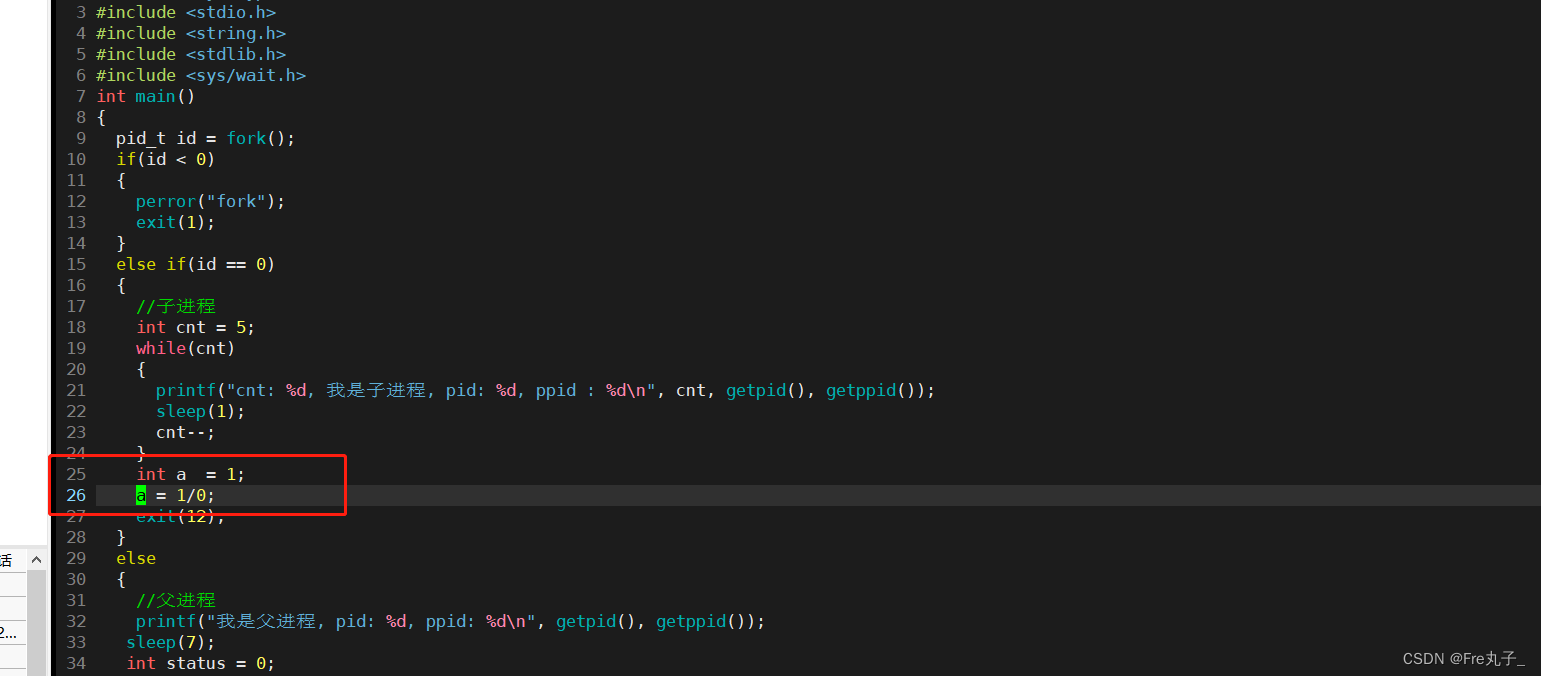
25 exit(12);
26 }
27 else
28 {
29 //父进程
30 printf("我是父进程, pid: %d, ppid: %d\n", getpid(), getppid());
31 sleep(7);
32 int status = 0;
33
34 // pid_t ret = wait(NULL);//阻塞式等待
35 pid_t ret = waitpid(id,&status,0);
36 if(ret > 0)
37 {
38 // 0x7F -> 0000.000 111 1111
39 printf("等待子进程成功, ret: %d, 子进程收到的信号编号: %d,子进程退出码: %d\n",\
40 ret, status & 0x7F ,(status >> 8)&0xFF); //0xff --> 0000...000 1111 1111
41 }
42 while(1)
43 {
44 printf("我是父进程, pid: %d, ppid: %d\n", getpid(), getppid());
45 sleep(1);
46 }
47
48 }
49 }
50
进行非阻塞测试

 1 #include <unistd.h>
  2 #include <sys/types.h>
  3 #include <stdio.h>
  4 #include <string.h>
  5 #include <stdlib.h>
  6 #include <sys/wait.h>
  7 int main()
  8 {


  9   pid_t id = fork();
 10   if(id < 0)
 11   {


 12     perror("fork");
 13     exit(1);
 14   }
 15   else if(id == 0)
 16   {


 17     //子进程
 18     int cnt = 5;
 19     while(cnt)
 20     {


 21       printf("cnt: %d, 我是子进程, pid: %d, ppid : %d\n", cnt, getpid(), getppid());
 22       sleep(1);
 23       cnt--;
 24     }
 25     exit(12);
 26   }
 27   else
 28   {


 29     //父进程
 30     printf("我是父进程, pid: %d, ppid: %d\n", getpid(), getppid());
 31    int Exit = 0;
 32    while(!Exit)
 33    {


 34
 35    int status = 0;
36
 37    // pid_t ret = wait(NULL);//阻塞式等待
 38    pid_t ret = waitpid(-1,&status,WNOHANG);
 39
 40    if(ret > 0)
 41     {


 42       if(WIFEXITED(status))
 43       {


 44         // 0x7F -> 0000.000 111 1111
 45            printf("等待子进程成功, ret: %d, 子进程收到的信号编号: %d,子进程退出码: %d\n",
 46                     ret, status & 0x7F ,WEXITSTATUS(status)); //0xff --> 0000...000 1111 1111
 47           Exit = 1;
 48       }
 49     }
 50    else if(ret == 0)
 51    {


 52       printf("子进程还在运行中,暂时还没有退出,父进程可以在等一等, 处理一下其他事情??\n");
 53       printf("这里还可以执行其他命令\n");
 54       sleep(1);
 55    }
 56    else{


 57      //等待失败
 58      printf("wait失败!\n");
 59      Exit = 1;
 60    }
 61    }
 62     while(1)
 63     {


 64       printf("我是父进程, pid: %d, ppid: %d\n", getpid(), getppid());
 65       sleep(1);
 66     }
 67
 68   }
 69 }
wait 和 waitpid
wait 和 waitpid可以拿到子进程的退出信息,那么为什么要用wait 和 waitpid函数呢?
这是因为进程之间具有写时拷贝功能,进程是具有独立性的,所以就需要用wait 和 waitpid函数来读取子进程的信息
那么wait 和 waitpid是凭什么能拿到子进程的信息呢?它们本来就是都是独立的,怎么可能呢?
这是因为wait 和 waitpid是读取子进程的task_struct结构的,当子进程位为僵尸进程的时候,子进程至少要保留进程的PCB信息,task_struct里面保留了任何进程退出时的退出结果信息
又因为wait 和 waitpid为系统调用,所以他们完成是有这个权力的。
进程替换
是什么?
如果我们创建新的子进程后,子进程想要执行一个全新的,这是我们就需要进行进程替换。
进程替换是通过特定的接口,加载磁盘上的一个权限程序(代码和数据),加载到调用进程的地址空间中,并和当前进程的页表重新建立映射。
怎么操作?
- 不创建子进程
- 创建子进程
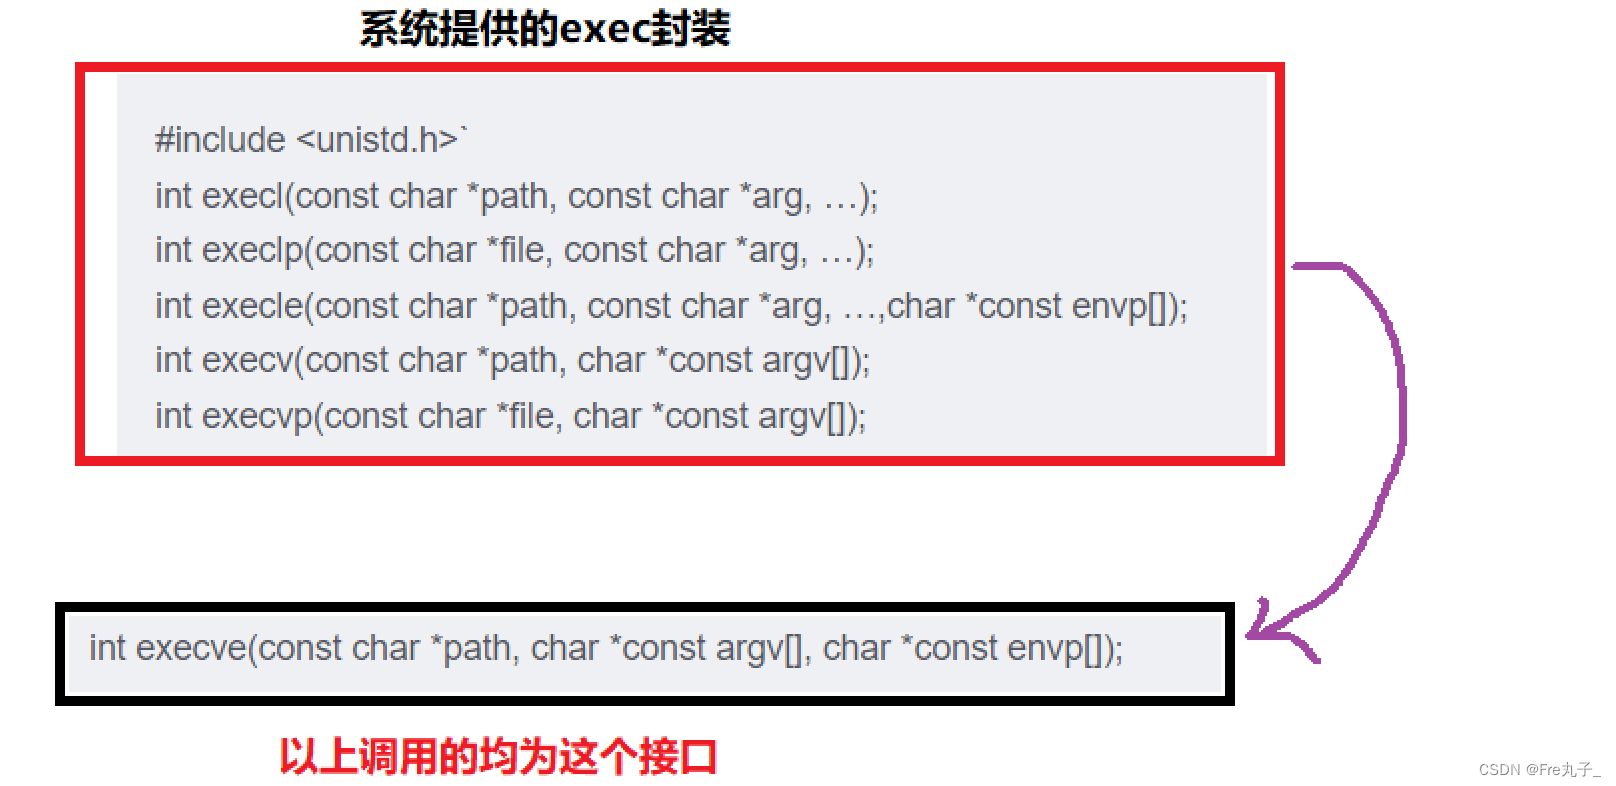
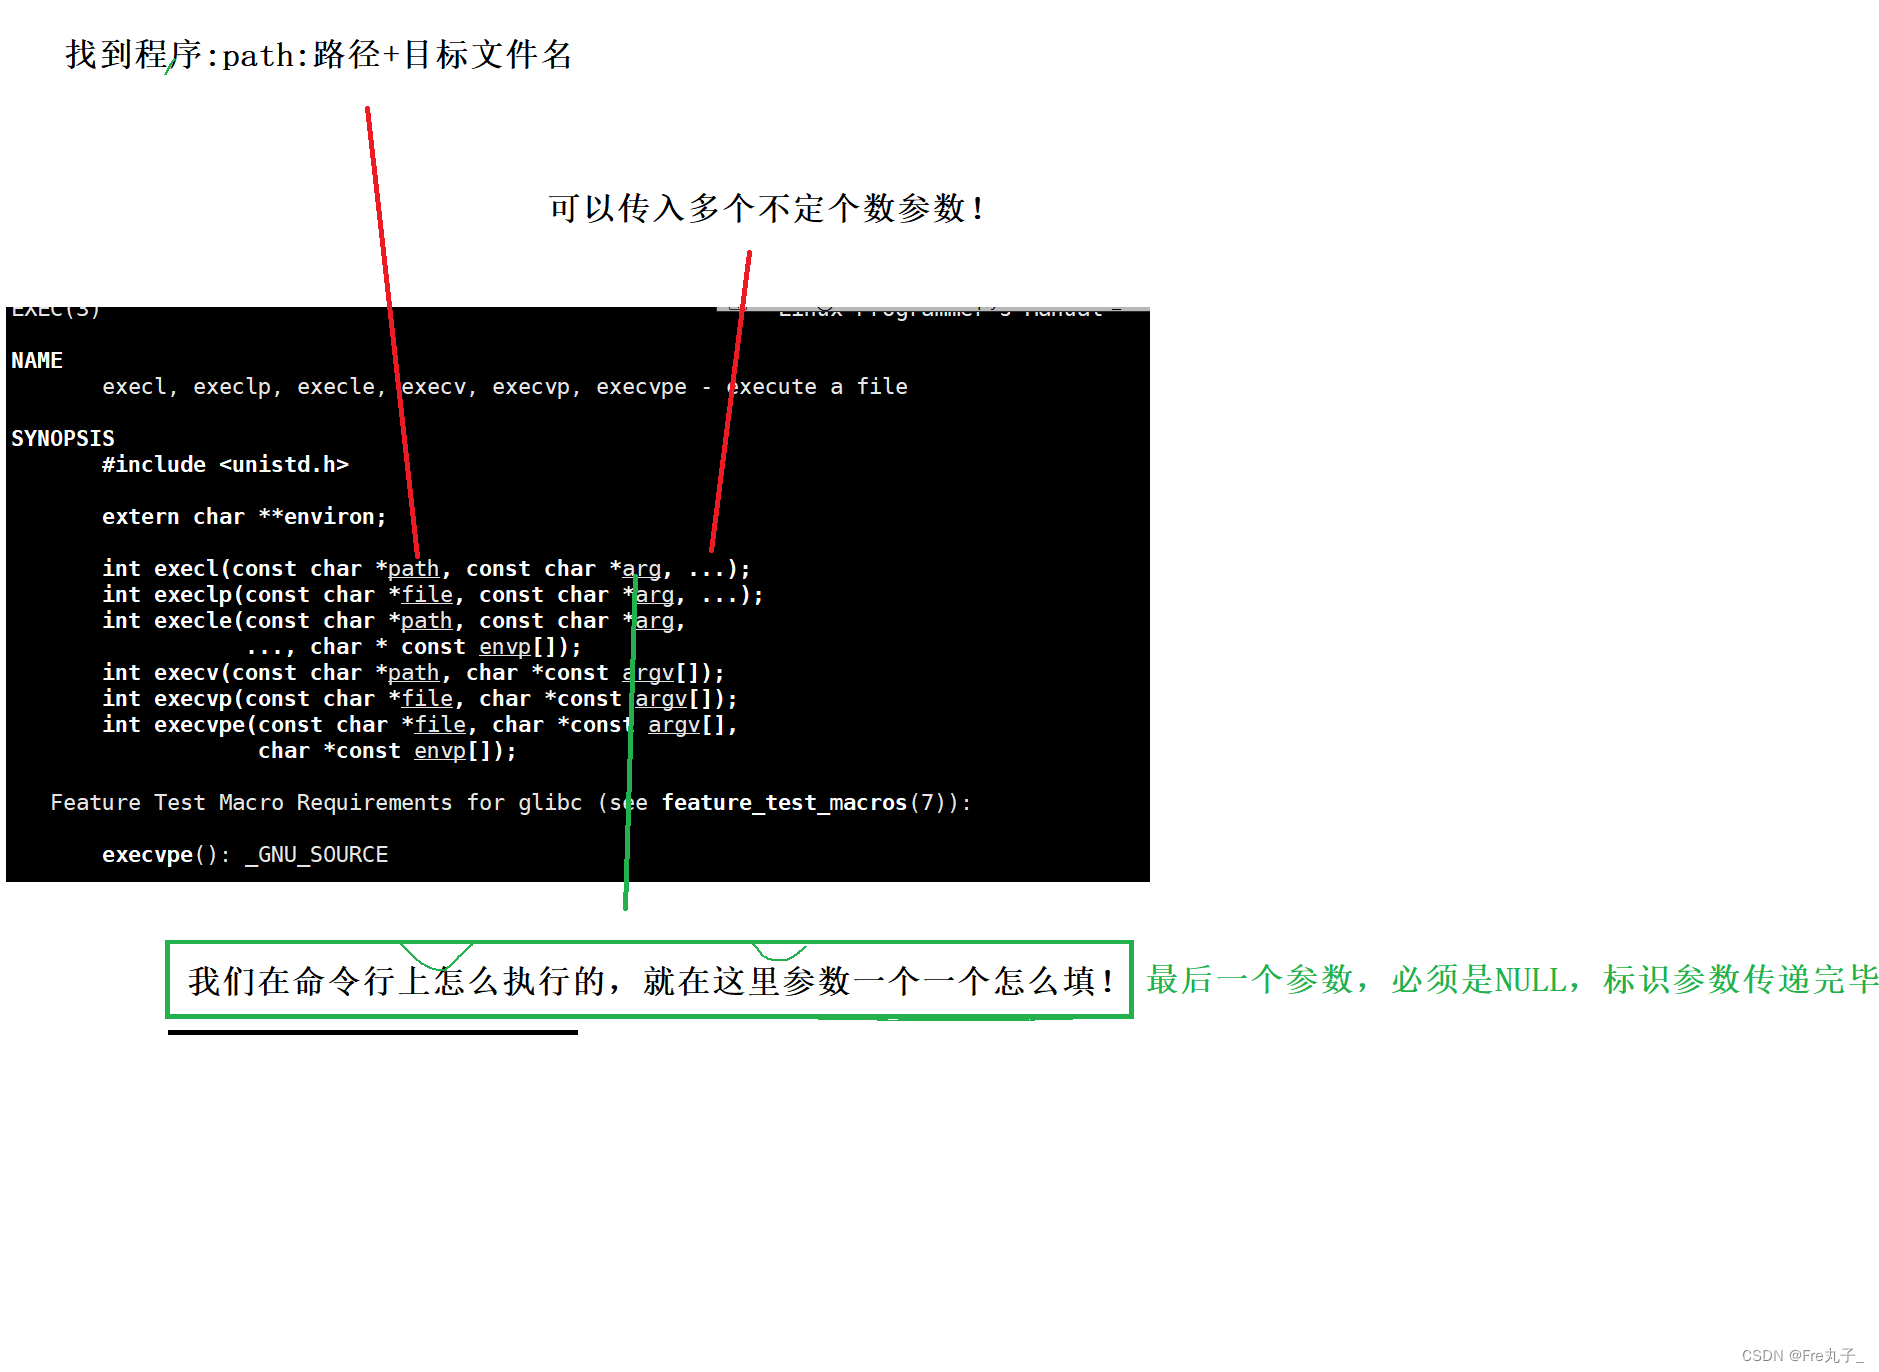
#include <unistd.h>`
int execl(const char *path, const char *arg, …);
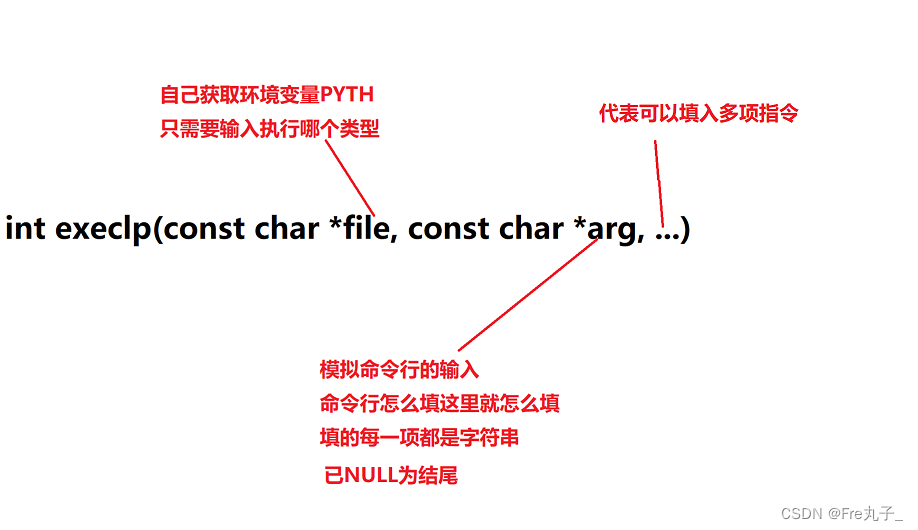
int execlp(const char *file, const char *arg, …);
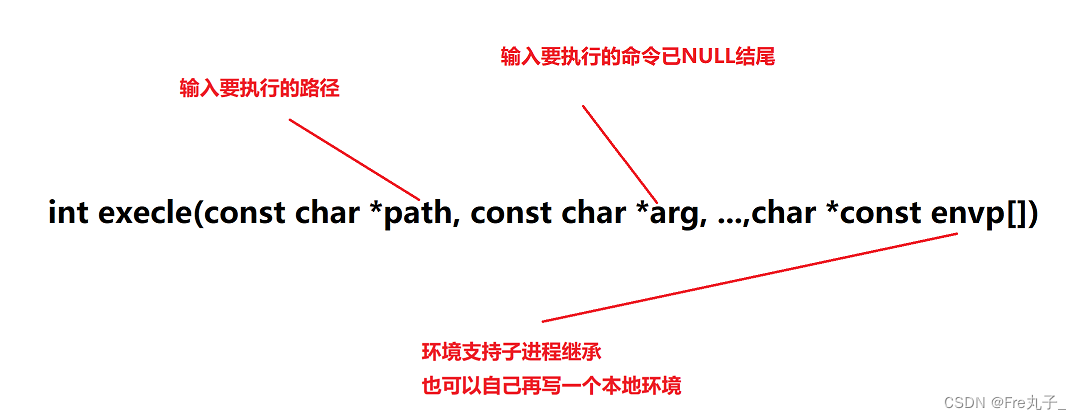
int execle(const char *path, const char *arg, …,char *const envp[]);
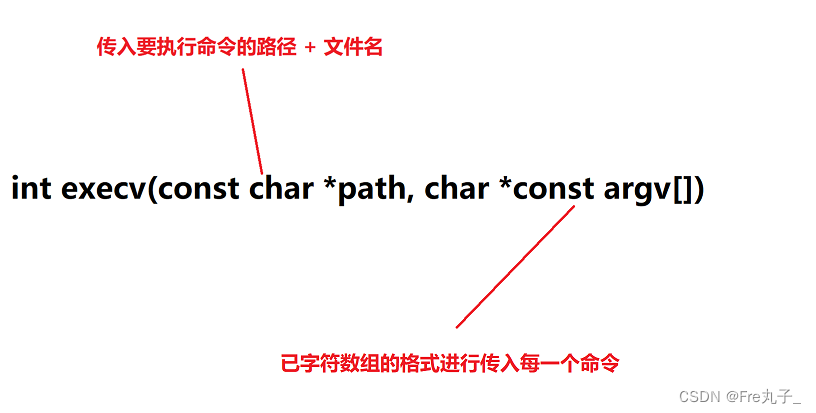
int execv(const char *path, char *const argv[]);
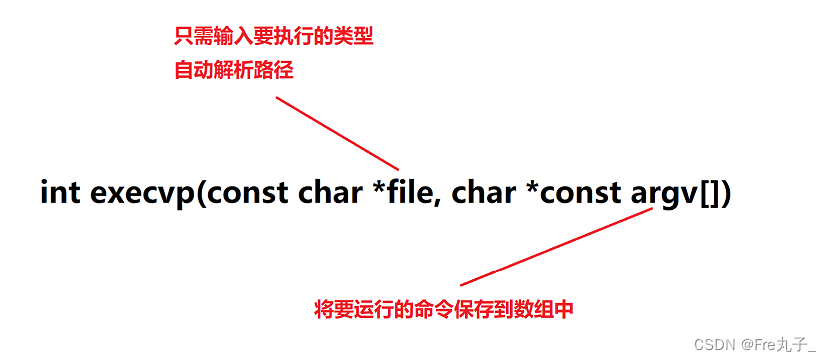
int execvp(const char *file, char *const argv[]);
int execve(const char *path, char *const argv[], char *const envp[]);
exec 后边的字母分别代表
- l(list) : 表示参数采用列表
- v(vector) : 参数用数组
- p(path) : 有p自动搜索环境变量PATH
- e(env) : 表示自己维护环境变量
创建子进程进行替换
1. 不创建子进程
int execl(const char *path, const char *arg, …);
  1 #include <unistd.h>
  2 #include <sys/types.h>
  3 #include <stdio.h>
  4 #include <string.h>
  5 #include <stdlib.h>
  6 #include <sys/wait.h>
  7
  8 int main()
  9 {


 10   printf("当前进程开始\n");
 11   execl("/usr/bin/ls", "ls", "--color=auto","-l", NULL);
 12     exit(1);
 13   printf("当前进程结束\n");
 14   return 0;
 15 }
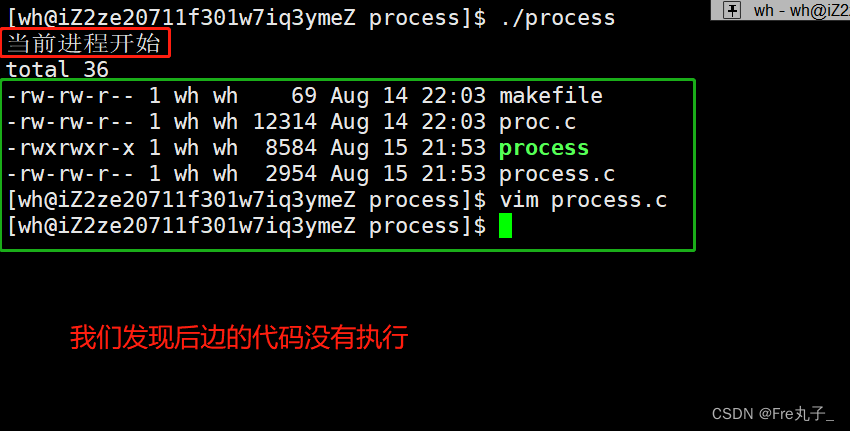
替换成功后,后边的代码为什么不执行?
这是因为execl成功替换后,会将当前进程的所有代码和数据都进行替换。包括已经执行和未执行的。
所以一旦替换成功后续所有代码全部不会执行。

2. 创建子进程
当我们进程替换的时候,为什么要创建子进程呢?
- 为了不影响父进程,因为替换的时候,是代码和数据全部替换的,所以我们选择创建子进程,在子进程进行替换。此时父子进程和子进程的代码和数据就彻底分开了,虽然以亲并不冲突
- 我们想让父进程聚焦在读取数据,解析数据,指派进程执行代码的功能。
int execl(const char *path, const char *arg, …);

int execlp(const char *file, const char *arg, …)

int execv(const char *path, char *const argv[])
int execvp(const char *file, char *const argv[])
int execle(const char *path, const char *arg, …,char *const envp[])
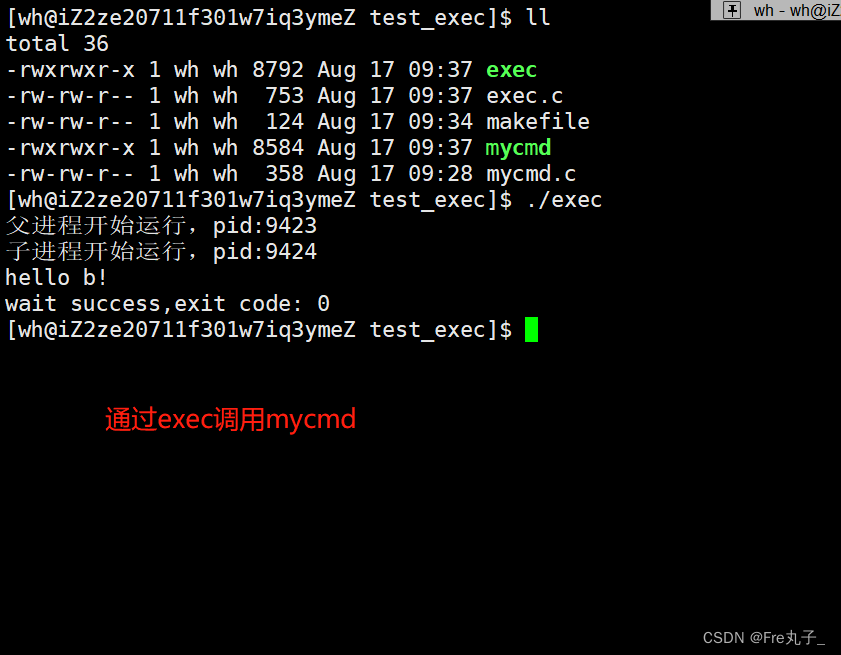
exec.c
1 #include <stdio.h>
2 #include <unistd.h>
3 #include <wait.h>
4 #include <stdlib.h>
5
6 #define NUM 16
7 int main()
8 {
9 const char* myfile = "./mycmd";
10
11 pid_t id = fork();
12 if(id == 0)
13 {
14 //子进程
15 printf("子进程开始运行,pid:%d\n",getpid());
16 sleep(2);
17 char* const _env[NUM]{
18 (char*)"MY_105_VAL=888777666555",
19 NULL
20 };
21
W> 22 char* const _argv[NUM]{
23 (char*)"ls",
24 (char*)"-a",
25 (char*)"-l",
26 (char*)"-i",
27 NULL
28 };
29 execle(myfile,"mycmd","-a",NULL,_env);
30 // execvp("ls",_argv);
31 //execv("/usr/bin/ls",_argv);//和下面的execl只有传参方式的区别
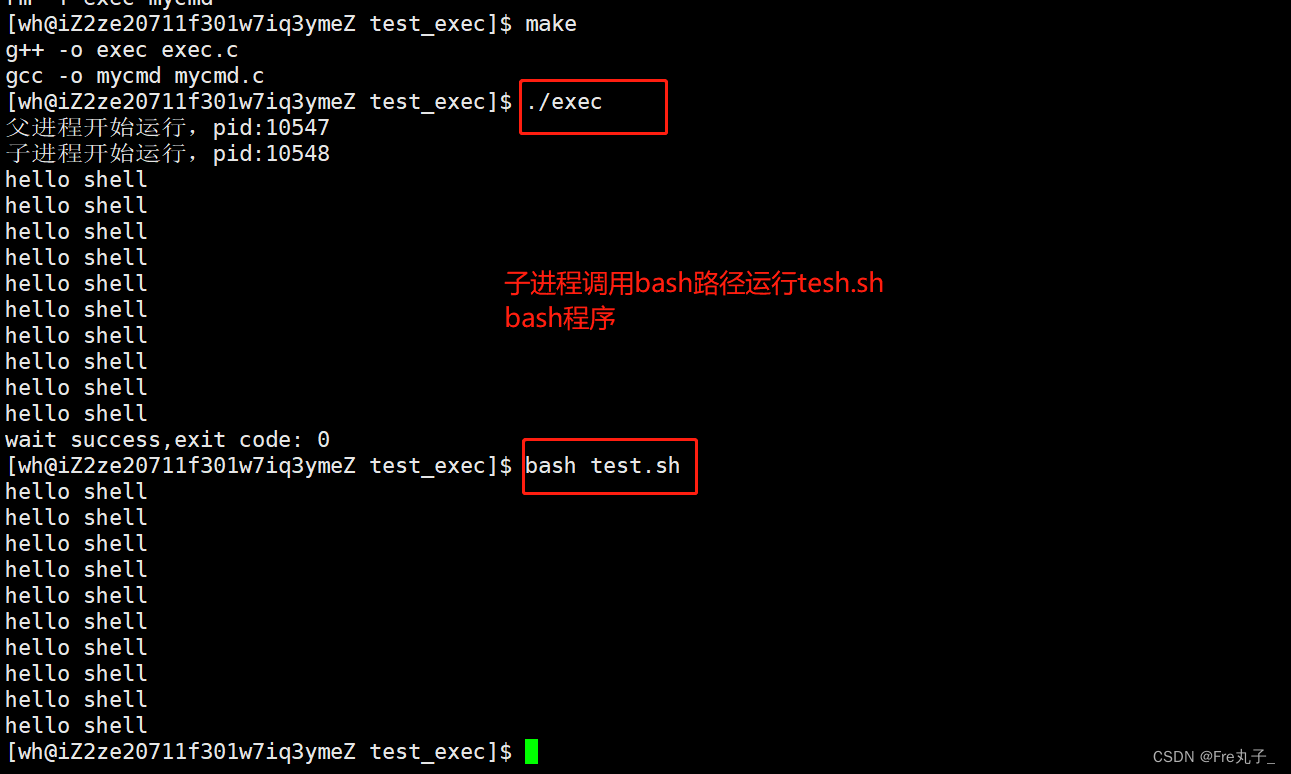
32 //execlp("bash","bash","test.sh",NULL);
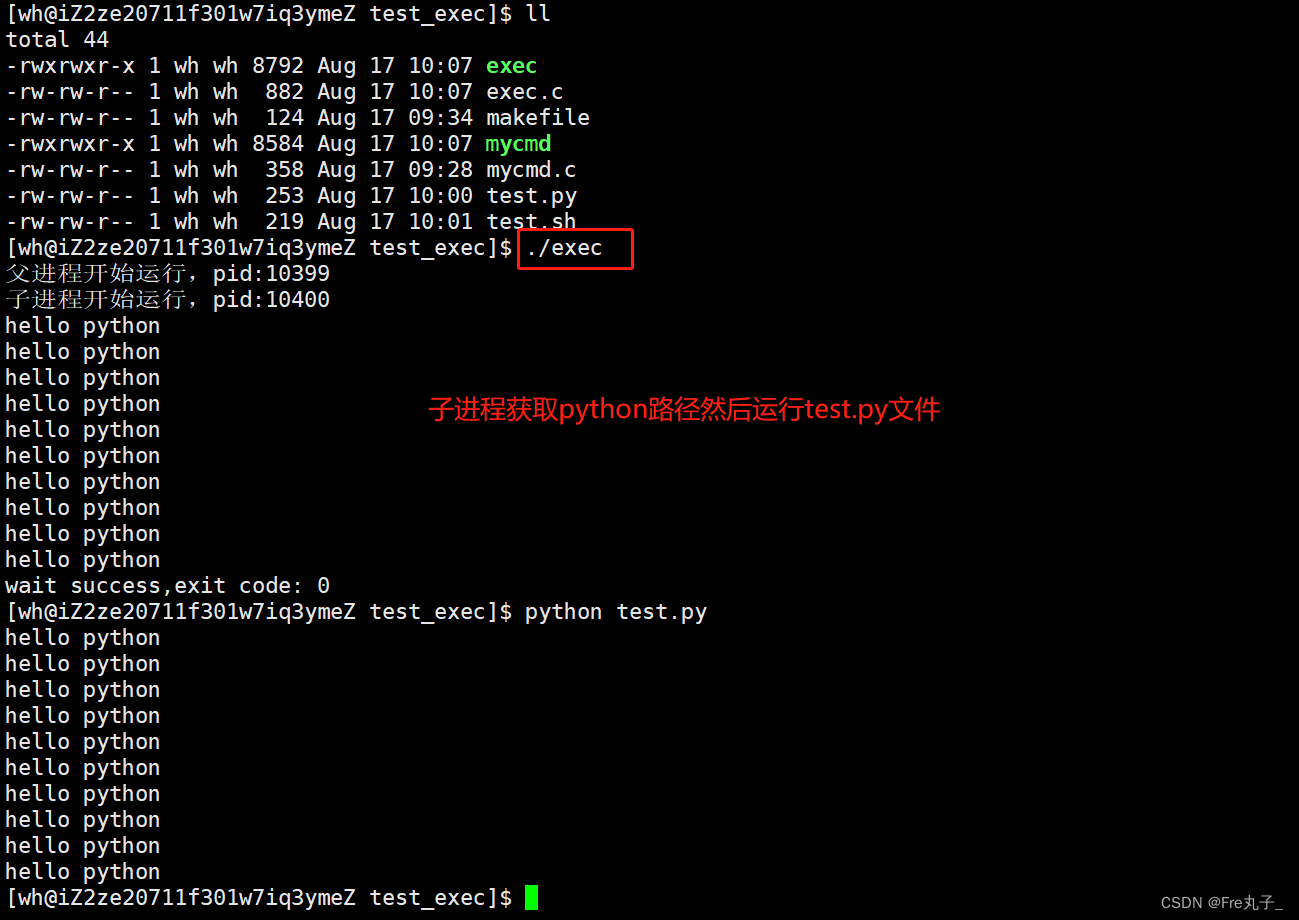
33 //execlp("python", "python", "test.py", NULL);
34 //execlp("ls","ls","-a","-l",NULL);
35 // execl(myfile, "mycmd", "-b", NULL);
36 // execl("/usr/bin/ls","ls","-a","-l",NULL);
37 //如果替换失败就会走下面的程序
38 exit(-1);
39 }
40 else
41 {
42 //父进程
43 printf("父进程开始运行,pid:%d\n",getpid());
44 int status = 0;
45 pid_t id = waitpid(-1,&status,0);
46 //阻塞等待, 一定是子进程先运行完毕,然后父进程获取之后,才退出!
47 if(id > 0)
48 {
49 printf("wait success,exit code: %d\n",WEXITSTATUS(status));
50 }
51 }
52 return 0;
53 }
 mycmd.c
  1 #include <stdio.h>
  2 #include <stdlib.h>
  3 #include <string.h>
  4 int main(int argc,char *argv[])
  5 {


  6   if(argc != 2)
  7   {


  8     printf("can not execute!\n");
  9     exit(1);
 10   }
 11   printf("获取环境变量: MY_105_VAL: %s\n", getenv("MY_105_VAL"));
 12
 13   if(strcmp(argv[1],"-a") == 0)
 14   {


 15     printf("hello a!\n");
 16   }
 17   else if(strcmp(argv[1],"-b") == 0)
 18   {


 19     printf("hello b!\n");
 20   }
 21   else
 22   {


 23     printf("default!\n");
 24   }
 25   return 0;
 26 }
test.py
  1 #! /usr/bin/python3.6
  2
  3 print("hello python");
  4 print("hello python");
  5 print("hello python");
  6 print("hello python");
  7 print("hello python");
  8 print("hello python");
  9 print("hello python");
 10 print("hello python");
 11 print("hello python");
 12 print("hello python");