官网参考链接:https://developer.android.google.cn/develop/ui/views/appwidgets/overview
1、什么是小部件
App widgets are miniature application views that can be embedded in other applications (such as the home screen) and receive periodic updates。
通俗解释:一个能够定期刷新并且加到其他应用上的微型视图。
更多android framework干货内容请找千里马私聊:https://www.bilibili.com/video/BV1wj411o7A9/
2、小部件的运行机制是什么?
 通过 AppWidgetProvider 定义小部件的行为
通过 RemoteView 和布局文件定义小部件的UI
通过AppWidgetManager 更新视图
在manifeset 里注册 AppWidgetProvider(继承于广播),设置监听的action
3、小部件运行在什么进程?
首先明白一下Host进程和widget进程,看如下图所示:

小部件运行波及的进程,及各个进程的责任:

小部件的运行逻辑需要分为三部分:AppWidgetProvider 中的逻辑运行在小部件所在应用进程。小部件的数据存储,权限校验的逻辑,widget进程和host进程的沟通桥梁即跨进程通讯中介,运行在system_process中。小部件渲染逻辑在host 进程中。
4、RemoteView如何工作?
RemoteView 继承于Parcelable,可在进程间传递。RemoteView 会将每一个设置的行为转换成相应的Action。在Host 侧进程时再将Action 翻译成对应的行为。
如:
正常自己进程
TextView 的setText方法,直接调mTextView.setText就行
但是这个widget都不是自己widget进程进行的渲染,这里就只能通过RemoteView方式来操作,RemoteView的原理其实就是,传递类是一个方法名字字符,因为字符串是可以跨进程传递的,然后到达了Host进程,Host进程可以根据方法名字的字符串进行反射调用
原理图如下:
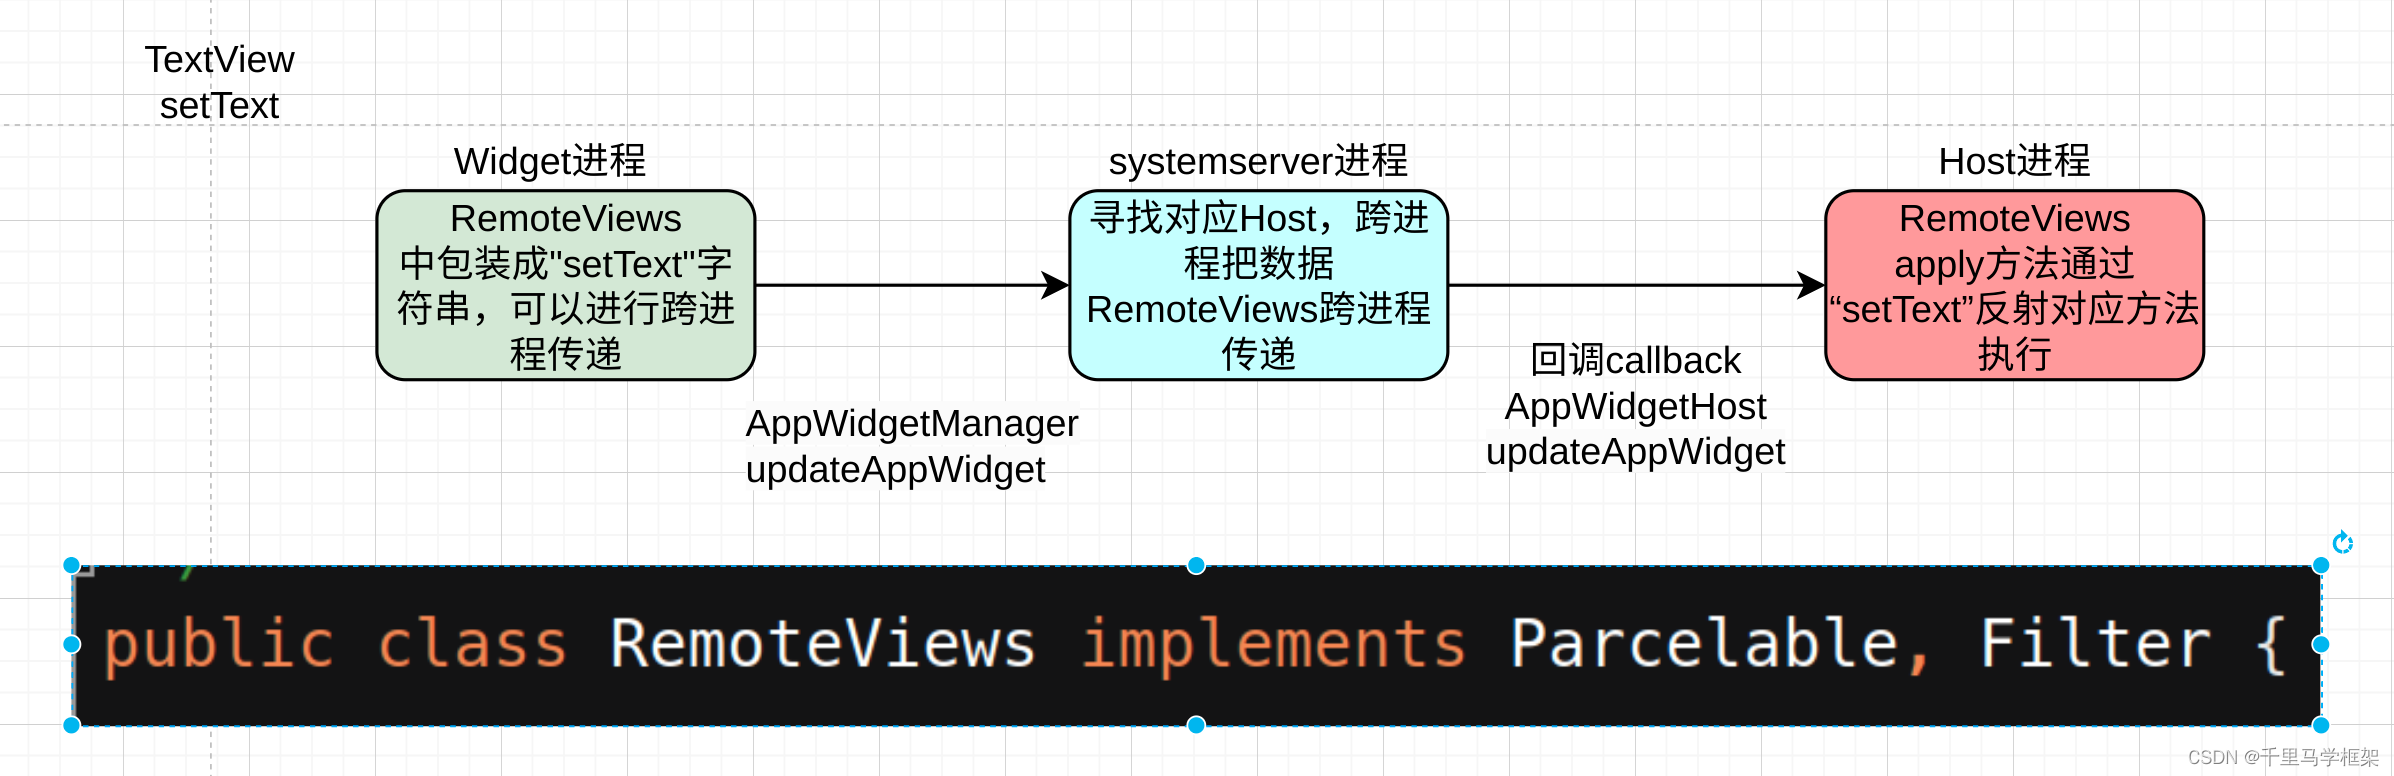
可以看出RemoteViews本质就是个可以进行跨进程控制显示view的媒介,没有像控制自己view那么的方便,对应view的控制接口都需要一一转化,所以还是很不灵活,而且这里注意了,因为view种类可能很多,但是remoteviews就只有固定一些,不支持随意各种view或者自定义

5、widget开发部分
AppWidgetProviderInfo object
Describes the metadata for an App Widget, such as the App Widget's layout, update frequency, and the AppWidgetProvider class. This should be defined in XML.
AppWidgetProvider class implementation
Defines the basic methods that allow you to programmatically interface with the App Widget, based on broadcast events. Through it, you will receive broadcasts when the App Widget is updated, enabled, disabled and deleted.
1 准备好AppWidgetProviderInfo信息
AppWidgetProviderInfo 主要来描述Widget的元数据,比如widget的layout,更新频率,一般在xml中进行定义
<appwidget-provider xmlns:android="http://schemas.android.com/apk/res/android"
    android:minWidth="60dp"
    android:minHeight="30dp"
    android:updatePeriodMillis="86400000"
    android:initialLayout="@layout/appwidget_provider"
    android:configure="com.example.android.apis.appwidget.ExampleAppWidgetConfigure"
    android:resizeMode="horizontal"
    >
</appwidget-provider>
最关键的是initialLayout会有初始化布局,即widget默认显示布局,即widget程序如果还没有调用代码的updateWidget前显示的默认布局
layout/appwidget_provider
<TextView xmlns:android="http://schemas.android.com/apk/res/android"
    android:id="@+id/appwidget_text"
    android:layout_width="wrap_content"
    android:layout_height="wrap_content"
    android:background="#ffff00ff"
    android:textColor="#ff000000"
/>
2 准备好AppWidgetProvider实现类
AppWidgetProvider的实现类
以广播为基础,回调通知AppWidget情况,比如更新,enable,disabled等通知
public class ExampleAppWidgetProvider extends AppWidgetProvider {


    @Override
    public void onUpdate(Context context, AppWidgetManager appWidgetManager, int[] appWidgetIds) {


        //省略
    }
    //省略
}
3 在manifest中进行注册
     <receiver android:name=".appwidget.ExampleAppWidgetProvider">
            <meta-data android:name="android.appwidget.provider"
                    android:resource="@xml/appwidget_provider" />
            <intent-filter>
                <action android:name="android.appwidget.action.APPWIDGET_UPDATE" />
            </intent-filter>
        </receiver>
meta-data标签也非常重要,它就是链接上了AppWidgetProviderInfo的xml
4 widget的ui通过代码更新方式
  static void updateAppWidget(Context context, AppWidgetManager appWidgetManager,
            int appWidgetId, String titlePrefix) {


        RemoteViews views = new RemoteViews(context.getPackageName(), R.layout.appwidget_provider);
        views.setTextViewText(R.id.appwidget_text, text);

        // Tell the widget manager
        appWidgetManager.updateAppWidget(appWidgetId, views);
    }
主要通过布局构建出对应的RemoteViews,然后对布局中的具体View进行相关set操作,最后调用appWidgetManager的updateAppWidget方法进行更新AppWidget
相关demo地址,需要下载aosp源码:
aosp/development/samples/ApiDemos/src/com/example/android/apis/appwidget/
widget展示在手机桌面的widget页面,因为前面的widget的manifest配置了,所以桌面才可以扫描展示出来:

拖动到桌面成功后widget显示如下:

6、Widget的显示Host进程详解
在aosp的CarLauncher中其实本身功能代码属于很简单,没有相关appwidget显示的需求点,但是是手机桌面是有完整的作为widgethost的代码部分。所以了解清除怎么作为一个WidgetHost就变得非常关键了。
需要
App widget host: The AppWidgetHost provides the interaction with the AppWidget service for apps that want to embed app widgets in their UI. An AppWidgetHost must have an ID that is unique within the host's own package. This ID remains persistent across all uses of the host. The ID is typically a hard-coded value that you assign in your application.

App widget ID: Each widget instance is assigned a unique ID at the time of binding (see bindAppWidgetIdIfAllowed(), covered in more detail in Binding widgets on this page. The unique ID is obtained by the host using allocateAppWidgetId(). This ID is persistent across the lifetime of the widget, that is, until it is deleted from the host. Any host-specific state (such as the size and location of the widget) should be persisted by the hosting package and associated with the app widget ID.

App widget host view: Think of AppWidgetHostView as a frame that the widget is wrapped in whenever it needs to be displayed. A widget is associated with an AppWidgetHostView every time the widget is inflated by the host. Note the following points:

By default, the system will create an AppWidgetHostView, but the host can create its own subclass of AppWidgetHostView by extending it.
Starting in Android 12 (API level 31), AppWidgetHostView introduces the the setColorResources() and resetColorResources() methods for handling dynamically overloaded colors. The host is responsible for providing the colors to these methods.
AppWidgetHost 负责和系统systemserver的AppWidget service进行相关的交互,每个AppWidgetHost需要有独立的id,也就意味者其实不仅仅只有桌面可以作为host,只是我们平常最常见是桌面,也代表可以有多个host同时显示widget

App widget ID代表每个App Widget实例都会有个独立的id,通过AppWidgetHost的allocateAppWidgetId的方法来获取,主要是在对widget进行binding时候需要这个id,就是bindAppWidgetIdIfAllowed方法需要这个id。
AppWidgetHostView
作为渲染widget的view,负责inflate widget的相关view
需要权限
BIND_APPWIDGET权限级别如下:
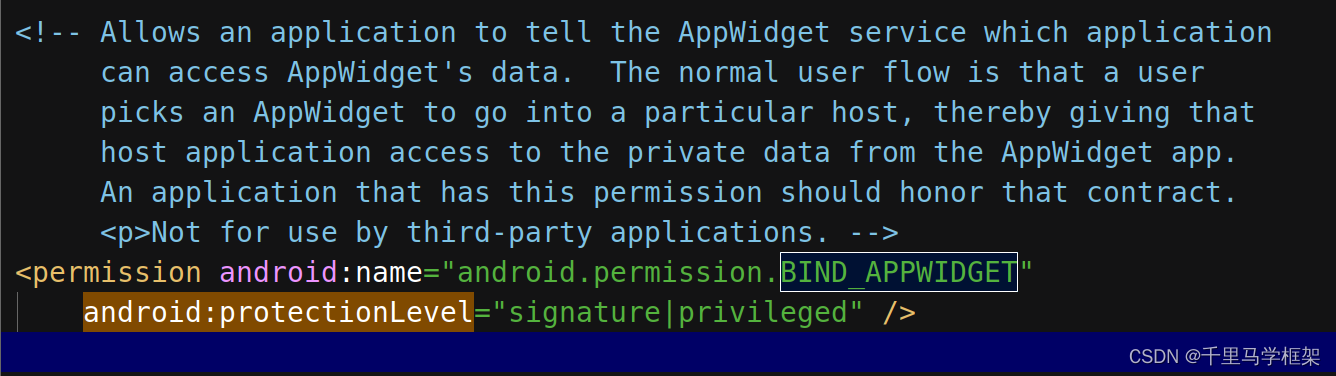 需要有platform签名,或者属于内置priv/app才可以,这点其实CarLauncher一般都是满足的,一般都是platform签名和系统一样。
具体实战分析(参考aosp的源码demo:development/apps/WidgetPreview/src/com/android/widgetpreview/WidgetPreviewActivity.java):
  第一步,根据独特HOST_ID,构造出AppWidgetHost :
  mAppWidgetHost = new AppWidgetHost(getApplicationContext(), APPWIDGET_HOST_ID);
  第二步,AppWidgetHost 申请出独特的widget id:
  int id = mAppWidgetHost.allocateAppWidgetId();
  第三步,用申请的widget id绑定到对应的widget的provider的componentName:
  mAppWidgetManager.bindAppWidgetId(mAppWidgetId, intent.getComponent(), options);
  第四步,获取providerInfo,创建对应的AppWidgetHostView,进行add:
	 AppWidgetProviderInfo providerInfo =
            AppWidgetManager.getInstance(getBaseContext()).getAppWidgetInfo(appWidgetId);
mAppWidgetView = mAppWidgetHost.createView(getBaseContext(), appWidgetId, providerInfo);
mAppWidgetFrame.addView(mAppWidgetView, mPreviewWidth, mPreviewHeight);
 现象演示:
现象演示:
