一、安卓交互功能封装
具体工程创建、模块创建、Java类创建及其他处理此处不在细说,详见:安卓WebView的使用
本文档只是针对指定包名来获取某个应用的图标、名称,并打开此应用。
1、方法调用类
具体代码如下:
import android.content.Context;
import android.content.Intent;
import android.content.pm.ApplicationInfo;
import android.content.pm.PackageManager;
import android.graphics.Bitmap;
import android.graphics.Canvas;
import android.graphics.drawable.Drawable;
import android.util.Log;

import java.io.ByteArrayOutputStream;

public class GetApplicationListUtils {
    private Context mContext;
    private static GetApplicationListUtils mGetApplicationListUtils = null;

    public GetApplicationListUtils(Context context) {
        this.mContext = context;
    }


    public static GetApplicationListUtils getInstance(Context context){
        if (mGetApplicationListUtils == null) {
            mGetApplicationListUtils = new GetApplicationListUtils(context);
        }
        return mGetApplicationListUtils;
    }

    //通过包名获取应用图标
    public byte[] getDrawableIconByPackageName(String packageName) {
        Drawable icon = getAppIcon(packageName);
        Bitmap bitmap = drawableToBitmap(icon);
        return bitmapToByte(bitmap);
    }

    //获取应用图标
    private Drawable getAppIcon(String packageName) {
        try {
            PackageManager pm = mContext.getPackageManager();
            ApplicationInfo info = pm.getApplicationInfo(packageName, 0);
            Log.i("GetApplicationListUtils","getAppIcon");
            return info.loadIcon(pm);
        } catch (Exception e) {
            e.printStackTrace();
            Log.i("GetApplicationListUtils","Exception");
            return null;
        }
    }

    //Drawable转Bitmap
    private Bitmap drawableToBitmap(Drawable drawable){
        //取drawable的长宽
        int width = drawable.getIntrinsicWidth();
        int height = drawable.getIntrinsicHeight();
        //取drawable的颜色格式
        Bitmap.Config config = Bitmap.Config.ARGB_8888;
        //创建对应Bitmap
        Bitmap bitmap = Bitmap.createBitmap(width,height,config);
        //建立对应Bitmap的画布
        Canvas canvas = new Canvas(bitmap);
        drawable.setBounds(0,0,width,height);
        //把drawable内容画到画布中
        drawable.draw(canvas);
        Log.i("GetApplicationListUtils","drawableToBitmap");
        return bitmap;
    }

    //Bitmap转Byte
    private byte[] bitmapToByte(Bitmap bitmap){
        ByteArrayOutputStream stream = new ByteArrayOutputStream();
        bitmap.compress(Bitmap.CompressFormat.PNG, 100, stream);
        Log.i("GetApplicationListUtils","bitmapToByte");
        return stream.toByteArray();
    }

    //通过包名获取应用名称
    public String getApplicationNameByPackageName(String packageName) {
        String name;
        PackageManager pm = mContext.getPackageManager();
        try {
            name = pm.getApplicationLabel(pm.getApplicationInfo(packageName, PackageManager.GET_META_DATA)).toString();
        } catch (android.content.pm.PackageManager.NameNotFoundException e) {
            name = "";
        }
        return name;
    }

    //通过包名打开应用
    public void StartApp(String packageName) {
        try {
            Intent intent = mContext.getPackageManager().getLaunchIntentForPackage(packageName);
            mContext.startActivity(intent);
        } catch (Exception exception) {}
    }
}
2、注意事项
(1)Drawable转Bitmap
获取应用图标后,会得到Drawable格式数据,需要将其转化为Bitmap,之后再次转化为Byte数组,以便后续Unity调用。
1)Bitmap获取
安卓10.0,即API Level 29以下版本,可以直接使用((BitmapDrawable)drawable).getBitmap()获取Bitmap;
安卓API Level 29(包括29)以上版本,((BitmapDrawable)drawable).getBitmap()失效,需要通过Bitmap.createBitmap(width,height,config)方式来获取Bitmap。
2)Bitmap.Config选择
为了保证有透明通道图标的正常显示,可以选用Bitmap.Config.ARGB_8888。
3)画布设置
画布需要设置,不然图标显示位置有问题。即以下代码不可缺少。
//建立对应Bitmap的画布
Canvas canvas = new Canvas(bitmap);
drawable.setBounds(0,0,width,height);
//把drawable内容画到画布中
drawable.draw(canvas);
二、Unity调用
1、AAR包放置
直接将AAR包拖放至Unity的Assets-->Plugins-->Android路径下。
2、创建C#脚本,调用AAR包
写入以下内容,用来调用AAR包里的函数接口。
using System.Collections;
using System.Collections.Generic;
using UnityEngine;
using UnityEngine.UI;
public class LauncherManager : MonoBehaviour
{
public RawImage appIcon;
public Text appNameText;
private AndroidJavaObject getApplicationListUtils;
private void Awake()
{
AndroidJavaClass unityPlayer = new AndroidJavaClass("com.unity3d.player.UnityPlayer");
AndroidJavaObject currentActivity = unityPlayer.GetStatic<AndroidJavaObject>("currentActivity");
AndroidJavaClass getApplicationListUtilsClass = new AndroidJavaClass("包名.GetApplicationListUtils");
getApplicationListUtils = getApplicationListUtilsClass.CallStatic<AndroidJavaObject>("getInstance", currentActivity);
}
// Start is called before the first frame update
void Start()
{
//获取应用图标数据
byte[] drawableBytes = getApplicationListUtils.Call<byte[]>("getDrawableIconByPackageName", "指定应用包名");
//新建一个Texture2D来加载获得的图像byte[]数据
Texture2D texture2D = new Texture2D(100, 100);
texture2D.LoadImage(drawableBytes);
//在界面上显示获得的应用图标
appIcon.texture = texture2D;
//在界面上显示获得的应用名称
appNameText.text = getApplicationListUtils.Call<string>("getApplicationNameByPackageName", "指定应用包名");
}
//打开应用
public void OpenApplication()
{
getApplicationListUtils.Call("StartApp", "指定应用包名");
}
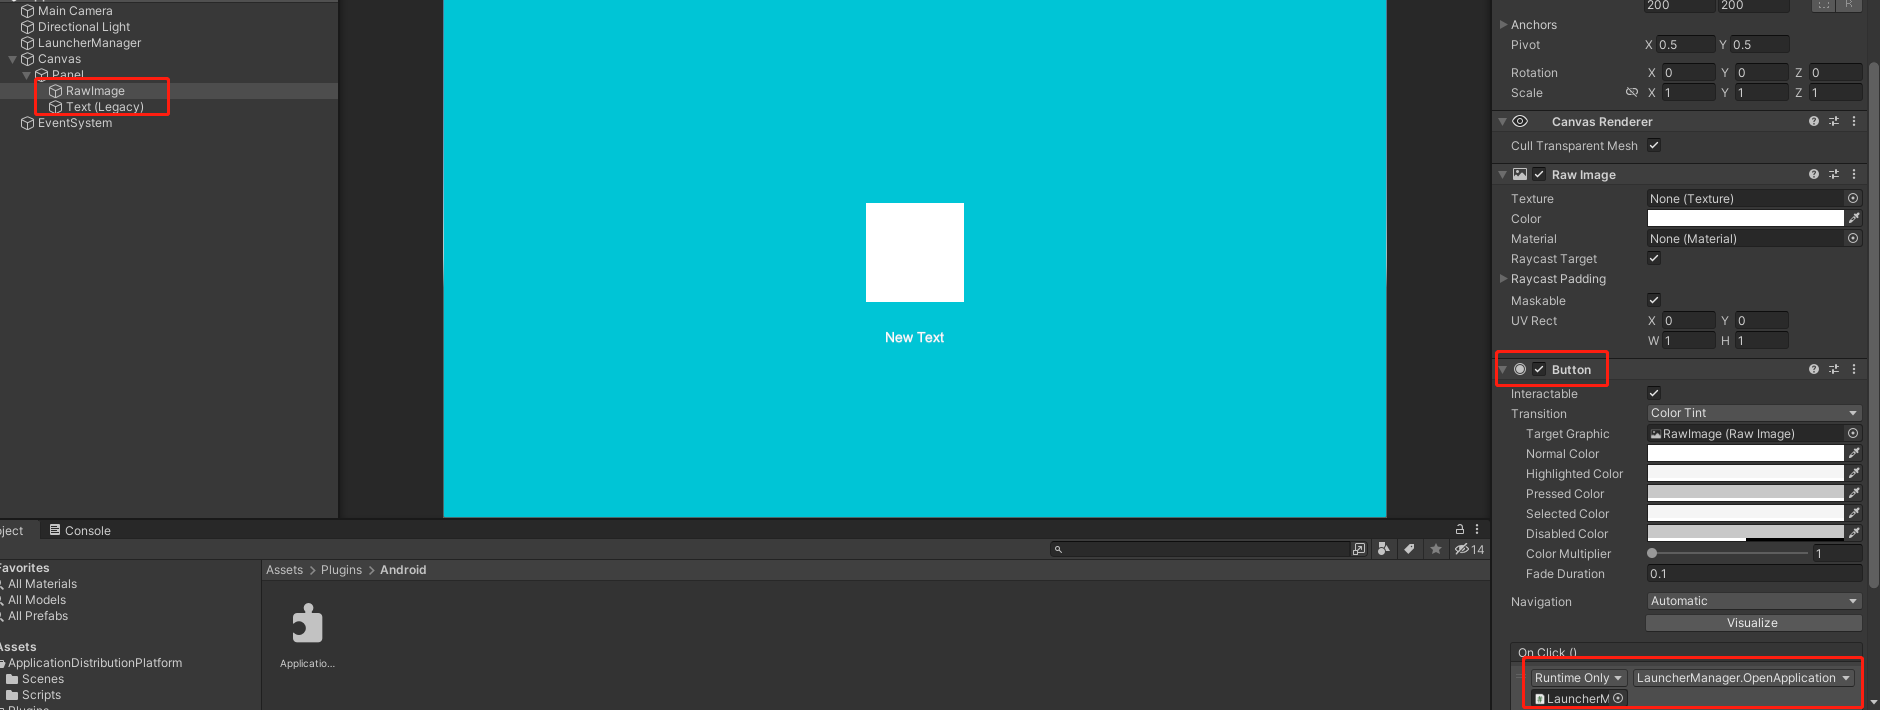
}3、调用测试
在Unity编辑器里创建一个RawImage和Text,前者用来展示应用图标,后者用来展示应用名称。并给RawImage添加Button组件来调用打开应用方法。