原文地址:https://medium.com/coinmonks/using-apis-in-your-ethereum-smart-contract-with-oraclize-95656434292e
Getting data from an outside source onto the blockchain is a non-trivial problem, and one solution is to use Oraclize. There’s already plenty of info out there about the pros and cons of oracles and the technical details behind them, so we won’t go into that. Instead, we’ll walk through how to use Oraclize to connect any web API to a smart contract.
I ran into a few roadblocks as I began trying to learn how to use Oraclize, and couldn’t find much information available online. I expected to find a straightforward, comprehensive tutorial that covered basic queries, verifying proofs, encrypting API keys, and setting up tests, but came up empty. As a result, I decided to write that tutorial to help out others looking for the same thing.
In this article we’ll first set up Remix to work with Oraclize, then we’ll cover writing and encrypting queries. Afterwards, implementing and verifying Oraclize queries in a contract will be discussed. Finally, we’ll get set up with Truffle to write tests for these Oraclize queries. Hope you find this helpful!
Note: Much of the information below came from the Oraclize Documentation and digging through their Gitter. Other references are provided as needed. This tutorial assumes basic knowledge of JavaScript, Solidity, Remix, and Truffle.
Step 0: Wait, What’s Oraclize?
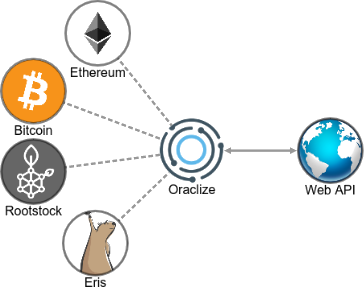
We won’t go into details here about how Oraclize works, as that’s covered in detail on their website. All you need to know for this article is:
- Oraclize provides a way to get outside data from any web API onto the blockchain
- To use it, you’ll use Oraclize’s smart contracts to send a query to Oraclize with your API call. Once they get a result from the API, they call a function named
__callbackin your smart contract and pass it the result as an input.
Step 1: Get Setup with Remix
First things first, lets get our development environment setup. Setting up the environment to write contracts with Oraclize has a few caveats, as Oraclize is not compatible with the JavaScript VM on Remix. It is compatible with the mainnet, Rinkeby, Ropsten, and Kovan, but using a testnet for development would of course be a huge pain and is not recommended.
Fortunately, Oraclize hosts their own patched version of the Remix IDE, which “adds a plugin enabling testing of Ethereum Oraclize-based contracts directly from the browser”. Let’s use this to get started.
Configure Remix
After opening the Oraclize version of Remix, you’ll see multiple example files. You’ll also notice the column on the right has many navigation icons, and the fourth one from the left (the Oraclize tab) might have a red exclamation mark over it. If it does, click this and you’ll see the image below.

This is an easy fix: just click the cube icon third from the left (the Environment tab) and choose the JavaScript VM option. This is opposite of the standard Remix IDE — to use Oraclize with the standard Remix IDE you must use injected Web3, whereas to use Oraclize with the Oraclize Remix IDE you must use the JavaScript VM.
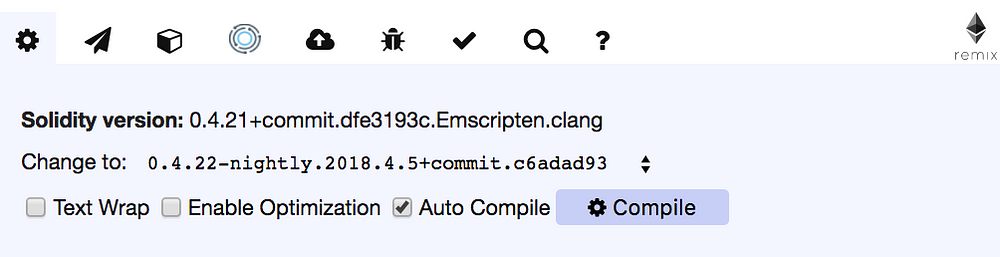
If you try to deploy and use one of these example contracts now, you might get an unhelpful error that says VM Exception: out of gas. If so, click the gear icon towards the left (the Settings tab) and see what compiler is being used. From this comment on a GitHub issue, it seems Solidity version 0.4.21 may have had some breaking changes that are incompatible with Oraclize, so change this to version 0.4.20 or lower. Version 0.4.20+commit.3155dd80 has been working for me and is what I’ll use throughout this article.

Using the red “Create” button, you should now be able to deploy any of the example contracts on the JavaScript VM! These sample contracts are all configured to query Oraclize once deployed, so if you wait a few seconds after deployment you’ll see an event get logged on the right-hand side. This event will display the value returned from the API call.
Using Oraclize Queries
Now is a good time to explain a few simple things about how Oraclize handles gas. You may have noticed you can’t call the update function again to make additional API calls, unless you send Ether with the transaction. This is because of how gas costs are paid using Oraclize. Here’s everything you need to know about gas in regards to Oraclize, straight from the docs:
- For any contract, the first Oraclize query using the default gas parameters is free (gas parameters can be changed, as discussed at the end of Step 3)
- All subsequent requests require the contract to pay for (1) the fee to use Oraclize, and (2) the gas to pay for the callback transaction
- Payments are taken from the contract balance automatically
- If the contract balance is not sufficient to cover gas costs, the request will fail and Oraclize will not return any data (be sure to handle this case in your contract!)
- Unless specified otherwise, the default gas price is 20 Gwei, and the default gas limit for the callback transaction 200,000
- Unspent gas is returned to Oraclize — it is not refunded to your contract
- Prices apply to the mainnet and all testnets, but since prices are paid in Ether, testnet usage is effectively free
- The fees to use Oraclize are shown in the table below, but check the pricing section of the documentation for the most up-to-date prices
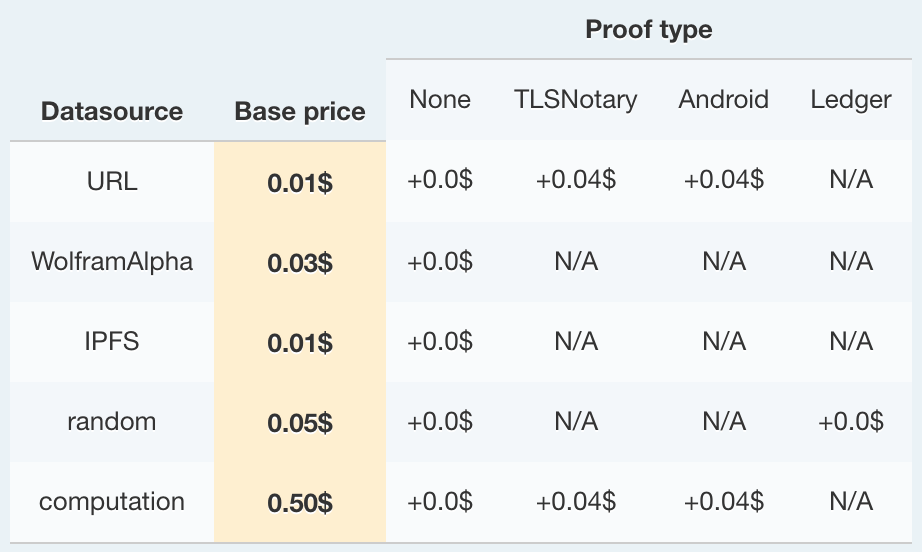
For simplicity throughout this article, we will always make the function that queries Oraclize require a minimum of 0.004 ETH — this comes from the default values of 200,000 gas and 20 Gwei (200,000 gas * 20 Gwei = 4,000,000 Gwei = 0.004 ETH). Another approach is to instead require a sufficient amount of ETH in the constructor. Remember that excess gas is not refunded, so these defaults should be tailored to your specific query to minimize unused gas.
Quick side note that might help later: A small mistake I found myself frequently making was accidentally sending value to a function not specified as payable, and vice versa. Use the second icon from the left (the Transaction tab) to specify the transaction gas limit and value.
Step 2: Get Your Queries Working
You can see some example queries in the sample contracts, but these are too simple for many real-world cases. For example, check out this monster query used by Etheroll.com (don’t worry, you’ll understand this soon as we build up to it).
In this section, we’ll use the random.org API to build our way up to understanding and using our own version of the Etheroll query above. The steps covered here should carry over well to many other APIs. The rest of this subsection is just notes about random number generation. Feel free to skip this if you’re here to use Oraclize with other types of APIs.
Note: Oraclize says the random datasource using s a Ledger Nano S is better for generating random numbers than the random.org API (full whitepaper here). The flip side is that the random.org API is more flexible regarding the range, quantity, and distribution of the returned values. Be aware that the random datasource is not available on the JavaScript VM, and only works on the mainnet and public testnets.
Below is a comment from Oraclize on Gitter regarding the random datasource (random DS). For some reason, you can’t link to specific comments on Gitter unless you found them via Google, so I am pasting the comment below.
The random DS is quite reliable, and in the case there are failures, those are failures built upon strong guarantees, so don’t look at is as a bad thing if every now and then it fails. The failure rate currently is dependent on network quality/orphan rate.
In regards to Random DS vs Random.org web; they have different guarantees. We can have one of our researchers maybe reply with better point about which is better (but in the end it’s just opinion of different peopls [sic]), or you can refer to the Ledger/Random DS proof whitepaper, which if interested in we can link.
To summarize, Random DS gives you a very powerful capability, in that it gives a proof that is verifiable on-chain, which should provide much greater guarantees that there’s no cheating occurring. One downfall is, it uses Ledger’s internal PRNG, but if that is broken or backdoored, there are much bigger risks, as people use Ledger devices to hold millions, and so far none have been compromised apparently due to bad RNG.
Random.org claims true RNG, but you have to remember, they are still a central authority, and you trust them only based on their reputation. The proof that comes alongside, is useful for after-the-fact verification, but it won’t stop ETH from being transferred at the moment, even if there is a compromise with Random.org or any other player in between (this may become possible though with a new technology that will be introduced [referring to ProofShield]). Random DS proof can already do this.
Using Random DS might also be a good way to differentiate oneself, but at the end, it’s up to you to find what the best fit is for your project and clients.
Initial Query Setup
Below is the Etheroll query again so you don’t need to scroll as far.
The easy stuff first: In the above query, the bytes32 rngID = oraclize_query(…) portion is simply how you call Oraclize, where bytes32 is the type of rngID, and rngID corresponds to the Query ID. The Query ID is a returned value provided by Oraclize to help verify the callback result and ensure the callback function is only called once. To ensure the callback for a given query is never inadvertently called twice, it is suggested to store this ID in a mapping when the query is sent, and remove it once you receive a callback from it. This will be shown in the sample contract in Step 3.
Ok, now let’s get a random.org API key for their JSON-RPC API. Keep track of your key, and remember that you don’t want to share this key or allow anyone else to use it. Alternatively, you should be able to follow along using the API key 00000000–0000–0000–0000–000000000000.
Note: Be aware that the JSON-RPC version of random.org API is still in public beta.
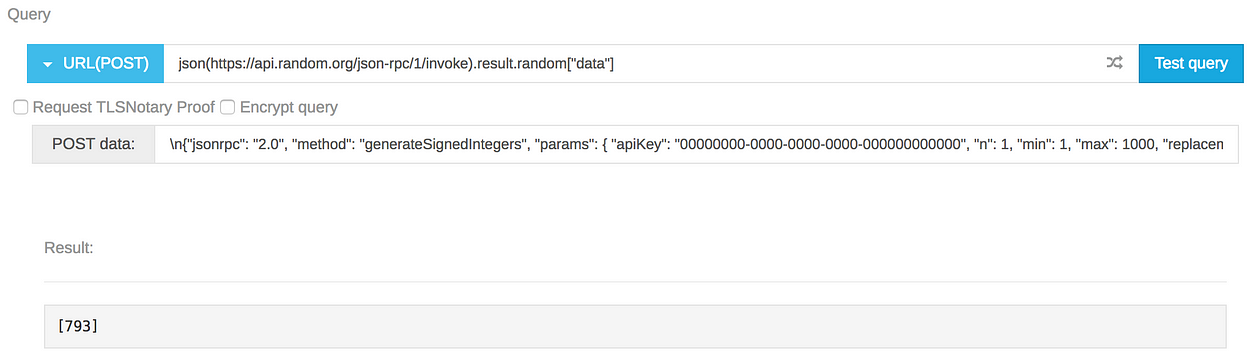
Now, click Introduction from the last URL linked, and there you’ll see that the API is invoked using the URL https://api.random.org/json-rpc/1/invoke. Then go back to the previous page, click Digital Signing, and here you’ll find the signed API methods available for use. In this case, we’ll assume the random number is for a lottery or raffle type of contract where we want to generate one random number, so generateSignedIntegers is the method we want.
Conveniently, Oraclize has a test query tool to help test your queries during development, so we’ll use that to get our random.org query working. Once on that page, you’ll need to change the query type to URL(POST), and enter json(https://api.random.org/json-rpc/1/invoke).result in the field. From the generateSignedIntegers documentation, we know a valid a set of parameters for the POST data looks like this:
{
    "jsonrpc": "2.0",
    "method": "generateSignedIntegers",
    "params": {
        "apiKey": "00000000-0000-0000-0000-000000000000",
        "n": 1,
        "min": 1,
        "max": 1000,
        "replacement": true,
        "base": 10
    },
    "id": 14215
}
Enter this into the field labeled POST Data. Now, even if you try removing all those spaces that carried over, your test query still won’t return anything. This is because you need to put \n before the opening brackets of your POST data. This is needed to “let Oraclize know that you want to send a JSON POST body request and not a POST url-encoded one”. Afterwards, your POST data field should now look like this:
\n{"jsonrpc": "2.0", "method": "generateSignedIntegers", "params": { "apiKey": "00000000-0000-0000-0000-000000000000", "n": 1, "min": 1, "max": 1000, "replacement": true, "base": 10 }, "id": 14215 }
Now your test query will work! (It should work even if you didn’t update the API key).
Note: The test query tool does time out after a bit, so just be aware of that if using the computation data source, which may take a few minutes to complete.
You’ll notice the query returns a lot more than just a random number. We don’t need everything that was returned — we only need the random number — so let’s update the query to reflect that. It should now read:
json(https://api.random.org/json-rpc/1/invoke).result.random["data"]Instead of using .random["data”], we could have used .random.data.0, since we are only returning one number. However, the .random["data"] format is easily adapted to returning other other parameters as well, such as the serialNumber field explained later. Feel free to test this out using a query such as:
json(https://api.random.org/json-rpc/1/invoke).result.random["serialNumber","data"]
Preparing to Add Encryption
Oraclize allows you to encrypt the full query, or just certain parameters. Encrypting the full query means the users have to trust that you’re actually using the API you claim to be using, so instead we only encrypt the API key. This is known as partial encryption.
To encrypt your key Oraclize provides a Python script, which you can find from the Encrypted Queries section of the the docs. Click that link, download the script, and use pip to install any of the required Python packages that you don’t have (likely the cryptography and base58 packages). The script is made for Python 2, so I suggest running it with Python 2 instead of Python 3. To run it, enter the following command in the terminal:
python encrypted_queries_tools.py -e -p 044992e9473b7d90ca54d2886c7addd14a61109af202f1c95e218b0c99eb060c7134c4ae46345d0383ac996185762f04997d6fd6c393c86e4325c469741e64eca9 "PASTE YOUR QUERY HERE"
The query you pasted can be the full query, or just the API key like in our case. For reasons that will become clear later, I prefer to paste the key without the quotes surrounding it, although either approach is ok. So your query should look like this:
python encrypted_queries_tools.py -e -p 044992e9473b7d90ca54d2886c7addd14a61109af202f1c95e218b0c99eb060c7134c4ae46345d0383ac996185762f04997d6fd6c393c86e4325c469741e64eca9 00000000-0000-0000-0000-000000000000
Running this will output the encrypted key. Unfortunately the test query site doesn’t seem to support partially encrypted queries (or if it does, I’ve been doing something wrong), so just keep that encrypted key handy for now.
It is important to be aware that the first contract to query Oraclize with an encrypted query or parameter becomes the “owner” of that encrypted query. If another contract tries to use the same encrypted query, it will receive an empty result. This is done to prevent “replay attacks”, where other users use your exact encrypted query or key. Therefore, you will need to generate a new encrypted key whenever you re-deploy a contract that uses an encrypted query.
Step 3: Implement the Queries into a Contract
Still with me? Good! Because our query is now ready to implement into a contract.
Setup
Head back to Oraclize’s Remix IDE from step 1, make sure it’s still configured properly, and create a new contract like the one shown below.
In the second line we import the Oraclize contracts. You may notice this differs from the documentation, where they instead import oraclizeAPI.sol. This is ok as the two versions are largely similar, but v0.5 is targeted at a newer compiler version and therefore removes many warnings. Be aware that outside of Remix, direct imports from GitHub may not be supported. Instead, you would need to use a local import or just paste the Oraclize code in directly from the oraclizeAPI_0.5.sol contract on GitHub.
If you’re familiar with Oraclize the contract should be pretty clear, but we’ll review it briefly for those who aren’t familiar. In getRandomNumber , we make sure a minimum amount of Ether was sent to cover gas costs, and then we send our API query to Oraclize (where the ... is a placeholder for the query).
Once Oraclize processes our query and retrieves the desired data from the API, it calls our contract’s __callback function. Any logic dependent on the result of the the API call should be done in this function. We don’t want anyone else except Oraclize to call this function, so we first must check the caller. Afterwards, we can save our random number and do whatever else is needed. We currently are not using all the inputs in __callback, but we will in the next section.
Adding Events and Verification
Before we add the query, let’s add some events to the contract. Using events provides two main benefits:
- We can listen for the events during testing and after deployment to make sure things are working properly
- The random.org API we’re using returns a serial number which gets incremented by 1 with each call to the API. Logging this with an event helps keep Oraclize honest by preventing the attack described in this this Etheroll audit report.
If using this on the mainnet, step 2 becomes pretty important and you would certainly want to log the serialNumber field. We won’t do that here, but doing so wouldn’t be too hard. Just modify the appropriate portion of the query to ....result.random["serialNumber","data"] as mentioned above, then use a library such as Nick Johnson’s stringutils library to efficiently parse the returned string.
Adding events is pretty straightforward if you’re familiar with Solidity. We’ll add one event once the query has been sent, and another event once we received the result.
Next we’ll add in the first verification check, which is to request an authenticity proof from Oraclize using the oraclize_setProof function from the imported oraclizeAPI_0.5.sol contract. The default configuration does not request a proof, and therefore Oraclize will not compute a proof. We won’t go into the details of the proofs here, and we’ll simply use the proof type shown in the example from the Oraclize documentation. (You can read more about the proof types here if interested). To request a proof with the callback, just add the following line to the constructor function:
oraclize_setProof(proofType_TLSNotary | proofStorage_IPFS);This line tells Oraclize we want a TLSNotary proof returned to us as a base58-decoded IPFS multihash. The bytes must be encoded to base58 to obtain the IPFS multihash.
If we request a TLSNotary proof without setting IPFS storage, the cost will be much higher and you’ll need to supply more gas. There is currently no reason not to use IPFS, as TLSNotary is not verifiable on-chain without ProofShield. With IPFS, the multihash can be saved and verified off-chain using the proof verification tool. The Network Monitor can also be used to ensure Oraclize is acting honestly.
If Oraclize cannot provide the authenticity proof for technical reasons, the function will still execute but without the requested proof. It’s up to you how to handle this, although Oraclize suggests to toss out the result and create a new query. If you’d like, one idea is to take the random number our API returns, hash it with the proof result, and use that to generate the final random number. This is the approach is taken by the Etheroll contract.
While we currently won’t do anything with this proof here aside from request that it be generated, you’ll soon be able to use it with ProofShield to verify the provided authenticity proofs on-chain. This will allow you to ensure the results you receive have not been tampered with and can be safely used in your contract.
Note: At the time of this writing, proofs on the testnets have been disabled due to some abuse there, so you may see an empty proof there for now. Also, remember from the pricing chart shown earlier that there is a cost to request a proof.
The next verification step is to utilize the Query ID. Recall from earlier that we want to use a mapping to track the Query ID of each request in order to make sure the __callback function is only called once per query. A variable called validIds was added to our contract track this. This process is straightforward and can be easily seen in the updated contract below. This contract also includes the events mentioned earlier and sets the proof type as just discussed.
Adding the Query
Now let’s fill in the query based on the test query we generated earlier. The query will be of the form:
oraclize_query( "nested",
                "[URL] ['POST URL', 'POST Data']",
                customGasLimit);
The nested datasource is needed to allow for partial encryption (i.e. encryption of just the API key, not the full query). The second parameter consists of a [URL] flag, indicating our data source is an HTTP API. Then we’ll need to specify the POST URL used in our test query, and the JSON POST Data object used in our test query. The final parameter here allows us to use a gas limit other than the default value. It’s optional, so we’ll ignore that for now.
Now that we’re using Solidity, you’ll need to escape all the quotes in the URL and JSON POST data used in the test query earlier. So, starting with the test query shown, you should end up with the code snippet that follows.
Update the test contract above and play around with it a bit to make sure everything is working right. You should see the events getting logged in the column on the right. If not, you might have something wrong in the query. Navigate to the fourth tab from the left (the Oraclize tab) and click on a query. This will open a tab with details of that query, including any error messages.
Encrypting the Query
Next, dig up that encrypted API key we made earlier since we’ll now add that in. We’ll use the decrypt datasource to replace the API key with its encrypted counterpart. This takes the form ${[decrypt] EncryptedAPIKey}, resulting in the updated function below. Notice how our ${[decrypt] ...} section is surrounded by quotes. This is necessary because we encrypted our API key earlier without quotes. Had we instead encrypted the key using escaped quotes, these would be unnecessary.
Aside from the addition of the decrypt parameter, you’ll notice there’s also a new string in the POST data — ${[identity] \"}\"} . This datasource is not well explained in the docs, but the Oraclize team was able to help me out on Gitter. I’ll relay the explanation here: Notice how for the decrypt data source we must use } as a delimiter for the subquery. But we also need to use the same type of closing braces in our JSON POST Data. Since } is a special character for delimiting subqueries, we need to escape the braces that we want to include in the JSON. So the ${[identity] \"}\"} segment ensures everything within the quotes (i.e. just the } in this case) gets included as part of the JSON POST data itself, as opposed to delimiting subqueries. Hopefully I explained that well.
Play around with this a bit more and make sure everything works, and once you’ve got it up and running we’ll finish up by modifying the gas parameters.
Customizing Gas Parameters
With the tougher parts out of the way, let’s finish off this section with something easy and simply modify the gas parameters to minimize wasted gas. 20 Gwei is a reasonable gas price to ensure queries are still completed somewhat quickly during network congestion, but perhaps we’re not concerned with that. At the time of this writing, ETH Gas Station tells us that a gas price of 1 Gwei will still give us reasonably fast confirmation times, so let’s use that price.
From playing around with some test queries on Remix, it seems we should be ok if we lower the gas limit to 175,000. We’ll define a constant called gasLimitForOraclize and pass this value into the oraclize_query function to change the gas limit. To change the gas price, we use a function from the Oraclize contract called oraclize_setCustomGasPrice and call it in our constructor. The final version of our template is shown below, with the updated gas parameters added. Notice that the require statement in the getRandomNumber function was also updated to reflect the new gas settings.
And that’s it! If you’ve made it this far you should have a pretty solid understanding of Oraclize and know how to use it properly and securely with any API. The final step is to configure your local environment for automated testing.
Step 4: Configure Your Local Environment
With our smart contract ready to go, we’ll now move everything over to a local environment for testing. I’ll be using VSCode, but any editor should suffice.
Initial Setup
Below are brief descriptions of the packages we’ll need, followed by the npm commands to install them all. Truffle, Ganache-CLI, Mocha, and Chai will be used, along with a beta version of web3 1.0.0. A utility called ethereum-bridge is also needed to link our local Ganache blockchain with Oraclize.
truffle: Ethereum development framework used compiling and deploying smart contractsganache-cli: Runs a personal, local Ethereum blockchain for testsmocha: JavaScript testing frameworkchai: Assertion library capable of pairing with any testing frameworkweb3: Used to interact with the blockchain for testing and front-end development (I prefer using the 1.0.0 beta, but feel free to use a different version if you’d like)ethereum-bridge: Enables our personal Ethereum blockchain to interact with Oraclize
First, make sure Truffle and Ganache-CLI are installed globally with the command npm install -g truffle ganache-cli.
Then in your project root, install Mocha, Chai, and web3 using the command npm install --save mocha chai [email protected].
The only thing left now is ethereum-bridge. Head to the ethereum-bridgerepository and git clone (or download) this somewhere else on your computer, completely independent of this project, and run npm install in the new ethereum-bridge folder. This ethereum-bridge folder can now be used with any project you’re working on, not just this one.
Now we’ll add the contracts to our folder structure and ensure they’re configured properly such that our Template.sol contract can use the Oraclize contract. Somewhere in your project you should have the folder structure shown below (but without the build folder if you haven’t yet compiled the contract). Migrations.sol will be created by Truffle, and you should create blank files for the other two contracts shown, where Template.sol is our contract from the Remix IDE and OraclizeAPI_0.5.sol is copied directly from the source code.

In case you aren’t familiar with truffle, I recommend learning the basics to understand the files shown here and how everything should be configured. To make sure we’re on the same page, the contents of 2_deploy_contracts.jsand truffle.js are shown below.
Now head back to the Template.sol contract, as we need to make one quick change. Unlike with the Remix IDE, we can no longer import the contract directly from GitHub, which is why we needed to paste the contents of the Oraclize contract into its own .sol file. So simply change the import statement from:
import "github.com/oraclize/ethereum-api/oraclizeAPI_0.5.sol";
to
import "./oraclizeAPI_0.5.sol";
Because I’m using web3 1.0.0 beta, and Truffle comes bundled with an earlier web3 version with a different API, my project has a web3.js file which you’ll see imported later in the Template.test.js file. For completeness, the source code of web3.js is also provided below in case you’d like to use it.
At this point, you should compile the template contract to ensure everything is setup properly so far. If using Truffle, cd to the truffle folder and enter truffle compile in the terminal. Afterwards, you’ll have a truffle/build/contracts folder containing various .json files.
Test Prep
Next we’ll write our tests so that in the next step we can simply run the tests to ensure Oraclize is setup and running properly. We won’t go into the details of the test setup file, so if you’re unfamiliar with testing you might want to check out the Mocha documentation.
Create a file called Template.test.js in the truffle/test folder. Below, you’ll see what our test file looks like. It’s important to not use accounts[9]anywhere for these tests, since we’ll tell Oraclize to use this account for deploying and calling Oraclize transactions. So be sure to only use accounts[0], accounts[1], etc.
In the file below, you’ll see we use two different methods of using events to test Oraclize. In the first method, we utilize the result variable output by the line const result = await template.getRandomNumber(...) function. We search the logs of this variable for the log event that gets fired when a query is sent. If we find this event, then we know our query was successfully sent to Oraclize, since this event is emitted only after the query has been sent.
We have to test the __callback function differently, which takes us to the second method. Since Oraclize — not us — calls the __callback function, we can’t loop through a similar result variable to check if the event fired. Instead, we use define the event we are interested in and use the .watchmethod. We then wrap this in a promise, which forces Mocha to wait for the event to be fired before finishing the test. Since we don’t want to wait forever in case something goes wrong, we use this.timeout at the beginning of our it function to set a limit on the execution time of this test. Once we find the event, we stop watching it using the .stopWatching() method. The API for these methods can be found in the Web3 JavaScript API for 0.2x.x (note that this is not the version 1.0.0 API because the contract instance was instantiated with Truffle, which uses 0.2.x.x).
Then, run truffle test from the truffle folder — your tests should run, but since we haven’t yet set up ethereum-bridge, they will fail.
Ethereum-Bridge Setup
Now we need to setup a bridge between our local Ganache-CLI development blockchain and Oraclize.
First, startup Ganache-CLI from your project root by simply entering ganache-cli in the terminal. Then in a separate terminal window, navigate to the ethereum-bridge folder we created earlier and and run the following command:
node bridge -H localhost:8545 -a 9 --devTo break this command down: node bridge is the main command, and -H localhost:8545 sets the bridge to use port 8545 (this corresponds to the default port used by Ganache-CLI, so change that number if you’re using a different port). The -a 9 section sets the bridge to use account 9 on that port, which is why we can’t use accounts[9] in our tests. You can change this number, but I suggest using 9 as your tests likely won’t need to use all 10 accounts Ganache generates (remember the first account is index 0). If needed, you can configure Ganache to generate, say, 50 accounts, and increase this number to 49. Finally, the --dev flag skips the query ID check and pending queries, and should be used for testing, or whenever Ganache may revert the blockchain state.
After running that command, one section of the output in the terminal will look something like this:
Please add this line to your contract constructor:
OAR = OraclizeAddrResolverI(0x6f485C8BF6fc43eA212E93BBF8ce046C7f1cb475);
However, you don’t need to do that! As seen in this GitHub issue, this is outdated. By default, “the bridge automatically generates and deploys the OAR at a deterministic address.”
Ensure both Ganache-CLI and ethereum-bridge are running. If so, the Ganche terminal should now show countless events called eth_getFilterChanges that are continually being generated. This is expected, as it indicates ethereum-bridge is working and watching for queries.
You can now run the truffle test command again, and if everything was set up correctly, the tests should pass! Woohoo! Give yourself a pat on the back. If you’re having problems or are getting stuck somewhere, feel free to ask a question in the comments.
Happy Oraclizing!