目录

一 taier分布式调度系统
支持的任务类型:
工作流、数据同步、实时采集、Flink
Shell、Python、Spark SQL、Hive SQL、Flink SQL、OceanBase SQL、ClickHouse SQL、Doris SQL、TiDB SQL、MySQL SQL、Vertica SQL、Postgre SQL、SqlServer SQL、Greenplum SQL、MaxCompute SQL、GaussDB SQL、自定义扩展
文档地址(Taier介绍 | Taier (dtstack.github.io))
2.1 flink-on-yarn
flink模式中单机和本地集群版只适合测试使用,不能适应生产生活,因此首先配置flink在yarn集群提交任务的模式
flink-on-yarn一共有3中模式.分别为Session Mode、Per-Job Mode、 Application Mode(1.10.x版本后添加的)
参考(详解Flink中yarn部署模式以及测试_立二拆四i的博客-CSDN博客_flink on yarn部署)
2.1.1 Session Mode
在yarn集群内部初始化一个flink集群常驻,一直运行,除非手工停止,这种模式需要先启动Flink集群,向Yarn申请资源, 资源申请到以后,永远保持不变。以后提交任务都向这里提交。
Session Mode的使用:
在提交Job前要开启yarn-session
参数可以通过 bin/yarn-session.sh --help来查看
优点:flink 集群环境是提前准备好的不需要为每个作业单独创建flink环境。
缺点:1、会⼀直有⼀个程序运⾏在yarn集群中,不管有没有任务提交执⾏,浪费资源。
2、job和job之间共享Flink-Session中的JobManager,资源隔离相对较差。
适⽤场景:离线的大量的小作业的时候可以考虑使⽤这种⽅式
2.1.2 Per-Job模式
直接在YARN上提交FlinkJob,一个Job会对应一个Flink集群,每提交一个作业都会单独向yarn申请资源初始化flink集群,直到作业执行完成,一个作业的失败与否并不会影响下一个作业的正常提交和运行,而且运行完就关闭释放资源,把资源还给yarn集群,资源利⽤更合理,独享Dispatcher和ResourceManager,按需接受资源申请;
优点:1、只有任务需要运⾏时才会开启flink集群;运行完就关闭释放资源,资源利用更合理;
2、job和job之间的资源隔离更加的充分。
缺点:对于小作业不太友好,因为需要不断的像yarn申请开启flink集群。
适⽤场景:适合实时的,⻓时间运⾏的⼤作业调度处理。
2.2 flink-on-yarn部署
由于chunjun最兼容flink-1.12.7
(1)去官网下载flink-1.12.7(Index of /dist/flink)
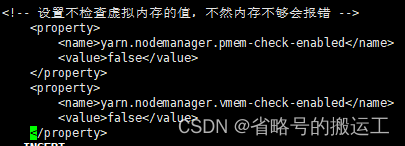
修改hadoop集群中的yarn-site.xml文件,将如下内容添加进去,因为对于flink使用yarn模式下,很容易造成内存超标,这个时候yarn会自动kill掉job
添加完以后分发到每台节点上
(2)vi /etc/profile添加HADOOP_CLASSPATH与HADOOP_CONF_DIR环境变量
(3)vi flink/conf/flink-conf.xml 我的配置当作参考
################################################################################
#  Licensed to the Apache Software Foundation (ASF) under one
#  or more contributor license agreements.  See the NOTICE file
#  distributed with this work for additional information
#  regarding copyright ownership.  The ASF licenses this file
#  to you under the Apache License, Version 2.0 (the
#  "License"); you may not use this file except in compliance
#  with the License.  You may obtain a copy of the License at
#
#      http://www.apache.org/licenses/LICENSE-2.0
#
#  Unless required by applicable law or agreed to in writing, software
#  distributed under the License is distributed on an "AS IS" BASIS,
#  WITHOUT WARRANTIES OR CONDITIONS OF ANY KIND, either express or implied.
#  See the License for the specific language governing permissions and
# limitations under the License.
################################################################################
#==============================================================================
# Common
#==============================================================================
# The external address of the host on which the JobManager runs and can be
# reached by the TaskManagers and any clients which want to connect. This setting
# is only used in Standalone mode and may be overwritten on the JobManager side
# by specifying the --host <hostname> parameter of the bin/jobmanager.sh executable.
# In high availability mode, if you use the bin/start-cluster.sh script and setup
# the conf/masters file, this will be taken care of automatically. Yarn/Mesos
# automatically configure the host name based on the hostname of the node where the
# JobManager runs.
jobmanager.rpc.address: master
# The RPC port where the JobManager is reachable.
jobmanager.rpc.port: 6123
# The total process memory size for the JobManager.
#
# Note this accounts for all memory usage within the JobManager process, including JVM metaspace and other overhead.
jobmanager.memory.process.size: 1600m
# The total process memory size for the TaskManager.
#
# Note this accounts for all memory usage within the TaskManager process, including JVM metaspace and other overhead.
taskmanager.memory.process.size: 1728m
# To exclude JVM metaspace and overhead, please, use total Flink memory size instead of 'taskmanager.memory.process.size'.
# It is not recommended to set both 'taskmanager.memory.process.size' and Flink memory.
#
# taskmanager.memory.flink.size: 1280m
# The number of task slots that each TaskManager offers. Each slot runs one parallel pipeline.
taskmanager.numberOfTaskSlots: 2
# The parallelism used for programs that did not specify and other parallelism.
parallelism.default: 2
# The default file system scheme and authority.
#
# By default file paths without scheme are interpreted relative to the local
# root file system 'file:///'. Use this to override the default and interpret
# relative paths relative to a different file system,
# for example 'hdfs://mynamenode:12345'
#
# fs.default-scheme
#==============================================================================
# High Availability
#==============================================================================
# The high-availability mode. Possible options are 'NONE' or 'zookeeper'.
#
high-availability: zookeeper
# The path where metadata for master recovery is persisted. While ZooKeeper stores
# the small ground truth for checkpoint and leader election, this location stores
# the larger objects, like persisted dataflow graphs.
#
# Must be a durable file system that is accessible from all nodes
# (like HDFS, S3, Ceph, nfs, ...)
#
high-availability.storageDir: hdfs://master:9000/flinkha/
high-availability.zookeeper.path.root: /flink
# The list of ZooKeeper quorum peers that coordinate the high-availability
# setup. This must be a list of the form:
# "host1:clientPort,host2:clientPort,..." (default clientPort: 2181)
#
high-availability.zookeeper.quorum: master:2181,slave1:2181,slave2:2181
# ACL options are based on https://zookeeper.apache.org/doc/r3.1.2/zookeeperProgrammers.html#sc_BuiltinACLSchemes
# It can be either "creator" (ZOO_CREATE_ALL_ACL) or "open" (ZOO_OPEN_ACL_UNSAFE)
# The default value is "open" and it can be changed to "creator" if ZK security is enabled
#
# high-availability.zookeeper.client.acl: open
#==============================================================================
# Rest & web frontend
#==============================================================================
# The port to which the REST client connects to. If rest.bind-port has
# not been specified, then the server will bind to this port as well.
#
rest.port: 8081
# The address to which the REST client will connect to
#
rest.address: master
# Port range for the REST and web server to bind to.
#
#rest.bind-port: 8080-8090
# The address that the REST & web server binds to
#
#rest.bind-address: 0.0.0.0
# Flag to specify whether job submission is enabled from the web-based
# runtime monitor. Uncomment to disable.
#web.submit.enable: false
#==============================================================================
# HistoryServer
#==============================================================================
# The HistoryServer is started and stopped via bin/historyserver.sh (start|stop)
# Directory to upload completed jobs to. Add this directory to the list of
# monitored directories of the HistoryServer as well (see below).
jobmanager.archive.fs.dir: hdfs://master:9000/flink/completed-jobs/
# The address under which the web-based HistoryServer listens.
historyserver.web.address: 0.0.0.0
# The port under which the web-based HistoryServer listens.
historyserver.web.port: 8082
# Comma separated list of directories to monitor for completed jobs.
historyserver.archive.fs.dir: hdfs://master:9000/flink/completed-jobs/
# Interval in milliseconds for refreshing the monitored directories.
historyserver.archive.fs.refresh-interval: 10000
注意本机scala版本,在flink安装包后缀有scala版本号,scala各版本差异较大,必须严格对应
(3)在flink/bin目录下./yarn-session.sh启动yarn-session模式,应该在JobManager启动节点上出现YarnSessionClusterEntrypoint

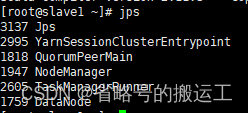
且yarn上应该出现Flinksessioncluster

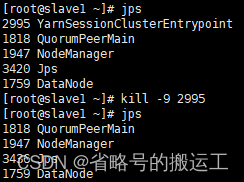
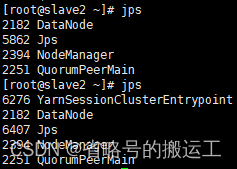
(4)由于之前配置过高可用,在kill掉slave1上的YarnSessionClusterEntrypoint后,该进程会在slave2上继续运行,application会稳定存在
至此本地cluster模式与yarn-session模式配置完成
2.3 taier安装
2.3.1 依赖的环境
我个人的环境如下
zookeeper-3.6.4
flink-1.12.7
Hadoop-2.8.5
yarn
nginx
taier-1.3.0
chunjun-1.12.7
2.3.1 taier集群部署
(1)创建目录taier,将官方安装包移至taier下解压tar –zxvf
vi taier/conf/application.properties //配置文件
(2)在MySQL上创建taier数据库
(3)设置zknode、元数据库、taier服务端口
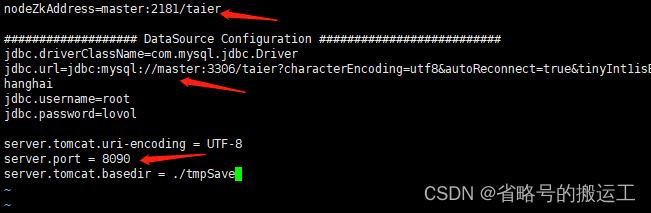
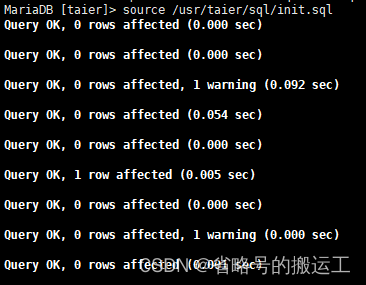
(4)首次运行,选择执行init.sql,创建元数据表
(5)在taier目录下创建logs目录mkdir /usr/taier/logs
(6)修改nginx.conf中的upstream和taier配置
集群模式部署下,不同节点的taier实例使用的MySQL和Zookeeper需要相同
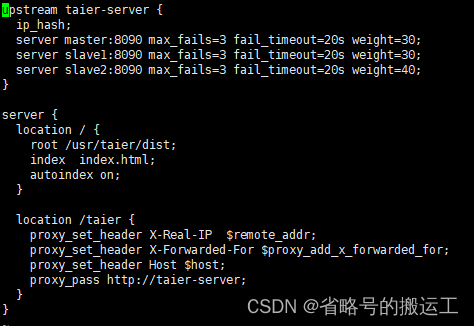
(7)nginx –s reload重启nginx服务
(8)将taier分发至另外两台服务器
(9)分别进入三台服务器sh taier/bin/taier.sh start启动taier进程,可以写个脚本,一次性启动

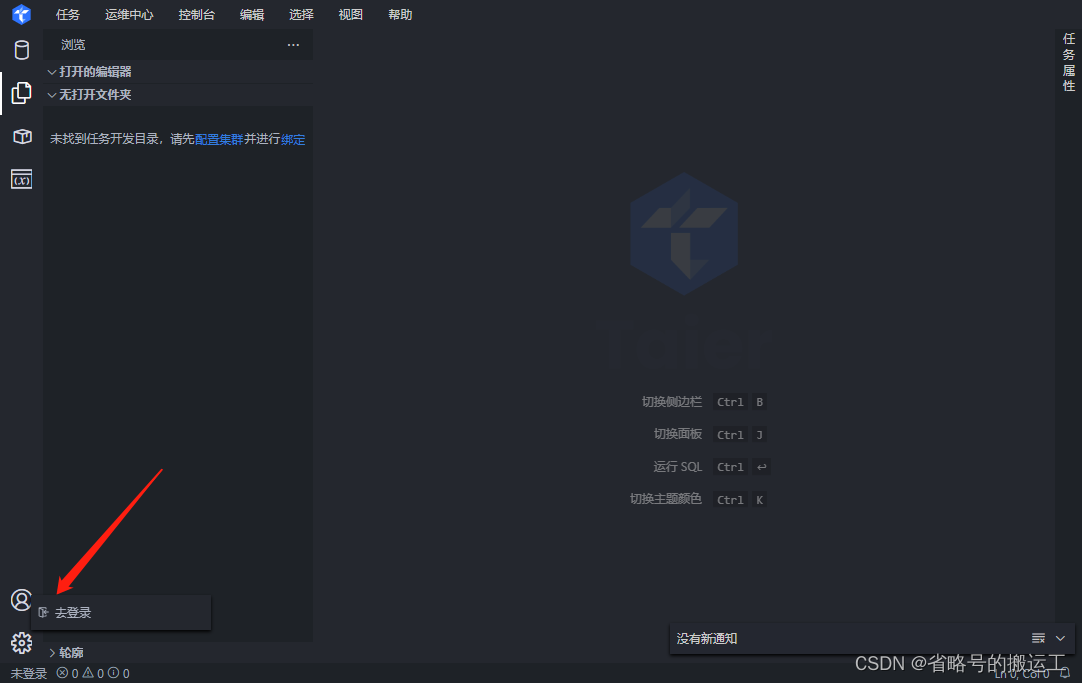
taier使用绑定
(1)进入地址http://${dress}:8090
界面打开后首先左下角登录租户
用户名密码:[email protected]/admin123
(2)点击配置集群

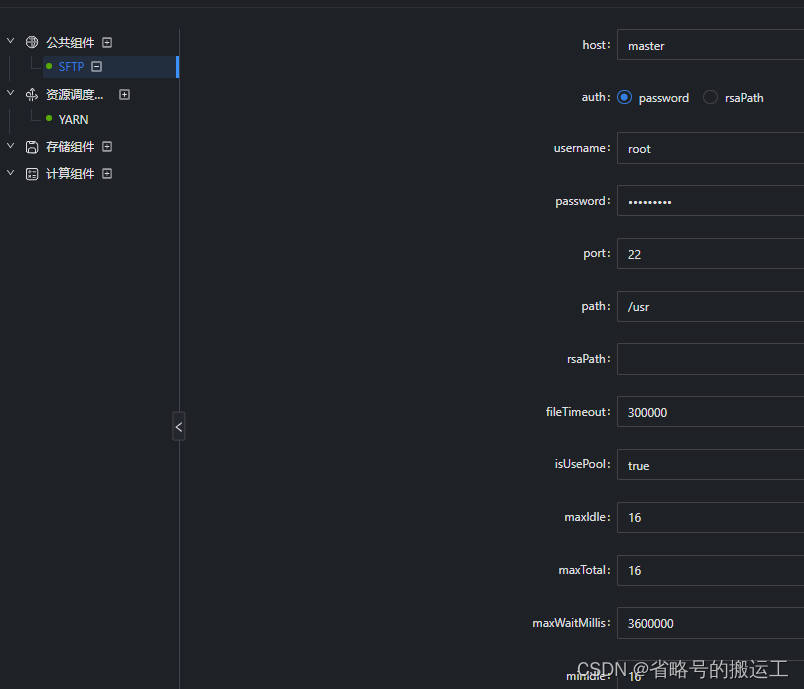
(3)配置sftp
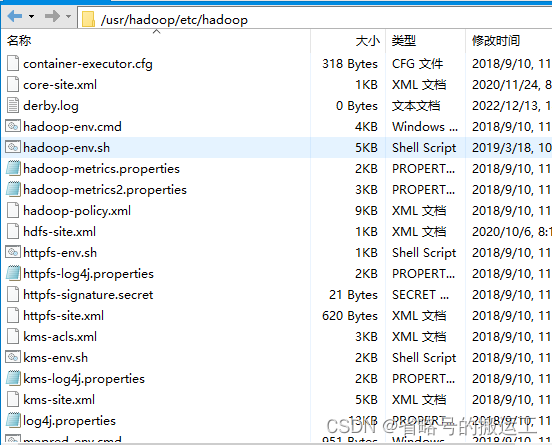
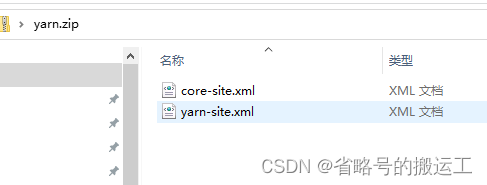
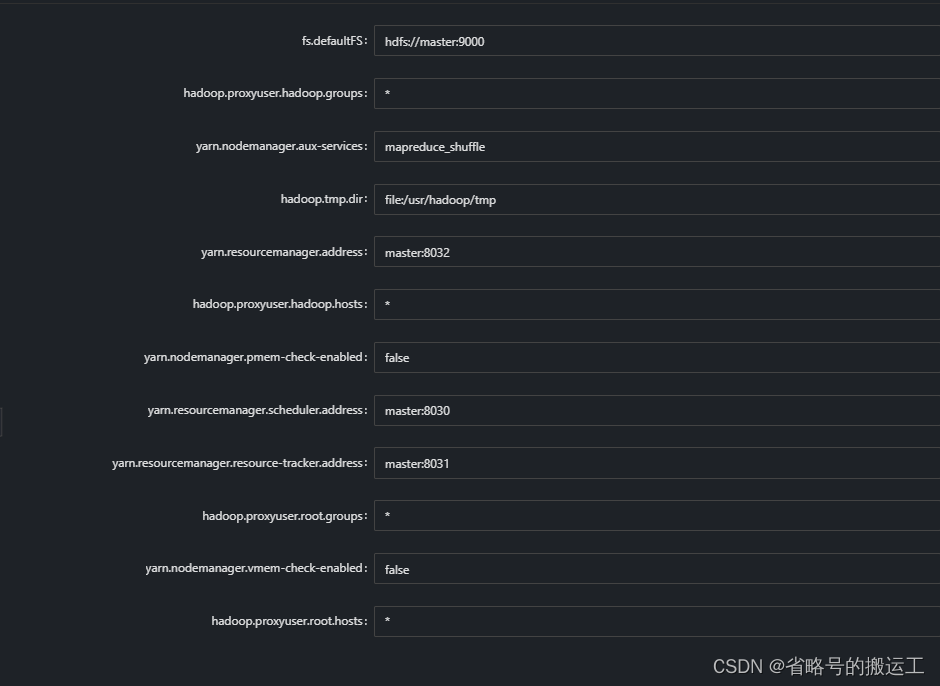
yarn配置需要上传压缩包,将core-site.xml与yarn-site.xml导出并打包上传,taier会读取其中细项

(4)配置hdfs
hdfs配置文件显示有误,压缩包中需要包含hdfs-site.xml

(5)设置计算组件flink
参数内容很多,官网参数配置非常详细,请参照配置
(6)集群配置好后绑定租户

2.4 结合任务详解各参数
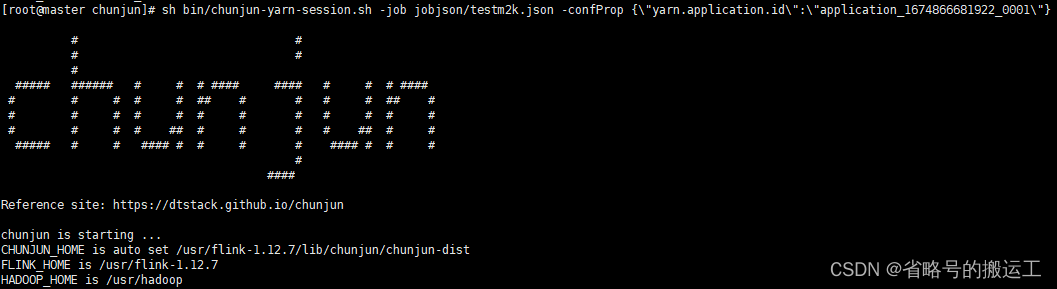
注意在运行taier上数据同步任务前先保证chunjun能够正常提交并运行任务,chunjun的安装非常简单,下载压缩包解压即可,就不详述了
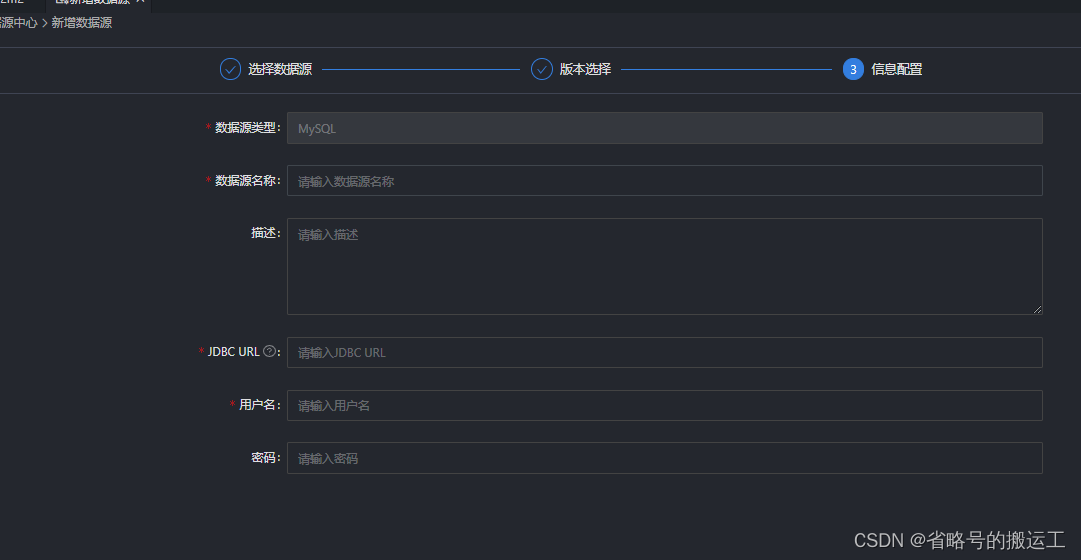
数据源配置
(1)新增数据源

(2)选择数据源类型
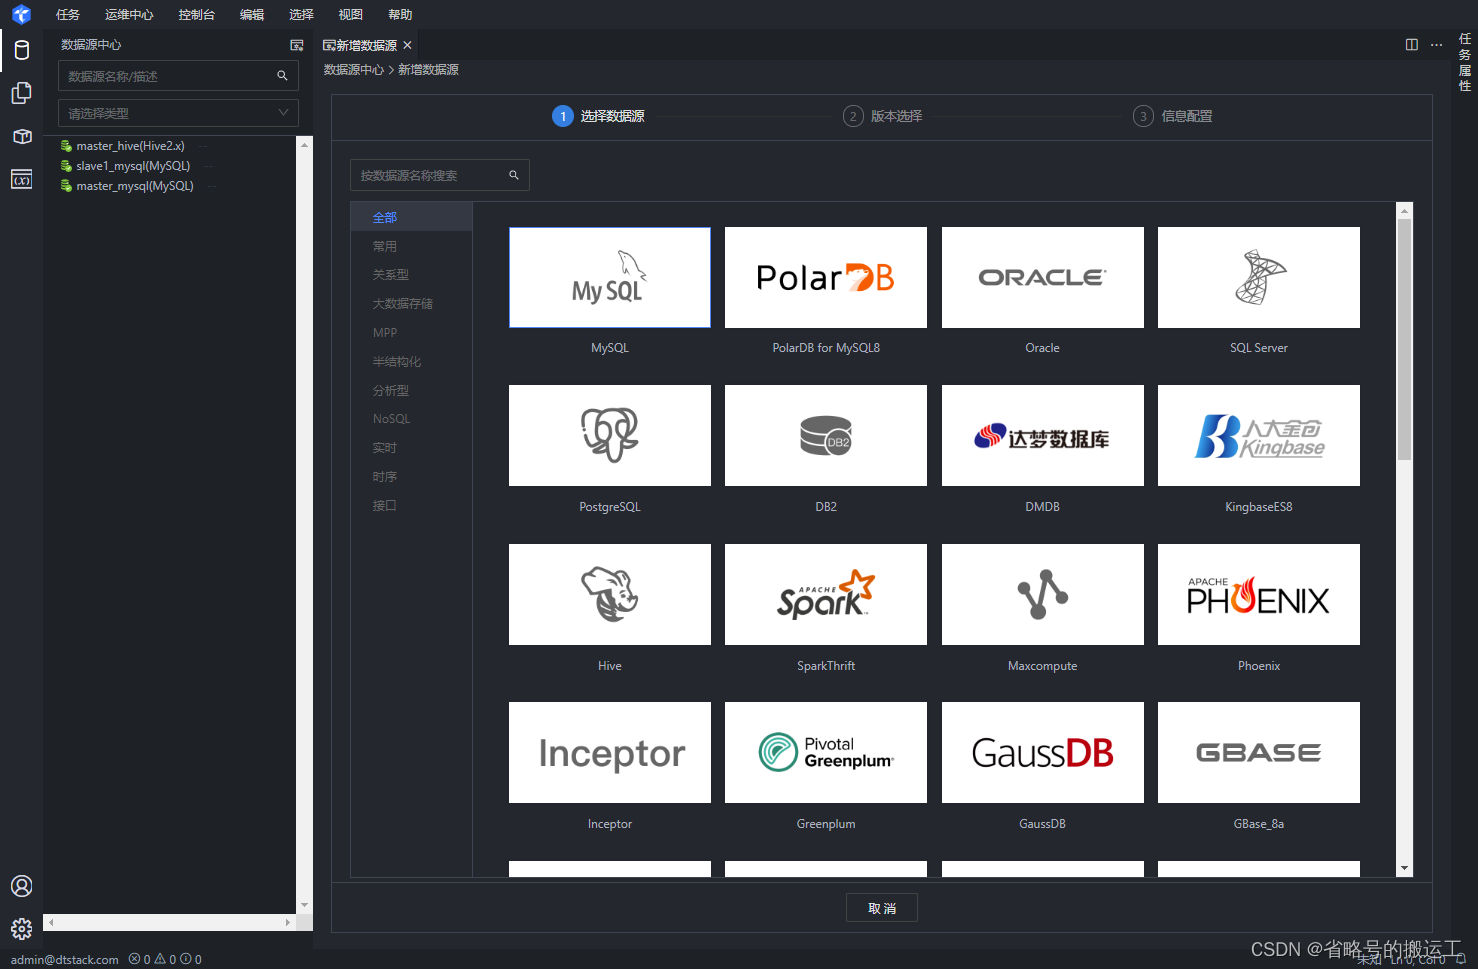
(3)配置数据源
2.4.1 数据同步任务: MySQL<->MySQL
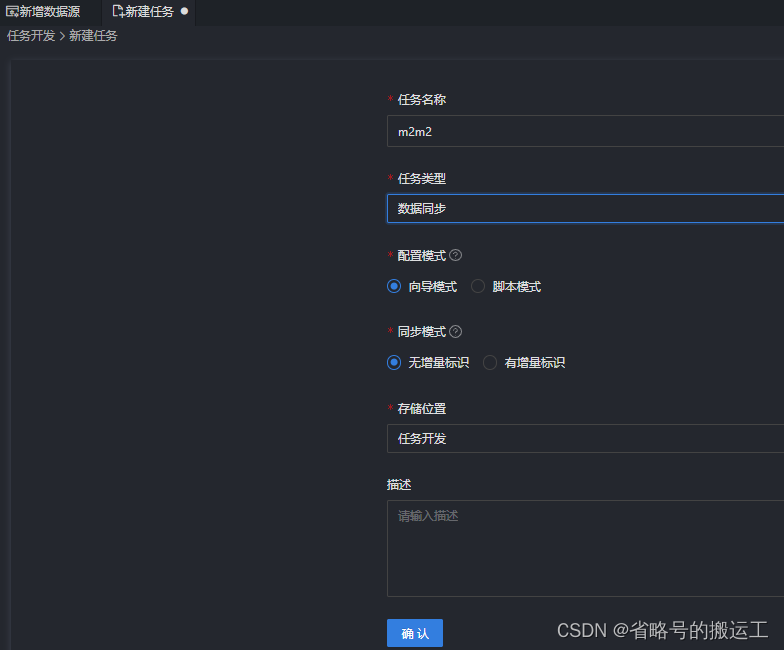
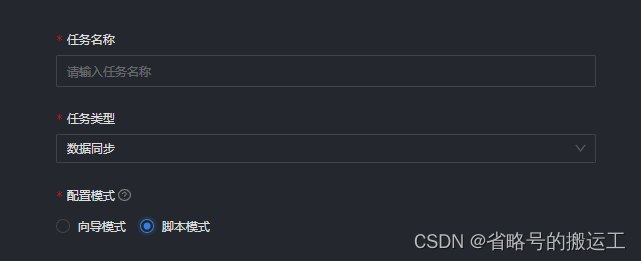
(1)任务-新建任务

(2)设置任务名称,任务类型选择数据同步,使用向导模式,向导模式可以根据用户在图形化界面填写的项自动生成json,非常方便
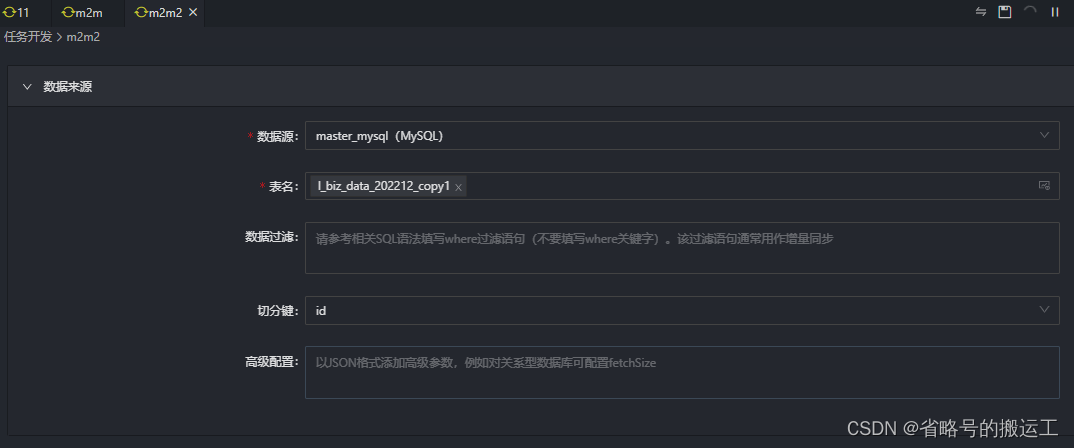
(3)设置数据来源,数据过滤的设置在增量同步中会使用,全量同步空着就好
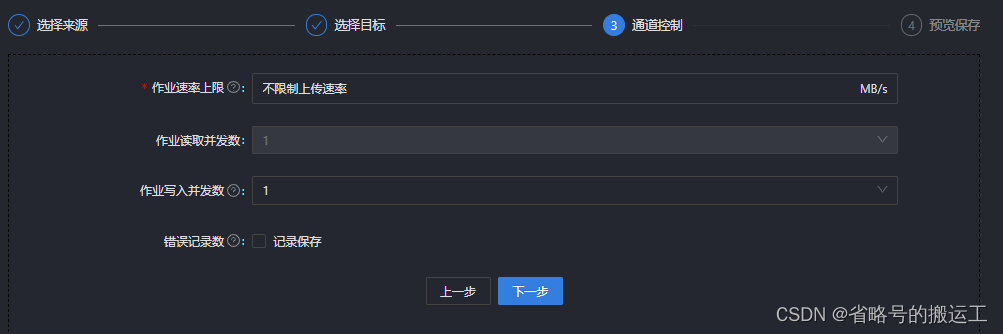
切分键的设置是与通道控制中的并发数配合使用的,建议将主键作为切分键,因为表主键通常情况下比较均匀,因此切分出来的分片也不容易出现数据热点。
目前离线开发目前支持MySQL、Oracle、SQLServer、PostgreSQL、DB2、GBase 8a、达梦、PolarDB for MySQL8、Phoenix、Greenplum,仅支持数值型字段作为切分键,不支持字符串、浮点、日期等其他类型。如果指定了不支持的类型,则忽略切分键功能,使用单通道进行同步
假设MySQL的 tableA 表中,有一个INT类型的字段名为 id 的主键,那么可以在切分键输入框中输入id字段,并在第四步的"作业并发数"中配置为5,则系统会产生5个并发线程同时读取MySQL表,每个任务会根据id字段的值进行数据切分,保证5个并发线程读取的数据是不同的,通过以上机制即可以加速数据读取的速度。
关系型数据库设置作业速率上限和切分键才能根据作业速率上限将表进行切分,只支持数值型作为切分键
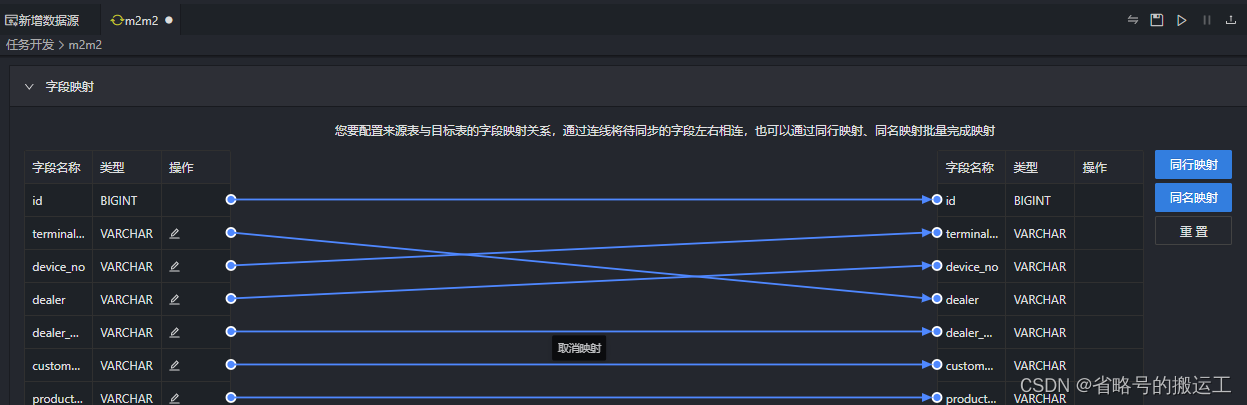
(4)选择目标表
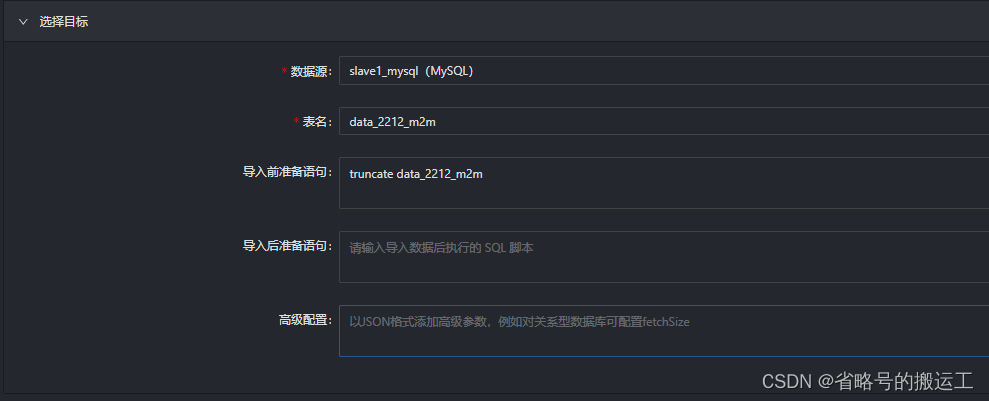
(5)可以一键生成映射
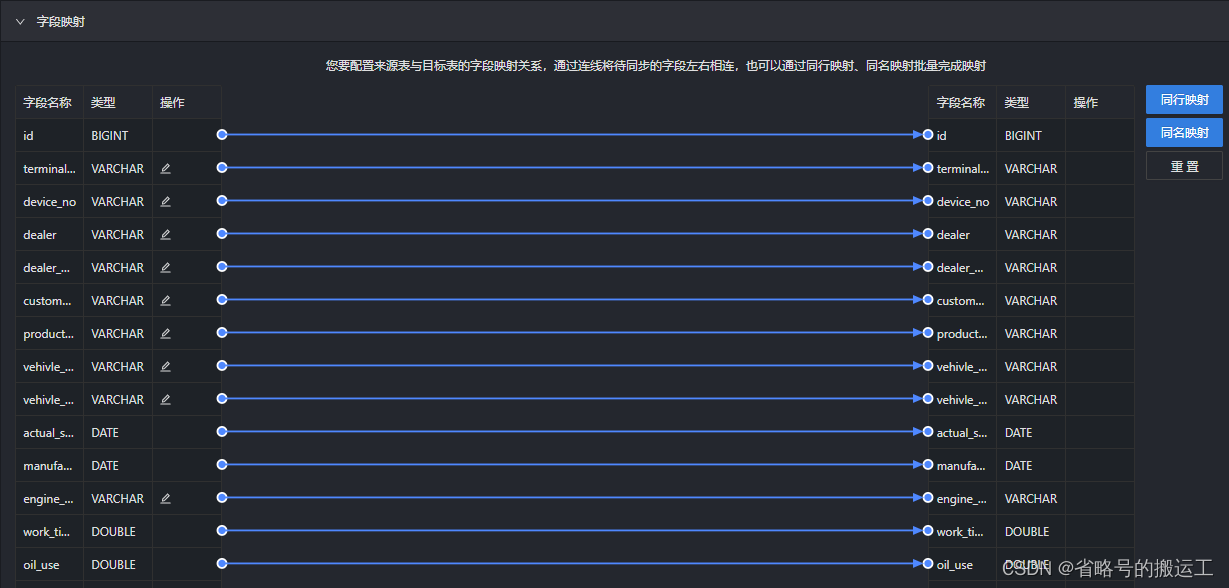
也可以拖动线条,自定义映射
(6)作业并发数需要与数据源配置中的切分键联合发挥作用,系统将一张表的数据切分多个通道并发读取,提高同步速度,如果作业并发数大于1但是没有配置切分键,任务将置为失败。
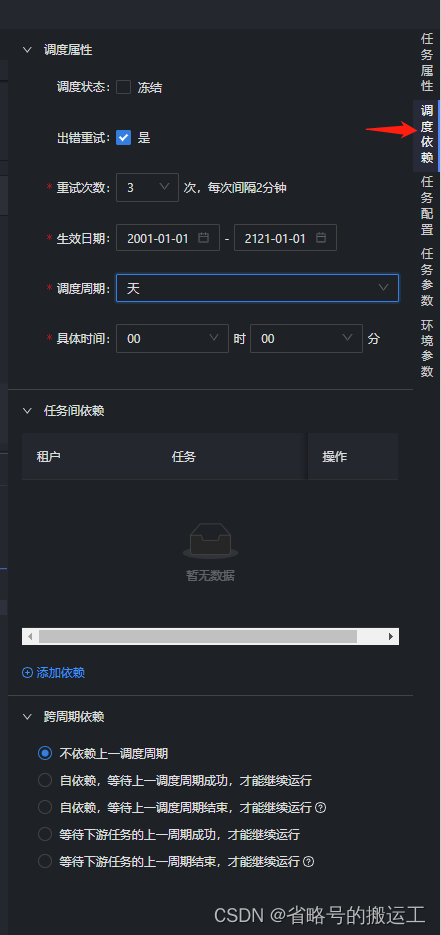
(7)保存后可以单次执行,也可以在后续设置好运行周期后上传至调度中心

(8)右侧调度依赖中可以选择运行周期与任务间依赖,运行周期有分钟、小时、天、周、月,类似datax-web,可以根据选择自动生成corn,任务间依赖可以设置上下游任务与跨周期依赖策略
(9)任务配置中的脏数据管理可以设置任务运行过程中的脏数据上限、脏数据处理失败次数上限、脏数据是否保存以及保存在哪个MySQL数据库中、日志打印频率(若设置保存入库则不打印)

(10)任务参数在之后的增量同步中使用
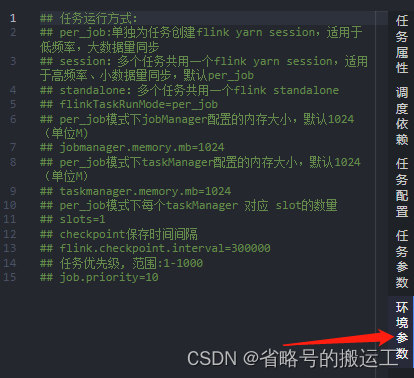
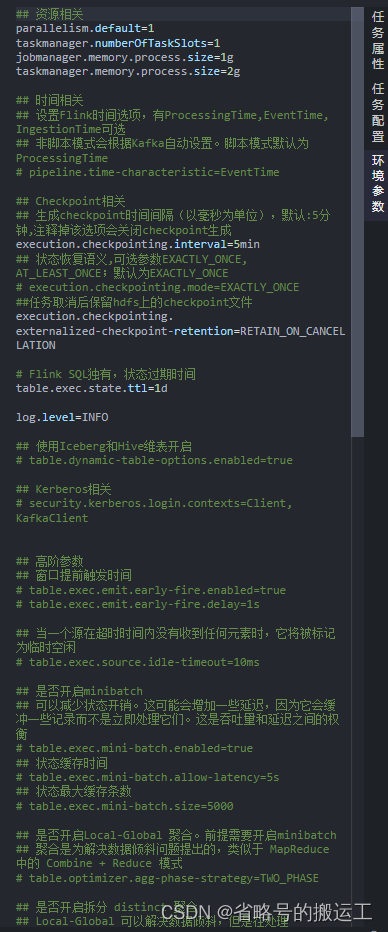
(11)环境参数有数据同步的默认参数信息 可以手动调整数据同步的运行模式以及slot数量等参数
数据同步同步任务默认为session模式,per_job模式需要去掉环境参数中的相应注释
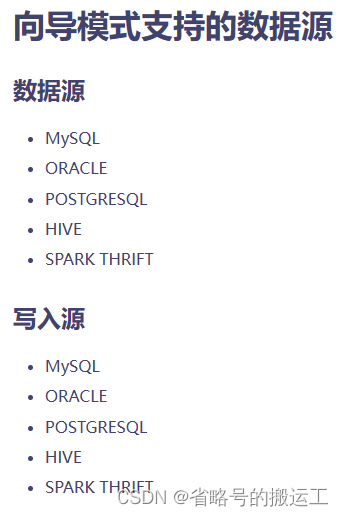
向导模式虽然方便,但目前仅支持下面五种数据源
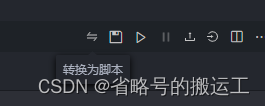
有更精细的设置方式——脚本模式,可以在创建任务时选择。向导模式不支持的数据源可以以此方式编写json
脚本模式支持的数据源
注意导航模式向脚本模式转换是单向不可逆的,转换前请慎重考虑
点击单次运行后界面运行日志

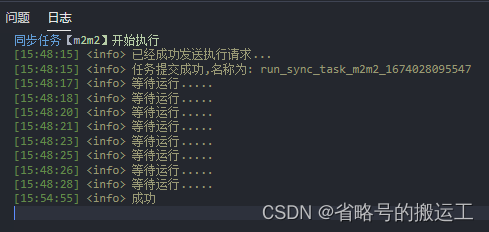
查看任务运行日志会发现实际结束时间是有差别的,实际任务完成的还要更快一点。不过除了调研,了解具体运行时长没有多少价值。单核2G单通道运行的情况下二十八万条数据五分钟同步完成,效果已经不错了

可能的报错
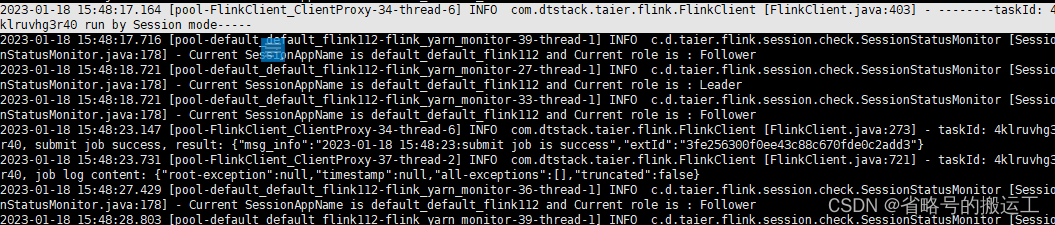
如果使用1.12.5以上chunjun运行时可能会报错:
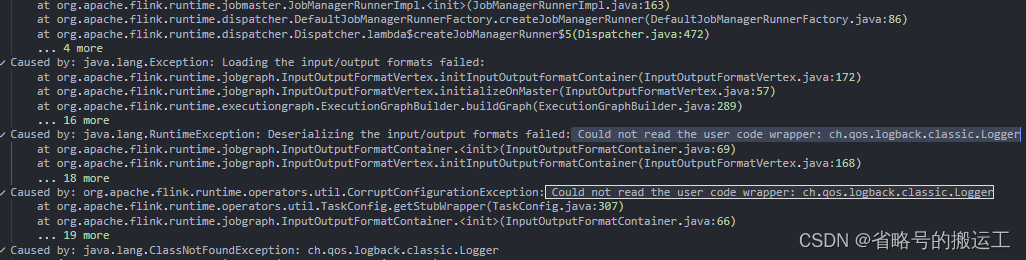
错误原因
chunjun新版本core中将logback的依赖改为了provided,打包时不会产生jar包,导致依赖无法加载
解决办法
自行下载logback的jar包并添加到flink/lib下
logback下载地址
https://mvnrepository.com/artifact/ch.qos.logback/logback-core/1.2.11
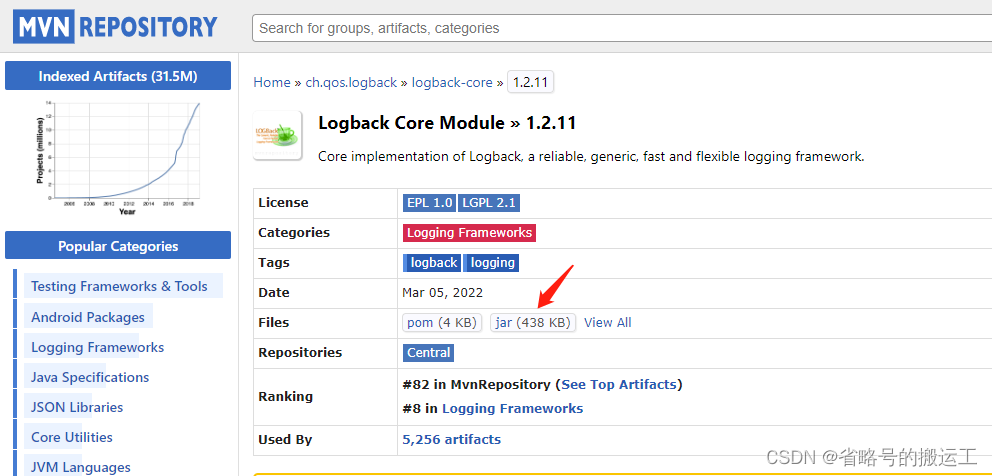
https://mvnrepository.com/artifact/ch.qos.logback/logback-classic/1.2.11

可能的报错:
同一job.json,chunjun中可以正常提交并运行,taier却显示提交失败
执行返回结果异常
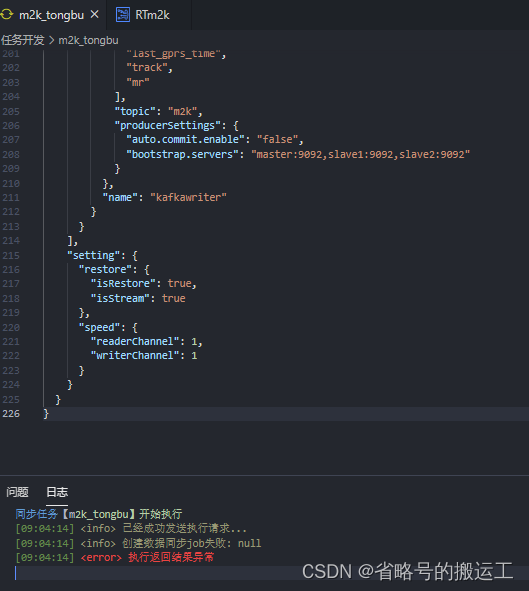
查看日志显示空指针
任务日志taier.log
2023-02-01 11:18:29.981 [http-nio-8090-exec-5] INFO org.springframework.web.servlet.DispatcherServlet [FrameworkServlet.java:547] - Completed initialization in 13 ms
2023-02-01 11:19:07.390 [http-nio-8090-exec-1] WARN c.d.t.d.service.develop.impl.DevelopJobService [DevelopJobService.java:127] - startSyncImmediately-->
com.dtstack.taier.common.exception.TaierDefineException: 创建数据同步job失败: null
at com.dtstack.taier.develop.service.develop.runner.SyncTaskRunner.readyForSyncImmediatelyJob(SyncTaskRunner.java:128)
at com.dtstack.taier.develop.service.develop.impl.DevelopJobService.startSyncImmediately(DevelopJobService.java:106)
错误原因:
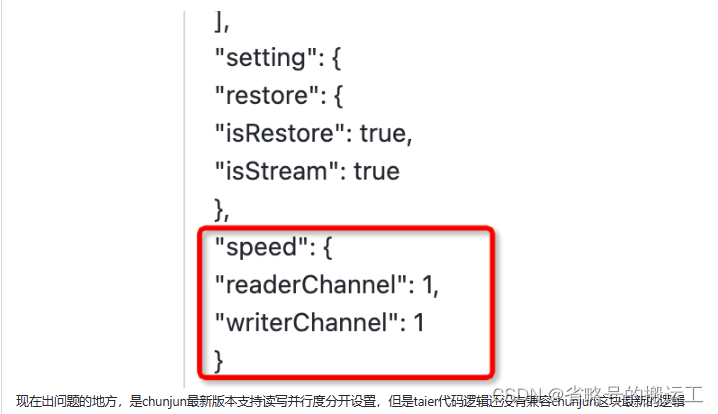
解决办法
临时解决可以先把
"speed": {
"readerChannel": 1,
"writerChannel": 1
}
设置成"speed": {
"channel": 1
}
保存后任务可以正常提交

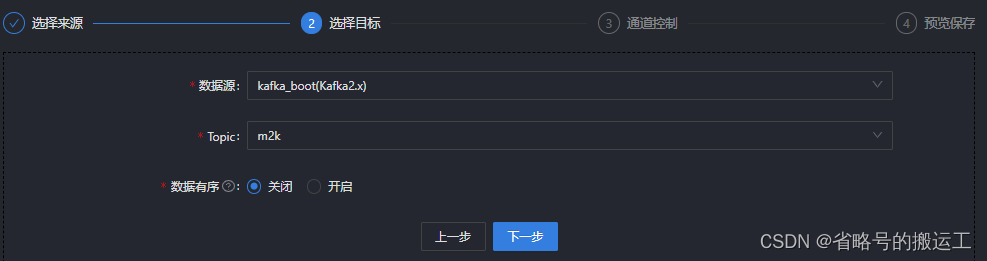
2.4.2 实时采集任务MySQL->kafka
实时采集任务依赖控制台 Flink组件 运行实时采集前请确保对应组件配置正确
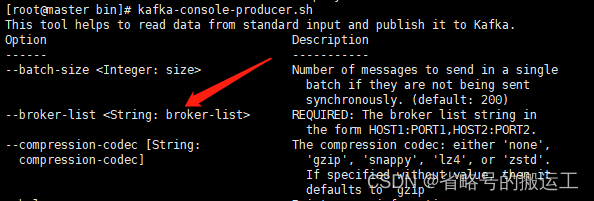
(1)新建kafka数据源
查看kafka生产者消费者创建时参数,若是--broker-list或--bootstrap-server,则证明kafka版本较新,数据源配置时连接方式选择broker地址;若是--zookeeper则连接方式选择集群地址并填入zk节点与端口号

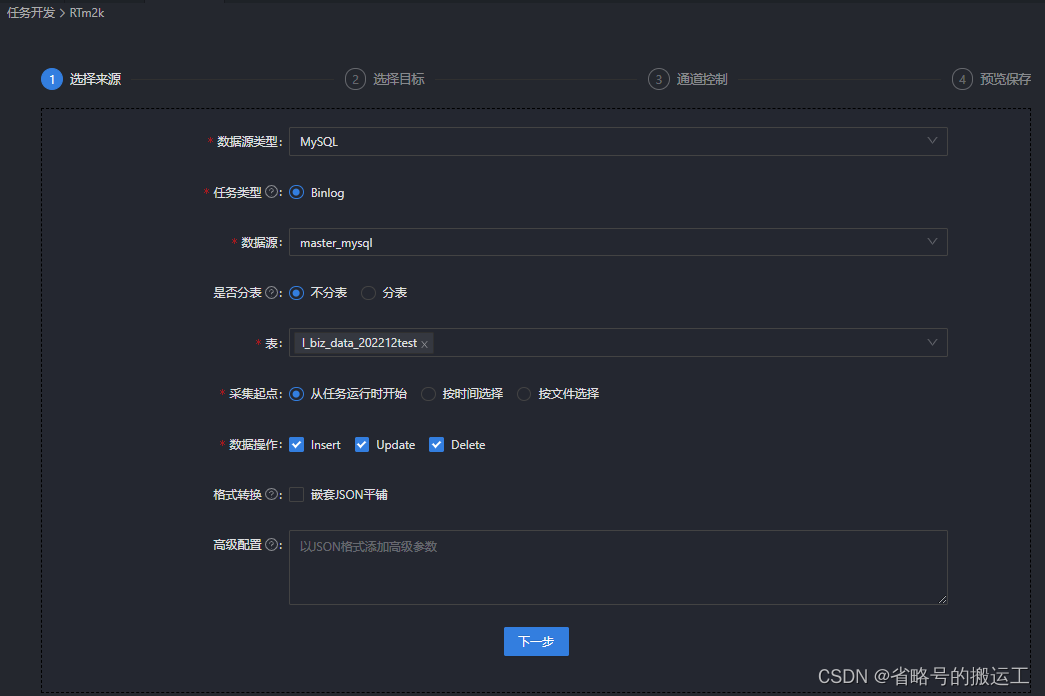
kafka中创建好的topic可以被读取到,可以证明kafka连接成功
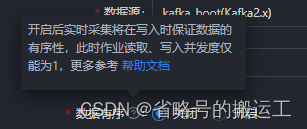
环境参数可以自定义任务调动的资源、flink时间类型(事件时间、接入时间、处理时间)、checkpoint生成保存策略等参数
实时采集任务的数据源为数据库的binlog,若未开启可能出现以下报错
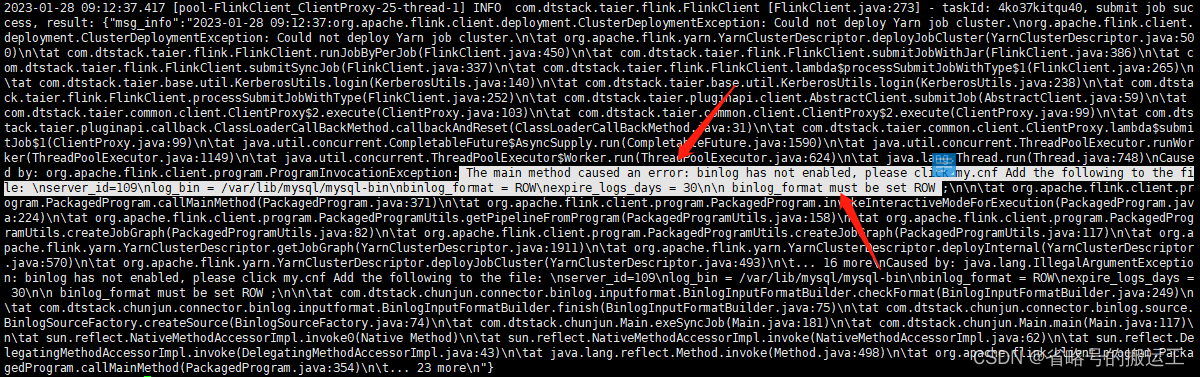
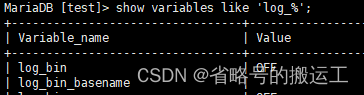
查看是否开启binlog show variables like 'log_%';
修改my.cnf:vi /etc/my.cnf

systemctl restart mysql重启mysql后可以发现binlog开启

将保存后的任务上传至调动中心并提交运行
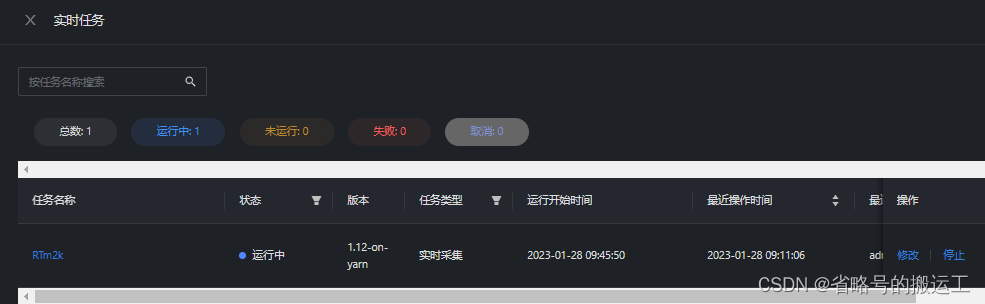
可以看到yarn生成了任务需要的application

由于在任务创建阶段选择了“从任务运行时开始”,所以对MySQL表中数据进行插入后,新的内容会被写入到kafka中
