目录
一、自动路由映射
1、GateWay项目创建
首先启动本地nacos,具体可参考:Nacos Windows安装_雨欲语的博客-CSDN博客
新建工程项目spring_cloud_test,pom引入依赖:
<parent>
        <groupId>org.springframework.boot</groupId>
        <artifactId>spring-boot-starter-parent</artifactId>
        <version>2.5.6</version>
        <relativePath/> <!-- lookup parent from repository -->
    </parent>
    <modelVersion>4.0.0</modelVersion>

    <artifactId>spring_cloud_gateway</artifactId>

    <properties>
        <maven.compiler.source>8</maven.compiler.source>
        <maven.compiler.target>8</maven.compiler.target>
    </properties>

    <dependencies>
        <dependency>
            <groupId>com.alibaba.cloud</groupId>
            <artifactId>spring-cloud-starter-alibaba-nacos-discovery</artifactId>
        </dependency>
        <dependency>
            <groupId>org.springframework.cloud</groupId>
            <artifactId>spring-cloud-starter-openfeign</artifactId>
        </dependency>
        <dependency>
            <groupId>org.springframework.cloud</groupId>
            <artifactId>spring-cloud-starter-loadbalancer</artifactId>
        </dependency>
        <dependency>
            <groupId>org.springframework.cloud</groupId>
            <artifactId>spring-cloud-starter-gateway</artifactId>
        </dependency>
    </dependencies>
创建启动类:
import org.springframework.boot.SpringApplication;
import org.springframework.boot.autoconfigure.SpringBootApplication;


@SpringBootApplication
public class GatewayApplication {
    public static void main(String[] args) {
        SpringApplication.run(GatewayApplication.class, args);
    }
}
新建配置文件:
server:
  port: 9999
spring:
  application:
    name: service-gateway
  cloud: # 配置Spring Cloud相关属性
    gateway:
      discovery: # 配置网关发现机制
        locator: # 配置处理机制
          # 只要请求地址符合规则: http://gatewayIP:gatewayPort/微服务名称/微服务请求地址
          # 网关自动映射。把请求转发到 http://微服务名称/微服务请求地址
          # 如:有微服务,命名是service-one
          # 请求地址是: http://localhost:9999/service-one/nacos/test
          # 自动转发到: http://service-one/nacos/test
          # 商业开发中,enabled一般不设置,使用默认值false。避免不必要的自动转发规则。
          enabled: false # 开启网关自动映射处理逻辑
          lower-case-service-id: true # 开启小写转换
    nacos:
      # nacos用户名和密码
      username: nacos
      password: nacos
      discovery:
        # nacos地址
        server-addr: 127.0.0.1
        group: dev
        namespace: dev
        metadata:
          version: v1.0.0
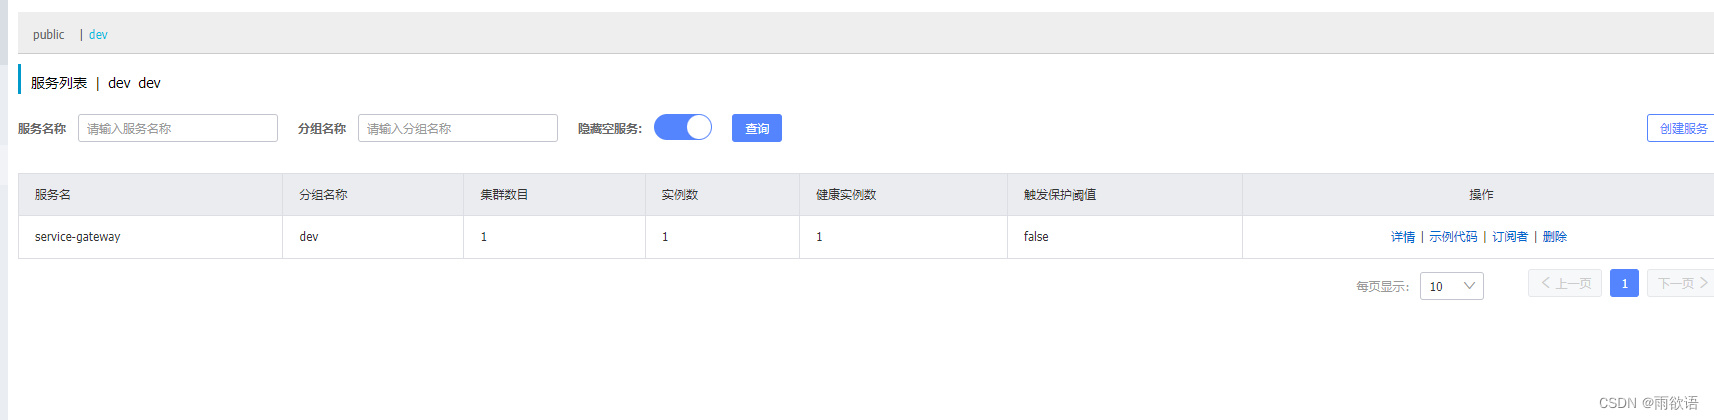
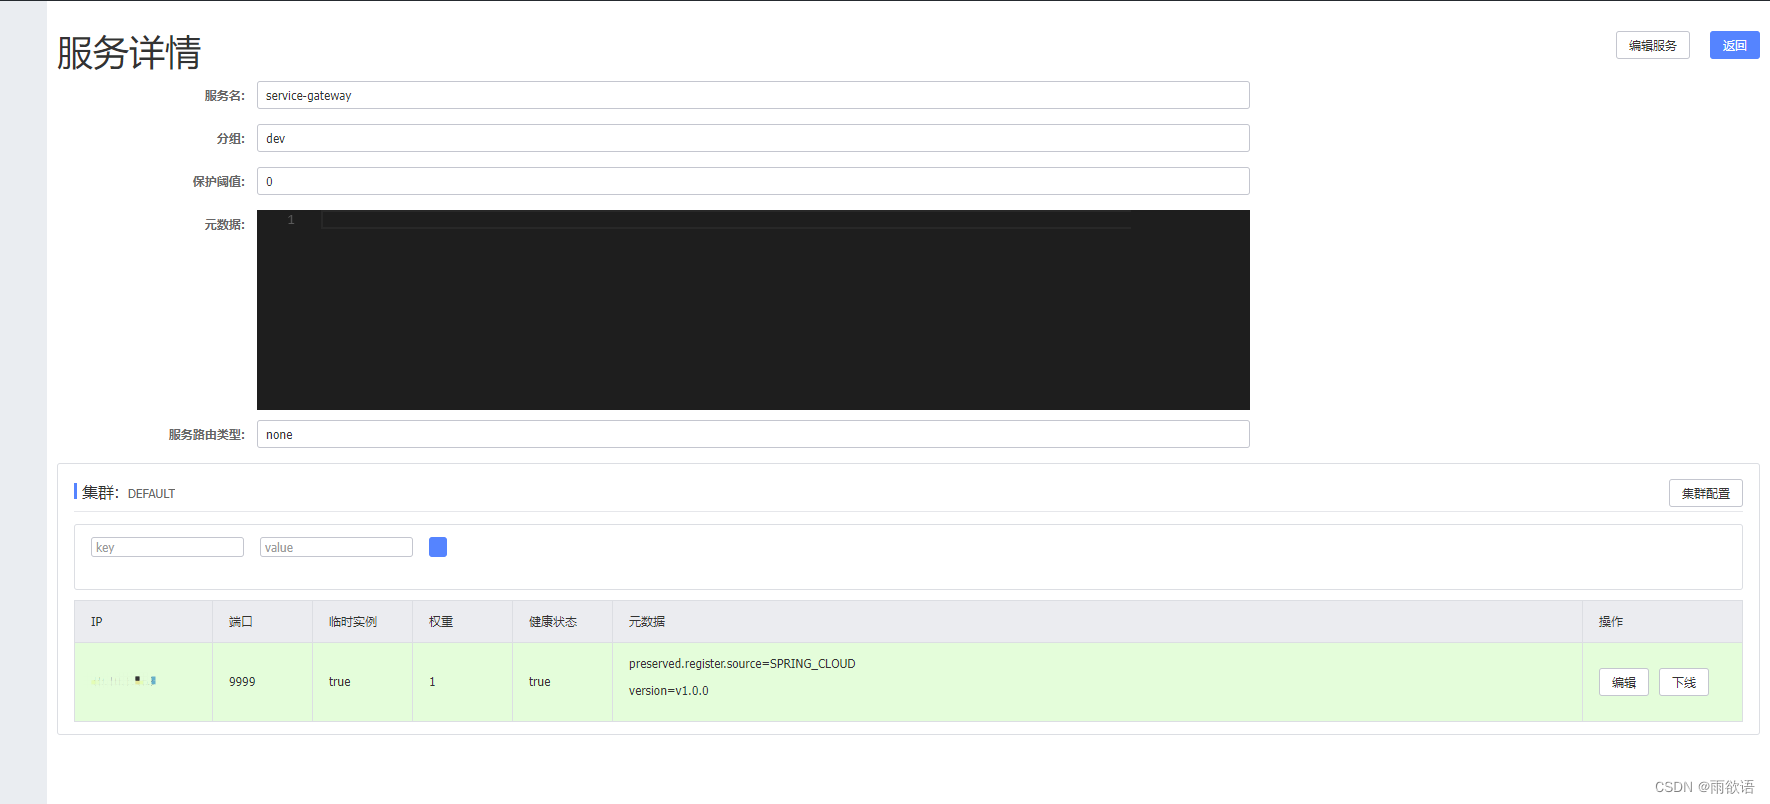
启动项目,然后在nacos中可看见服务注册成功:
2、子项目创建
新建子项目service_one,service_two。
pom引入依赖:
 <parent>
        <groupId>org.springframework.boot</groupId>
        <artifactId>spring-boot-starter-parent</artifactId>
        <version>2.5.6</version>
        <relativePath/> <!-- lookup parent from repository -->
    </parent>
    <modelVersion>4.0.0</modelVersion>

    <artifactId>service_one</artifactId>

    <properties>
        <maven.compiler.source>8</maven.compiler.source>
        <maven.compiler.target>8</maven.compiler.target>
    </properties>

    <dependencies>
        <dependency>
            <groupId>org.springframework.boot</groupId>
            <artifactId>spring-boot-starter-web</artifactId>
        </dependency>
        <dependency>
            <groupId>org.springframework.boot</groupId>
            <artifactId>spring-boot-devtools</artifactId>
            <scope>runtime</scope>
            <optional>true</optional>
        </dependency>
        <dependency>
            <groupId>org.projectlombok</groupId>
            <artifactId>lombok</artifactId>
            <optional>true</optional>
        </dependency>
        <dependency>
            <groupId>org.springframework.boot</groupId>
            <artifactId>spring-boot-starter-test</artifactId>
            <scope>test</scope>
        </dependency>
        <!--Spring Cloud Alibaba Nacos discovery -->
        <dependency>
            <groupId>com.alibaba.cloud</groupId>
            <artifactId>spring-cloud-starter-alibaba-nacos-discovery</artifactId>
        </dependency>

    </dependencies>
启动类:
import org.springframework.boot.SpringApplication;
import org.springframework.boot.autoconfigure.SpringBootApplication;
import org.springframework.cloud.client.discovery.EnableDiscoveryClient;


@SpringBootApplication
@EnableDiscoveryClient
public class OneApplication {
    public static void main(String[] args) {
        SpringApplication.run(OneApplication.class, args);
    }
}
controller:
import org.springframework.web.bind.annotation.GetMapping;
import org.springframework.web.bind.annotation.RequestMapping;
import org.springframework.web.bind.annotation.RestController;

@RestController
@RequestMapping("/nacos")
public class NacosTestController {

    @GetMapping("/test")
    public String test(){
        return "8080";
    }
}
配置文件:
server:
  port: 8080
spring:
  application:
    name: service-one
  cloud:
    nacos:
      username: nacos
      password: nacos
      discovery:
        enabled: true
        register-enabled: true
        server-addr: 127.0.0.1
        group: dev
        namespace: dev
        metadata:
          version: v1.0.0
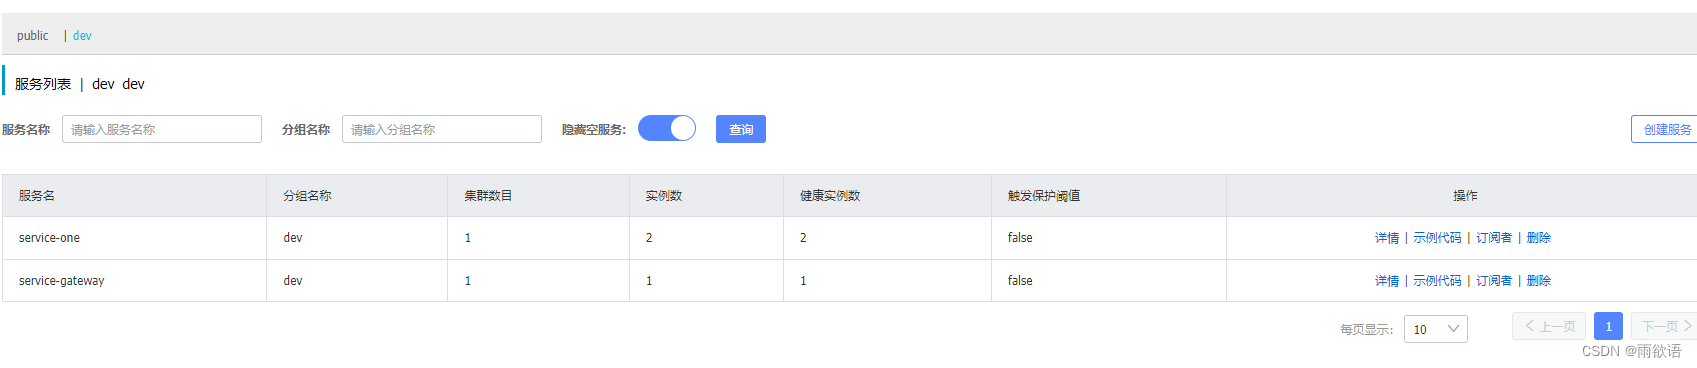
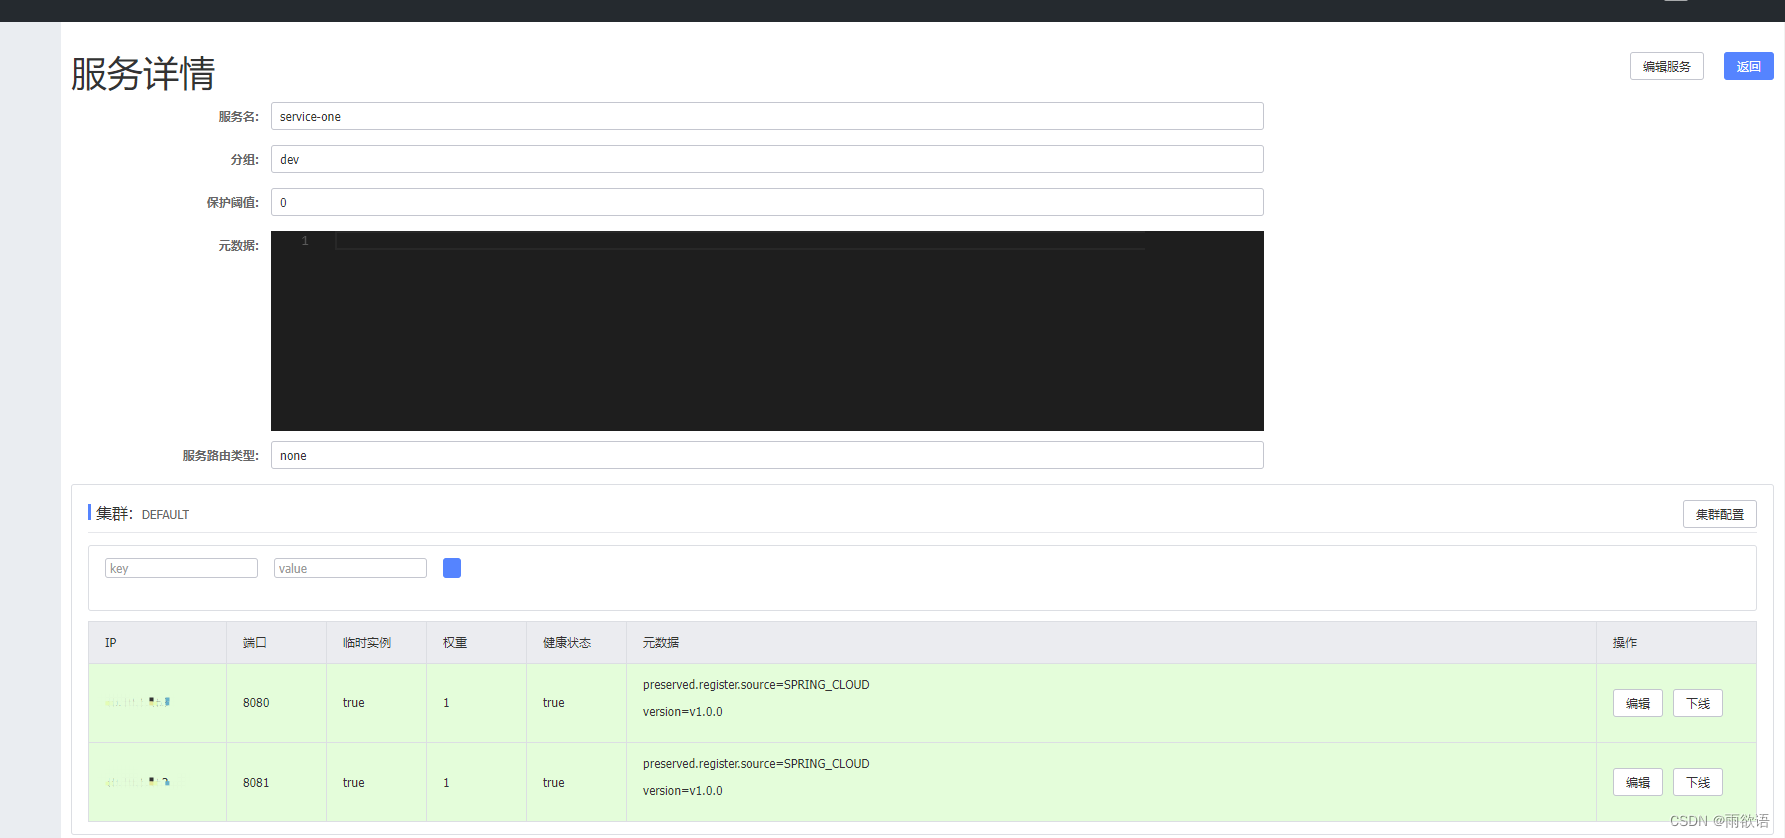
另外一个服务同理,只是换一个port,然后启动,可在nacos看见服务已注册上去:
3、测试调用
本地调用:http://localhost:9999/service-one/nacos/test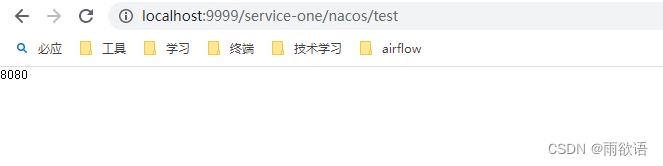
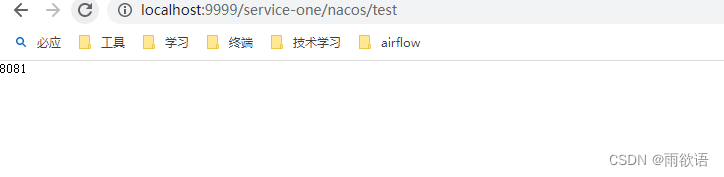
可以看见由gateway进行了自动转发,并且是轮询进行。
二、手动路由配置
1、手动路由配置
手动路由配置其余操作与自动路由配置一样,只是配置文件进行修改:
server:
  port: 9999
spring:
  application:
    name: service-gateway
  cloud: # 配置Spring Cloud相关属性
    gateway:
      discovery: # 配置网关发现机制
        locator: # 配置处理机制
          # 只要请求地址符合规则: http://gatewayIP:gatewayPort/微服务名称/微服务请求地址
          # 网关自动映射。把请求转发到 http://微服务名称/微服务请求地址
          # 如:有微服务,命名是service-one
          # 请求地址是: http://localhost:9999/service-one/nacos/test
          # 自动转发到: http://service-one/nacos/test
          # 商业开发中,enabled一般不设置,使用默认值false。避免不必要的自动转发规则。
          enabled: false # 开启网关自动映射处理逻辑
          lower-case-service-id: true # 开启小写转换
      routes: # 配置网关中的一个完整路由,包括命名,地址,谓词集合(规则),过滤器集合
        - id: service-one # 路由定义的命名,唯一即可。命名规则符合Java中的变量符命名规则
          uri: lb://service-one # 当前路由定义对应的微服务转发地址,lb - 代表loadbalance
          # 谓词/谓词,命名是有一定规则。是GatewayPredicate接口实现的命名前缀,XxxRoutePredicateFactory
          predicates: # 配置谓词集合
            - Path=/service/** # 定义一个谓词。格式: 谓词名字=参数  或者  name: 名字  args: 参数
          filters:
            # 过滤转发地址前缀, 过滤1节
            # 如: 请求地址 - http://localhost:9999/service/nacos/test
            # 对应的谓词, 规则是 /service,符合
            # 对应的uri是 lb://service-one  转换成 http://service-one 且包含负载均衡
            # 转发地址是: http://service-one/service/nacos/test
            # 过滤器是 过滤转发地址前缀, 过滤1节, 即删除 /service -> http://service-one/nacos/test
            - StripPrefix=1
          metadata:
            connect-timeout: 15000 #ms
            response-timeout: 15000 #ms
    nacos:
      username: nacos
      password: nacos
      discovery:
        server-addr: 127.0.0.1
        group: dev
        namespace: dev
        metadata:
          version: v1.0.0
需要注意的是开启手动,建议是建自动路由配置关闭,此时访问:http://localhost:9999/service/nacos/test即可实现与自动路由配置一样的效果。